
For the uninitiated, developing for the iOS platform can seem a little daunting. There are so many aspects to think about when building an application: interface layout, backend data manipulation, managing code libraries and documentation, creating and releasing builds—the list goes on and on.
As you probably know by now, Xcode was built to let you perform all of these tasks in a single, consistent application. It is a true integrated development environment (IDE). However, with so many features and capabilities, it can take a while to learn all of its tricks. In this chapter, we'll be walking through the basics and getting you on course to be an Xcode master. Topics we'll cover include:
- Setting up Xcode and new projects
- Navigating the sections of the Xcode application
- Configuring a project
- Understanding resource files
- Using the editor to modify source files
- Creating a
Hello worldapplet
By the end of this chapter, you'll be able to create and configure a new project, create/import/edit source files, and build your project to a simulator or device.
Before we can jump in and get our hands dirty, there are a few things we need to do. We'll start off by installing Xcode and looking at where you can access beta versions of the software when they're available. Then we'll get set up with the developer accounts we made in Chapter 1, Overview of iOS Development. Finally, we'll look at setting up a new project.
Really? A whole subtopic on installing an application? It does seem a little silly, but you'll find that when working with development environments there is a lot more going on than a traditional consumer-facing application. For that reason, we'll take a little time to make sure that everything is installed properly.
In this book, we'll be working with Xcode 8. In order to make things as simple as possible, Apple distributes the latest version of Xcode through the Mac App Store (MAS). When new versions of iOS are released (10.0, 10.1, 10.2, and so on), Xcode will be updated through the App Store, bundled with the latest SDK.
To install the latest stable version of Xcode, visit the MAS, search for Xcode, and click Install. During the download and installation, make sure that you allow Xcode to install any additional components, especially the Command-Line Tools. These tools are important to the backbone of Xcode, and it's necessary to make sure they are installed:
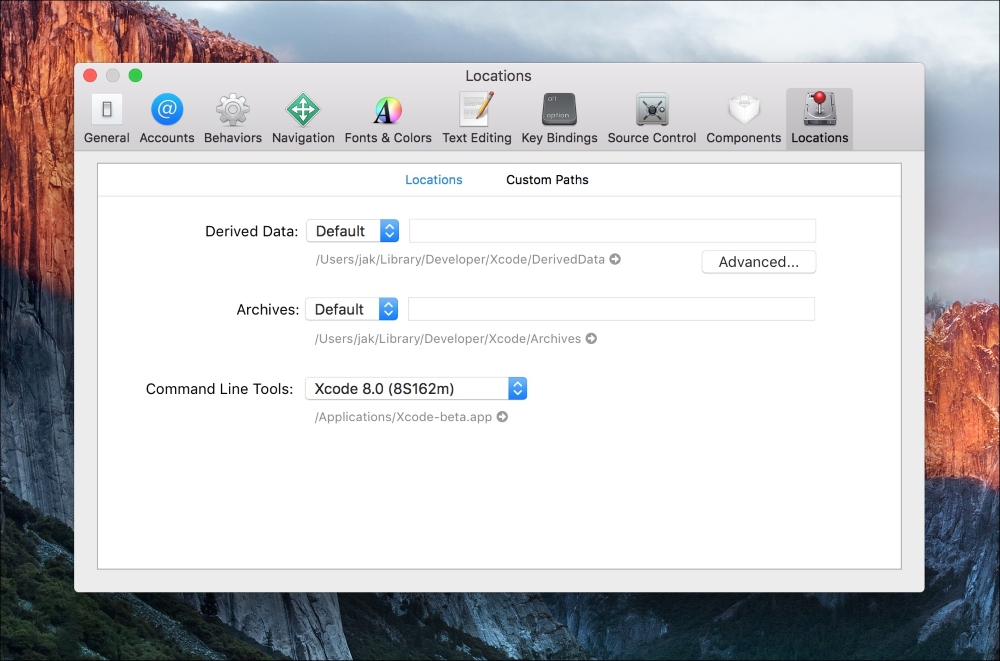
Figure 2.1: Ensuring the command-line tools are installed properly
A quick way to make sure the command-line tools are installed is to open Xcode, navigate to the menu bar item Xcode | Preferences, then click on the Locations tab all the way to the right. At the bottom of the window, you should see a drop-down menu for Command-Line Tools. If it is filled in, like in the previous screenshot, everything should be working properly.
Great! Everything should be installed and running smoothly now. However, as a developer it will be your job to make sure your apps are up to date when new versions of iOS launch to the public. In order to let developers check for bugs and add support for new features, Apple frequently releases beta versions of Xcode on their developer portal. This way you'll be a few months ahead of major releases, and your app can be up to date and bug free on the day that everyone else gets the new OS.
Note
Apple frequently rearranges their developer portal to make it easier to navigate, so while these instructions are valid at the time of writing, you might have to do a little improvising if things have moved. It's also worth noting that there isn't always a current beta; if you don't see one, they just might not have one.
To download Xcode betas, you won't be able to use the Mac App Store. You'll have to navigate to the Xcode developer portal at https://developer.apple.com/xcode/download/. If there is a beta version available, it will be near the top of the page. Here is an example from the Xcode 8 beta page:
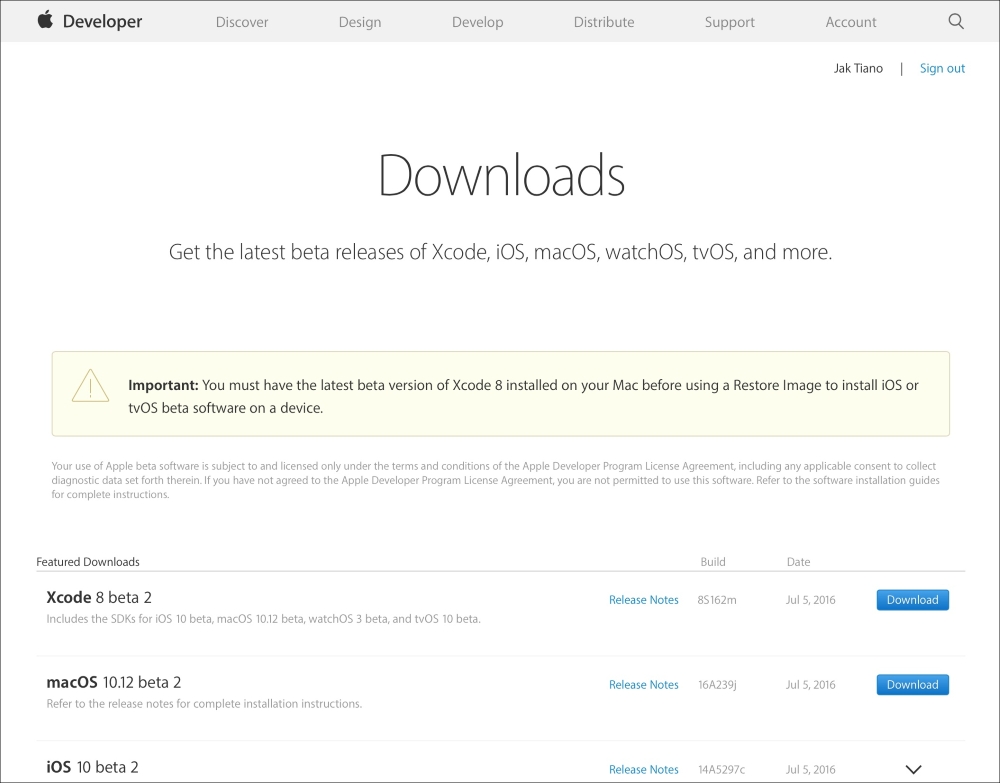
Figure 2.2: The Xcode download portal on the Apple developer site
Remember though, we're using Xcode 8! If there is an Xcode 9+ beta by the time you read this, it might be fun to poke around, but make sure you are on 8.x for the rest of the book so that everything lines up. (Most of what you learn in this book will most likely apply to Xcode 9 and higher, though.)
Once you have Xcode installed, there's still one more thing you have to do to complete the initial setup. When I first started using Xcode (version 3.0), managing your developer account was a real pain. You had to create provisioning profiles and register App IDs manually on the developer portal, and then download and import certificates into Xcode. Luckily, pretty much the entire process is now automated and integrated into Xcode itself; all we have to do is log in to our developer account from inside Xcode:

Figure 2.3: Logging in to our developer account from the Xcode 8 account preferences
First, launch Xcode. You should see the Welcome to Xcode dialog box, with options to start a new playground or a new project. What we want to do is navigate to the menu bar item Xcode | Preferences, and then in the resulting window click on the second tab, labeled Accounts. Then click on the little + button in the lower-left of the window and select Add Apple ID. Then simply type in the Apple ID and password you used to register your account… and that's it! Xcode will now take care of all provisioning profiles and App IDs automatically!
Tip
A note on provisioning profiles and signatures:
Provisioning profiles are what Xcode uses to sign your application's executable file; a valid signature is required to load and run an app on an iOS device. This makes it so that it is very hard to install malware on a device, but it also causes a lot of headaches for new developers. If you ever run into errors that have to do with signatures, there are tons of threads all over the Internet that can help you figure out your specific problem.

Figure 2.4: The Xcode launch splash screen
Now we're installed, logged in, and ready to roll. Launch Xcode (or just click on the icon in your dock) to bring up the Welcome to Xcode dialog again. On the right will be a list of recent projects you've opened. Since this is the first time you've opened Xcode, yours will most likely be empty. In Figure 2.4, you can see how my most recent projects fill that space. On the left are three options: Get started with a playground, Create a new Xcode project, and Check out an existing project. We'll get to all of these options in time, but for now, go ahead and select Create a new Xcode project.

Figure 2.5: Choosing a template for a new Xcode project
In the next dialog, you can choose a template. On the left, you can select the platform and category for the template, and on the right you can choose a specific template. For the most part, we'll be sticking to the iOS | Application category, and more times than not we'll be working with a Single View Application template. This template is as close as you can get to a blank project. The second most useful template here is the Game template, which allows you to create a new SpriteKit, Metal, or OpenGL project. This would otherwise be very difficult to manually set up from a Single View Application. If you're interested in what the other templates do, you can read a description at the bottom of the window by clicking on each one. But for our purposes, we'll be selecting Single View Application, and then clicking Next.

Figure 2.6: Setting the options for our new project
The next screen is our final piece of setup. In the first text field, you can give your project a name. I've named this project HelloWorld, because it's fitting and I'm uncreative, but you can name it anything you like. It's worth noting that while you can have spaces in your name, it's usually best practice to avoid them, as I did. Below the Product Name is a dropdown for the Team being used: this is your Apple Developer account (for me, it's my name).
The second text field is for the
Organization Name. Here you should type in either your own name or the name of the company you are working for. This will usually be the same as your team name, though I'm using PacktPub here because this book is being published by Packt Publishing.
The third text field, Organization Identifier, is a bit more complicated. When publishing to the App Store, every app needs a unique bundle ID. To ensure this, Apple encourages a reverse-domain-name format for IDs. This means that you would use your company (or personal) website domain name, since every domain is unique and has one owner. You would then use the format of domainExtension.domainName.productName.
Underneath that text field, you can see some grey static text that represents your final bundle identifier. You'll see it uses your reverse-domain Organization Identifier, with your Product Name appended to the end.
The next option is a drop-down menu to select the programming language for the project you're starting. You can choose from Swift or Objective-C, but in this book we will be sticking exclusively to the new Swift programming language, so keep Swift selected.
Below that is another dropdown that lets you select the devices you are building for. You can choose to build only for iPhone, only for iPad, or create a Universal build for all devices. Xcode now has so many features that make it easy to create universal builds, so we'll be using that option exclusively in this book, so again, leave it selected.
The last three options are checkboxes that enable certain features. Each one is self-explanatory, and sets up your project with the files needed to use each given feature. Later in the book there is a chapter dedicated specifically to using Core Data, and another chapter covering both Unit Tests and UI Tests. For now, we don't need any of these features so leave them all unchecked and click Next.
The next and final screen is a standard OS X dialog box to choose where to save your project. When you save, Xcode will create a root folder with the name you gave your project, so you don't need to create a new folder for the project. I use a folder called Xcode Projects in my Documents folder, but where you save it is up to you. Once you've selected a location, click Create in the lower right of the window, and we've finished creating our project.