
So right now, we've got our notification registered to be delivered every day at noon. But that's only scratching the surface with what we can do with notifications. In this section we'll add actions, badges, and custom sounds.
When you receive a notification in iOS, sometimes you can 3D touch on the notification or pull it down to reveal quick response actions. We can add our own notification actions by creating UNNotificationAction objects, adding them to a UNNotificationCategory, and then assigning a category to a notification's content.
To begin, let's create a new function that will take care of setting up all of the categories and actions. We'll modify our application(didFinishLaunchingWithOptions:) function like so:
let center = UNUserNotificationCenter.current()
center.requestAuthorization(options: [.alert, .badge, .sound]) { granted, error in
    if granted {
        center.setNotificationCategories( self.getNotificationCategories() )
        self.scheduleReminderNotification()
    }
}
Now let's get to work setting up those categories. We'll create the getNotificationCategories() function (which returns a Set of categories), and then implement our first action:
func getNotificationCategories () -> Set<UNNotificationCategory> {

    let textAction = UNNotificationAction(identifier: "Snippets.Action.NewText ", title: "New Text Snippet", options: [.authenticationRequired, .foreground])
}
Here, we're creating a new action called textAction, which will ultimately allow us to create a new text snippet right from the notification banner. We give it an identifier of Snippets.Action.NewText, and a title of NewTextSnippet. In the options array, we give it the .authenticationRequired option to make sure the user's phone is unlocked to be allowed to use the action. We also add the .foreground option to let the app know to launch the app when the action is pressed.
Next, we need to create another action for creating a photo snippet. The parameters are all pretty much the same, except that we replace the word Text with Photo throughout:
func getNotificationCategories () -> Set<UNNotificationCategory> {

    let textAction = UNNotificationAction(identifier: "Snippets.Action.NewText ", title: "New Text Snippet", options: [.authenticationRequired, .foreground])
}
Finally, we need to create a category to hold these actions. We first create an instance of UNNotificationCategory, and set the identifier to Snippets.Category.Reminder. We'll be using this identifier later to assign categories to our notifications. Then, we just pass in the actions as an array. We aren't using any intent identifiers (which are related to Siri), or any options so we leave those arrays blank:
func getNotificationCategories () -> Set<UNNotificationCategory> {

    let textAction = UNNotificationAction(identifier: "Snippets.Action.NewText ", title: "New Text Snippet", options: [.authenticationRequired, .foreground])

    let photoAction = UNNotificationAction(identifier: "Snippets.Action.NewPhoto", title: "New Photo Snippet", options: [.authenticationRequired, .foreground])

    let reminderCategory = UNNotificationCategory(identifier: "Snippets.Category.Reminder", actions: [textAction, photoAction], intentIdentifiers: [], options: [])

    return Set<UNNotificationCategory>( [reminderCategory] )
}
Once the category is fully set up, we create a set of UNNotificationCategory objects, and then return it.
With our new
Snippets.Category.Reminder category set up, we just need to assign this category to our daily reminder notification's content:
let content = UNMutableNotificationContent()
content.title = "Reminder"
content.body = "Have you snipped anything lately?"
content.sound = UNNotificationSound.default()
content.categoryIdentifier = "Snippets.Category.Reminder"
Now, the next time you get your daily reminder, you can pull down or 3D touch to see two buttons to create a text or photo snippet!
Note
If you don't feel like waiting until noon to see if it worked, see if you can figure out how to add a new BarButtonItem to your storyboard (next to the New button), and have it call an IBAction in ViewController.swift that creates a new test notification with the category set to Snippets.Category.Reminder. (This is how I took the photos below).
Here is what this should look like in a banner notification:

Figure 12.7: The reminder notification with actions being displayed from a banner
These are the actions in the notification center:
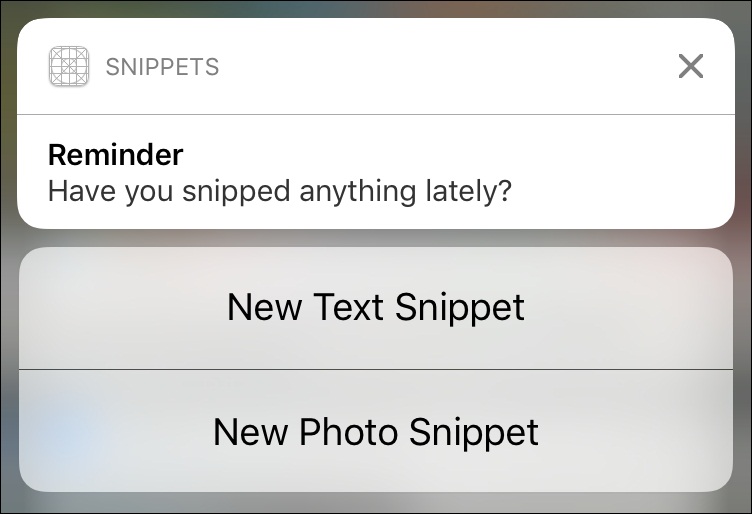
Figure 12.8: The reminder notification with actions being displayed from the notification center
Finally, this is what our actions look like on the lock screen:
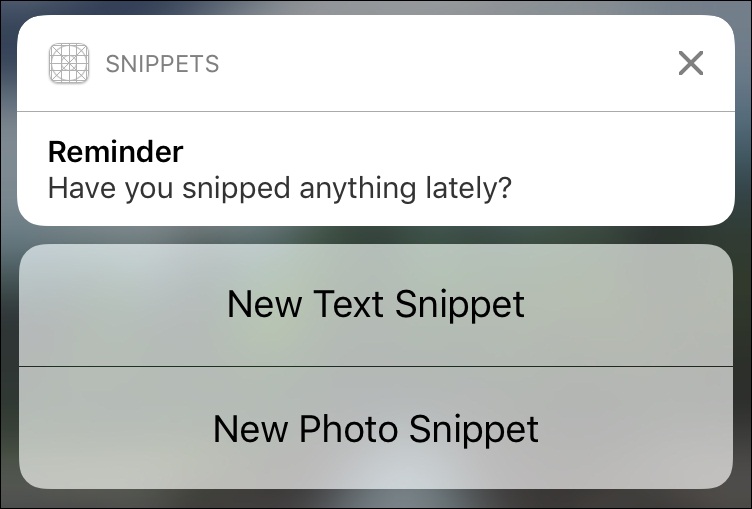
Figure 12.9: The reminder notification with actions being displayed from the lock screen
Awesome! The only problem now is that these buttons don't do anything yet. In order to respond to the action, we need to create an extension of the AppDelegate class that implements the UNUserNotificationCenterDelegate protocol, and then write a function that receives action responses.
To start, let's create the extension at the bottom of the AppDelegate.swift file, and add the empty handler function:
extension AppDelegate: UNUserNotificationCenterDelegate {

    func userNotificationCenter(_ center: UNUserNotificationCenter, didReceive response: UNNotificationResponse, withCompletionHandler completionHandler: @escaping () -> Void) {

        }
    }
}
This function passes in a handful of parameters, but we're mostly concerned with the response here. We're going to look at the action identifier of the response to see what we should do:
func userNotificationCenter(_ center: UNUserNotificationCenter, didReceive response: UNNotificationResponse, withCompletionHandler completionHandler: @escaping () -> Void) {

    switch response.actionIdentifier {
        case "Snippets.Action.NewText":
            let vc = self.window!.rootViewController as! ViewController
            vc.createNewTextSnippet()

        case "Snippets.Action.NewPhoto":
            let vc = self.window!.rootViewController as! ViewController
            vc.createNewPhotoSnippet()

        default:
            break
    }

    completionHandler()
}
Finally, we need to call the completionHandler() closure that is passed in, otherwise the app will crash. Then to finish everything off, we set the delegate of the UNUserNotificationCenter back up in the application(didFinishLaunchingWithOptions:) function.
let center = UNUserNotificationCenter.current()
center.delegate = self
center.requestAuthorization(options: [.alert, .badge, .sound]) { granted, error in
    if granted {
  center.setNotificationCategories( self.getNotificationCategories())
        self.scheduleReminderNotification()
    }
}
Try pressing the buttons on the notifications now, and you'll launch the app into the correct snippet creation view controller!
Note
Before we move on, lets acknowledge that this code is very similar to the code we wrote much earlier in the book that handled the 3D touch shortcuts. As a little challenge, see if you can go back to that earlier code, and separate it a bit better into smaller functions, so that we can reuse that code here in our notification handlers.
We also dealt with an edge case with the shortcuts: if the user was already creating a snippet when the shortcut was used, the app asked the user if they wanted to throw away the other snippet, or continue editing it. See if you can also get that functionality working with the notification handlers!
In most apps where detail is paid attention to, badges on the app icon correspond to the number of items awaiting the user's action inside the app. Our application is pretty simple and doesn't have particularly urgent notifications, so we normally wouldn't implement icon badges for our current feature set. However, for the sake of learning, let's do it anyway!
Here's the good news about icon badges: they're ridiculously easy to implement. We only need to add one line of code to our notification set up:
func scheduleReminderNotification() {
    let center = UNUserNotificationCenter.current()
    center.getPendingNotificationRequests() { pendingRequests in

        guard !pendingRequests.contains(where: { r in r.identifier == "Snippets.Reminder"}) else {
            print("Notification already exists")
            return
        }

        let content = UNMutableNotificationContent()
        content.title = "Reminder"
        content.body = "Have you snipped anything lately?"
        content.sound = UNNotificationSound.default()
        content.categoryIdentifier = "Snippets.Category.Reminder"
        content.badge = 1

        var fireDate = DateComponents()
        fireDate.hour = 12
        let trigger = UNCalendarNotificationTrigger(dateMatching: fireDate, repeats: true)

        let request = UNNotificationRequest(identifier: "Snippets.Reminder", content: content, trigger: trigger)

        center.add(request, withCompletionHandler: nil)
    }
}
Now, when our notification comes in, it will set the badge number to 1. In order to clear the number when the user comes back into the application, we'll implement the applicationDidBecomeActive() function, and set the badge number to zero when the application is opened:
func applicationDidBecomeActive(_ application: UIApplication) {
    application.applicationIconBadgeNumber = 0
}
Try this out and see how the badge number changes!
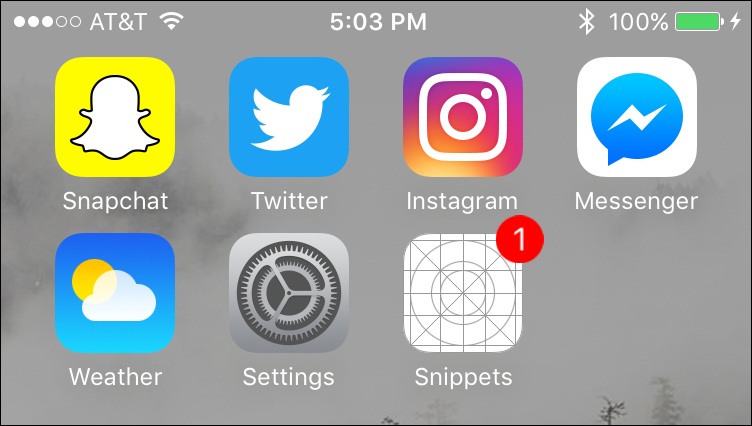
Figure 12.10: Our snippets app with a notification badge displayed
Now, the bad news about badge numbers: we are hardcoding the number to set the badge number. This obviously won't work if there are more kinds of notifications that can show up!
In the event that you're using remote notifications that are pushed from a server, you'll have to keep track of those numbers yourself on the server, and send them in with the notification. If using local notifications, you'll have to do some fancy tracking to keep updating the numbers of all pending notifications. Every situation is different, and it's up to you to figure out the best solution for managing the badge number associated with notifications for your app.
Adding sound to a notification can really add some weight to the alert. Using a custom sound is also a great way to give your app some character. Like badges, adding sound is a pretty simple task.
First, drag in the CustomSound.caf file from the chapter 12 resources folder into your Xcode project. When importing, make sure you copy the files and include them in your app target. The settings should look like this:
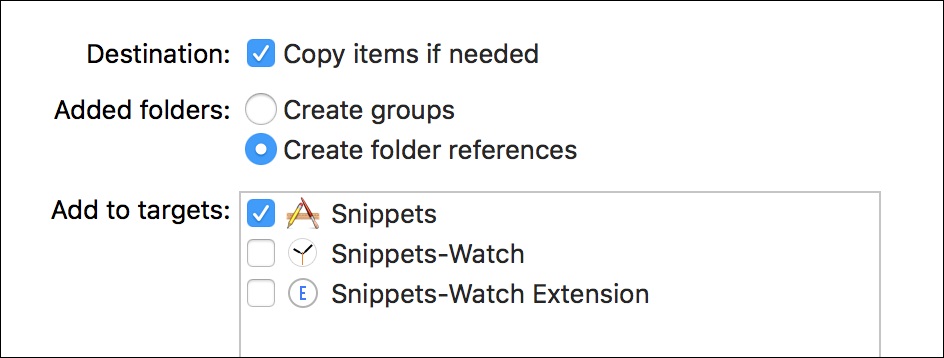
Figure 12.11: The import settings for our CustomSound.caf file
Once the sound is imported into the project, we use the UNNotificationSound(named:) initializer, instead of UNNotificationSound.default() like before:
func scheduleReminderNotification() {
    let center = UNUserNotificationCenter.current()
    center.removeAllPendingNotificationRequests()
    center.getPendingNotificationRequests() { pendingRequests in

        guard !pendingRequests.contains(where: { r in r.identifier == "Snippets.Reminder"}) else {
            print("Notification already exists")
            return
        }

        let content = UNMutableNotificationContent()
        content.title = "Reminder"
        content.body = "Have you snipped anything lately?"
        content.sound = UNNotificationSound(named: "CustomSound")
        content.categoryIdentifier = "Snippets.Category.Reminder"
        content.badge = 1

        var fireDate = DateComponents()
        fireDate.hour = 17
        fireDate.minute = 13
        fireDate.second = 40
        let trigger = UNCalendarNotificationTrigger(dateMatching: fireDate, repeats: true)

        let request = UNNotificationRequest(identifier: "Snippets.Reminder", content: content, trigger: trigger)

        center.add(request, withCompletionHandler: nil)
    }
}
Now, build and run the project, and you should get a custom sound when the notification arrives! (Make sure to turn your sound on).
If you prefer to use the default sound, you can use the following code instead:
reminderNotification.soundName = UILocalNotificationDefaultSoundName
Note
If your custom sound isn't playing, you might have to uninstall the app, reboot your phone, clean the Xcode project (command + shift + K), and reinstall the app. Sometimes things get a little finicky! ! Also worth noting is that as of the writing of this book, iOS 10.0 is the current version of iOS, and this issue should be fixed in iOS 10.1.
We've got a pretty solid set of notification functionality going right now, but there's still one big piece missing: what happens if a notification is received while the user is currently inside the app?
iOS responds to notifications differently when the app is in the foreground vs the background. So far, all of our code has been telling the notification what to display on the banner, what sounds to play, what to change the badge number to. However, we don't need to do any of this when inside the app, since we can much more effectively tell the user something important just happened!
As I mentioned with the badges, there's no real reason to interrupt the user to remind them to make a snippet when they're already in the app, but we'll look at how to do this for educational purposes.
What we are going to do is present the user with an alert to let them know what is going on with the notification. We'll be using the UIAlertController to display the notification information, and let the user act.
To receive notifications while the application is in the foreground, we need to implement a different handler in our UNUserNotificationCenterDelegate class extension. Let's head to the extension and add this new function:
func userNotificationCenter(_ center: UNUserNotificationCenter, willPresent notification: UNNotification, withCompletionHandler completionHandler: @escaping (UNNotificationPresentationOptions) -> Void) {

    let content = notification.request.content
    if content.categoryIdentifier == "Snippets.Category.Reminder"{

  }
}
First, we're creating an if statement to see what category the notification belongs to. Right now we only have the Snippets.Category.Reminder category, but later on we might have more; it's best to plan ahead to prevent bugs in the future:
Next we are going to create an alert to present to the user:
func userNotificationCenter(_ center: UNUserNotificationCenter, willPresent notification: UNNotification, withCompletionHandler completionHandler: @escaping (UNNotificationPresentationOptions) -> Void) {
    let content = notification.request.content
    if content.categoryIdentifier == "Snippets.Category.Reminder"{
        let vc = self.window!.rootViewController as! ViewController

        let alert = UIAlertController(title: content.title, message: content.body, preferredStyle: .alert)

        let newTextSnippetAction = UIAlertAction(title: "New Text Snippet", style: .default) { (action: UIAlertAction) in
            vc.createNewTextSnippet()
        }
        let newPhotoSnippetAction = UIAlertAction(title: "New Photo Snippet", style: .default) { (action: UIAlertAction) in
            vc.createNewPhotoSnippet()
        }
        let cancelAction  = UIAlertAction(title: "Cancel", style: .cancel, handler: nil)

        alert.addAction(newTextSnippetAction)
        alert.addAction(newPhotoSnippetAction)
        alert.addAction(cancelAction)
        vc.present(alert, animated: true, completion: nil)
    }
}
vc.present(alert, animated: true, completion: nil)
    }
}
    }
}
First we grab a reference to the root view controller. Then we instantiate the alert itself, using the notification content's title and body for the alert's title and message, respectively. After that, we create the three actions we want to allow the user to do: create a new text snippet, create a new photo snippet, or cancel. To wrap things up, we add our actions and present the alert controller to the user:

Figure 12.12: The alert letting us know we received a notification while inside the app
And with that, we've implemented a pretty basic way to let the user know of a notification that was received.