
In the last section, we learned about how to start using Core Data in a project that already has the feature enabled from the beginning. However, our Snippets project was started without Core Data enabled so, before we can continue, we're going to have to prepare our project for use with Core Data. There are two things we need to do: set up the managed context and the rest of the Core Data stack in our AppDelegate.swift file, and then create the data model for Snippets using the editor we just covered. Before we get started, open your Snippets Xcode project (or use my final version from Chapter 8, Exploring Common iOS Frameworks), and import the CoreData framework.
So far, we've only looked at how to create a data model in Core Data. Now, we need to set up the code that will let us load, manipulate, and save our data. The objects that help us to do this are referred to as the Core Data stack. This is composed of three pieces: the managed object model, the persistent store container, and the managed object context.
Note
Most of the code in this section is taken from the boilerplate code added to a project when you enable Core Data using the checkbox at project creation time.
This section might have some code that is a little tough to understand, but that's okay! The important part is that you understand what each part of the stack does, and why it's important.
Before we can understand how this
stack works together, we need to understand some other concepts. A few times throughout this chapter, I've mentioned something known as the object graph, and how Core Data is used to manage it. We've also spent a good amount of time learning about the data model, which Core Data is also responsible for. So before we move forward, let's look at how the two are related.
The data model is a description of a piece of data. The data model tells us that a Person must have a name and an age, and can have a resident relationship with a House. The data model is effectively a blueprint.
The object graph is a set of real data. It tells us that we have three actual people named Emma, Tyler, and Natasha, along with their ages and what House they each live in. The object graph is an implementation of a data set that follows the rules set by the data model. This is actually what is being loaded and saved by Core Data.
Armed with this information, let's now take a look at what is going on in the Core Data stack. The NSManagedObjectModel (usually abbreviated to mom) loads in a data model that we created in the data model editor. The mom is pretty much only used as a way for the NSPersistentStoreCoordinator to know what kind of data is being loaded. To create an instance of the NSManagedObjectModel, we need to load in the model from a file. While a bit counterintuitive, we are not actually going to load in the .xcdatamodeld file, but a file with the same name but a different extension: momd.
Navigate to your AppDelegate.swift file and add an import CoreData command to the top of the file. Then, scroll to the bottom of the class, and add the following code to create our NSManagedObjectModel:
// MARK: - Core Data stack
lazy var managedObjectModel: NSManagedObjectModel = {
    let modelURL = Bundle.main.url(forResource: "SnippetData", withExtension: "momd")!
    return NSManagedObjectModel(contentsOf: modelURL)!

}()
Note
Here, we're declaring a lazy property with the lazy keyword. What this means is that the code inside the block will only initialize this property the first time some other object comes looking for it, not during initialization. This makes initialization much faster, and has the added benefit of making sure that time isn't spent initializing this property if no other object ends up needing it at runtime.
First, we get the location of our data model file from our application's resources using Bundle.main.url(forResource:), again using the filename from our .xcdatamodeld file, but with the momd extension instead. From there we can just instantiate the NSManagedObjectModel using that URL, and return it.
The next part of the Core Data stack is the NSPersistentStoreCoordinator. This object uses the managed object model to actually read and instantiate instances of objects from the persistent store based on the blueprints of the mom (the managed object model, not the mother). A simple way to think about the persistent store is that it is the saved data that exists on disk (it's not always that simple, but don't worry about that for now).
So, essentially, the NSPersistentStoreCoordinator uses the data model to know what the data should look like, and then coordinates creating new data and saving data to the disk. In practice, the managed context (which we will cover next) will do most of the heavy lifting with the persistent store coordinator, but we still need to set it up. Let's do that now:
llazy var persistentStoreCoordinator: NSPersistentStoreCoordinator = {
    let coordinator = NSPersistentStoreCoordinator( managedObjectModel: self.managedObjectModel)
    let urls = FileManager.default.urls( for: .documentDirectory, in: .userDomainMask)
    let url = urls.last!.appendingPathComponent("SingleViewCoreData.sqlite")
    do {
        try coordinator.addPersistentStore(ofType: NSSQLiteStoreType, configurationName: nil, at: url, options: nil)
    } catch {
        // Replace this to handle the error appropriately.
        let nserror = error as NSError
        print ("Unresolved error (nserror), (nserror.userInfo)")
        abort()
    }
    return coordinator
}()
First, we instantiate a new NSPersistentStoreCoordinator by passing in the managed object model. Again, this is so that the persistent store coordinator knows what the data will look like.
Next, we play around in the file system for a few lines of code in order to get the location of the database (the actual persistent store) that will be coordinated. Once we have that URL, we use a do/try/catch block to load the database from the URL. If it fails, we'll catch the error and need to handle it, but otherwise our NSPersistentStoreCoordinator is set up and ready to go!
Lastly, we have our NSManagedObjectContext, which is mainly what we'll be working with in our code. The purpose of the managed context is to provide an area to play with our data. It is here that we will edit data and create new instances of data; Apple describes the managed context as an intelligent scratchpad. When we are done creating, editing, and deleting data, the managed context can be used to tell the system to save our data, which flushes it through the persistent store and down onto the disk.
Let's set up our managed context now:
lazy var managedObjectContext: NSManagedObjectContext = {
    let coordinator = self.persistentStoreCoordinator
    var managedObjectContext = NSManagedObjectContext( concurrencyType: .mainQueueConcurrencyType)
    managedObjectContext.persistentStoreCoordinator = coordinator
    return managedObjectContext
}()
First, we get a reference to our persistent store coordinator. Then we create a new instance of the NSManagedObjectContext class and pass in the concurrency type. Don't worry about this for now, but we're passing in .mainQueueConcurrencyType. Finally, after initializing the managedObjectContext, we assign its persistentStoreCoordinator to be our instance that we grabbed in the first line. This lets the managed object context know what database it is working with. Now we can return the fully set up context.
We've now completely set up the Core Data stack in our AppDelegate. The managed object model describes our data, the persistent store coordinator interfaces with the database, and the managed object context lets us create, edit, and save data.
However, we can still do a little more in our AppDelegate to make using the stack a bit easier. Let's create a helper function at the bottom of our AppDelegate class that makes it really simple to save our data:
// MARK: - Core Data Saving support
func saveContext () {
    if managedObjectContext.hasChanges {
        do {
            try managedObjectContext.save()
        } catch {
            // Replace this to handle the error appropriately.
            let nserror = error as NSError
            print("Unresolved error (nserror), (nserror.userInfo)")
            abort()
        }
    }
}
The first thing we do in this saveContext() function is check to see if we've made any changes to our data. If not, then there is no point in saving! If changes have been made, then we try to save the data by calling the save()function in our managed object context. If the save is unsuccessful, we'll have to handle the error.
This helper function will make it easier down the line to save our data. Now, with one function call, we can make sure we are not saving data that doesn't need to be saved, in addition to handling errors.
Let's put our new
saveContext() function to use. In your AppDelegate class, you should have several empty function stubs still in the class from when the project was created. Many of these are places where you can add code to run when the application enters and exits different states, like entering and exiting the background. There should also be a function called applicationWillTerminate(), which is called when an app is closed. This is a great time to make sure that the user's data is saved, so let's call our saveContext() function from here:
func applicationWillTerminate(_ application: UIApplication) {
    self.saveContext()
}
This will make it so that if any data accidentally goes unsaved, then our app will save it just before shutdown so that information is not lost.
Now we've got our stack set up, and some easy saving functionality ready to go!
The only thing left to do before we can start saving data in our Snippets app is to recreate our data model for Core Data. Right now we have SnippetData.swift, which uses classes to model our data. In this section, we're going to make a new .xcdatamodeld file that will take the place of our SnippetData.swift file.
To begin, create a new file (command + N), and from the template chooser search for, and then choose Data Model. This will create a new .xcdatamodeld file in your project. Make sure to name it SnippetData, since this is what we told our NSManagedObjectModel our model file would be called.
Since we've already been over how to use the data model editor, I'm just going to give you some descriptions of the entities, and leave it up to you to create them and their attributes. However, one thing we didn't cover earlier was that you can have subentities, which act like subclasses. Since our existing SnippetData.swift data model uses subclassing to carry over redundant data, we're going to use subentities in our model. To create a subentity, select an entity from the entity sidebar and set the parent property from the attribute inspector. The entity will then inherit all of the parent entity's attributes and relationships.
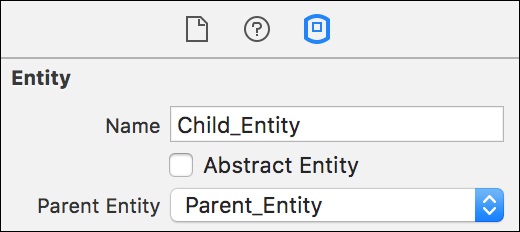
Figure 9.7: A close up of the attribute inspector showing the parent entity option
As you can see, you'll be able to select the Parent_Entity from a drop-down menu which contains all existing entities in your model. This means you'll have to create the parent entities first. Remember that you can also use the attribute inspector to set whether or not an attribute is optional or required.
First, let's create our base snippet type, which will be the parent of our other snippet data types. Here are the specifications for this entity:
|
Entity Name: Snippet |
Parent: No Parent Entity | |
|---|---|---|
|
Attributes | ||
|
Key |
Type | |
|
|
Date |
REQUIRED |
|
|
Double |
OPTIONAL |
|
|
Double |
OPTIONAL |
|
|
String |
REQUIRED |
Next, we'll create and set up the text snippet entity:
|
Entity Name: Snippet |
Parent: Snippet | |
|---|---|---|
|
Attributes | ||
|
Key |
Type | |
|
|
String |
REQUIRED |
Finally, we'll create our photo snippet entity:
|
Entity Name: Snippet |
Parent: Snippet | |
|---|---|---|
|
Attributes | ||
|
Key |
Type | |
|
|
Binary Data |
REQUIRED |
Make sure to double check all of your entities and attributes are set up correctly with the correct types, and the keys have no spelling mistakes. Once we start coding in the next section, any spelling mistakes here in the data model will give you errors when trying to retrieve data. If you set everything up the same way, your visual data model hierarchy should look like this:
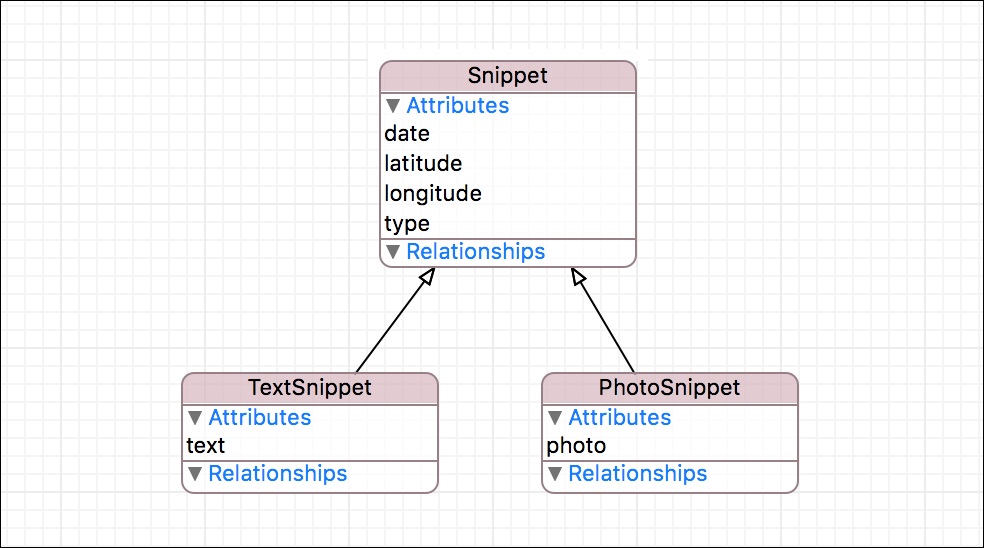
Figure 9.8: Our completed data model, represented in visual form
And with our data model completed, our Snippets project is completely ready to start using the persistence features of Core Data.