
Many applications, games in particular, love to use the accelerometer sensor in the iPhone to let the user precisely tilt their device as an interaction mechanism. In the last section we used UIDevice to get notifications about general orientation changes of the device, but there is a way to get much more precise data: the Core Motion framework. In this section, we'll be taking a look at some of the sensory data available through the CMMotionManager class.
Before we get started, let's reset our ViewController class to get rid of our UIDevice experiments, and start with our Core Motion experiments (you can create a new project if you don't want to get rid of the old code):
import UIKit
import CoreMotion

class ViewController: UIViewController {

    let motionManager = CMMotionManager()

    override func viewDidLoad() {
        super.viewDidLoad()
    }
}
Remember to link the CoreMotion framework before you import at the top of the view controller. We've also initialized a CMMotionManager object at the top of the class so that we have access to it throughout the next few examples.
Let's first begin by setting up and pulling data from the accelerometer. If you've never heard of an accelerometer before, or don't know what it does, it's quite simple: it measures linear acceleration from both gravity and movement. This means we can not only get orientation information from the accelerometer, but also process how its movement changes over time:
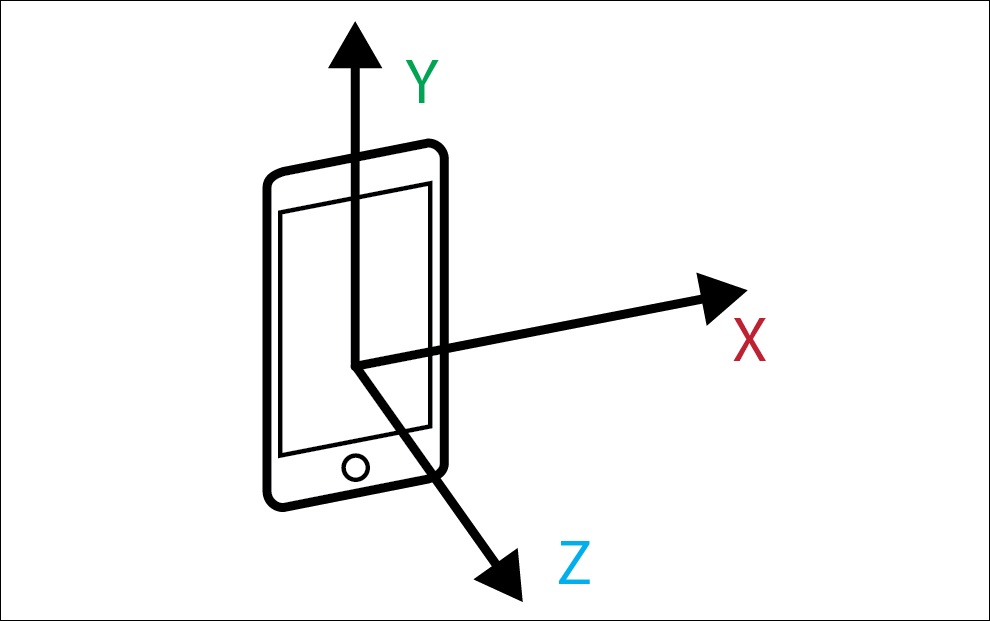
Figure 11.1: Linear motion along the x, y, and z axes of the device
Note
The kind of math and algorithms that would be necessary to really analyze this raw data would be far outside the scope and subject matter of this book, so we're just going to focus on how to get the raw data.
In order to get the data from the accelerometer, we're going to need to do three things: create a function that handles data updates; create a new operation queue to run the data processing; and configure the motion manager and begin updates.
First, we'll create a new function called onAccelerometerUpdate(), which will be notified every time the accelerometer updates. Since this function will be sent to the CMMotionManager to be used as a handler, it needs to conform to the CMAccelerometerHandler signature, which is defined as:
(CMAccelerometerData?, Error?) -> Void
func onAcelerometerUpdate(data: CMAccelerometerData?, error: Error?) {
    if error == nil, let d = data {
        print("x (d.acceleration.x)")
        print("y (d.acceleration.y)")
        print("z (d.acceleration.z)")
    } else {
        print("Error: (error?.localizedDescription)")
    }
}
We check to see that there is no error, and then we unwrap the CMAccelerometerData optional value. Inside the if statement, we are printing out the x, y, and z component of the accelerometer data (all three values range from -1.0 to 1.0). If we detect an error, we print it out in the else statement.
Next, we need to create a new OperationQueue for our updates to run on. The easiest way to think about an operation queue is that it is a separate area to execute commands. By default, our code runs on the main operation queue. Since the accelerometer data may update many times per second, we create a different queue for it to run on so that it doesn't slow down the main queue.
At the top of the class, we'll create a new operation queue like this:
let motionQueue = OperationQueue()
Finally, we need to configure our CMMotionManager for accelerometer updates, and then tell it to begin running those updates:
override func viewDidLoad() {
    super.viewDidLoad()

    if motionManager.isAccelerometerAvailable {
        motionManager.accelerometerUpdateInterval = 0.25
        motionManager.startAccelerometerUpdates(to: motionQueue, withHandler: onAccelerometerUpdate)
    }
}
In the viewDidLoad() function, we first need to check if the accelerometer is available by checking the isAccelerometerAvailable property of our motionManager. If it returns true, then we continue with the setup by setting the frequency that the updates are run. In this example I'm setting the update interval to 0.25 (in seconds), which gives us four updates per second. If we were doing real processing on the accelerometer, this would be far too slow, but it's fine just for looking at the values coming out.
Finally, we begin polling the sensor by telling it to start updating the accelerometer and passing in our motionQueue, and the name of our handler function. Let's take a look at all of this together before running the project on our device:
let motionManager = CMMotionManager()
let motionQueue = OperationQueue()

override func viewDidLoad() {
    super.viewDidLoad()
    if motionManager.isAccelerometerAvailable {
        motionManager.accelerometerUpdateInterval = 0.25
        motionManager.startAccelerometerUpdates(to: motionQueue, withHandler: onAccelerometerUpdate)
    }
}

func onAccelerometerUpdate(data: CMAccelerometerData?, error: Error?) {
    if error == nil, let d = data {
        print("x (d.acceleration.x)")
        print("y (d.acceleration.y)")
        print("z (d.acceleration.z)")
    } else {
        print("Error: (error?.localizedDescription)")
    }
}
Again, our motion manager is set up, then sent a new operation queue and a reference to a handler function that can process the accelerometer data. If you build and run this project on your device, you should see the x, y, and z values being printed out to the console.