
Now that we know what Git does, and have a project all set up with a local Git repository, in addition to a remote Git repository hosted on https://github.com/, let's take a look at the version control tools built into Xcode.
In the last section, we left off with a newly created project in our freshly cloned local repository. We never staged or committed any of our new files to our repository that we pulled down, so let's use this opportunity to look at how we use commit from within Xcode.
To begin a commit, press option + command + C on the keyboard, or navigate to Source Control | Commit in the menu bar. Once you do that, you'll see the commit window:

Figure 5.15: The commit window in Xcode
On the far left is the staging area. Each file that is eligible to be staged will have a checkbox next to it, and if you wish to add it to the commit you are about to make, you need to make sure the box is ticked.
On the right side of the window is a split-view of the selected file's new version on the left half, and the last committed version on the right half. In this case, all of the files are new, so there's nothing to see on the right half.
On the bottom is a text box where you can enter a commit message. Remember, a commit message is necessary, and Xcode won't let you finish a commit without writing a message in the box.
Finally, on the lower left hand side, is a checkbox that lets you automatically push your work to a remote repository, after it commits to the local repository.
For now, let's write Added new project as the commit message, and then click the Commit {X} Files button to commit our changes.
Now that we've committed to our local repository, we want to push our changes up to our remote repository on GitHub. Thinking back to our charts earlier in the chapter, we remember that before we can push, we need to make sure we pull from the remote first. To pull, we can use the shortcut option + command + X or navigate to Source Control | Pull:

Figure 5.16: Selecting which branch to pull
Before you pull, you have to select a branch to pull from; right now, we only have the master branch, but more on that later. Click Pull, and you should be notified that your local repository is up to date. Now we're ready to push our changes back up to the remote.
Navigate to Source Control | Push in the menu bar, then click Push on the dropdown that appears. Before it finishes the push, you will probably be asked for your GitHub user name and password. Enter these in the dropdown and press OK, and you'll see your push go through!
If you head back to https://github.com/ and look at the page for your repository, you can see that the changes we just made are reflected there. Pretty neat, huh?
Remember back in Chapter 2, Welcome to Xcode, when we were exploring the different editor modes? There was the standard editor which we use all the time, and there was the assistant editor which we've used on occasion so far. But now, it's finally time to check out the third tab: the version editor. To quickly switch to the version editor, use the shortcut option + shift + command + enter.
The name of the version editor is pretty self-explanatory: it lets you edit a file while looking at its version history, and seeing the differences. Try opening up ViewController.swift and start writing some blank test functions to see how it works:

Figure 5.17: The version editor in use
The version editor does its best to show you where parts of the code have been added or deleted since the last commit. You can also go to the bottom of each split editor window and select which revision you want to be viewing, to compare the file to several different versions of itself. You can also click on the dropdown that appears in the middle of a change to discard that change if you realize that the change was made by accident or in error.
At the bottom of the middle bar between the two versions is a timeline button. Click it, and you'll be given a graphical timeline that will let you scrub through all of the commits over the life of the project to find a previous version of the code. If you find that something has been broken, you can use this feature to go back through code to find an older version that still works.
The last feature that we're going to look at in this chapter is one of Git's most powerful. When working on a large project with other developers, it's important to have a stable codebase. But sometimes, you need to add big new features that may hurt the stability of your code for a little while. In situations like these, you can create a branch from your master copy of the project, and work on the new feature without worrying about breaking the main application. After a while, once the feature is complete and the stability has returned, you can merge the branch back in with the master copy. Let's look at how we would do this.
We're going to create a new branch where we can make some new test functions for our app. To do this, navigate to the Source Control menu-bar item, then select your working copy, and click New Branch:
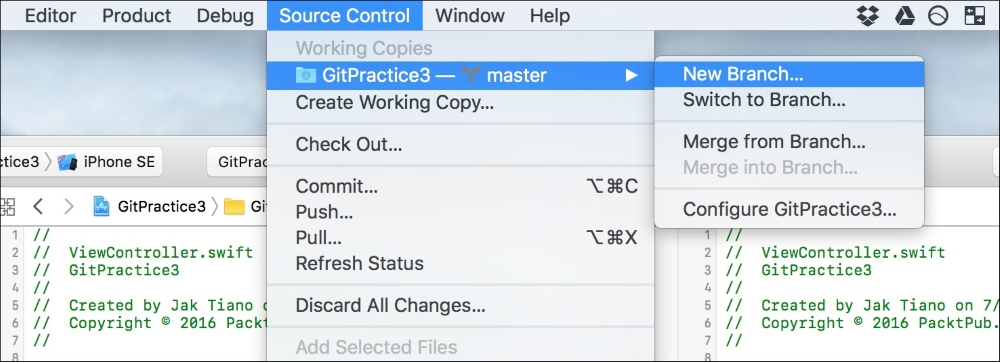
Figure 5.18: Creating a new branch in Xcode from the Source Control menu
Once you select New Branch…, give the branch a name (no spaces). We'll call our branch New-Test-Functions. Now that we've got a new branch, we can go around and make changes to our code without worrying about breaking anything in the master branch.
To test this out, let's go back to ViewController.swift, and make a couple test functions. Change out your ViewController class so that it contains this code:
class ViewController: UIViewController {

    override func viewDidLoad() {
        super.viewDidLoad()
    }

    func testFunction1 () {
        print ("test 1")
    }

    func testFunction2 () {
        print ("test 2")
    }
}
Now commit the code (option + command + C) to the New-Test-Functions branch. If you go back to the Source Control menu-bar item, then select your working copy again, but this time choose
Switch to branch, you can jump back to the master and see that it's just how you left it.
In the real world, this means that if you are hard at work on version 2.0 of a product, but a small bug is found in the previous version, you can save your work, jump back to the old version to patch the bug, and then go right back to the new branch and resume work on 2.0.
Now to wrap this all together, let's merge our New-Test-Functions branch back in with the master. Head to the Source Control menu-bar item, then select your working copy again, and this last time choose the Merge from branch option. When given the option, choose the New-Test-Functions branch to merge from. You will be brought to the branch merge window:
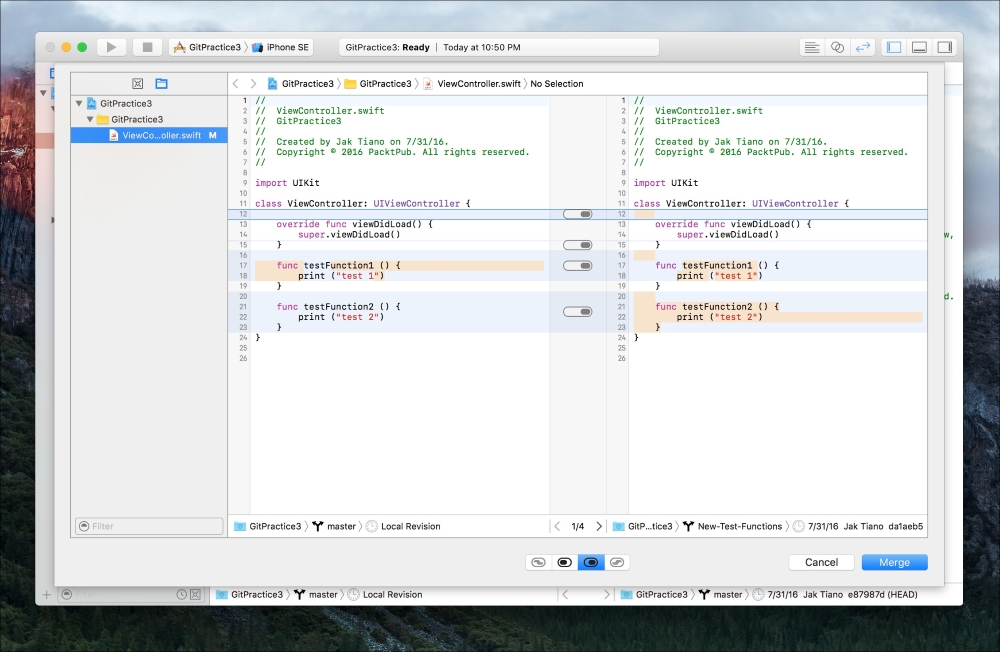
Figure 5.19: The branch merge window
The branch merge window is very similar to the commit window, but instead of the commit message area, it has some toggles. On the left side of the window is a list of all the files that need to be merged together. If you click on a file, it will show you the final version of the file on the left, and the branch's version of the file on the right. The toggles along the bottom allow you to choose how each individual difference is merged.
Once you have gone through every file and selected all the correct points for merging, you can hit the Merge button in the lower right part of the window. That's it! You created a new branch, switched between branches, and merged it back into the master branch.