
We've now spent three chapters working on building up the functionality for our note taking/journaling application, Snippets. However, while we've demonstrated a good amount of the core features such as content creation, 3D touch support, location tracking, and social sharing, we still don't have an application that a user can carry around with them and use.
We are lacking a key feature: persistence.
When a user closes our app or turns off their phone, they lose all of the snippets they've created. To me that sounds like a pretty terrible journaling application. In this chapter we're going to finally give our app's model the attention it deserves!
To accomplish our goal of persistent app data across multiple launches, we're going to be using the Core Data framework and its associated data containers. In this chapter, we're going to cover:
- What is Core Data?
- The data model components (entities, attributes, and relationships)
- Using the data model editor
- Adding Core Data support to an existing application
- Saving, fetching, and deleting data from our object graph
So what exactly is Core Data used for, and what is it capable of? To be technical, it is an object graph and persistence framework. To be less technical, it is a framework that makes it easy to save, change, track, and sort lots of data.
In this section, we're going to cover the model aspect of Model-View-Controller (MVC) again, and look at how Core Data ties into those ideas of separating data from views. Then, we're going to look at how Core Data represents data relationships, and finally, we'll learn how we can create our own specific descriptions of the data our app needs to manage.
In the very first chapter of this book, we took some time discussing the concept of MVC, and how we separate an application's data from its interface, and connect it through the controller. We've come a long way since then, and we've learned a ton about creating views and programming controllers.
However, as it stands now, our ViewController class is completely owning the model: it holds onto an array of data that it adds to and reads from. Let's go back and look at how the model is supposed to work in an MVC application (see Figure 9.1):

Figure 9.1: Diagram of model functionality
As you can see, we want to completely encapsulate our model. This will allow us to make changes to the model, without significant code changes in the controller, and down the line it will make it much easier to move the data. Right now, everything is stored locally on the device, but maybe in six months when we have 100,000 users we might want to start storing data in the cloud. No matter what your reasoning, proper model encapsulation will keep your app much easier to manage, and save you plenty of headaches in the future.
Note
Throughout the rest of this chapter, we'll be exploring every aspect of Figure 9.1. I recommend that you continue to refer back to this diagram as you read through, and make mental notes about where the different parts of this chapter line up with it. It's very important to have a solid grasp of how your data is moving through your app!
So, looking at Figure 9.1, where does Core Data fit in with things? Actually, it takes care of the entire model box for us. On the backend, Core Data will interface with the saved data on the disk, and uses SQLite as its database to manage data. However, it also allows us to interface with this data at run time with instances of the data in a managed context (which we'll discuss in a bit), and deals with a lot of the in-between parts automatically.
Now, this isn't a book on database programming, so for our purposes we don't have to look any deeper than that, and Core Data is abstract enough that we really don't need to know any more! But if you're intrigued and want to know what's going on behind the scenes of Core Data, there is plenty of information about it online.
Now, let's take a look at how Core Data works when it comes to defining our model. As I mentioned a bit earlier, Core Data manages an object graph. The object graph is the runtime version of a data model, which is a way of describing how different pieces of complex data are composed and relate to each other. This data model has three main parts: entities, attributes, and relationships.
The easiest way to think about an entity is as if it were an object. An entity has a name (like person) and is composed of the other two pieces, attributes and relationships. In our case, we'll create entities like TextSnippet, which will have attributes like date, coordinate, and text.
While entities are the objects, attributes can be seen as the properties. An attribute is a piece of data with a certain data type. For example, our person entity might have a name attribute, which is of the string type, and an age attribute which is an integer. With Core Data, we can also set an attribute to be optional (the default) or required. If an attribute is required but isn't set, Core Data will throw an error. Attributes can also have default values.
Finally, we have relationships which are pretty self-explanatory: they describe how two entities relate to one another. Going back to the person entity, let's imagine we also have a house entity. We can create a new relationship named address in the person entity, and connect it to the house. We can also create an inverse relationship by creating an owner relationship in the house and connecting it to the person.
Relationships can also be one of two types: to-one, and to-many. Our house/person example were both examples of to-one relationships, since each house had one owner, and each person had one address. However, multiple people can live in a house, so we can change the name of the owner relationship to be resident, and set it as a to-many relationship. Then the house can have as many residents as is needed.
It's also important to set rules for deletion with relationships. There are several things that can happen when an object gets deleted: it can nullify its relationship with related objects; it can cascade the deletion, deleting the connected object with it; or it can deny the deletion of the original object if the connected object exists.
With our person/house example, if a house gets deleted we shouldn't delete the people, since they might have other houses, but we should nullify their relationship to each other. How about a company/employee relationship? If the employee is deleted we should nullify the relationship with the company, but if the company itself is deleted, we should cascade that deletion down to the employee since they can no longer be employed if the company is gone.
Relationships are a very powerful tool, but are usually only useful when dealing with more complex data models. For our purposes they won't be used much, but it's good to understand how they work for future projects.
Now that we've learned about the three main components of the data model in Core Data, let's take a look at the editor! Let's create a little throwaway Xcode project to cut our teeth on Core Data before we set it up in our Snippets project. When starting this project, make sure to (finally) check off the box that says Use Core Data (Figure 9.2):

Figure 9.2: Check off the Use Core Data option
If you take a look at the project, you'll see some minor changes. In the AppDelegate, there's a bunch of new boilerplate code that sets up our managed context, but most interesting to us right now is the new .xcdatamodeld type file in our project navigator. This file is what describes our data model, and it uses a custom editor view to create entities, attributes, and relationships. Click on the file to open it and take a look:
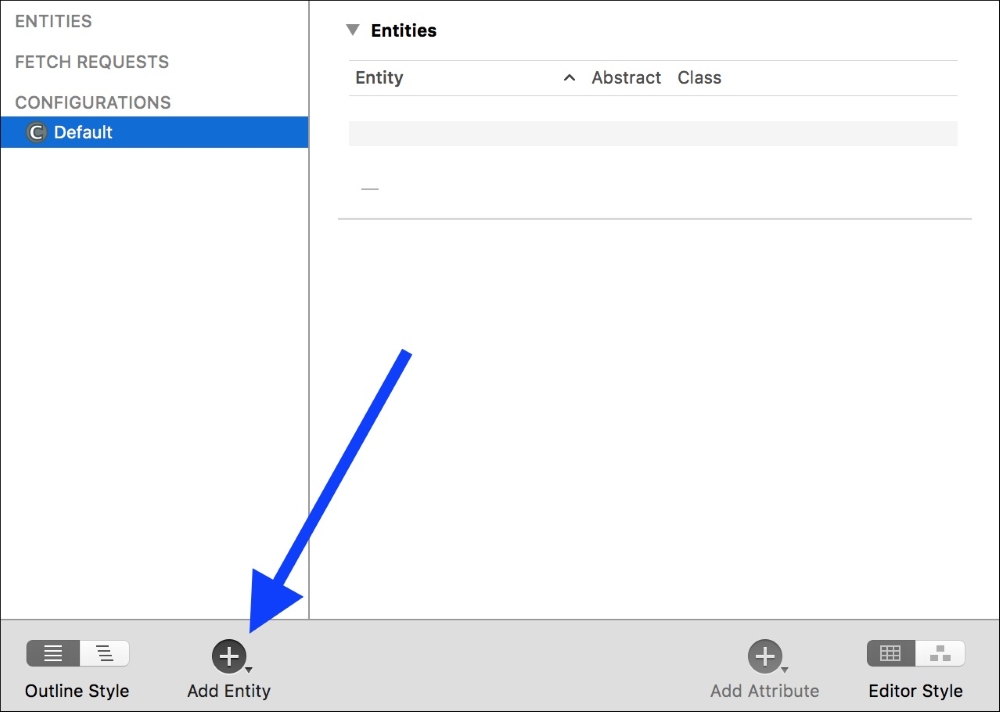
Figure 9.3: The Core Data data model editor
To start, there's not much going on. Let's add our first entity by clicking the Add Entity button on the bottom of the window, shown in Figure 9.3. We should now see a new entity named Entity under the Entities section on the left sidebar. In the middle of the editor window we have the ability to add new attributes, relationships, and fetched properties (don't worry about these for now).
For this example, let's use the
Company/Employee model from the end of the last section to get us acquainted to the data model editor. First, change the name of our boring Entity to be
Company. Then, in the attributes section, click the plus button to create a new attribute and call it name. Next to the attribute's name is a drop-down menu for the attribute's data type; select String. Now create another string attribute and call it industry:
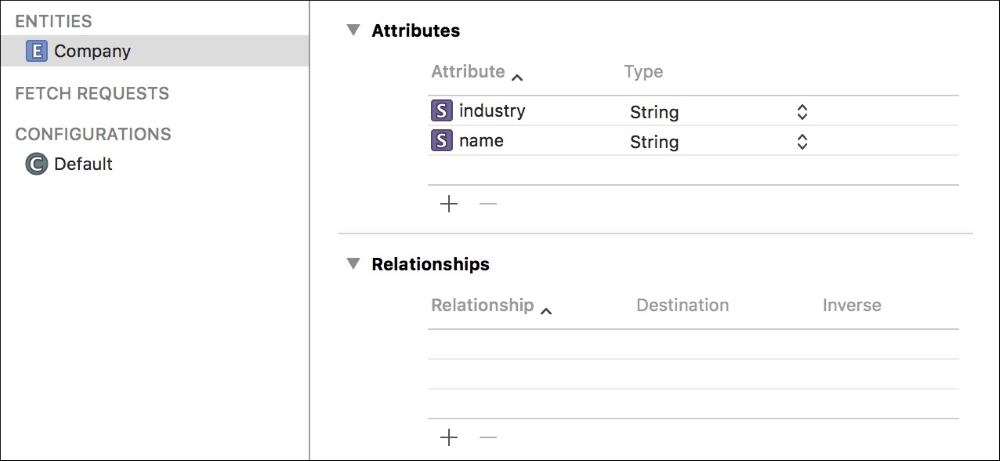
Figure 9.4: Our Company entity soso with its attributes set
Next, let's create another entity, this time named Employee. We'll add a name attribute of type String, and a salary attribute of type Integer16. If you select the salary attribute, and look in the attribute inspector (option + command + 3), you can see that we can set some data validation and default values. Let's enable a minimum of 40000 and a maximum of 200000, with the default value of 40000. This will ensure that our salary attribute always falls within one of these values, which can be useful in some scenarios.
Now that we have two entities, we can also create a relationship. Add a new relationship with the plus button, and name it employer. Next to its name, set the Destination of the relationship to our Company entity. For now, we'll leave the Inverse column blank:
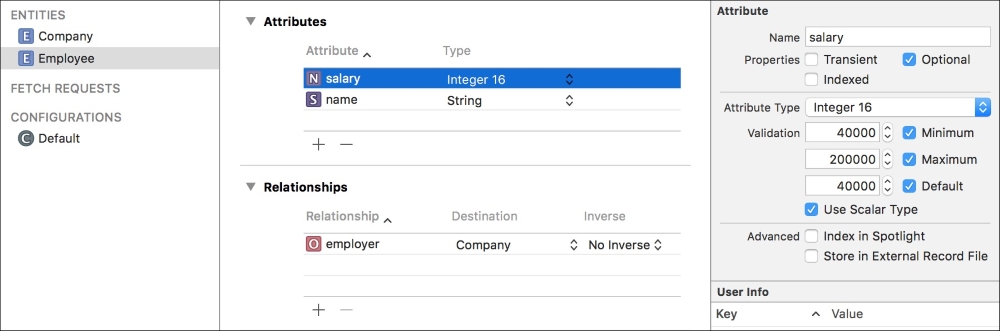
Figure 9.5: The Employee entity and its salary attribute selected with data validation edits made
Now that we have our Employee entity finished, let's head back to the Company entity and add a new relationship. Create the new relationship and name it employee, with the destination set to our Employee entity. This time, we will set the Inverse to the other relationship we made in the Employee entity; the employer relationship should be visible in the Inverse column dropdown.
The last relationship we made used the default values for its type and delete rule (to-one and nullify, respectively), so we didn't need to change them. However, our employee relationship needs to be of the type to-many, and the delete rule needs to be set to cascade.
To change these settings, click on the employee relationship in our Company entity, and then take a look at the attribute editor. You should see a set of dropdown options, below the name field. Set Delete Rule to cascade, and Type to to-many. Now the
Company can relate to several employees, and when the Company is deleted, all of the employees are deleted with it.
Finally, let's take a look at the data model visualization feature. If you look in the lower right corner of the editor, there's a toggle called Editor Style. Toggle the style to the other mode, and you'll see a visual representation of your data model:

Figure 9.6: A visual representation of our data model
You can imagine how useful this can be later on when dealing with more complex data models! At this point, you know all of the basic tools for creating entities, attributes, and relationships, so play around a bit and see what kind of data you can model.