
So far, we've seen how to add interface elements to a storyboard, and then how to add constraints to keep the elements in their correct place. However, we can also add and configure gestures in our storyboard, and for simple gestures this can be quite powerful. In this section, we are going to add a double tap gesture to an image that will flip it upside down.
Before we get started, let's create a little test project for us to explore gesture input. Create a new Single View Application Xcode project (Swift/Universal), and name it Gestures. Don't bother creating a git repository for it. Before we start working, you'll also want to add the wink.png file in the resources folder of this chapter to your project folder, and then add the file to the Xcode project (option + command + A).
As per usual when working with the storyboard, we are going to implement most of our functionality without having to write any code.
To start, go to the storyboard and drag an image view onto our view controller. From the Attribute Inspector, set the image to wink.png. Give it a size of 200 x 200, add a width constraint, and then a 1:1 aspect constraint. Finally, give it a vertical center and horizontal center constraint, and we should have a square, centered image to play with.
Next, we're going to add a gesture to our storyboard. In the object library, search for tap, and you should see the UITapGestureRecognizer. Drag the gesture from the library onto the image view; this will create a link between the two.
Before we move on, remember earlier when we talked about how UIView has a userInteractionEnabled property? Well, while most default to true, UIImageView is set to false by default. That means that our gesture isn't going to receive touch information. To change this, go to the Attributes Inspector, and check the box that says User Interaction Enabled, as shown by the red arrow in Figure 7.1:
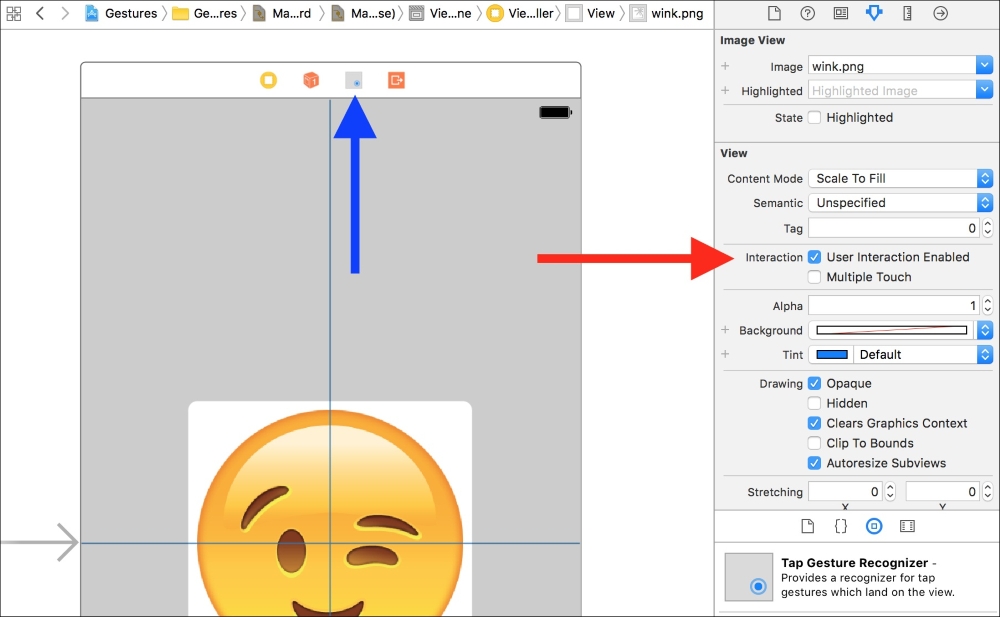
Figure 7.1: Blue arrow – the gesture in the storyboard; Red arrow – the User Interaction Enabled property
Next, we want to configure the gesture itself. If you look at the top of the view controller, you'll see a new icon that represents our tap gesture (the blue arrow in Figure 7.1). Like we said before, gesture recognizers are reusable, so they aren't added to specific views but to the view controller itself.
Click on the tap gesture icon in the view controller icon bar; you'll see its properties show up in the Attribute Inspector. Since we want to configure the tap gesture to be used as a double tap, we set it to recognize 2 Taps from 1 Touch:

Figure 7.2: Configuring the tap gesture from the Attribute Inspector
The last step in the storyboard is to link up our objects to our view controller code. Go into the Assistant Editor view and create an @IBOutlet for the UIImageView with the name imageView. We are also going to create an @IBAction for the gesture. Just like creating outlets or actions for UI elements, you can control drag from the tap gesture icon into the view controller code:

Figure 7.3: Control-dragging from the gesture in the storyboard to our ViewController.swift file
Here, you'll want to create an action named flipImage. This is the function that will be called when the gesture is recognized. With that, the double tap gesture is completely set up in the storyboard, and we just need to write a little code to actually make the image flip.
If you build and run the app on your device, you'll see the wink image in the middle of the screen. We've set up the gesture, but when you double tap on the image nothing happens! Let's add a little functionality so we can see that our gesture is working properly.
First, we're going to add two properties to the top of our view controller class, a UIImage and a Bool:
var image = UIImage(named: "wink")
var flipped: Bool = false
The image stores a reference to the same wink image that we used in the storyboard, which we'll need when we flip the image later. The Boolean will be used to keep track of the state of the image.
Then, inside the flipImage() function, we are just going to switch the Bool to the opposite of its current state:
@IBAction func flipImage(sender: AnyObject) {
    flipped = !flipped
}
All that's left is to change the image when the Bool value changes. To do this, we're going to use a cool feature of Swift that lets us run some code whenever a value of a property is changed. Let's update our flipped property to look like this:
var flipped: Bool = false {
    didSet {
        if flipped {
            let temp = UIImage(cgImage: image!.cgImage!, scale: 1.0,orientation: .downMirrored)
            imageView.image = temp
        } else {
            imageView.image = image
        }
    }
}
After the property declaration, we'll add a set of brackets and then define a code block that runs after the property's value changes using the didSet keyword. Inside, we'll check to see if flipped is true, and if so, we change our the image of imageView to be the flipped version of the image. Otherwise, we use the standard one.
So now when we double tap the image, we flip our flipped Bool, which then automatically changes the image in our UIImageView. Build and run on your device, and then double tap the wink image to see our gesture recognizer in action.
Here's all of the code for the view controller. Look how much we accomplished with such a small amount of code:
import UIKit

class ViewController: UIViewController {

    @IBOutlet weak var imageView: UIImageView!
    var image = UIImage(named: "wink")
    var flipped: Bool = false {
        didSet {
            if flipped {
                let temp = UIImage(cgImage: image!.cgImage!, scale: 1.0, orientation: .downMirrored)
                imageView.image = temp
            } else {
                imageView.image = image
            }
        }
    }

   override func viewDidLoad() {
        super.viewDidLoad()
    }

    @IBAction func flipImage(_ sender: AnyObject) {
        flipped = !flipped
    }
}