
So now we've covered the building blocks of programming in Swift. Our next step is to understand how to put these pieces together in an object-oriented programming environment. To do that, we're going to need to learn about classes, structs, and enumerations in Swift.
Classes in Swift are composed of properties and methods (functions). Let's jump right into an example:
class MyClass {

    var myInt: Int
    var myFloat: Float

    private var myOptString: String?

    init () {
        myInt = 0
        myFloat = 0
    }

    func generateString() -> String {
        myOptString = "(myInt) (myFloat)"
        return myOptString!
    }

}
On the first line, you see the beginning of the class declaration, beginning with the class keyword, followed by the class name. Class names in Swift should always be capitalized. The rest of the class declaration is inside a set of curly braces.
At the top of the class, we declare our properties, in this case myInt, myFloat, and myOptString. You'll notice that myOptString is set to private. By default, properties are internal, so myInt and
myFloat will be accessible from other classes.
Note
In Swift, source code is separated into modules. Here is the definition from Apple's documentation:
A module is a single unit of code distribution—a framework or application that is built and shipped as a single unit and that can be imported by another module with Swift's import keyword.
The internal access keyword means that it can be accessed only from that module. Usually, you can think of it as public, but in Swift public means it can be accessed from outside of its defining module as well.
Under our property declarations, we have our init() method. This method is called when the class instantiates a new object. In Swift, it is mandatory to give all properties a value by the end of the init() method. If you cannot assign a value to a property until after the init() method, it should be an made an optional property since it will take on the default value of nil. Since our first two properties are not optionals, they are initialized in our init() function.
Finally, below our init(), we declare our class's methods. In this case, there is only one method, which creates a string out of our two numbers, saves that to a private property, and returns the result.
Now let's take a look at a simple inheritance scenario in Swift:
class MySubclass : MyClass {

    var myDouble: Double

    init(doubleValue: Double) {
        myDouble = doubleValue
        super.init()
    }

    override func generateString() -> String {
        super.generateString()
        myOptString! += " (myDouble)"
        return myOptString!
    }

}
Again, on the first line we begin the class declaration with the class keyword. This time, since we are creating a subclass, we write the new class's name followed by the parent class and separated with a colon.
As with our parent class declaration, we have our property declarations at the top, followed by our init(), and finally our methods. In this class, we only declare one additional property and inherit the other three.
Now let's look at how init() has changed. You can see that in this init() we are passing in a parameter, which will be the initial value of the myDouble variable. You can also see that at the bottom there is the line super.init(), which initializes the superclass.
The most important thing to note about this initializer is that the order in which we do things is important. In a Swift initializer, a class must always initialize all of its own properties before its superclass does so. That's why we assign a value to myDouble, and then call super.init(). It's also worth noting that we can't customize our properties until after our superclass initializes everything. So first we initialize all properties, then pass off responsibility up the class hierarchy, then once the scope comes back to the class we can do further setup.
Finally, let's take a look at the new method in our subclass. Here you'll see a new keyword, override. This means that we are rewriting the functionality of a function from our superclass. The functionality of the original function (generateString) was to generate a string from its two properties, but now we have a new property to add to that string. You can see that we also call the superclass's implementation of this function from inside our new version. So first we let the original version do its thing, then add our new data to the end, and finally return our result.
Now let's look at how we could use this object:
let myObj = MySubclass(doubleValue: 2)
myObj.myFloat = 3.14
myObj.myInt = 33
Here you can see how initializers work in practice. Since init() isn't a standard method, we don't call it like other methods or functions. Instead, we use the class name followed by parentheses, which contain our arguments. Here we are passing in the value of 2 to initialize our myDouble value, then we set some public variables as we like:
let str = myObj.generateString()
This is how we could use our generateString() method to get a description of the values in our object. If you're in a playground, you'll see that the str constant contains a value of 33 3.14 2.0.
Again, this is just a very rough overview of classes in Swift, but we'll be using them extensively throughout the rest of the book, so we'll be pros by the time we're finished.
Structs are similar to classes, but with limited functionality. In most cases, you'll be using structs to create a custom data type that can store related information in a single, easily digestible package.
The important difference between a struct and a class is that a struct is a value type, which means that its values are copied when assigned or passed to a function. Here is an example:
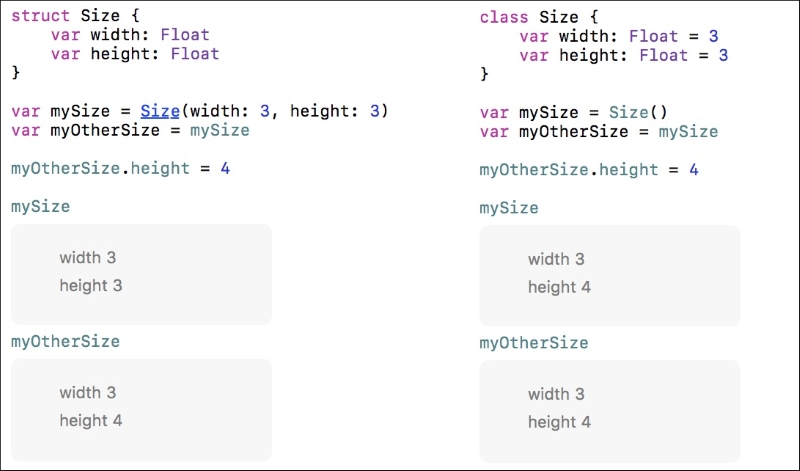
Figure 3.11: The playground results view shows the difference between a class and a struct
In Figure 3.11, you can see that on the left I define a new struct called Size, which has a width and height property. Then I create an instance called mySize, and a second instance called myOtherSize which is assigned from mySize. On the right, I do the exact same thing except with a class.
Since a struct copies values, myOtherSize is a completely new set of data, and when I change one of the values, the other one doesn't change. You can see on the left that mySize still has its initial values of 3 and 3, where myOtherSize has the modified value of 4 for its width.
With a class, a reference to an object is passed around, so when we modify the width of myOtherSize as a class (on the right), you see the mySize object also changes. That's because they actually point to the exact same data, whereas the struct creates new, separate copies.
As mentioned earlier, structs are usually best used for modeling information that is just a set of simple data types. If it needs special behaviors or inheritance, you should probably be using a class.
An enumeration (enum) is a very powerful tool in Swift. Since the language focuses on being thorough and specific, an enum is a great way to create a new data type that has a finite number of possible values. This lets the compiler know ahead of time what the possible values can be so that it can protect against issues.
For example, since switch statements must have exhaustive cases, the compiler knows every possible value of an enum, and can make sure every possible value is accounted for with a case.
Let's take a look at how we would create a new enum:
enum Season {
    case spring
    case summer
    case fall
    case winter
}
Just like with classes and structs, we begin with a keyword, this time enum, followed by the type name and a set of curly braces. However, with an enum, we want to be defining a set of possible values that the type can be set to, which we do using the case keyword followed by the value.
To use an enum, we use dot syntax:
let favoriteSeason = Season.fall
let leastFavoriteSeason: Season = .summer
You can see in the first example that we set our favoriteSeason equal to Season.Fall. The type Season is inferred. However, in the second example, we can see that if the type is explicitly stated, the Swift compiler knows that we are dealing with a Season enumeration, and lets us use a shorthand to access its values by omitting the enum's type name.
If you've used enums in some other language, such as Objective-C or C++, you'll notice that in Swift there is no backing type or value behind our cases. That's because enums in Swift aren't redefined integers, as in other languages. We can, however, give an enum a backing value, and we're not limited to integers:
enum Season: String {
    case spring = "Spring"
    case summer = "Summer"
    case fall = "Fall"
    case winter = "Winter"
}

let favoriteSeason = Season(rawValue: "Fall")!
print(favoriteSeason.rawValue)
Modifying some of our code from earlier, we've now given all of our seasons a backing value of the type String. Note the differences in the enum declaration, how we can now initialize an enum value by using its rawValue, and how we can also access the raw value later.