
13. Getting Connected
Going Worldwide
Hooking up to the Internet used to be a privilege afforded only to universities and corporations. Now it’s actually an essential part of owning and using any PC, and it’s available to virtually everyone.
In this chapter, you’ll find information about choosing an Internet service provider (ISP), making the connection through a modem or other link, installing and configuring your system, and making your system safe and secure. This chapter tells how to select an Internet connection technology and connect a single computer to the Internet. However, this isn’t your only option. You can take any one of several routes:
• If your computer is part of an existing local area network (LAN) with Internet access, you can skip this chapter entirely because Internet access comes as part and parcel of your LAN connection. In fact, if you are part of a corporate LAN, it is probably a violation of your company’s security policy to establish your own independent connection. (If it’s not, it should be!)
• If you have a LAN for your home or office, you can provide Internet access to all of your computers through one connection. You should read Chapter 19, “Connecting Your Network to the Internet,” and decide whether you want to connect your LAN. Use the instructions in this chapter to set up the initial connection; Chapter 19 tells you how to share it with the rest of your workgroup. (If you have two or more computers but haven’t yet set up a network to connect them, you should seriously consider doing so. Chapter 17, “Creating a Windows Network,” tells how.)
• If you want to use your existing ISP account and connection technology, you can skip the introductory sections of this chapter and go right to “Installing a Modem for Dial-Up Service” or “Installing a Network Adapter for Broadband Service,” on page 345.
• If you need to make a clean start with the Internet, read on!
Connection Technologies
Not long ago, you had one choice to make for your Internet connection: which brand of modem to buy. Now options abound, and you can choose among several technologies, speeds, and ISP types. A huge technology shift is taking place as high-speed digital (broadband) connection services are being deployed worldwide.
Let’s take a look at the basic Internet connection technologies that are appropriate for an individual user or workgroup. After describing each one, I’ll show you roughly what each costs to set up and use.
Analog Modem
Standard, tried-and-true dial-up modem service requires only a telephone line and a modem in your computer. The downside is that this ties up a telephone line while you’re online. Furthermore, if you have call waiting, the “beep” that occurs when someone calls while you’re online can make the modem drop its connection. To avoid these hassles, many people order an additional phone line just for the modem, and this adds to the monthly expense.
Dial-up service is adequate for general Web surfing—that is, reading text and viewing pictures. However, you will find it woefully inadequate for viewing video or for voice communication. (In other words, forget about YouTube.)
To use standard dial-up Internet service, you need a modem and a telephone cable. Modems come in internal, external, USB, and PC Card varieties from dozens of manufacturers. Most computers made for home use come with a modem preinstalled. On business computers, they’re usually an extra-cost item.
ISDN
Integrated Services Digital Network (ISDN) is a special digital-only telephone service that can carry two independent voice or data conversations over one telephone wire. ISDN service is actually a different type of telephony; you can’t plug an ordinary telephone into an ISDN line. ISDN modems can carry data at 64Kbps or 128Kbps, depending on whether you use one or two of its channels to connect to your ISP. Although ISDN Internet service is still available in some areas, I don’t recommend it as an Internet connection option. Dial-up is nearly as fast as ISDN. If you need greater speed, and you can’t get DSL or cable service, satellite and wireless service are better options.
DSL
Digital Subscriber Line (DSL) service sends a high-speed digital data signal over the same wires your telephone line uses while that line is simultaneously used for standard telephone service. This means that you can get DSL service installed without needing an extra telephone line. The most common DSL service is called asymmetric, or ADSL, because it receives data at 128Kbps to 6000Kbps but sends at a lower rate. (This is fine because most Web surfing involves sending a very small request and receiving a large amount of data.)
Note
![]()
DSL varieties include asymmetric, symmetric, high-speed, and DSL over ISDN, so you might run into the acronyms SDSL, ADSL, HDSL, and IDSL, or the collective xDSL. For this chapter, these distinctions are unimportant, so I just call it DSL.
DSL has at least one Achilles’ heel: Its availability is restricted by your distance from the telephone company’s central office, and it isn’t available when the distance is more than a couple of miles (as the wires run, not as the crow flies). DSL’s reach can be extended by optical fiber lines and special equipment, but this is expensive for the telephone companies to install. DSL might never make it into rural areas.
DSL modems come in two varieties: External units connect to your computer through a network adapter or a USB cable. Internal units plug right in to your computer. If your ISP uses external adapters, before you buy a network adapter, check with your DSL provider, because often one is included in the installation kit. In addition, before you decide to pay extra to get service for multiple computers, read Chapter 19 to see how all your computers can share a single connection.
Cable Modem
Your local television cable company may provide cable modem Internet service, which sends high-speed data signals through the same distribution system it uses to carry high-quality TV signals.
Cable modem service has none of the distance limitations of DSL. One criticism of cable service is that data speeds can drop during high-use times such as the early evening because everyone in a given neighborhood is sharing a single network “pipe.” Surveys show, however, that cable subscribers usually get several times the download speed of DSL subscribers.
![]() For more information on DSL and cable modem service, see Chapter 19, which describes these technologies with a focus on using them to connect a LAN to the Internet, but you still might find the information helpful.
For more information on DSL and cable modem service, see Chapter 19, which describes these technologies with a focus on using them to connect a LAN to the Internet, but you still might find the information helpful.
Cable modems generally are external devices that connect to your computer through a network adapter or a USB cable. Before you buy a network adapter, though, check with your ISP; one might be included in the installation kit. Some ISPs charge extra to lease the modem. The price of a cable modem is $30–$60 new and about $1 on eBay, so leasing one from your cable company isn’t such a deal. Also, if you have more than one computer and your cable ISP wants to charge you for extra connections, read Chapter 19 to see how all your computers can use a router to share a single connection.
Satellite Service
Satellite Internet service uses microwave signals and small (roughly 2-foot-diameter) dish antennas to connect to an orbiting communication satellite. You should consider only bidirectional satellite service, which uses the satellite dish for both sending and receiving. Satellite’s one advantage is that it’s available where DSL and cable haven’t yet reached, wherever there’s a good view of either the southern sky in the Northern Hemisphere, or the northern sky in the Southern Hemisphere. The disadvantages are many: Installation requires the abilities of both a rocket scientist and a carpenter, the equipment and service plans can be expensive, you’ll have to sign a long-term contract to get discounts on installation and equipment, and the system suffers from the same slowdowns that affect cable service. If you download more than your monthly quota allows, you’ll likely be punished by having your download speed cut to a crawl for the remainder of the month. Heavy rain or snow can interfere with the signal, so service may be interrupted or degraded during storms. Despite all this, many people beyond the reach of cable and DSL say that satellite service is usually worth the hassle.
Satellite service requires you to purchase a receiving dish antenna, a receiver, and a USB or network adapter to connect the setup to your computer. Your ISP should furnish these devices. For unidirectional satellite service, you also need to have a phone line near your computer.
Installing satellite or wireless modems is not terribly tricky, but the procedure is specific to the type of hardware you’re using. Therefore, unfortunately, I have to leave you at the mercy of the manufacturer’s instruction manual, and can’t provide any specific instructions in this book.
One bit of advice I can give: Installing a satellite dish is difficult, and it’s best to hire a professional dish installer for this task. (Our executive editor, Rick Kughen, didn’t have the benefit of this sage advice when he installed his, and his conclusion is, “About halfway through the ordeal, I decided that I really wished I had paid the $199 installation fee.”) Some satellite providers offer free installation, however, so you might not have to get dirty installing your own or pay big bucks to have someone else do it.
Caution
![]()
After your satellite connection is set up, you must be sure that Windows Firewall is enabled to protect your computer against hackers. I mention this again later in the chapter. You can read more about firewalls and network security in Chapter 32.
Wireless and Cellular Service
Wireless Internet service is available in most major metropolitan areas and even in some remote areas, through cellular telephone providers. (Our editor, Rick Kughen, notes that he can get wireless Internet service in his rustic fishing village in central Indiana!) Three types of service are available:
• Fixed-antenna wireless service—The wireless modem connects to a small whip or dish antenna, and data transfer rates typically are more than 1Mbps using setups with fixed antennae.
• Wireless modems for laptops—With this type of service, you connect a small plug-in PC card or USB wireless modem unit to your computer, and the install software provided by your cellular company. The modem as a built-in radio, and it establishes a data connection through the cellular network.
• Tethered data service through a cell phone—Some cell phones let you connect a data cable from the phone to your computer. The telephone provides the radio and modem components.
Fixed-antenna wireless is similar to satellite service. You must purchase a receiving antenna, a receiver, and a USB or network adapter to connect the setup to your computer. Your ISP should furnish these devices. You might also have to pay for professional installation. When the network connection is set up, you can use it on a single computer or share it using a router, as I describe in Chapter 19.
The other two options are portable, and serve only a single computer. You may be able to find data plans that let you buy service on a day-by-day basis rather than committing to a long-term service contract. This can be very cost effective when you travel. Since the setup and usage steps are specific to each provider, I can’t provide instructions in this chapter.
Choosing a Technology
With all the options potentially available to Windows users for Internet access, making a choice that fits your needs and limitations can become a bit confusing. Research the options that local and national ISPs provide, and then start narrowing them. Table 13.1 summarizes the costs and speeds of several ways for a single computer user to access the Internet (excluding ISDN and wireless service). The prices shown are typical costs for the service in question after applying the usual discounts and special offers.
Table 13.1 Internet Connection Options for the Individual User
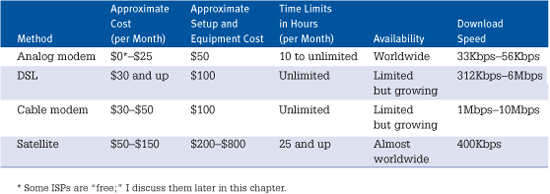
Remember that you have several costs to factor in:
• The cost of hardware required to make the connection
• The cost of installation and setup
• The monthly ISP cost for Internet service
• The cost of telephone lines, if you order a separate line just for Internet access, or the savings you’ll get if you can drop one or more phone lines you use for just dial-up service when you upgrade to DSL or cable
• The savings you’ll get if you can drop separate dial-up service accounts and extra phone lines for high-speed service that you can share
In addition, if you travel frequently, ask any prospective ISP to tell you if they provide free dial-up or wireless hot-spot Internet service when you’re on the road. These costs can add up quickly if you select an ISP that makes you pay extra for this service.
For more information on selecting an Internet technology and to help choose an ISP, check out these sites:
• For information on DSL and cable, see www.dslreports.com.
• For information on satellite service in North and Central America, check out www.starband.com, www.hughesnet.com and www.wildblue.com. In Australia, check www.telstra.com. In Europe, Southern Africa, the Middle East, the Indian subcontinent, and Southeast Asia, see www.intelsat.com. Satellite services are often resold through regional companies.
• For information on wireless service, see www.mobilebroadbandnetwork.com or contact your area’s cellular providers.
Choosing Equipment
You need to purchase equipment that is compatible with the particular type of Internet service you’ll be using. Your computer might have come with a modem preinstalled, so, if you will use dial-up service, you might not have to make any decisions. If you will buy new connection hardware, here are some points to consider:
• Most broadband services require specific hardware that your ISP provides (you can sometimes buy a DSL or cable modem independently, but be sure it will be compatible with the equipment your ISP uses). In addition, broadband modems connect via USB or through an Ethernet network adapter. If your service needs a network adapter, and your computer doesn’t already have an Ethernet adapter, be sure to get one that’s compatible with Windows 7.
• If you will want to share your Internet connection with other computers via a LAN, read Chapter 19 before making any hardware purchases; you’ll find information on some special hardware setups.
• Above all, be sure any hardware that you have to plug directly into the computer (modem or LAN adapter) appears in the Windows Compatibility Center list (www.microsoft.com/windows/compatibility). This is important because not every vendor provides Windows 7–compatible drivers for all of their products. Therefore, check the list before you make any purchases.
• For dial-up service, choose a modem that is compatible with the fastest service level your ISP provides. Your ISP should be using V.90 modems for 56Kbps service. If your ISP still uses X2 or K6Flex modems, it’s way behind the times. Some ISPs support the V.92 call-waiting protocol. If you have a modem that supports this feature, ask prospective ISPs whether they support it and whether there’s an additional charge.
Ordering the Service
Ordering standard dial-up modem Internet service is really quite simple. Just call the ISP, talk to the sales department, and ask the sales representative to mail or fax you instructions for configuring Windows 7. In fact, it’s easy enough that they might just talk you through it over the phone.
Ordering cable, DSL, or satellite service is also quite easy because the ISP takes care of all the details. The provider first checks to see whether your neighborhood qualifies for the service. Then a rep calls you back with the news and either sends you a self-installation kit or schedules an installation appointment.
When the service is installed, you’re ready to configure your Windows 7 computer. If you’re using DSL or cable Internet service, skip ahead to “Installing a Network Adapter for Broadband Service” on page 345.
If you’re using satellite service, skip ahead to “Satellite Service” on page 332.
If you’re using dial-up Internet service, continue with the following section.
Installing a Modem for Dial-Up Service
Installing a modem is a pretty painless process these days. Your modem should come with straightforward installation instructions; follow those, and you’ll be online in no time.
For an internal modem, you’ll pop open your PC’s case and insert the modem card into a free expansion slot inside the computer. For an external modem, it’s a more simple matter of cabling it to a USB or serial port on your PC. (Don’t forget to connect the power supply and turn it on.) A PC card modem simply plugs into your portable computer.
![]() For more information about installing new hardware, see Chapter 27, “Installing and Replacing Hardware.”
For more information about installing new hardware, see Chapter 27, “Installing and Replacing Hardware.”
From that point, here’s what you need to do.
If your modem is Plug and Play–compatible, Windows 7 should automatically detect it when you turn on your computer and log in. In many cases, Windows already has the required software available and installs it.
Note
![]()
When you have your modem set up, skip ahead to “Configuring a Dial-Up Internet Connection” on page 338.
If Windows cannot find a set of drivers that matches your brand and model of modem, you might be asked to insert a CD or floppy disk that the modem manufacturer should have provided with your modem.
If you’re using an older modem, you might need to add it to the configuration manually by following these steps:
1. Choose Start, Control Panel. In the search box in the upper-right corner, type the word modem. Then, click the phrase Phone and Modem.
2. Select the Modems tab, shown in Figure 13.1.
Figure 13.1 The Modems tab identifies the modems currently installed in your system.
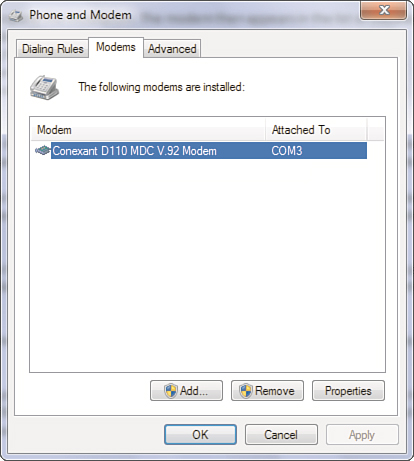
3. If Windows has already detected your modem, its name appears in the Modems tab. If the correct modem type is listed, skip to step 8. If the wrong modem type is listed, skip to the next section, “Changing the Modem Type.”
If no modem is listed, click the Add button to run the Add Hardware Wizard.
4. Click Next. Windows locates the COM port and determines the type of modem you have. If this is successful, Windows tells you. In this case, continue with step 7.
5. If Windows detects your modem incorrectly and doesn’t offer you the chance to correct the mistake, skip to step 7 and then correct the problem using the instructions in the next section. If you are given the opportunity to correct the problem, click Change and locate the manufacturer and model of your modem in the dialog box. If you find the correct make and model, select them and click OK. If your modem came with a driver disk for Windows 7, click Have Disk and locate the installation file for the modem.
If your modem isn’t listed, try to download the proper driver from Windows Update or from the modem manufacturer (using another computer, of course). You also might try selecting a similar model by the same manufacturer.
6. After you select the modem type, click OK and then Next.
7. Click Finish to complete the installation.
8. Select the Dialing Rules tab.
9. Select My Location and click Edit.
10. Enter the General tab information for your current location, as shown in Figure 13.2.
Figure 13.2 In the Edit Location dialog box, you can record the dialing instructions for your current location. The important settings are Country/Region, Area Code, codes for outside lines (if you are on a corporate phone system), and Disable Call Waiting.
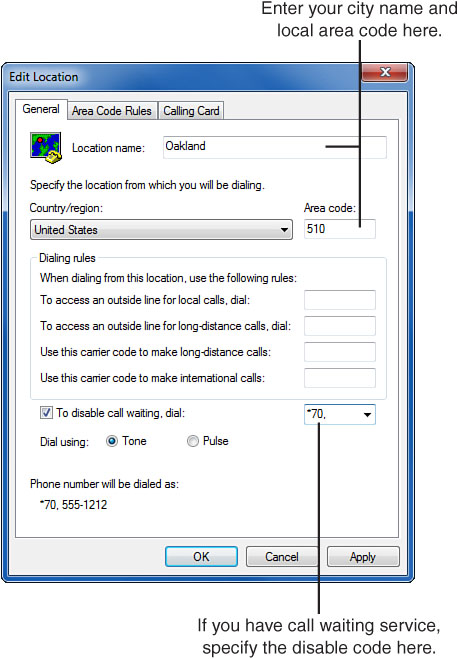
11. Enter a name for your location—for example, home, the name of your city, or another name to distinguish the current telephone dialing properties. Set the country, area code, and dialing rules information.
For example, if your telephone system requires you to dial a 9 to make an outside local call, enter 9 in the box labeled To Access an Outside Line for Local Calls, Dial. Make a corresponding entry for long-distance access.
If your telephone line has call waiting, check To Disable Call Waiting, Dial and choose the appropriate disable code.
I assume here that your ISP access number is a local call in the same area code. If this is not the case, you might want to fill in the Area Code Rules tab for the ISP access number. (If you don’t know the number yet, don’t worry; you can come back and fix it later.)
12. Click OK.
Now your modem is installed and you can continue with “Configuring Your Internet Connection,” later in this chapter.
Changing the Modem Type
If Windows incorrectly determines your modem type, you can change it by selecting the appropriate modem in the Modem list (see Figure 13.1) and clicking Properties. Then follow these steps:
1. Select the General tab and click Change Settings.
2. Select the Driver tab and click Update Driver.
3. Select Browse My Computer for Driver Software.
4. Click Browse to locate the proper INF setup file.
5. Click Finish.
Alternatively, you could delete the modem and add it back in manually.
Configuring a Dial-Up Internet Connection
Windows can quickly walk you through setting up the connection from your modem to your ISP. In this section, I show you how to set up the connection the first time, and how to modify it later on if that should be necessary. The subsequent sections tell you how to use the connection to connect to the Internet.
Creating a New Dial-Up Connection
To set up a new connection to your dial-up Internet service, click Start, Control Panel, View Network Status and Tasks (under Network and Internet), and select Set Up a New Connection or Network. Select Connect to the Internet and click Next. Click Dial-Up.
If you already have an account with an Internet Service Provider (ISP), you need to fill in the information provided by your ISP when prompted.
Note
![]()
This step in the Connect to the Internet Wizard doesn’t actually deal with the area code correctly. We’ll fix it later, under “Adjusting Dial-Up Connection Properties.”
The first field asks for the local access telephone number for your ISP. Enter the local number, optionally preceded by any other codes needed to dial the call. For instance, in the United States, if you enter an area code, you must first enter a 1, then the area code, as shown in Figure 13.3. You can enter parentheses or dashes (-) between the parts of the number, if you want; the modem ignores them.
Figure 13.3 When prompted, enter the local access number for your ISP.
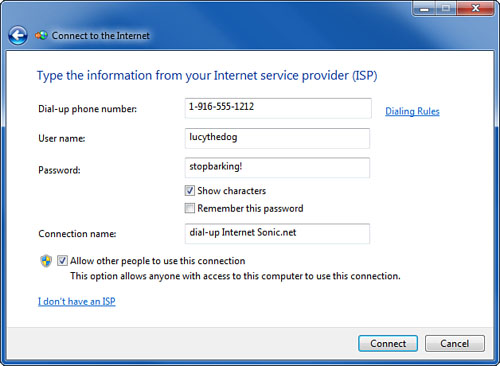
The next two fields ask for your ISP username and password, as shown in Figure 13.3. If you select the Show Characters option, the Password field displays the characters in your password instead of the black circles. This can be useful if you need to verify that you are typing in the correct password.
Caution
![]()
Be sure to use a local number. Your ISP will not help pay your phone bill if you choose a toll number by mistake!
If you want to have Windows remember the password for your ISP account so you don’t need to type it in each time you connect to the Internet, select the Remember This Password option.
Tip
![]()
If you will be traveling, you’ll probably accumulate several of these dial-up connections, one for each location you visit, so it would be helpful to add the location to the connection name, as in “Earthlink - Chicago.”
The last field asks for a connection name. Type in a name that will help you identify what the connection is used for. The name of your ISP is always good.
The last option, Allow Other People to Use This Connection, is not enabled by default. Select this option if you want the Internet account information to be useable by anyone who uses the computer. Uncheck this if you don’t want other users to connect to the Internet with your dial-up account.
Click Connect. Windows 7 immediately dials your ISP. Check to be sure that the connection works before proceeding.
The last step in setting up a dial-up Internet connection is to clean up the new connection’s settings such the area code and call waiting control. We’ll do that in the next section.
Note
![]()
If you have several ISP accounts, ISP access numbers for different cities, or both personal and business dial-up connections, you can add additional connections by repeating the Connect to the Internet Wizard process for each access telephone number or account.
For maximum protection against hackers, I suggest that you read Chapter 32, on network security. At the very least, follow the steps in the next section to be sure that Windows Firewall is enabled. It ought to be enabled by default, but you should check just to be safe.
Adjusting Dial-Up Connection Properties
As configured by the wizard, your dial-up connection is properly set up for most ISPs. However, the wizard doesn’t do a good job of setting up the area code and call-waiting settings, so you might want to manually adjust these. You won’t likely need to change any of the other settings, but just in case (and because I know you’re curious), I walk you through the various settings and properties that are part of a dial-up connection.
Tip
![]()
You can instantly view your list of dial-up connections by clicking the Network icon in the notification area of the taskbar, as described in the next section.
To adjust a connection’s properties, click the Network icon in the taskbar, as shown in Figure 13.4. This displays all dial-up connections you’ve configured (see Figure 13.5).
Figure 13.4 Click the Network icon in the taskbar to work with your list of Internet and network connections. On your computer, the icon may appear as shown at the left. If you have a wireless network adapter in your computer, it appears as shown at the right.
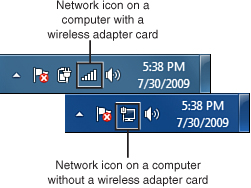
Figure 13.5 The View Available Networks list shows icons for each of your dial-up accounts and high-speed links.
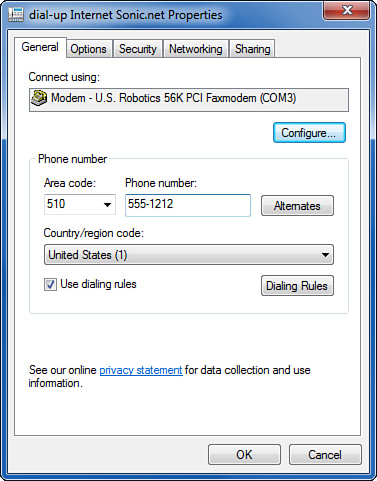
Right-click the icon for your dial-up connection and select Properties. You’ll see five tabs, shown in Figure 13.6, which I will run through in the order in which they appear. Only a few settings ever need to be changed for an ISP connection:
• The General tab lists modem properties and the ISP telephone number. The following two settings are the most important ones to examine and if necessary, change:
• If you travel with your computer, check Use Dialing Rules, and be sure that the ISP’s area code is set correctly in its own box, and is not entered in the same box as the phone number. Figure 13.6 shows how it should look.
• If your telephone line has call waiting service, you must tell Windows to disable call waiting when it dials your ISP.
To do this, click the Dialing Rules button. Select your current location and click Edit. If the location name is “My Location,” change it to the name of your city. Then, at the bottom, check To Disable Call Waiting, Dial: and select the code used by your telephone company. Figure 13.2, earlier in the chapter, shows how this might look. Click OK twice to return to the connection properties dialog.
• If you have multiple modems, you can choose at the top of this tab which one to use for this particular connection. (If you select more than one modem, Windows will attempt to use them simultaneously. Don’t do this unless your ISP offers “modem binding” service.)
• Using the Configure button for the modem, you can set the maximum speed used to communicate from the computer to the modem. For external modems connected via a COM port, if you don’t have a special-purpose high-speed serial port, you might want to reduce this speed from the default 115200 to 57600.
• Using the Alternates button for the telephone number, you can add multiple telephone numbers for your ISP, which will be automatically tried, in turn, if the first doesn’t answer.
Figure 13.6 A dial-up connection’s Properties dialog box lets you change dialing rules, set network parameters, manage the security options, and manage networking and sharing options.
• On the Options tab, you can configure dialing and redialing options.
• Select the Display Progress While Connecting option to have progress information displayed during the connection process.
• Select the Prompt for Name and Password, Certificate, etc. option to have Windows 7 prompt you for your dial-up username and password each time you connect. You can also use dial-up networking to log on to your Windows domain. Don’t check this option if you use a commercial ISP; that’s only for connections to corporate networks.
• You can select to have Windows 7 prompt you for the phone number of your ISP each time you connect.
• You can select a time to wait before hanging up the line when no activity occurs. By doing so, if you pay an hourly rate to your ISP, you can help cut costs by having your computer disconnect itself from the Internet if it detects that you’ve not been using your connection for a set amount of time.
• To maintain a permanent, or nailed-up, dial-up connection, check Redial If Line Is Dropped and set the disconnect time to Never. (Do this only with the consent of your ISP.)
• The Security tab controls whether your password can be sent in unencrypted form. It’s okay to send your ISP password unsecured.
• The Networking tab determines which network components are accessible to the Internet connection. If you’re dialing in to a standard ISP, leave File and Printer Sharing unchecked; you’ll learn more about that in Chapter 19.
Tip
![]()
If you want to rename a dial-up connection, you have to go about it an odd way: Open the Network and Sharing Center and select Manage Adapter Settings. An icon for your dial-up connection will appear here. Right-click it and select Rename.
• The Sharing tab allows other network users to connect through your computer’s Internet connection. You’ll learn more about Internet Connection Sharing in Chapter 19.
Click OK to save your changes.
Making and Ending a Dial-Up Connection
If you use a dial-up connection with an analog modem, after you’ve set up an icon for your ISP, making the connection is a snap. You use this same procedure if you use a broadband connection with Point-to-Point Protocol over Ethernet (PPPoE) that requires you to log on:
1. Click the Network icon in your taskbar (refer to Figure 13.4).
2. Select the appropriate connection from the list and click Dial.
3. When Windows displays a connection dialog box (see Figure 13.7). If you previously let Windows remember the password, you can simply skip ahead to step 4.
Figure 13.7 If you previously saved your dial-up password, you can just click Dial to connect. Otherwise, enter your username and password.
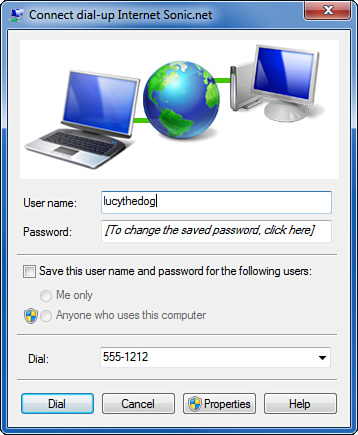
Otherwise, enter the password assigned by your ISP. At this point, you can check Save This User Name and Password for the Following Users. Select “Me Only” or, if you want to allow others to connect with your account (or you don’t care who uses your account), select Anyone Who Uses This Computer. Then, click Dial.
4. For a dial-up connection only, check that the phone number is correct, including area code and any required prefix numbers. You might need to click Properties to correct your current location (Dialing From) and/or the Dialing Rules if the prefix or area code isn’t correct.
5. Click Dial to make the connection.
Windows then dials your ISP and establishes the connection.
Modem Doesn’t Dial ISP
![]()
If you attempt to connect to your ISP, but the modem doesn’t make an audible attempt to connect, there are several possible solutions:
• Your phone line might not be correctly plugged into the modem. Be sure the phone cable is plugged into the correct jack on the modem.
• The phone line might not be working. Try an extension phone in the same wall jack to see if there’s a dial tone.
• The modem might be working, but its speaker volume might be turned down. (This has fooled me more than once!) Some external modems have volume knobs. You can set the volume on an internal modem by opening Control Panel, Hardware and Sound, Device Manager. Expand the Modems option in the tree to view all your modems, right-click the modem in the tree, and select Properties. Select the Modem tab and adjust the volume control.
• The modem might have a hardware problem. Open the modem properties, as described in the previous paragraph. View the Diagnostics tab and click Query Modem. After 5–15 seconds, you should see some entries in the Command/Response list. If an error message appears instead, your modem is not working properly. If it’s an external modem, be sure it’s powered up. If it’s an internal modem, see Chapter 27. Try to update the modem’s driver software.
If the connection fails, Windows displays a (usually) sensible message explaining why: There was no dial tone because your modem is unplugged, there was no answer at the ISP or the line is busy, or your user ID and password failed. In the last case, you get three tries to enter the correct information before Windows hangs up the phone.
Modem Dials ISP But the Connection Fails
![]()
If you attempt to connect to your ISP, and the modem makes the call, but the Internet connection still fails, Windows should indicate what sort of problem was encountered. You might have typed your account name and password incorrectly. Try one or two more times. If it still doesn’t work, a call to your ISP is the best next step. Your ISP might require you to enter the account name information in an unintuitive way. (Earthlink, for example, at one time required you to put ELN before your account name.) Your ISP’s customer support people can help you straighten this out.
When your connection is made, you should be able to browse websites, check your email, and so on.
Can’t Reach Any Websites
![]()
If your Internet connection seems to be established correctly, but you can’t reach any websites, turn to Chapter 21, Troubleshooting Your Network,” for the nitty-gritty details. Troubleshooting connection problems is such a large topic that an entire chapter is devoted to it.
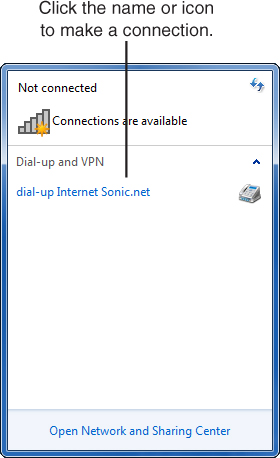
Hanging Up a Dial-Up Connection
When you finish using your Internet connection, click the Network icon in the taskbar, as shown earlier in Figure 13.4. Click the name of your Internet connection, then click Disconnect. Windows will hang up the connection.
Installing a Network Adapter for Broadband Service
If you are going to use cable or DSL Internet service, the following sections should help you get the service installed and working. To start with you will need to connect your computer to your cable or DSL modem. A very few DSL and cable modems use a USB connection and can just be plugged into your computer this way.
Tip
![]()
If a professional installer configures your computer or adds software to it, be sure to take thorough notes of what he or she does. Don’t hesitate to ask questions—you have a right to know exactly what the installer is doing. Be sure to test the setup before the installer leaves.
However, most DSL and cable service providers require an Ethernet network adapter for use by their modems. Most computers have an Ethernet adapter built in, ready to use. Or, your ISP will supply and install one for you. You won’t have to lift a finger. You just need to log in using an Administrator account and supervise while the installer does his or her stuff.
If you want to purchase or install the network adapter yourself, install it according to the manufacturer’s instructions. This process will go something like this:
• For an internal adapter in a desktop computer, shut down Windows, unplug the computer, and install the card. Then, power up the computer and log on.
• For a laptop computer, if you have to install a plug-in PCMCIA (PC Card) adapter, you don’t need to shut down Windows. Just plug in the card.
The Plug and Play system should take care of the rest for you.
After installation, confirm that the network adapter is installed and functioning by following these steps:
1. Click Start, right-click Computer, and then select Manage.
2. Select the Device Manager in the left pane. The list in the right pane should show only “first-level” items. Under Network Adapters, you should see no items listed with an exclamation mark icon superimposed.
Caution
![]()
When your network adapter is working and connected to your DSL or cable modem, Windows may pop up a box asking you to set a location for the network it has just detected. If you plugged your network adapter directly into your cable or DSL modem, you must choose Public as the location, so that Windows knows to block network services that could be abused by hackers.
If the network adapter appears and is marked with a yellow exclamation point, follow the network card troubleshooting instructions in Chapter 21, “Troubleshooting Your Network.”
If you’re using cable Internet service, skip ahead to “Configuring a PPPoE Broadband Connection” on page 347.
Installing Filters for DSL Service
For DSL service with self-installation, you will be provided with filters, devices that plug into your telephone jacks and block the DSL signal from reaching your telephones and answering machines. You need to identify every phone jack that is connected to the line your DSL service uses, and install a filter on every jack but the one that plugs into your DSL modem. If you need to plug a phone into the same jack that the DSL modem uses, use a dual jack adapter, with a filter on the side that connects to the phone.
Tip
![]()
If a jack is unused, you don’t need to plug a filter in it, but it’s a good idea to put a label over the jack indicating that it carries the DSL signal. This way you’ll remember to add a filter if you ever do plug a phone or other device into this jack.
Alternatively, the service installer might connect your telephone line to a device called a splitter outside the house and will install a separate cable to bring the DSL signal to your computer. These devices separate the high-frequency DSL carrier signal from the normal telephone signal.
Now, skip ahead to “Configuring a PPPoE Broadband Connection” on page 347.
Configuring a High-Speed Connection
If you’re using an Ethernet network adapter to connect your computer to a DSL or cable Internet service, the installer might set up your computer for you. “Self-install” providers give you a set of instructions specific to your service. I can give you a general idea of what’s required.
1. Click the Network icon in the taskbar and then click Open Network and Sharing Center.
Caution
![]()
If your broadband service uses a network adapter (that is, an Ethernet adapter) to connect to a cable or DSL modem, you must take the following steps to secure your computer from hackers.
2. Under View Your Active Networks, locate the icon that corresponds to the network adapter that connects to your DSL or cable modem—it’s probably labeled Local Area Connection.
Be sure that the label next to the network’s icon says Public Network, not Home Network or Work Network. Because the connection hooks up directly to the Internet, it must be designated as a Public network.
If the label says Home Network or Work Network, click on those words and select Public Network.
3. Now, for additional insurance, at the left, select Change Adapter Settings. Locate the icon for the adapter that goes to your DSL or cable modem. Right-click it and select Properties.
4. Under This Connection Uses the Following Items, uncheck File and Printer Sharing for Microsoft Networks, and uncheck Client for Microsoft Networks.
5. If your ISP requires you to set a specific IP address for the network adapter, highlight Internet Protocol Version 4 (TCP/IPv4) and click Properties. Check Use the Following IP Address, and enter the IP Address, Subnet Mask, and Default Gateway provided by your ISP. You may also be instructed to enter DNS server addresses.
6. Click OK.
After the adapter has been configured and attached to the DSL or cable modem with a network cable, you configure the connection. The procedure you should use depends on whether your ISP uses PPPoE or an always-on connection. The following sections describe these procedures.
Configuring a PPPoE Broadband Connection
Most DSL and some cable Internet providers use a connection scheme called Point-to-Point Protocol over Ethernet (PPPoE). This technology works a lot like a standard dial-up connection, but the “call” takes place through the DSL circuit or TV cable instead of over a voice connection. Windows 7 has PPPoE software built in, but the setup process varies from provider to provider; yours should give you clear instructions.
If you perform the procedure manually, the steps should look like this:
1. Open the Network and Sharing Center window by clicking Start, Control Panel, View Network Status and Tasks.
Note
![]()
Some ISPs give you a CD-ROM with installation software that does the next setup procedure for you. I intensely dislike this practice: Who knows what other software—including adware and “customer support” spyware—they’re installing? Personally, I lie to them, tell them I’m installing the connection on a Macintosh or Linux computer that can’t use their software, and ask for the information needed to perform the setup manually. Sometimes this works, and sometimes it makes life difficult. For instance, one major ISP I’ve worked with requires you to set up the service account through a special website, so if you want to shun its software, you need Internet access to set up your Internet access.
2. Click Set Up a New Connection or Network. Select Connect to the Internet and click Next. If Windows says you are already connected to the Internet, click Set Up a New Connection Anyway. If Windows asks, “Do you want to use a connection that you already have?,” click No, Create A New Connection.
3. Select Broadband (PPPoE).
4. Enter the username and password assigned by your ISP. You might want to check Show Characters before you enter the password, to make sure you enter it correctly.
5. In most cases, you will want to let anyone who uses your computer use your Internet connection. To make this easy, check both Remember This Password and Allow Other People to Use This Connection.
6. Enter your ISP’s name and click Connect.
At this point, you’re prompted to sign on. Surprisingly, the procedure for signing on and off is exactly the same as for dial-up Internet service. This is described earlier in this chapter under “Making and Ending a Dial-Up Connection,” so I won’t repeat the instructions here. I will repeat one tip: remember to click the Network icon on the taskbar, shown in Figure 13.4, whenever you want to start or stop your Internet connection.
Note
![]()
Installing a network adapter to connect to a broadband modem doesn’t give you a LAN—it’s just a way of connecting to the modem. If you want to set up a LAN in addition to an Internet connection, see Chapter 17, “Creating a Windows Network,” and Chapter 19, “Connecting Your Network to the Internet.”
Setting Up Dynamic IP Addressing (DHCP)
In most cases, your ISP will use the DHCP protocol to configure client network adapters. This is the default setting for all new network adapters.
Some ISPs require you to give them the MAC address of your network adapter. This is an identification number built into the hardware that uniquely identifies your particular network adapter. To find this number, follow these steps:
1. Open a Command Prompt window by clicking Start, All Programs, Accessories, Command Prompt.
2. Type ipconfig /all and press Enter.
3. You might need to scroll back, but find the title that reads something similar to Ethernet Adapter Local Area Connection. Look for the name of the adapter that goes to your broadband modem. This might be Local Area Connection 2, if you’ve installed an extra adapter. Ignore any entries that mention the word Miniport. If you have multiple adapters and can’t tell which is which, unplug the network cable from all but the one that goes to the modem and type the command again.
4. Find the line titled Physical Address. It will be followed by six pairs of numbers and letters, as in 00-03-FF-B9-0E-14. This is the information to give to your ISP.
Alternatively, you might be instructed to set your computer’s name to a name that your ISP provides. To do this, follow these steps:
1. Log on using an Administrator account. Click Start, right-click Computer, and select Properties.
2. Under Computer Name, Domain, and Workgroup Setting, click Change Settings. On the Computer Name tab, click the Change button.
3. Enter the computer name as supplied by your ISP, as shown in Figure 13.8.
Figure 13.8 Specify a required computer name in the Computer Name/Domain Changes dialog box.
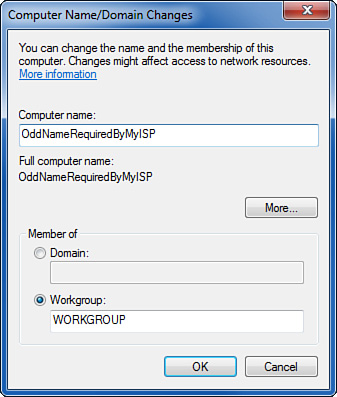
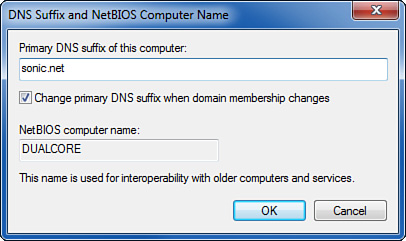
4. Click More and enter the domain name specified by your ISP, as shown in Figure 13.9.
Figure 13.9 Enter the domain name provided by your ISP. This may just be their domain name or it can include an additional location prefix.
When you close all these dialog boxes by clicking OK, you need to let Windows restart. When it restarts, your Internet connection should be up and running.
Setting Up a Fixed IP Address
In some cases, your ISP will require you to set your LAN adapter to a fixed IP address. This might be required with either PPPoE or “always-on” service. To set the address, follow these steps:
1. Log on as a Computer Administrator. Open the Network and Sharing Center window, for example, from Start, Control Panel, View Network Status and Tasks.
2. Under View Your Active Networks, click the connection name, for example, Local Area Connection. In the Status window, select Properties to open the Local Area Connection Properties dialog box.
3. Select the Networking tab, select the Internet Protocol (either Version 6 or Version 4 depending on the IP provided by your ISP), and click the Properties button.
4. Select Use the Following IP Address, and enter the IP address, subnet mask, and default gateway information provided by your ISP, as shown in Figure 13.10.
Figure 13.10 Here you can add the network address, subnet mask, and DNS information supplied by your ISP.
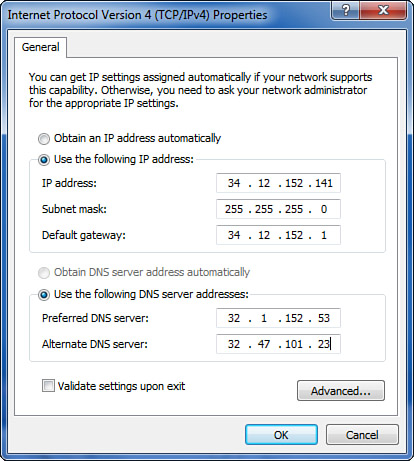
5. Select Use the Following DNS Server Addresses, and enter the two DNS addresses provided by your ISP.
Tip
![]()
If you use your computer at work and at home, and have a fixed IP address at home, leave the IP address and DNS settings set to Obtain Automatically for work, and make the fixed IP address entries for home on the Alternate Configuration tab that appears when Obtain Automatically is selected.
When you’re entering TCP/IP dotted-decimal numbers such as 1.2.3.4, the spacebar advances the cursor across the periods. This technique is much easier than using the mouse to change fields.
6. Click OK to return to the Local Area Connection Properties dialog box.
When you have completed this procedure, return to the PPPoE setup steps, or, if you have always-on service, open Internet Explorer to test-drive your new connection.
Changing the Default Connection
If you don’t establish a connection manually before using an Internet program such as Internet Explorer, Windows dials your ISP automatically when you start these programs. If you don’t want Windows to dial automatically, or if you have defined multiple dial-up connections, you can tell Windows which, if any, of the connections you want it to dial automatically.
To change the default settings, follow these steps:
1. Open the Control Panel, select Network and Internet, and click Internet Options. Alternatively, within Internet Explorer, you can choose Tools, Internet Options.
2. Select the Connections tab and highlight the dial-up connection you want to use for Internet browsing (see Figure 13.11).
Figure 13.11 In the Internet Properties dialog box, you can specify which dial-up connection to use automatically when an Internet application is started.
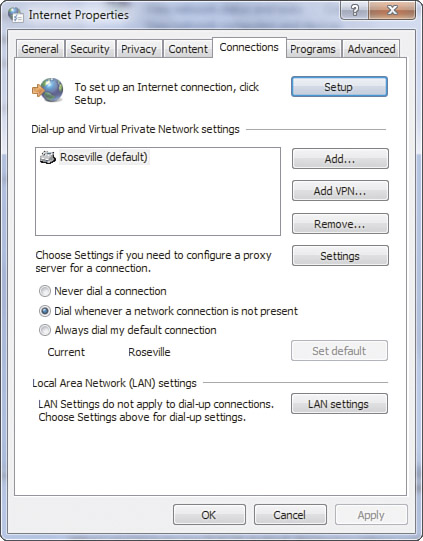
3. If you use a standalone computer or a portable computer that sometimes has Internet access via a LAN, select Dial Whenever a Network Connection Is Not Present.
If you want to use the modem connection even while you’re connected to a LAN, you can select Always Dial My Default Connection.
Finally, if you don’t want Windows to dial automatically and you prefer to make your connection manually, you can choose Never Dial a Connection.
4. If you have actually changed the default dial-up connection, click Set Default.
5. Click OK.
Managing Multiple Internet Connections
Life would be so simple if computers and people just stayed put, but that’s not the way the world works anymore. Portable computers now account for more than half of the computers sold in the United States. Managing Internet connections from multiple locations can be a little tricky.
I talk a bit more about the ins and outs of traveling with your computer in Chapter 34, “Wireless Networking,” and Chapter 35, “Hitting the Road,” where the topics are wireless and remote networking.
The issue comes up with plain Internet connectivity as well, so let me share some tips:
• If you use a LAN Internet connection in the office and a modem connection elsewhere, open the Connections tab of the Internet Properties dialog box and choose Dial Whenever a Network Connection Is Not Present, as I discussed in the previous section, “Changing the Default Connection.”
• If you use different LAN connections in different locations, see “Multiple LAN Connections,” in Chapter 35.
• If you use a dial-up ISP with different local access numbers in different locations, life is a bit more difficult. It would be great if Windows would let you associate a distinct dial-up number with each dialing location, but it doesn’t—dialing locations just adjust the area code and dialing prefixes.
The solution is to make separate connection icons for each location’s access number. After you set up and test one connection, right-click its icon and select Create Copy. Rename the icon using the alternate city in the name; for example, I might name my icons My ISP Berkeley, My ISP Freestone, and so on. Finally, open the Properties dialog box for the new icon and set the appropriate local access number and dialing location.
In this case, it’s best to tell Windows never to automatically dial a connection (as shown earlier in “Changing the Default Connection”) because it will not know which of several connections is the right one to use; it might dial a long-distance number without you noticing.
Moving around from one network to another or one ISP to another can also cause major headaches when you try to send email. The reason is that outgoing email has to be sent from your email program to a mail server called an SMTP server. These servers are set up to reject incoming email from any unidentified user who is not directly connected to or dialed up to their own network. For example, if you have an email program that is set up to send email through your company’s mail server and you try to send mail from home, your company’s server will see that you’re connected from a foreign network—that is, your ISP’s network—and might reject the message, calling it an “attempt to relay mail.”
Likewise, you might experience the same problem if you are set up to send through your ISP’s mail server and then try to send mail from a wireless connection at an Internet café.