chapter 10
Essential Peripherals
“The Macintosh uses an experimental pointing device called a ‘mouse.’ There is no evidence that people want to use these things. I don’t want one of these newfangled devices.”
—JOHN C. DVORAK, CIRCA 1984

In this chapter, you will learn how to
■ Explain how to support multipurpose connectors
■ Identify and install standard peripherals on a computer
■ Identify and install common removable storage devices and their media
Modern computing devices sport a variety of peripherals—stuff you plug into the system unit—that extend and enhance their capabilities. This chapter looks at common ports first, then turns to a laundry list of standard peripherals. The chapter finishes with a discussion of various mass storage devices, such as flash drives and the fading but not yet gone optical disc technologies.
1101
■ Supporting Common Ports
Whenever you’re dealing with a device that isn’t playing nice, you need to remember that you’re never dealing with just a device. You’re dealing with a device and the port to which it is connected. Before you start troubleshooting the device, you need to look at the issues and technologies of some of the more common input/output (I/O) ports and see what needs to be done to keep them running well.

Serial Ports
Techs at times have to support or service older gear, such as installed point-of-sale systems or networking components soldiering on in the background. Many of these old devices connect to computers using serial connections, which use the Recommended Standard 232 (RS232), introduced way back in 1960. A serial port manifests as a 9-pin, D-shell male socket, called a DB9 or an RS232. You won’t find serial ports on anything made in the last decade, but CompTIA thinks they’re important enough to include in the CompTIA A+ 1101 objectives. Figure 10.1 shows a serial connector on a cable and a DB9 port.

• Figure 10.1 DB9 connector and port

USB Ports
Universal serial bus (USB) connects almost every type of peripheral one might consider today. Most folks have used USB ports and USB devices, but let’s go beyond the user level and approach USB as techs.
Understanding USB
The core of USB is the USB host controller, an integrated circuit normally built into the chipset. The host controller acts as the interface between the system and every USB device that connects to it. Connected to the host controller is a USB root hub, the part of the host controller that makes the physical connection to the USB ports. Every USB root hub is a bus, similar in many ways to an expansion bus. Figure 10.2 shows one possible diagram of the relationship between the host controller, root hub, and USB ports.

• Figure 10.2 Host controller, root hub, and USB ports in a typical system
A single host controller supports up to 127 USB devices, though real-life circumstances create sharper limits. Even if a host controller supports a certain number of USB ports, there’s no guarantee that the motherboard maker will supply that many ports. To give a common example, the AMD X370 chipset supports 16 USB ports, but only a few motherboard makers supply that many USB ports.
A USB host controller is the boss (primary) of any device (secondary) that plugs into that host controller. The host controller sends commands and provides power to USB devices. The host controller is upstream, controlling devices connected downstream to it (see Figure 10.3). The host controller is shared by every device plugged into it, so speed and power are reduced with each new device.
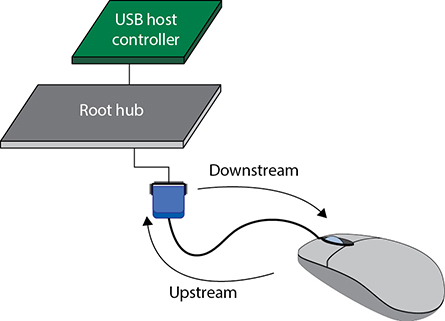
• Figure 10.3 Host controller and USB mouse showing upstream/downstream
USB Standards and Compatibility
When advancing compliance programs, the Universal Serial Bus Implementers Forum (USB-IF) authorizes the use of their USB-IF Platform Interoperability test lab for vendors to test specific USB technology. Products that are early to implement new USB standards are encouraged to attend the USB-IF Platform Interoperability Lab for certification and compliance testing.
Once certified, USB-IF also emphasizes to vendors the importance and value of consistent messaging on USB product packaging, marketing materials, and advertising as the USB standard has gone through many revisions in the past including the following:
■ USB 1.1 was the first widely adopted standard and defined two speeds: Low-Speed USB, running at a maximum of 1.5 Mbps (plenty for keyboards and mice), and Full-Speed USB, running at up to 12 Mbps.
■ The USB 2.0 standard introduced Hi-Speed USB running at 480 Mbps.
■ USB 3.0 is capable of speeds of up to 5 Gbps—ten times faster than USB 2.0. USB 3.0 is marketed as SuperSpeed USB. It’s also referred to as USB 3.1 Gen 1, though not on the CompTIA A+ exams.
■ USB 3.1 can handle speeds up to 10 Gbps. It’s marketed as SuperSpeed USB 10 Gbps or USB 3.1 Gen 2.
■ USB 3.2 supports speeds up to 20 Gbps using a pair of 10-Gbps lanes. This version is labeled “2×2” to represent 2nd generation, 2 lanes.
If you think all of those names and numbers are confusing, you’re right. Table 10.1 provides a quick reference to help you sort it all out.
Table 10.1 USB Standards

USB 2.0 is fully backward compatible with USB 1.1 devices, while USB 3.0/3.1 is backward compatible with USB 2.0 devices. Older devices won’t run any faster than they used to, however. To take advantage of the fastest USB speeds, you must connect a USB device to a USB port at least as fast as the device. Backward compatibility may enable you to use a faster USB device with a slower port, but a quick bit of math tells you how much time you’re sacrificing when you’re transferring a 2-GB file at 480 Mbps instead of 10 Gbps!
Most people want to take advantage of these amazing speeds, but what do you do if your motherboard doesn’t have built-in SuperSpeed USB ports? One option is to add an adapter card like the one shown in Figure 10.4.

• Figure 10.4 USB expansion card
Motherboards capable of both USB 1.1 and USB 2.0 usually share the available USB ports (see Figure 10.5). For every USB port on your computer, a Low-Speed or Full-Speed device uses the USB 1.1 host controller, whereas a Hi-Speed device uses the USB 2.0 host controller.

• Figure 10.5 Shared USB ports for 1.1 and 2
USB 3.0 and 3.1, on the other hand, are different enough from USB 2.0 that they typically use separate host controllers. You can plug older USB devices into a USB 3.0 or 3.1 port, as noted, but they will run at the slower speeds. The only ports that work at 10 Gbps are the USB 3.1 ports (see Figure 10.6).

• Figure 10.6 Shared USB ports for all speeds of USB
Table 10.2 USB Connector Colors

USB devices have built-in processes, called end points, that use USB controller resources. Some devices have just a few end points, while others have many. Unfortunately, the number of end points supported by a USB controller is limited. When enough devices are connected to a controller to exceed the limit, devices may not work and Windows will generate a USB controller resource warning. Fortunately, the fix is simple: move USB devices to another controller. While USB 3.x is faster than USB 2.0 ports, USB 2.0 supports more end points. Moving low-performance devices such as keyboards and mice from USB 3.0 to USB 2.0 ports can free up USB 3.0 end points without affecting performance. If USB resources are low across USB 3.0 devices, move some of the devices to other USB 3.0 controllers.
USB Cables and Connectors
When USB 1.1 was introduced, the standard defined two types of connectors: USB A and USB B. USB A connectors plug upstream toward the host controller (which is why you see them on the PC) and USB B connectors plug downstream into USB devices.
The A and B plugs come in sizes: “standard” USB A/USB B, miniUSB A/miniUSB B, and microUSB A/microUSB B (see Figure 10.7). The mini and microUSB A connectors were basically ignored; most devices come hard wired. The miniUSB B and microUSB B connectors connect smaller devices such as cameras and smartphones.

• Figure 10.7 USB type A and B connectors
The introduction of USB 3.0 required an upgraded USB A connector and new Micro-B (see last connector in Figure 10.7) connectors, capable of handling the much greater speeds. USB 1.1 and 2.0 cables used four-pin connectors, while USB 3.0/3.1 A and B ports and connectors use nine pins. The USB 3 A connector looks exactly like the older USB A connectors, sneaking the new pins into the same old USB A connector.
The USB industry introduced color schemes to identify the different port types (see Figure 10.8). Table 10.2 lists the colors and the standards.

• Figure 10.8 Blue USB 3.0 ports (left) and teal USB 3.1 ports (center)
 Tech Tip
Color Options
It’s not uncommon to see laptops with red, orange, or yellow USB A ports. These are “always on” ports to charge other devices even if the laptop is turned off. There is no standard to these colors.
The keyed USB Standard-A connector has proven remarkably difficult to insert. The long-running joke on it, for example, is that it takes three tries to insert a plug: up position, down position, and then, finally, the superposition (which is the up position when you try it again).
The USB-IF standards body released the universal USB Type-C plug and port to address the problem with A and to unify the connector types. USB Type-C replaces both A and B plugs of all sizes.
USB Type-C uses 24 pins, can be inserted in either orientation, fully supports USB 3.1, and even supports other buses such as Thunderbolt (see “Thunderbolt Ports” later in this chapter). USB Type-C is quickly replacing microUSB as the dominant USB connection for devices (see Figure 10.9).
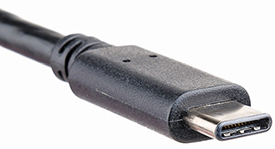
• Figure 10.9 USB Type-C connector
Cable length is an important limitation to keep in mind with USB. USB 1.1 and USB 2.0 specifications allow for a maximum cable length of 5 meters. Although most USB devices never get near this maximum, some devices, such as digital cameras, can come with cables at or near the maximum 5-meter cable length. The USB 3.x standards don’t define a maximum cable length. Because USB is a two-way (bidirectional) connection, as the cable grows longer, even a standard, well-shielded, 20-gauge, twisted-pair USB cable begins to suffer from electrical interference. To avoid these problems, I stick to cables that are no more than about 2 meters long, except in special circumstances. My staff photographer, for example, has a 4.5-meter cable between his camera (at the photo station) and his Mac. It works just fine in the studio.
USB Hubs
Each USB host controller supports up to 127 USB devices, but as mentioned earlier, most motherboard makers provide only six to eight real USB ports. So what do you do when you need to add more USB devices than the motherboard provides ports? You can add more host controllers (in the form of internal cards), or you can use a USB hub. A USB hub is a device that extends a single USB connection to two or more USB ports, almost always directly from one of the USB ports connected to the root hub. Figure 10.10 shows a typical USB hub. USB hubs are often embedded into peripherals. The monitor shown in Figure 10.11 comes with a built-in USB hub—very handy!
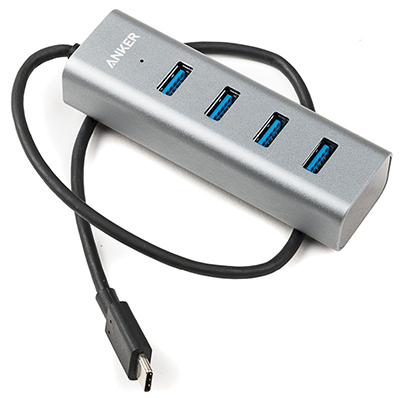
• Figure 10.10 USB hub

• Figure 10.11 Monitor with built-in USB hub
Hubs also come in powered and bus-powered versions. If you choose to use a general-purpose USB hub like the one shown in Figure 10.10, and you have power-hungry devices like external bus-powered hard drives, use a powered hub. A single USB port only provides 500 milliamps of power, which must be split among all the devices connected to an unpowered hub. This means a single power-hungry device connected to the hub can take all the power for itself, starving the other ports of power.
Troubleshooting USB Issues
The biggest troubleshooting challenge you encounter with USB is a direct result of its widespread adoption and ease of use. Pretty much every modern PC comes with multiple USB ports, and anyone can easily pick up a cool new USB device at the local computer store. The problems arise when all of this USB installation activity gets out of control, with too many devices using the wrong types of ports or pulling too much power. Happily, by following a few easy steps, you can avoid or eliminate these issues.
Windows, Linux, Chrome, and macOS include many built-in drivers for USB devices. You can count on the OSs to recognize keyboards, mice, and other basic devices with their built-in drivers. Just be aware that if your new mouse or keyboard has some extra buttons, the default USB drivers might not support them. To be sure I’m not missing any added functionality, I always install the driver that comes with the device or an updated one downloaded from the manufacturer’s Web site.
Another tough issue is power. A mismatch between available and required power for USB devices results in scary error codes and can result in nonfunctioning or malfunctioning USB devices. If you’re pulling too much power, you must disconnect devices off that root hub until the error goes away. Install an add-in USB expansion card if you need to use more devices than your current USB hub supports.
One of the options available to us in Windows is to control USB power when the computer is off. Turning off USB power when the computer is shut down is a good way to conserve battery power, because otherwise the computer is providing power to devices that are not needed when the computer is off. This control is called USB selective suspend. It is controlled through the Control Panel under Power Options in the Advanced settings menu. USB selective suspend can be set differently, depending on whether the computer is plugged in or running on battery. When enabled, USB ports are placed in a low power state when the computer is off and restored to full power function when the computer operates. With USB selective suspend enabled, great power savings are available for portable computers that are connected to power-hungry devices such as USB hard drives.
![]()
There’s one more problem with USB power: sometimes USB devices go to sleep and won’t wake up. Actually, the system is telling them to sleep to save power. You should suspect this problem if you try to access a USB device that was working earlier but that suddenly no longer appears in Device Manager. To fix this, head to Device Manager to inspect the hub’s Properties, then open the Power Management tab and uncheck the Allow the computer to turn off this device to save power checkbox, as shown in Figure 10.12.
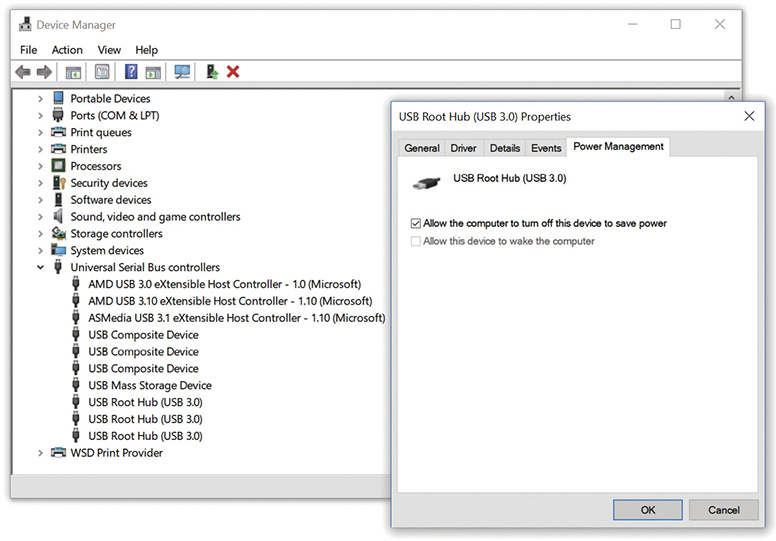
• Figure 10.12 Power Management tab
“My USB port still doesn’t work!” There’s a couple of reasons, besides circuit failure, that can affect all of the USB ports in a computer and that fall under a category that CompTIA calls USB permissions. That’s a highfalutin term that means USB settings in the UEFI/BIOS. Many BIOS setup programs include several settings that impact USB port operations. One setting enables or disables all onboard USB ports. This can be necessary if the USB controller chip on the motherboard fails but the rest of the board still functions. You can add USB ports with an add-on card that has USB ports. The BIOS settings won’t impact USB ports on an add-on card.
Another setting is backward compatibility. We’re used to having USB ports that support older versions of USB. That is typically a default USB configuration that is set in the UEFI/BIOS setup program. But it doesn’t have to be. In some BIOS setup programs, backward compatibility can be disabled. This would prevent USB 2.0 devices from working when plugged into USB 3 ports. If you plug a mouse or keyboard into a USB 3 port and it doesn’t work, troubleshoot by trying it in a USB 2.0 port and by checking the USB settings in the BIOS setup program.
Thunderbolt Ports
Intel and Apple developed Thunderbolt ports as a high-speed alternative to existing technologies such as USB, tapping the PCI Express bus for up to six external peripherals (Thunderbolt functions alongside USB these days.) PC developers have adopted the technology, and you will find it standard on many laptop and desktop systems these days. If you have a custom-built PC, assuming your motherboard is Thunderbolt-ready, you can readily upgrade by purchasing PCIe Thunderbolt cards. Thunderbolt supports video (up to a single 4K video monitor—see Chapter 17) and audio signals. It handles data storage devices just fine, too.
Thunderbolt 1 and Thunderbolt 2 connect computing devices with a Mini DisplayPort (mDP) connector. Thunderbolt 3 uses a USB Type-C connector. Thunderbolt can use copper or fiber cabling. With copper, Thunderbolt chains can extend up to 3 meters. With fiber, on the other hand, a Thunderbolt chain can extend up to 60 meters.
Even though both USB and Thunderbolt use the same USB Type-C connector, they are not compatible, prompting manufacturers to mark their ports with clear logos (see Figure 10.13).

• Figure 10.13 Thunderbolt and USB logos
And did I mention that Thunderbolt offers amazing bandwidth? Thunderbolt 1 runs full duplex at 10 Gbps, so it compares to USB 3.1. Thunderbolt 2 combines internal data channels, enabling throughput at up to 20 Gbps. Thunderbolt 3 offers throughput up to 40 Gbps at half the power consumption of Thunderbolt 2. Nice!
General Port Issues
No matter what type of port you use, if it’s not working, you should always check out a few issues. First of all, make sure you can tell a port problem from a device problem. Your best bet here is to try a second known-good device in the same port to see if that device works. If it does not, you can assume the port is the problem. It’s not a bad idea to reverse this and plug the device into a known-good port.
If you’re pretty sure the port’s not working, you can check a few things: first, make sure the port is turned on. Almost any I/O port on a motherboard can be turned off in system setup. Reboot the system and find the device and see if the port’s been turned off. You can also use Windows Device Manager to enable or disable most ports. Figure 10.14 shows a disabled USB controller in Device Manager; you’ll see a small down-pointing arrow in Windows. To enable the port, right-click the device’s icon and choose Enable.

• Figure 10.14 Disabled USB controller in Device Manager in Windows 10 and 11
Ports need drivers just as devices need drivers. All operating systems have excellent built-in drivers for all common ports, so if you fail to see an active port (and you know the port is enabled in system setup), you can bet the port itself has a physical problem.
 Try This!
Expansion Opportunities
Manufacturers constantly update and produce expansion cards and peripherals to give consumers the latest technology, so try this! Check your system for USB or Thunderbolt ports. What does it have? Then go to an online retailer such as https://www.newegg.com and search for upgrades. Can you get a PCIe USB 3.1 card with Type-C ports? What about an add-on Thunderbolt card? As a related search, check the availability of powered and unpowered USB hubs. What variations can you get?
■ Common Peripherals
Peripherals enhance the capabilities of computing devices. Common peripherals include keyboards and mice, but there are many more. The CompTIA A+ 220-1101 exam explores a lot of peripherals. Here’s a list for this chapter:
■ Keyboards
■ Pointing devices (mouse and touchpad)
■ Biometric devices
■ Smart card readers
■ Barcode scanners/QR scanners
■ Touchscreens
■ KVM switches
■ Game controllers and joysticks
■ Digitizers
■ Multimedia devices
■ Digital cameras
■ Webcams
■ Sound processors, speakers, and microphones
You probably don’t use all of these “common” devices every day, so I’ll cover each of them in detail. (Later chapters explore other common peripherals, such as video capture cards, TV tuners, printers, and scanners.)
Keyboards
The keyboard is both the oldest and still the primary way you input data into a PC. All modern operating systems come with perfectly good drivers for any keyboard, although some fancier keyboards may come with specialized features (screens, lights, programmable keys) that require special drivers to operate properly.
Tech Tip
Wireless Keyboards and Batteries
Wireless keyboards remove the cable between you and the PC. Make sure to keep a complete set of spare batteries around.
Modern keyboards connect via USB port, whether wired or wireless. In the last few years there’s been a resurgence of the ancient but fast PS/2 port. Figure 10.15 shows a combination mouse/keyboard PS/2 port on a modern motherboard.
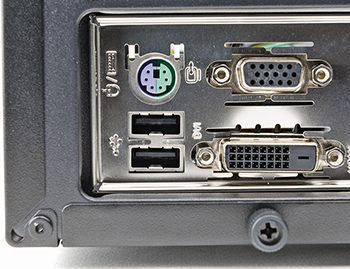
• Figure 10.15 Combination mouse/keyboard PS/2 (circular connector, top left)
There’s not much to do to configure a standard keyboard. The only configuration tool you might need in Windows is the Keyboard Control Panel applet. This tool enables you to change the repeat delay (the amount of time you must hold down a key before the keyboard starts repeating the character), the repeat rate (how quickly the character is repeated after the repeat delay), and the default cursor blink rate. Figure 10.16 shows the default Windows Keyboard Properties dialog box. Some keyboard makers provide drivers that add extra tabs.

• Figure 10.16 Keyboard Control Panel applet
Windows and Linux share the same standard QWERTY keyboards, including the CTRL and ALT modifier keys that enable you to do certain keyboard shortcuts. (Press CTRL-Z to undo an action, for example.) Windows-specific keyboards also come with the WINDOWS LOGO modifier key. Apple keyboards have three modifier keys: CONTROL, OPTION, and COMMAND. The first two correspond to CTRL and ALT; the COMMAND key is the macOS special modifier key. You can use Windows keyboards with macOS, but you need to go into the Keyboard preferences in System Preferences to map the modifier keys properly (see Figure 10.17).

• Figure 10.17 Keyboard options in macOS System Preferences
Keyboards might be easy to install, but they do fail occasionally. Given their location—right in front of you—the three issues that cause the most keyboard problems stem from spills, physical damage, and dirt.
Spilling a soda onto your keyboard can make for a really bad day. If you’re quick and unplug the keyboard from the PC before the liquid hits the electrical components, you might be able to save the keyboard. It’ll take some cleaning, though. More often than not, you’ll get a sticky, ill-performing keyboard that is not worth the hassle—just replace it!
Other common physical damage comes from dropping objects onto the keyboard, such as a heavy book (like the one in your hands). This can have bad results! Most keyboards are pretty resilient, though, and can bounce back from the hit.
Clean grime off the keys by using a cloth dampened with a little water, or if the water alone doesn’t do the job, use a bit of isopropyl alcohol on a cloth (see Figure 10.18).

• Figure 10.18 Cleaning keys
Dirty keys might be unsightly, but dirt under the keys might cause the keyboard to stop working completely. When your keys start to stick, grab a bottle of compressed air and shoot some air under the keys. Do this outside or over a trash can—you’ll be amazed how much junk gets caught under the keys!
The bottom line when it comes to stuck keys is that the keyboard’s probably useless with the stuck key, so you might as well try to clean it. Worse comes to worst, you can always buy another keyboard.
Pointing Devices
Have you ever tried to use Windows, Chrome, or macOS without a mouse or other device to move the cursor? It’s not fun, but it can be done. All techs eventually learn the navigation hot keys for those times when mice fail, but all in all we do love our mice. There are two common pointing devices, mice and touchpads. A mouse moves the cursor as you move the mouse; a touchpad moves the cursor as you move your fingers over its surface.
Now you can get the best of both by using what’s called a multi-touch gesture. A gesture is a combination of using a mouse, touchpad, or finger movements and mouse clicks to perform a function. With two fingers together, for example, you can scroll up and down on a page by moving your fingers up and down on the touchpad. Have a bunch of Windows open and want see them all at once? With three fingers swipe up on the touchpad. See something interesting on a Web page or PDF? Pinch in with two fingers to zoom in; then spread your fingers to zoom out just like on your phone.
Apple’s Magic Trackpad and Microsoft’s Precision Touchpad have both upped the ante in the area of multi-touch gestures. Many of the gestures come directly from multi-touch phones and tablets and will be the same on macOS, Chrome, and Windows. But each OS does have a few unique gestures, so make sure to head over to the respective Web sites of Apple and Microsoft for an up-to-date list.
In Windows, you can adjust your mouse or touchpad settings through the Mouse Control Panel applet or Settings app. Figure 10.19 shows the Windows 10 Settings app and Control Panel applet. macOS has both Mouse and Trackpad applets in System Preferences.

• Figure 10.19 Mouse Settings and Control Panel applet
Modern pointing devices require little maintenance and almost never need cleaning, as the optics that make them work are never in contact with the grimy outside world. On the rare occasion where an optical mouse begins to act erratically, try using a cloth or damp cotton swab to clean out any bits of dirt that may be blocking the optics (see Figure 10.20).

• Figure 10.20 Cleaning an optical mouse
Biometric Devices
Biometric devices scan and remember unique aspects of various body parts, such as your iris, face, head image, or fingerprint, using some form of sensing device. This information is used as a key to prevent unauthorized people from accessing whatever the biometric device is securing. Chrome, macOS, and Windows 10 and 11 have built-in support for using biometrics like fingerprint scanners (see Figure 10.21) and facial recognition to secure user accounts. Windows uses Windows Hello to manage biometric authentication; in Figure 10.22, I’m training my system to recognize my face using a Windows Hello–compatible infrared camera.

• Figure 10.21 Laptop with built-in fingerprint scanner

• Figure 10.22 Training Windows Hello facial recognition
Biometric security is very common with smartphones. Both Apple and Android vendors support fingerprint scanners for phones that have that feature. This replaces password/PIN security. Figure 10.23 shows the Android fingerprint scanner learning a new fingerprint. When asked by Android or an application, you simply press your finger against the fingerprint scanner. It confirms your identity (assuming your fingerprint matches), and then special software that comes with the scanner supplies your credentials.

• Figure 10.23 Fingerprint scanner on an Android phone
Biometric devices are also used for recognition. Recognition is different from security in that the biometric device doesn’t care who you are; it just wants to know what you’re doing. The best example of this is voice recognition. Voice recognition programs convert human voice input into commands or text. Apple, Microsoft, and Google use voice recognition in many forms, including Siri in iOS and Cortana in Windows 10 and 11 (both can respond to input for searching and other functions). Google uses voice recognition in its flagship office productivity app, Google Docs, so students can speak in addition to typing.
No matter what biometric device you use, you use the same steps to make it work:
1. Install the device.
2. Register your identity with the device by following the setup routine to register your unique fingerprints, retina, face, etc.
3. Configure software to tell the device what to do when it recognizes your scanned identity.
Barcode Scanner/QR Scanner
Barcode scanners read standard Universal Product Code (UPC) barcodes or Quick Response (QR) codes (see Figure 10.24), primarily to track inventory. Scanners enable easy updating of inventory databases stored on computing devices.

• Figure 10.24 UPC code (left) and QR code (right)
Two types of barcode scanners are commonly found with personal computers: pen scanners and hand scanners. Pen scanners look like an ink pen and must be swiped across the barcode (see Figure 10.25). Hand scanners are held in front of the UPC code while a button is pressed to scan. All barcode scanners emit a tone to let you know the scan was successful.
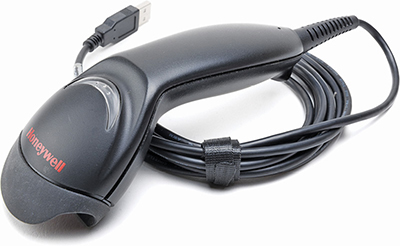
• Figure 10.25 Barcode hand scanner
Barcode scanners use USB ports or go wireless. No configuration is usually necessary, other than making sure that the barcode scanner works with whatever database or point-of-sale software you use.
Touchscreens
A touchscreen is a monitor with some type of sensing device across its face that detects the location and duration of contact, usually by a finger or stylus. All touchscreens then supply this contact information to the PC as though it were a click event from a mouse. Touchscreens are used in situations for which conventional mouse/keyboard input is either impossible or impractical:
■ Smartphones
■ Smart watches
■ Fitness monitors
■ Information kiosks
■ Point-of-sale systems
■ Tablets
■ E-readers
Touchscreens can be separated into two groups: built-in screens like the ones in smartphones, and standalone touchscreen monitors like those in many point-of-sale systems. From a technician’s standpoint, you can think of a standalone touchscreen as a monitor with a built-in mouse. These touchscreens have a separate USB port for the “mouse” part of the device, along with drivers you install just as you would for any USB mouse.
Windows includes a Control Panel applet for configuring the touchscreens on tablet PCs, such as the Microsoft Surface. Windows also has a Tablet applet in Settings that has Tablet Mode options for standard touchscreen–enabled computers, including many laptops (see Figure 10.26). You can use these applets to adjust how you interact with the touchscreen just as you would with the Mouse or Keyboard applets. The applets enable you to configure what happens when you tap, double-tap, use gestures called “flicks,” and more.
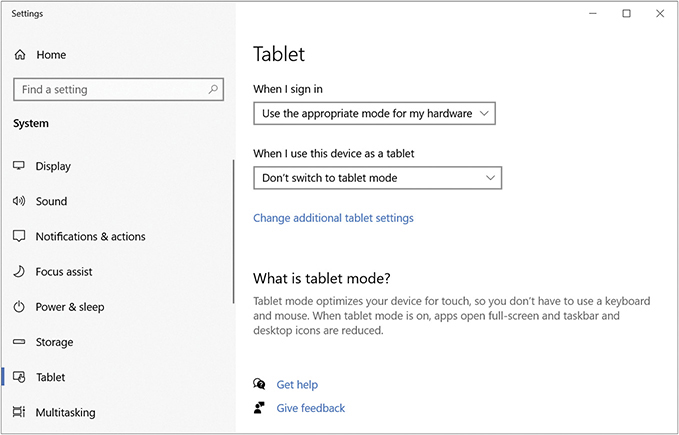
• Figure 10.26 Tablet Mode in Windows 10 and 11 Settings
KVM Switches
A keyboard, video, mouse (KVM) switch is a hardware device that most commonly enables multiple computers to be viewed and controlled by a single mouse, keyboard, and screen. Some KVM switches reverse that capability, enabling a single computer to be controlled by multiple keyboards, mice, or other devices. KVM switches are especially useful in data centers where multiple servers are rack mounted, space is limited, and power is a concern. An administrator can use a single KVM switch to control multiple server systems from a single keyboard, mouse, and monitor.
There are many brands and types of KVM switches. Some enable you to connect to only two systems, and some support hundreds. Some even come with audio output jacks to support speakers. Typical KVM switches come with two or more sets of wires that are used for input devices such as PS/2 or USB mice and video output (see Figure 10.27).

• Figure 10.27 A typical KVM switch
To use a KVM switch, you simply connect a keyboard, mouse, and monitor to the KVM switch and then connect the KVM switch to the desired computers. Once connected and properly configured, assigned keyboard hotkeys—a combination of keys typically assigned by the KVM switch manufacturer—enable you to toggle between the computers connected to the KVM switch. In most cases, you simply tap the SCROLL LOCK key twice to switch between sessions.
Installing a KVM switch is not difficult; the most important point to remember is to connect the individual sets of cables between the KVM ports and each computer one at a time, keeping track of which keyboard, mouse, and video cable go to which computers. (I highly recommend labeling and using twist or zip ties.)
If you get the connections wrong, the KVM switch won’t function as desired. If you connect a mouse and keyboard wires to the correct KVM port, for example, but attach the same computer’s video cable to a different port on the KVM switch, you won’t get the correct video when you try to switch to that computer. The same holds true for the mouse and keyboard cables. Don’t cross the cables!
Game Controllers and Joysticks
Whether you’re racing through tight turns at top speeds or flying a state-of-the-art jet fighter, having the right controller for the job is important for an enjoyable gaming experience. Two peripherals are commonly used for controlling PC games, game controllers and joysticks.
Some PC games, especially those that were designed to be played on consoles like the Microsoft Xbox or Sony PlayStation, are best enjoyed when using a game controller. A game controller has an array of buttons and triggers to affect movement and actions on the screen (see Figure 10.28).

• Figure 10.28 Xbox wireless game controllers
Over the past decade, flight simulator programs have declined in popularity, and so have joysticks (see Figure 10.29). Once a required component of a gamer’s arsenal, you only need joysticks now if you are a serious flight simulator fan. Most modern games are controlled by game controller or mouse and keyboard.
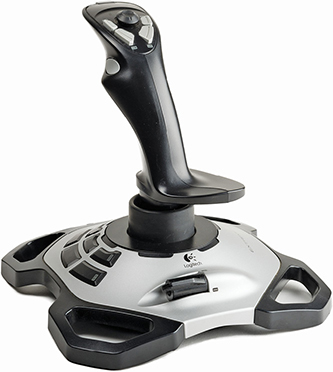
• Figure 10.29 A joystick
Game controllers and joysticks have used plenty of connectors over the years, including the eponymous joystick connector. These days, they all connect to computers via USB or wireless connections. Depending on the complexity of the controller, you may need to install drivers to get a game controller or joystick working.
You’ll need to configure a game controller or joystick to make sure all the buttons and controls work properly. In Windows, go to the Devices and Printers applet. Depending on your game controller or joystick, you’ll be able to configure the buttons, sticks, triggers, and more (see Figure 10.30). You can calibrate the analog sticks so they accurately register your movements. You can even adjust the amount of vibration used by the controller’s force feedback (if available). Force feedback adds vibration or resistance to the controller to mirror what’s happening in the game.

• Figure 10.30 Game controller properties
Once you’ve set up your controller, you should be ready to take to the skies, or the streets, or wherever else you go to game.
Digitizers
PCs and Macs have quickly become the most powerful and flexible tools available for visual artists. Given the number of applications dedicated to producing various visual styles—including painting, sketching, animation, and more—digital art stands toe-to-toe with its more traditional counterpart. It’s only reasonable that a category of hardware would appear to help users take advantage of these tools.
A digitizer (otherwise known as a pen tablet) enables users to paint, ink, pencil, or otherwise draw on a computer (see Figure 10.31). Now, don’t get carried away and start taking watercolors to your monitor. The digitizer receives input using a special surface. When a user presses against the surface, usually with a stylus or touch pen, the surface transforms (or digitizes) the analog movements into digital information. The drawing application receives the information from the digitizer and turns it into an image onscreen (see Figure 10.32). If you draw a line on the digitizer, for example, that line should appear onscreen.

• Figure 10.31 A type of digitizer known as the Wacom pen tablet

• Figure 10.32 Drawing with a digitizer
Most digitizers connect via a USB or wireless connection. You’ll need to install drivers before you connect the device, although they should be included in the box. The digitizer should also include a configuration utility. Here you can adjust the pressure sensitivity of the stylus, configure buttons on the tablet, and set the portion of the screen to which the tablet can draw.
People interact with simple digitizer technology a lot in the form of signature pads, devices that enable you to sign your name and have that signature converted to digital. Every time you sign a credit card pad, for example, you use a signature pad.
Multimedia Devices and Formats
Multimedia devices like digital cameras and webcams enable sharing of photographs and video chats with friends and family around the world. Almost all mobile devices come with some capability to produce and record multimedia.
Digital Cameras
Digital cameras capture every moment of life today and are essential tools for everything from note-taking to capturing your child’s first steps. Because digital cameras seem to be integrated with every new gadget, I need to clarify that this section will be talking about dedicated cameras. Because these digital cameras interface with computers, CompTIA A+ certified techs need to know the basics.
Storage Media Digital cameras save pictures and videos onto some type of removable storage media. The most common removable storage media used in modern digital cameras is the Secure Digital (SD) card (see Figure 10.33). Consumer digital cameras are fading because we all have one built into our smartphones. The days of the SD card have become numbered in favor of smaller, faster, and higher capacity digital cards. There are others you might run across as you get into professional cameras. (For details about removable storage media, see the discussion in the “Storage Devices” section later in this chapter.)

• Figure 10.33 Secure Digital card
Connection Digital cameras either plug directly into a USB port (see Figure 10.34) or connect to a Wi-Fi network. Another common option is to connect the camera’s storage media to the computer, using one of the many digital media readers available.

• Figure 10.34 Camera connecting to USB port
You can find readers designed specifically for SD cards, as well as other types. Plenty of readers can handle multiple media formats. Many computers come with a decent built-in SD card reader (see Figure 10.35).

• Figure 10.35 Digital media reader built into computer
Webcams
Cameras in or on computer monitors, often called webcams because their most common use is for Internet video communication, enable people to interact over networks with both voice and video. Webcams range greatly in quality and price.
Webcams vary in both image and sound capture quality. Because webcams are mostly used for video chat, they tend to be marketed similar to other video cameras using terms like 720p, HD, and 4K. The most common dedicated webcams today provide a 1080p experience.
Figure 10.36 shows two of my editors chatting via webcam using Microsoft Teams.

• Figure 10.36 Video chatting by webcam with Teams
Most people who use online video also want a microphone. Many webcams come with microphones, or you can use a standalone device. Those who do a lot of video chatting may prefer to get a good-quality headset with which to speak and listen.
Sound Components
Virtually every computing device today comes with four critical components for capturing and outputting sound: a sound device built into the motherboard or a dedicated sound card, speakers, microphone, and recording/playback software. This section explores each component. But let’s start with how digital devices (computers) deal with analog input/output (sound waves).
Analog to Digital (and Vice Versa) Sound Computers capture (record) sound waves in electronic format through a process called sampling. In its simplest sense, sampling means capturing the state or quality of a particular sound wave a set number of times each second. The sampling rate is measured in units of thousands of cycles per second, or kilohertz (KHz). The more often a sound is sampled, the better the reproduction of that sound. Most sounds in computing are recorded with a sampling rate ranging from 11 KHz (very low quality, like an ancient telephone) to 192 KHz (ultra-high quality, better than the human ear).
Tech Tip
Sound Terminology
Every modern motherboard comes with sound-processing capabilities built in. Techs refer to built-in sound as built-in sound, even when there’s no expansion card for sound. People use dedicated sound card expansion cards for specific tasks, such as turning a computer into a recording studio device. For typical use, the built-in sound suffices for most users.
Sounds vary according to their loudness (amplitude), how high or low their tone (frequency), and the qualities that differentiate the same note played on different instruments (timbre). All the characteristics of a particular sound wave—amplitude, frequency, timbre—need to be recorded and translated into ones and zeros to reproduce that sound accurately within the computer and out to your speakers.
The number of characteristics of a particular sound captured during sampling is measured by the bit depth of the sample. The greater the bit depth used to capture a sample, the more characteristics of that sound can be stored and thus re-created. An 8-bit sample of a Slash guitar solo, for example, captures 28 (256) characteristics of that sound per sample. It would sound like a cheap recording of a recording, perhaps a little flat and thin. A 16-bit sample, in contrast, captures 216 (65,536) different characteristics of his solo and reproduces all the fuzzy overtones and feedback that gives Slash his unique sound.
The last aspect of sound capture is the number of tracks of sound you capture. Most commonly, you can capture either a single track (monaural) or two tracks (stereo). More advanced captures record many more sound tracks, but that’s a topic for a more advanced sound capture discussion.
The combination of sampling frequency and bit depth determines how faithfully a digital version of a sound captures what your ear would hear. A sound capture is considered CD quality when recorded at 44.1 KHz, with 16-bit depth and in stereo. Most recording programs let you set these values before you begin recording. Figure 10.37 shows the configuration settings for Audacity, a free and powerful sound recording and editing tool.

• Figure 10.37 Audacity�s quality settings
Recorded Sound Formats Audio files have numerous file formats, both uncompressed and compressed. The granddaddy of all sound formats is pulse code modulation (PCM). PCM was developed in the 1960s to carry telephone calls over the first digital lines. With just a few minor changes to allow for use in PCs, the PCM format is still alive and well, although it’s better known as the WAV format in the PC world. WAV files are great for storing faithfully recorded sounds and music, but they do so at a price. WAV files can be large, especially when sampled at high frequency and depth. A 4-minute song at 44.1 KHz and 16-bit stereo, for example, weighs in at a whopping 40-plus MB.
What’s interesting about sound quality is that the human ear cannot perceive anywhere near the subtle variations of sound recorded at 44.1 KHz and 16-bit stereo. Clever programmers have written algorithms to store full-quality WAV files as compressed files, discarding unnecessary audio qualities of that file. These algorithms—really nothing more than a series of instructions in code—are called compressor/decompressor programs or, more simply, codecs. You’ve most likely encountered the Fraunhoffer MPEG-1 Layer 3 codec, more often called by its file extension, MP3. Today there are many common formats, one of the most popular ones being Advanced Audio Encoding (AAC), the format used for Apple iPhone and iPad, YouTube Music, and more.
Streaming media is a data file that is downloaded and played on your computer and immediately discarded. Streaming media is incredibly popular and has spawned an entire industry of Internet radio stations and music services.
Speaker Support You’d be hard pressed to find a motherboard without built-in sound (see Figure 10.38). Every motherboard at the very least supports two speakers or a pair of headphones, but most motherboards support five or more speakers in discrete channels. These multiple speakers provide surround sound—popular not only for games but also for those who enjoy watching movies on their personal computers. The motherboard shown in Figure 10.39, for example, has outputs for many speakers.

• Figure 10.38 A motherboard with multiple speaker connections
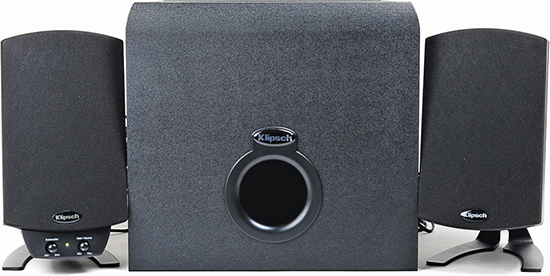
• Figure 10.39 A 2.1 speaker set
Another popular speaker addition is a subwoofer. A subwoofer provides the amazing low-frequency sounds that give an extra dimension to your movies, music, and games. Almost all modern systems support both surround sound and a subwoofer and advertise this with a nomenclature such as Dolby Digital or DTS. The nomenclature for multiple speakers follows a simple format, the number of speakers plus the subwoofer. A 2.1 system, for example, has two satellite speakers and a sub (see Figure 10.39). A 5.1 system has five satellites and a sub.
Jacks Virtually every system comes with at least three connections, called jacks when used with sound: one for a stereo speaker system, one for a microphone, and one for a secondary input called line in. If you look at the back of a motherboard with built-in sound, you’ll invariably see at least these three connections. On most systems, the main stereo speaker jack is green, the line in jack is blue, and the microphone jack is pink. You’ll often find plenty of other connectors as well. Refer back to Figure 10.39.
Here’s a list of some of the standard audio jacks:
■ Main speaker out Just what it sounds like, the main speaker output is where you plug in the standard speaker connector.
■ Line out Some systems will have a separate line out jack that is often used to connect to an external device such as a DVD or MP3 player. This enables you to output sounds from your computer.
■ Line in The line in port connects to an external device such as a DVD or MP3 player to enable you to import sounds into your computer.
■ Rear out The rear out jack connects to the rear speakers for surround sound audio output.
■ Analog/digital out The multifunction analog/digital out jack acts as a special digital connection to external digital devices or digital speaker systems, and it also acts as the analog connection to center and subwoofer channels.
■ Microphone The microphone port connects to an external microphone for voice input.
Many sound processors also come with a special Sony/Philips Digital Interface (S/PDIF or SPDIF) connector that enables you to connect your sound card directly to a 5.1 speaker system or receiver (see Figure 10.40). Using a single S/PDIF instead of a tangle of separate wires for each speaker greatly simplifies your sound setup. S/PDIF connections come in two types, optical and coaxial. The optical variety looks like a square with a small door (at right in Figure 10.40). The coaxial is a standard RCA connector (at left), the same type used to connect a DVD player to your stereo. It doesn’t matter which one you use; just make sure you have an open spot on your receiver or speakers.

• Figure 10.40 S/PDIF connectors
Configure speakers and speaker settings with the Sound applet/preferences. (Go to the Control Panel in Windows; System Preferences in macOS.)
Tech Tip
Audio over HDMI and DisplayPort
Both HDMI and DisplayPort are capable of carrying audio to, say, a TV or stereo receiver. This is very handy as you only need one cable for audio and video, making everything nice and tidy. If you have a video card that can send audio over HDMI/DisplayPort, its ports will be listed as playback devices along with your traditional speaker and S/PDIF ports in the Windows Settings/Sound dialog (Windows 10 and 11) and Sound applet (all versions) in the Control Panel.
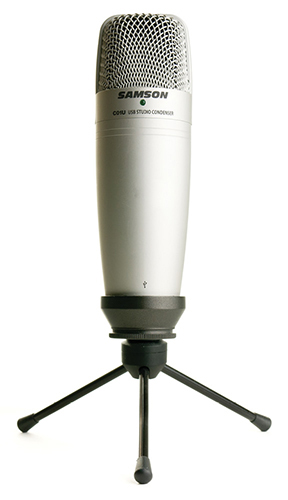
Microphones Speakers are great for listening to music, but what if you’re a musician looking to record your own music? Or, more likely, an office worker needing to jump on a Zoom call? In either of these cases, you’ll need a microphone of some sort to get audio into your computer. Assuming your computer doesn’t already have a microphone built in, you’ll need to connect an external one via USB (see Figure 10.41), built-in audio interface, or sound card. A microphone records sound by turning vibrations into an electronic signal. Microphones are mainly used for recording voices, though you can easily record any other sounds.
• Figure 10.41 A large-diaphragm USB microphone
Headsets If you want to listen to music without disturbing others or if you want to chat with your friends over Discord while gaming (see Figure 10.42), you’ll probably want a headset. Headsets come with or without a microphone and use the same connectors as speakers and microphones. Headsets without microphones more commonly use 1/8-inch RCA jacks, while headsets with microphones more commonly use USB, although there are many exceptions to that rule.

• Figure 10.42 Headsets are great for gaming.
Many systems have moved to dedicated USB audio boxes for recording or listening. Figure 10.43 shows a USB audio interface, the Focusrite Scarlett 2i2 (left), and a Schiit digital-to-analog converter (DAC) for listening to music.
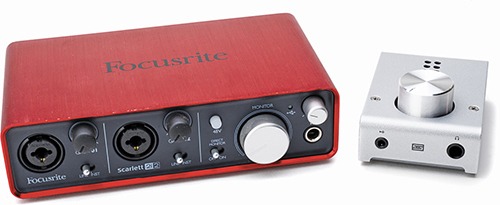
• Figure 10.43 Scarlett audio interface and Schiit DAC
Video Formats
Video files can be massive, so let’s take a moment to see how video files are stored. With an audio file, as discussed earlier, this is a simple process. You pick a format such as AAC and save the file. Video is far more complicated.
A video is two or more separate tracks—moving picture and audio—that each go through a compression algorithm (codec). Otherwise, the resulting files would be huge, even for short videos. The compressed tracks then get wrapped up into a container file, what’s often called a wrapper. When you receive a file saved in a standard wrapper, such as .MOV for a QuickTime Movie file, you have no way to know for certain which codecs were used to compress the video or audio tracks inside that container file (see Figure 10.44).

• Figure 10.44 A standard container file holds multiple tracks, each encoded separately.
Codecs Video files use standard audio codecs for the audio tracks, such as WAV or MP3, but vary wildly in the type of video codecs used. Just as with audio codecs, video codecs take a video stream and compress it by using various algorithms. Here are some of the standard video codecs:
■ MPEG-2 Part 2, used for DVDs and broadcast TV.
■ H.264, used for everything from smartphone video and streaming video to Blu-ray movies.
■ H.265, half the size of H.264 at the same quality. Used to support 4K video.
■ VP9, Google’s competitor to H.265, used in places like Android devices.
■ AV1, another competitor to H.265, designed by a group of companies including Amazon, Intel, Microsoft, and Google. YouTube is one of its main users.
Wrappers When both the video and audio streams of your video file are compressed, the file is placed into some sort of container file or wrapper. The key thing to note here is that the wrapper file doesn’t necessarily specify how the video or audio tracks were encoded. You can look at two seemingly identical movie files—for example, both saved with the .MP4 file extension—and find that one will play audio and video just fine in Windows Media Player, but the other one might play only the audio and not the video because Media Player lacks the specific codec needed to decode the video stream. Here are some of the more common video wrappers you might run across:
■ AVI (note this ends in the letter “I”, not numeral 1), a container file for Windows (not used much these days)
■ MOV, the standard format for Apple QuickTime
■ MP4, probably the most common format these days, used for H.264 and H.265 video
■ MKV, the Matroska Multimedia Container, a free and open container format with native support in Windows 10 and 11
■ Removable Storage Devices
Removable media refers to any type of mass storage device that you may use in one system and then easily remove from that system and use in another. Today’s highly internetworked computers have reduced the need for removable media as a method of sharing programs and data, but removable media has so many other uses that it’s still going strong. Removable media is the perfect tool for software distribution, data archiving, and system backup.
This section covers the most common types of removable media used today. For the sake of organization, the removable media types are broken down into these groups:
■ Flash memory From USB thumb drives to flash memory cards
■ Optical discs Any shiny disc technology, such as DVDs and Blu-ray Discs
We can add external drives to this mix, meaning any hard drive, SSD, or optical drive that connects to a PC via an external cable. These drives manifest just like an internal drive, as you studied in Chapter 8 and Chapter 9, so there’s nothing special to discuss here.
Flash Memory
Flash memory, the same flash memory that replaced ROM chips for system BIOS, found another home in personal computing devices in the form of removable mass storage devices. Flash memory comes in two families: USB thumb drives and memory cards. USB thumb drives are flash devices that have a standard USB connector. Memory card is a generic term for a number of tiny cards used in cameras, smartphones, and other devices. Both of these families can manifest themselves as drives in modern OSs, but they usually perform different jobs. USB thumb drives have replaced virtually all other rewritable removable media as the way people transfer files or keep copies of important programs. My thumb drives (yes, I have two on me at all times) keep backups of my current work, important photos, and a stack of utilities I need to fix computers. Memory cards are very small and make a great way to store data on cameras and smartphones and then transfer that data to your computer.
Flash Drives
Moving data between computers has historically been a pain, but USB flash memory drives, also known as thumb drives, jump drives, and flash drives, make the process much easier (see Figure 10.45). For a low price, you can get a 128-GB USB flash memory drive that holds a ton of data.

• Figure 10.45 Thumb drives
The smallest thumb drives are slightly larger than an adult thumbnail; others are larger and more rounded. The drives are hot-swappable in all modern operating systems. You simply plug one into any USB port and it appears in File Explorer or on the Desktop as a removable storage device. After you plug the drive into a USB port, you can copy or move data to or from the drive and then unplug the unit and take it with you. You can read, write, and delete files directly from the drive. Because these are USB devices, they don’t need an external power source. The nonvolatile flash memory is solid-state, so it’s shock resistant and is supposed to retain data safely for a decade.
Current systems enable you to boot from a thumb drive, replacing the traditional CDs and DVDs with fast flash drives. Most of the classic bootable-utility-CD makers have created USB versions that seek out your thumb drive and add an operating system with the utilities you wish to use.
Memory Cards
Memory cards are the way people store data on small appliances. Memory cards come in several formats, so let’s start by making sure you know the more common ones.
CompactFlash CompactFlash (CF) is the oldest removable flash media card standard (see Figure 10.46). CF cards come in two sizes: CF I (3.3 mm thick) and CF II (5 mm thick). CF II cards are too thick to fit into CF I slots.
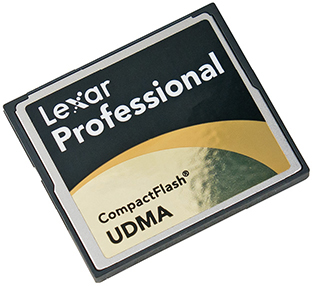
• Figure 10.46 CF card
Secure Digital Secure Digital (SD) cards, as mentioned earlier, are common but becoming less so. About the size of a postage stamp, you’ll see SD cards in just about any type of device that uses flash media.
In addition to full-size SD cards, there are two smaller forms called mini Secure Digital (miniSD) cards and micro Secure Digital (microSD) cards. Today the miniSD format has fallen out of use, but full-size SD is still popular in cameras, and microSD is often found in other small devices where its small size is an advantage. Figure 10.47 shows the full-size and micro forms of SD cards.

• Figure 10.47 SD and microSD cards
SD cards come in three storage capacities. Standard SD cards store from 4 MB to 4 GB, Secure Digital High Capacity (SDHC) cards store 4 GB to 32 GB, and Secure Digital Extended Capacity (SDXC) cards have a storage capacity of 32 GB to 2 TB. Early SD card readers and devices cannot read the SDHC or SDXC cards, though the latter standards provide backward compatibility.
When it comes to figuring out how fast a given SD card is, things start to get complicated. Card speeds matter when it comes to intensive uses like high-quality video and high-resolution or high-speed photography.
To try and make it easy for users to pick a card that will be fast enough for their use, the people behind the SD cards have created a few standards to communicate performance. These standards roughly break down into three different generations. The first-generation cards use the speed class (2, 4, 6, and 10) ratings to indicate the card’s minimum MB/s write speed; a Class 10 card should write at a minimum of 10 MB/s.
The second generation of speed ratings coincided with the introduction of the new Ultra High Speed (UHS) bus. These cards use the UHS Speed Class standard; Class U1 cards should both read and write at a minimum of 10 MB/s, while U3 cards should read and write at a minimum of 30 MB/s.
The third generation of performance standards is the Video Speed Class. These standards are designed to support the newest video standards such as 4K and even 8K. The slowest class is V6, supporting 6 MB/s, but it goes all the way up to V90, which guarantees 90 MB/s write speed. If this wasn’t confusing enough, modern cards often sport indicators for more than one (if not all) of these speed rating systems.
 Cross Check
IOPS
You read about IOPS back in Chapter 8 in the context of examining performance of other mass storage devices, so cross check your memory now. Does the discussion of IOPS refer primarily to HDDs or SSDs? How does the performance of either type of drive compare with the IOPS of a fast SDXC card, such as a class A2?
But wait, there’s more! The speed classes we’ve looked at guarantee that a card can continuously write at the indicated rate or higher. Ratings like this are critical for figuring out whether a card can keep up with a device like a video camera. But these days, SD cards are just as likely to be used in a smartphone as they are in a camera. That’s where the Application Performance Class ratings come in. This standard has two classes, A1 and A2. They both support a minimum of 10 MB/s sustained write. Where they differ is how many input/output operations per second (IOPS) the card can do. The A1 class can sustain 1500 IOPS while reading and 500 IOPS while writing. The A2 class can keep up with at least 4000 IOPS while reading and 2000 IOPS while writing. These performance characteristics don’t matter much when a card is writing video, but they make all the difference when multiple smartphone apps are using it.
Beyond these ratings, SD cards often have a maximum read speed (in MB/s) printed on the card or packaging. This practice started years ago with cards oriented toward professionals, but has become relatively common on cards of any quality. If you’re wondering why the maximum write speed isn’t also on the card, that’s a great question; while it isn’t printed on any card we’ve seen yet, product listings for high-performance SD cards typically mention the maximum write speed.
Because there’s a wide variety of SD cards available with different qualities, two cards of the same capacity can vary wildly in price and performance. It’s important to evaluate each card’s properties to avoid wasting money on performance you don’t need, or thinking you got a great deal on a massive card only to find it can’t keep up with your brand-new professional video camera.
Card Readers Whichever type of flash memory you use, your computer must have a card reader to access the data on the card directly. A number of inexpensive USB card readers are available today (see Figure 10.48), and many computers and home printers come with built-in SD readers—handy to have when you want to pull the photos from your camera for editing or quickly print a photo.

• Figure 10.48 USB card reader
Whichever type of flash memory you have, understand that it acts exactly like any other mass storage drive. If you wish, you can format a memory card or copy, paste, and rename files.
Optical Media
Optical disc is the generic term for shiny, 12-centimeter-wide discs. The drives that support them are called optical drives. This section examines optical discs, finishing with the details about installing optical drives. Optical drives are dying or dead, replaced by flash media and streaming Internet feeds. You’ll see them on legacy computers and the CompTIA A+ exams. Memorize the contents of this section for the exams, then just let optical media go.
CD, DVD, and Blu-ray Disc drives and discs come in a variety of flavors and formats. Compact disc (CD) is a medium that was originally designed in the early 1980s as a replacement for vinyl records. The digital versatile disc (DVD) first eliminated VHS cassette tapes from the commercial home movie market, and grew into a contender for backups and high-capacity storage. Blu-ray Disc (BD) became the only high-definition and 4K, high-capacity optical format.
Going beyond those big three household names, the term “optical disc” refers to technologies such as CD-ROM, CD-R, CD-RW, DVD, DVD+RW, BD-R, BD-RE, and so on. Each of these technologies will be discussed in detail in this chapter—for now, understand that although “optical disc” describes a variety of exciting formats, they all basically boil down to the same physical object: that little shiny disc.
CD-Media
The best way to understand optical disc technologies is to sort out the many varieties available, starting with the first: the compact disc. All you’re about to read is relevant and fair game for the CompTIA A+ certification exams.
CDs store data by using microscopic pits burned into a glass master CD with a powerful laser. Expensive machines create plastic copies of the glass master that are then coated with a reflective metallic coating. CDs store data on one side of the disc only. The CD drive reads the pits and the non-pitted areas (lands) and converts the pattern into ones and zeros.
CD Formats The first CDs were designed for playing music and organized the music in a special format called CD-Digital Audio (CDDA), which we usually just call CD-audio. CD-audio divides the CD’s data into variable-length tracks; on music CDs, each song gets one track. CD-audio is an excellent way to store music, but it lacks advanced error checking, file support, or directory structure, making it a terrible way to store data. For this reason, The Powers That Be created a special method for storing data on a CD, called—are you ready—CD-ROM. The CD-ROM format divides the CD into fixed sectors, each holding 2353 bytes.
At first glance you might think, “Why don’t CD-ROMs just use a FAT or an NTFS format like hard drives?” Well, first of all, they could. There’s no law of physics that prevented the CD-ROM world from adopting any file system. The problem is that the CD makers did not want CD-ROM to be tied to Microsoft’s or Apple’s or anyone else’s file format. In addition, they wanted non-PC devices to read CDs, so they invented their own file system just for CD-ROMs called ISO-9660. This format is sometimes referred to by the more generic term CD File System (CDFS). The vast majority of data CD-ROMs today use this format.
CD-ROM Speeds The first CD-ROM drives processed data at roughly 150,000 bytes per second (150 KBps), copying the speed from the original CD-audio format. Although this speed is excellent for listening to music, the CD-ROM industry quickly recognized that installing programs or transferring files from a CD-ROM at 150 KBps was the electronic equivalent of watching paint dry. Since the day the first CD-ROM drives for PCs hit the market, there has been a desire to speed them up to increase their data throughput. Each increase in speed is measured in multiples of the original 150-KBps drives and given an × to show speed relative to the first (1×) drives. Here’s a list of the common CD-ROM speeds, including most of the early speeds that are no longer produced:

CD-R Making CD-ROMs requires specialized, expensive equipment and substantial expertise, so a relatively small number of CD-ROM production companies do it. Yet, since the day the first CD-ROMs came to market, demand was high for a way that ordinary PC users could make their own CDs. The CD industry made a number of attempts to create a technology that would let users record, or burn, their own CDs.
In the mid-1990s, the CD industry introduced the CD-recordable (CD-R) standard, which enables affordable CD-R drives, often referred to as CD burners, to add data to special CD-R discs. Any CD-ROM drive can then read the data stored on the CD-R, and all CD-R drives can read regular CD-ROMs. CD-R discs come in two varieties: a 74-minute disc that holds approximately 650 MB, and an 80-minute variety that holds approximately 700 MB (see Figure 10.49). A CD-R burner must be specifically designed to support the longer, 80-minute CD-R format, but most drives you’ll encounter can do this.

• Figure 10.49 A CD-R disc, with its capacity clearly labeled
CD-R discs function similarly to regular CD-ROMs, although the chemicals used to make them produce a brightly colored recording side on almost all CD-R discs. CD-ROM discs, in contrast, have a silver data side. CD-R technology records data by using organic dyes embedded into the disc. CD-R burners have a second burn laser, roughly ten times as powerful as the read laser, that heats the organic dye. This causes a change in the reflectivity of the surface, creating the functional equivalent of a CD-ROM’s pits.
CD-R drives have two speeds that matter: the record speed and the read speed, both expressed as multiples of the 150-KBps speed of the original CD-ROM drives. The record speed, which is listed first, is always equal to or slower than the read speed. For example, a CD-R drive with a specification of 8×24× would burn at 8× and read at 24×.
CD-RW Just as CD-R drives could both burn CD-R discs and read CD-ROMs, a newer type of drive called CD-rewritable (CD-RW) took over the burning market from CD-R drives. Although this drive has its own type of CD-RW discs, it also can burn to CD-R discs, which are much cheaper.
CD-RW technology enables you not only to burn a disc, but to burn over existing data on a CD-RW disc. The CD-RW format essentially takes CD-media to the functional equivalent of a 650-MB flash-media drive. Once again, CD-RW discs look exactly like CD-ROM discs with the exception of a colored bottom side. Figure 10.50 shows all three formats.
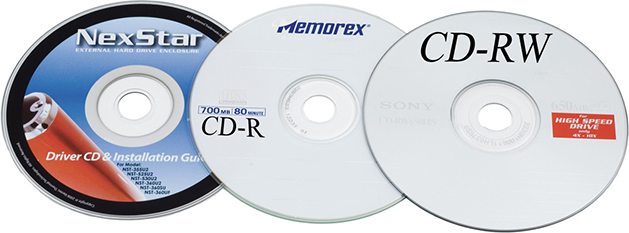
• Figure 10.50 CD-ROM, CD-R, and CD-RW discs
A CD-RW drive works by using a laser to heat an amorphous (noncrystalline) substance that, when cooled, slowly becomes crystalline. The crystalline areas are reflective, whereas the amorphous areas are not. Because both CD-R and CD-RW drives require a powerful laser, making a drive that could burn CD-Rs and CD-RWs was a simple process, and plain CD-R drives disappeared almost overnight. Why buy a CD-R drive when a comparably priced CD-RW drive could burn both CD-R and CD-RW discs?
CD-RW drive specs have three multiplier values. The first shows the CD-R write speed, the second shows the CD-RW rewrite speed, and the third shows the read speed. Write, rewrite, and read speeds vary tremendously among the various brands of CD-RW drives; here are just a few representative samples: 8×4×32×, 12×10×32×, and 48×24×48×.
Windows and CD-Media Virtually all optical drives use the same interface as your mass storage drives. You just plug in the drive and, assuming you didn’t make any physical installation mistakes, the drive appears in Windows (see Figure 10.51).

• Figure 10.51 Optical drive in Windows
DVD-Media
For years, the video industry tried to create an optical-media replacement for videotape. The DVD was developed by a large consortium of electronics and entertainment firms during the early 1990s and released as digital video discs in 1995. The transformation of DVD to a data storage medium required a name change to digital versatile discs. You’ll still hear both terms used. The industry also uses the term DVD-video to distinguish the movie format from the data formats. With the exception of the DVD logo stamped on all commercial DVDs (see Figure 10.52), DVDs look exactly like CD-media discs, but that’s pretty much where the similarities end.

• Figure 10.52 Typical DVD-video
The single best word to describe DVD is capacity. The lowest capacity DVD holds 4.37 GB of data, or two hours of standard-definition video. The highest capacity DVD versions store roughly 16 GB of data, or more than eight hours of video. DVD uses a number of technologies, but three are most important. First, DVD uses smaller pits than CD-media, and packs them much more densely. Second, DVD comes in both single-sided (SS) and double-sided (DS) formats. As the name implies, a DS disc holds twice the data of an SS disc, but it also requires you to flip the disc to read the other side. Third, DVDs come in single-layer (SL) and dual-layer (DL) formats. DL formats use two pitted layers on each side, each with a slightly different reflectivity index. Table 10.3 shows the common DVD capacities.
Table 10.3 DVD Versions/Capacities

DVD-ROM DVD-ROM is the DVD equivalent of the standard CD-ROM data format except that it’s capable of storing up to almost 16 GB of data. Almost all DVD-ROM drives also fully support DVD-video, as well as most CD-ROM formats. Most DVD drives sold with PCs are DVD-ROM drives.
Recordable DVD The IT industry has no fewer than three distinct standards of recordable DVD-media: DVD-R, DVD-RW, and DVD-RW DL. DVD-R discs work like CD-Rs. You can write to them but not erase or alter what’s written. DVD-RW discs can be written and rewritten, just like CD-RW discs. DVD-RW DL can be written to on two layers, doubling the capacity. Most DVD drives can read all formats.
Blu-ray Disc Media
Blu-ray Disc is the last generation in optical disc formatting and storage technology (see Figure 10.53). Because of its near-perfect audio and video quality; mass acceptance by industry-leading computer, electronics, game, music, retail, and motion picture companies; and huge storage capacities of up to 25 GB (single-layer disc), 50 GB (dual-layer disc), and 100 GB (BDXL), Blu-ray Disc technology enjoyed wild popularity until flash memory prices dropped in the 2010s to basically kill off all optical media.

• Figure 10.53 Standard Blu-ray Disc
BD-ROM BD-ROM (read only) is the Blu-ray Disc equivalent of the standard DVD-ROM data format except, as noted earlier, it can store much more data and produces superior audio and video results. Almost all BD-ROM drives are fully backward compatible and support DVD-video as well as most CD-ROM formats. If you want to display the best possible movie picture quality on your HDTV, you should get a Blu-ray Disc player and use Blu-ray Discs in place of DVDs. Most new computer systems don’t come standard with optical drives installed. You can often custom-order a system with a Blu-ray Disc drive, or you can simply connect one yourself. Figure 10.54 shows a Blu-ray Disc drive.
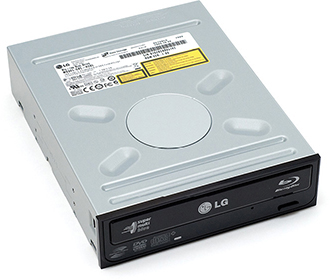
• Figure 10.54 A combination CD/DVD/Blu-ray Disc drive
BD-R and BD-RE Blu-ray Discs come in two writable formats, BD-R (recordable) and BD-RE (rewritable). You can write to a BD-R disc one time. You can write to and erase a BD-RE disc several times. There are also BD-R and BD-RE versions of mini Blu-ray Discs.
Installing Optical Drives
From ten feet away, optical drives of all flavors look absolutely identical. Figure 10.55 shows a CD-RW drive, a DVD drive, and a BD-R drive. Can you tell them apart just by a glance? In case you were wondering, the CD-RW drive is on the bottom, the DVD drive is next, and finally the BD-R drive is on the top. If you look closely at an optical drive, you will normally see its function either stamped on the front of the case or printed on a label somewhere less obvious (see Figure 10.56).

• Figure 10.55 CD-RW, DVD, and BD-R drives
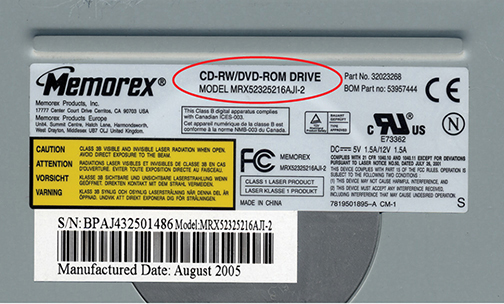
• Figure 10.56 Label on optical drive indicating its type
Most internal optical drives use SATA. External optical drives often use USB or Thunderbolt connections. Plug them in and go.
Chapter 10 Review
■ Chapter Summary
After reading this chapter and completing the exercises, you should understand the following about essential peripherals.
Explain how to support multipurpose connectors
The core of USB is the USB host controller, an integrated circuit normally built into the chipset. The host controller acts as the interface between the system and every USB device that connects to it. Connected to the host controller is a USB root hub, the part of the host controller that makes the physical connection to the USB ports. Host controllers support many ports, but the number of USB ports a system has is usually dependent on what the motherboard manufacturer decided to supply. The host controller sends commands and provides power to USB devices. The host controller is upstream, controlling devices connected downstream to it. The host controller is shared by every device plugged into it, so speed and power are reduced with each new device.
■ Multiple USB standards are in use today: USB 1.1 defines Low-Speed USB, which runs at 1.5 Mbps, and Full-Speed USB, which runs at 12 Mbps. USB 2.0 defines Hi-Speed USB, which runs at 480 Mbps. USB 3.0, marketed as SuperSpeed USB or USB 3.1 Gen 1, runs at up to 5 Gbps. USB 3.1, marketed as SuperSpeed USB 10 Gbps or USB 3.1 Gen 2, runs at up to 10 Gbps.
■ USB devices of any speed can connect to any USB port, though they will run at the speed of the slowest device. A USB 3.0 device connected to a USB 2.0 port will run at 480 Mbps. You can install a USB expansion card to use more devices than your current USB hub supports.
■ USB hubs extend the number of USB devices you can connect to a single port. Make sure you get a powered USB hub so it will support the fastest speed and not draw power away from other devices.
■ Thunderbolt 1 and 2 connect computing devices with a Mini DisplayPort connector, whereas Thunderbolt 3 uses a USB Type-C connector. Thunderbolt can use copper or fiber cabling. With copper, Thunderbolt chains can extend up to 3 meters. With fiber, a Thunderbolt chain can extend up to 60 meters. Thunderbolt 1 runs full duplex at 10 Gbps. Thunderbolt 2 combines internal data channels, enabling throughput at up to 20 Gbps. Thunderbolt 3 brings speeds up to 40 Gbps.
■ When troubleshooting problems, first determine if the issue is a port problem or a device problem. Swap out the troubled device for a known good device (one that works in another computer). If a known good device fails, you can safely assume you have a port problem. If a known good device functions properly, you most likely have a device problem. For device problems, replace the device. For port problems, verify that the port is enabled, make sure you have the driver installed for the port itself, and check the condition of the cables and physical connectors.
Identify and install standard peripherals on a computer
■ Keyboards are the oldest type of input device and still the primary way users input data. Although a keyboard works without the installation of additional drivers, you need to install drivers for specialty keyboards, such as keyboards with fancy buttons or other programmable features.
■ Modern computers come with one of two common pointing devices, a mouse or a touchpad. Move the cursor with your mouse or fingers. Multi-Touch gestures enable even more options on devices using multiple fingers on a touchpad.
■ Various pointing device settings can be configured via the Mouse Control Panel applet or Settings app. macOS has both Mouse and Trackpad applets in System Preferences. Configurable settings include mouse speed, double-click speed, and acceleration.
■ Biometric devices scan various body parts, such as fingerprints, for authentication, security, and recognition. Both macOS and Windows 10/11 have built-in support for using biometrics like fingerprint scanners and facial recognition to secure user accounts. Voice recognition allows users to speak commands to the computer, such as “Skype Mike Meyers.”
■ Memory card readers scan the chip embedded in such devices as ID badges to enhance access and security.
■ Barcode scanners read standard Universal Product Code (UPC) barcodes or Quick Response (QR) codes, primarily to track inventory. The two types of barcode scanners are pen scanners and hand scanners. Pen scanners look like ink pens and must be swiped across the barcode. Hand scanners are held in front of the UPC code while a button is pressed to scan. All barcode scanners emit a tone to verify that scan was successful. Barcode scanners use USB ports or go wireless.
■ Tablets feature touchscreens, as do information kiosks, smartphones, and point-of-sale systems. Touchscreens can be operated with either a finger or a stylus. Some devices, such as smartphones, have built-in touchscreens, while a point-of-sale system may use a standalone touchscreen monitor. Windows includes a Control Panel applet for configuring the touchscreens on tablet PCs, plus a Tablet applet in Settings that has Tablet Mode options for standard touchscreen–enabled computers.
■ KVM switches are hardware devices with which multiple systems can be monitored and controlled by a single mouse, keyboard, and monitor. KVM switches are most commonly used in data centers, enabling administrators to control multiple rack-mounted servers from a single keyboard, mouse, and monitor station.
■ When keyboard and mouse aren’t sufficient, game controllers and joysticks enable you to control your PC games. Most game controllers connect via USB or wirelessly. You can use the Devices and Printers applet in Windows to configure your devices.
■ A digitizer or pen tablet enables users to paint, ink, pencil, or otherwise draw on a computer. The digitizer receives input using a special surface, such as a signature pad for electronic signing.
■ Digital cameras save pictures and videos onto removable storage media, such as SD cards. Photos and videos can be transferred to a PC either by connecting the camera directly to a USB port or by connecting to a Wi-Fi network. Alternatively, if the PC is equipped with a media card reader, the flash memory card can be removed from the camera and inserted directly into the PC’s card reader.
■ Webcams are often used for Internet video communication. The most common dedicated webcams today provide 1080p HD resolution experience, with cameras integrated into laptops often being 720p. Many webcams come with built-in microphones, or you can use a standalone device. If you do a lot of video chatting, consider using a good-quality headset with which to speak and listen.
■ Computing devices offer four critical components for capturing and outputting sound: a sound device built into the motherboard, speakers, microphone, and recording/playback software. A sound capture is considered CD quality when recorded at 44.1 KHz, with 16-bit depth and in stereo.
■ WAV, MP3, and AAC are common file formats for sound. Using MP3 compression, you can shrink a WAV file by a factor of 12 without losing much sound quality.
■ Sound cards and built-in sound use 1/8-inch jacks for speaker output, audio input, and microphones. Common speaker setups include stereo, 2.1 (stereo with a subwoofer), and 5.1 (surround sound).
■ Video files use standard audio codecs for sound, such as MP3. Video codecs take a video stream and compress it by using various algorithms. Some standard video codecs are MPEG-2 Part 2 (DVD) and H.264 (Blu-ray Disc). Wrappers contain compressed audio and video files. Standard wrapper types include AVI (Windows) and MOV (Apple QuickTime).
Identify and install common removable storage devices and their media
■ Flash memory includes USB thumb drives and memory cards. USB thumb drives have a standard USB connector and have replaced many other forms of removable media as the way to transfer files. Memory cards, a generic term, are used in digital cameras, smartphones, and other devices.
■ Secure Digital is the most popular flash card. Smaller versions of Secure Digital cards, miniSD and microSD, are also available. The miniSD format has fallen out of use, but microSD cards are popular in other small devices where its small size is an advantage.
■ SD cards have performance ratings. Speed class (2, 4, 6, and 10; UHS) indicates the card’s minimum MB/s write speed. Video Speed Class on newer devices indicates support of the newest video standards, such as 4K. Application Performance Class ratings indicate both the sustained write speed and IOPS (input/output speed).
■ CDs come in many varieties. CD-Digital Audio is for playing music, but it lacks advanced error checking, file support, and directory structure. CD-ROM discs are for storing data. They use the ISO-9660 file system, also known as CDFS.
■ CD-R discs are burnable once. CD-RW discs enable you to erase data and burn new data.
■ DVD-ROM, the DVD equivalent of CD-ROM, can store up to 16 GB of data. Recordable DVD-media comes in three varieties: DVD-R, DVD-RW, and DVD-RW DL. You can write to DVD-R discs but not erase or alter what’s written. DVD-RW discs can be written and rewritten. DVD-RW DL can be written to on two layers, doubling the capacity. Most DVD drives can read all formats.
■ Standard Blu-ray Discs have storage capacities of up to 25 GB (single-layer disc), 50 GB (dual-layer disc), and 100 GB (BDXL) and provide near-perfect picture quality. You can write to a BD-R (recordable) disc one time. You can erase and write to a BD-RE (rewritable) disc several times.
■ Most internal optical drives use SATA. External optical drives often use USB or Thunderbolt connections. Plug them in and go.
■ Key Terms
2.1
5.1
Advanced Audio Encoding (AAC)
barcode scanner
BD-R (recordable)
BD-RE (rewritable)
BD-ROM (read only)
biometric device
Blu-ray Disc (BD)
card reader
CD File System (CDFS)
CD quality
CD-recordable (CD-R)
CD-rewritable (CD-RW)
CD-ROM
codec
compact disc (CD)
CompactFlash (CF)
digital-to-analog converter (DAC)
digital versatile disc (DVD)
digitizer
DVD-ROM
DVD-RW
keyboard
keyboard, video, mouse (KVM) switch
memory cards
microSecure Digital (microSD)
microphone
miniSecure Digital (miniSD)
MP3
optical mouse
Quick Response (QR)
Secure Digital (SD)
signature pad
Sony/Philips Digital Interface (S/PDIF or SPDIF)
sound card
Thunderbolt
touchscreen
Universal Product Code (UPC)
universal serial bus (USB)
USB 2.0
USB 3.0
USB flash memory drive
USB host controller
USB hub
USB root hub
USB selective suspend
USB Type-C
webcam
■ Key Term Quiz
Use the Key Terms list to complete the sentences that follow. Not all terms will be used.
1. A(n) __________________ transfers data at up to 480 Mbps and is used for webcams, scanners, older wireless adapters, and older flash-media drives.
2. A __________________ device transfers data at up to 12 Mbps on the universal serial bus.
3. __________________ sets a USB port to provide power or shut down when the computer is off.
4. The __________________ standard connects computing devices with a Mini DisplayPort connector.
5. A(n) __________________ scans the chip embedded in such devices as ID badges to enhance access and security.
6. __________________ are used to store data on small appliances.
7. Barcode scanners read standard __________________ barcodes, primarily to track inventory.
8. Windows generates a __________________ when enough devices are connected to a controller to exceed the limit, and devices may not work.
9. __________________ is the most popular container format for H.264 encoded video.
10. A series of instructions telling a computer how to read a compressed file is called a(n) __________________.
11. While a CD-ROM disc holds 700 MB of data, a(n) __________________ stores from 4.37 GB to 15.9 GB, depending on the number of sides and layers used.
■ Multiple-Choice Quiz
1. How many devices can a single USB host controller support?
A. 2
B. 4
C. 63
D. 127
2. What is the maximum USB cable length as defined by the USB 2.0 specification?
A. 4.5 feet
B. 4.5 meters
C. 5 feet
D. 5 meters
3. Which of the following is a high-speed alternative to existing technologies such as USB and DisplayPort?
A. Lightning
B. eSATA
C. USB 3.1
D. Thunderbolt
4. What do digitizers enable people to do on a PC?
A. Capture video
B. Draw, paint, and write
C. Secure using fingerprints
D. Switch between multiple computers using the same keyboard, mouse, and monitor
5. USB 3.2 2×2 supports which maximum speed?
A. 480 Mbps
B. 10 Gbps
C. 20 Gbps
D. 40 Gbps
6. When purchasing an SDXC card for a digital camera, Vera notes several performance variations among the models available, such as V12, U3, and A2. What do these standards signify?
A. Support for video standards; sustained data transfer speeds; and IOPS, respectively
B. IOPS; support for video standards; and sustained data transfer speeds, respectively
C. Sustained data transfer speeds; support for video standards; and IOPS, respectively
D. They don’t actually stand for anything. It’s just marketing.
7. What icon does Windows Device Manager display over disabled devices?
A. Yellow triangle
B. Down-pointing arrow
C. Blue I
D. Green D
8. Jack downloaded a video shared by a friend, ourfamilyholiday.avi. When he opens it in his media player software, he hears sound but gets no picture. What’s the most likely problem and solution?
A. His media player software doesn’t support AVI files. He needs to install a new media player.
B. His computer is a Mac; he needs to play the file on a Windows system.
C. His computer lacks the proper video codec. He needs to update the codecs installed on his computer.
D. The video is corrupt. His friend needs to share it with him again.
9. To what does the .1 in 5.1 or 2.1 refer?
A. Volumetric sound positioning
B. Subwoofer
C. Subchannels
D. Reverb positional matrices
10. Which device is a biometric device?
A. Barcode scanner
B. Optical mouse
C. Fingerprint scanner
D. Flatbed scanner
11. John’s boss tasks him to buy a set of four SD cards for a new video project, two for each camera. The video will be captured in high definition, so the files will be huge. Given such a scenario, what type of card will John have to buy to support 128-GB capacity for each card?
A. SD
B. SDHC
C. SDXC
D. xD
12. Which Blu-ray Disc format enables you write and erase the media several times?
A. BD-ROM
B. BD-R
C. BD-RE
D. BD-RW
13. Which multimedia device is used for Internet video communication, which allows people to interact over networks with both voice and video?
A. Speaker
B. Microphone
C. Webcam
D. Sound processor
14. In Windows, which Control Panel applet enables you to configure a game controller or a joystick?
A. Devices and Printers
B. Joysticks and Gamepads
C. Input Devices
D. Game controllers are only configured within a PC game.
15. While testing a newly installed KVM switch, you can’t display the second connected system while tapping the SCROLL LOCK key. What is most likely the problem?
A. Incorrect KVM UPC code
B. Crossed video cable
C. Locked SCROLL LOCK key
D. Active KVM
■ Essay Quiz
1. A friend at the local film school needs a new keyboard and external hard drive. Given such a scenario, what advice can you give her about the connection style for each of these devices?
2. Dylan is excited because he just got a new mirrorless digital camera. He tried to connect it with USB to his laptop, but the computer doesn’t recognize it. He’s called you for help. Given such a scenario, what will you tell him?
3. Ken asks for your help because he is always forgetting his Windows password. What can you recommend to make logons easier for him?
4. Sandra’s always trying new video games. She usually plays role-playing games like Elden Ring and Destiny, but a friend bought her Microsoft Flight Simulator. She wants to get the most out of the experience. What device should she get to enhance her experience? How should she set it up?
5. The new head of sales is frustrated because when she tries to use her keyboard, letters continue to print across the screen even if she quickly taps a key, resulting in messages that llllooooooookkkk lllliiiikkkkeeee tttthhhhiiiissss. How can you walk her through fixing this problem over the phone?
Lab Projects
• Lab Project 10.1
Many personal computers used to include FireWire ports but these are mostly gone. The highest performance data ports at this time are USB 3.2 2×2. Check the following three Web sites: https://www.dell.com, https://www.hp.com, and https://www.apple.com. Is a USB 3.2 2×2 port standard built-in equipment on their new computers? If so, how many of these ports are included? If not, do the sites offer USB 3.2 2×2 as an optional add-on?
• Lab Project 10.2
Explore the Keyboard and Mouse Control Panel applets. Change the settings and try to use the devices. Which settings caused the most frustration? Were there any changes you made that you preferred over the original settings?
• Lab Project 10.3
Grab a lab partner, a pen, a pad of paper, and a stopwatch. How many input devices can you two name in 30 seconds? Reset the timer. How many output devices can you two name in 30 seconds? Are any devices considered both input and output?