chapter 9
Implementing Mass Storage
“Wisely and slow; they stumble that run fast.”
—SHAKESPEARE, ROMEO AND JULIET, ACT 2, SCENE 3

In this chapter, you will learn how to
■ Explain the partitions available in Windows
■ Discuss hard drive formatting options
■ Partition and format hard drives
■ Maintain and troubleshoot hard drives
From the standpoint of your PC, a freshly installed hard drive is nothing more than a huge pile of unorganized storage space. Sure, CMOS recognizes it as a drive—always a step in the right direction—but your operating system is clueless without more information. Your operating system must organize that storage so you can use the drive to store data. This chapter covers that process.
Historical/Conceptual
After you’ve successfully installed a hard drive, you must perform two more steps to translate a drive’s raw media into something the system can use: partitioning and formatting. Partitioning is the process of electronically subdividing a physical drive into one or more units called partitions. After partitioning, you must format the drive. Formatting installs a file system onto the drive that organizes each partition in such a way that the operating system can store files and folders on the drive. Several types of file systems are used by Windows. This chapter will go through them after covering partitioning.
The process of partitioning and formatting a drive is one of the few areas remaining on the software side of PC assembly that requires you to perform a series of fairly complex manual steps. The CompTIA A+ 220-1102 exam tests your knowledge of what these processes do to make the drive work, as well as the steps needed to partition and format hard drives in Windows.
This chapter continues the exploration of hard drive installation by explaining the concepts of partitioning and formatting, and then going through the process of partitioning and formatting hard drives. The chapter wraps with a discussion on hard drive maintenance and troubleshooting issues, the scope of which includes all the operating systems covered on the current exams.

■ Hard Drive Partitions
Before a magnetic disk drive leaves the factory, it is magnetically preset with millions (hundreds of millions on really big drives) of storage areas known as sectors. Older hard drives had 512-byte sectors; modern drives use 4096-byte Advanced Format (AF) sectors. Figure 9.1 shows a close-up of several sectors on a typical HDD.

• Figure 9.1 Sectors on an HDD
Solid-state drives come from the factory with each NAND chip storing millions (hundreds of millions on really big drives) of 4096-byte storage areas known as pages. A group of pages are combined into a block. The size of a block varies, but 128 pages per block isn’t uncommon. Figure 9.2 shows a simplified concept of how this looks.

• Figure 9.2 SSD pages and blocks
The CPU and operating system never talk to these internal structures. Instead, the controller on the HDD or SSD uses logical block addressing (LBA) to present all these storage chunks as nothing more than a number that starts at LBA0 and goes until every sector or page has an LBA number (see Figure 9.3). These LBA chunks are also called blocks.

• Figure 9.3 LBA in action
LBA makes addressing any form of mass storage easy, and that’s how the operating system interacts with the mass storage, via blocks. The operating system presents to the user files and folders, not LBA addresses. We must organize mass storage in a way that enables us to store and retrieve files, create folders, and so on. The first step to doing this is partitioning.
If you think of a hard drive as an empty building filled with many rooms (the blocks), partitioning is what organizes the rooms into something bigger (like suites or companies) and gives each bigger entity a name (see Figure 9.4). Partitioning takes a single physical drive and electronically organizes it into one or more . . . partitions. With that analogy, think of partitions as collections of rooms in the building. Partitions provide tremendous flexibility in hard drive organization. With partitions, you can organize a drive to suit your personal taste.

• Figure 9.4 Partitions on an SSD
You can partition a hard drive to store more than one operating system: store one OS in one partition and create additional partitions for another OS. Granted, most people use only one OS, but if you want the option to boot to either Windows or Linux, partitions are the key.
1102
Windows supports three different partitioning methods: the older master boot record (MBR) partitioning scheme, Windows’ proprietary dynamic storage partitioning scheme, and the GUID partition table (GPT). (I’ll cover all three of these in their respective sections, following this introduction.) Microsoft calls a hard drive that uses either the MBR partitioning scheme or the GPT partitioning scheme a basic disk and calls a drive that uses the dynamic storage partitioning scheme a dynamic disk.
A single Windows system with three hard drives may have one of the drives partitioned with MBR, another with GPT, and the third set up as a dynamic disk, and the system will run perfectly well. The bottom line? You get to learn about three totally different types of partitioning. I’ll also cover a few other partition types, such as hidden partitions, and tell you when you can and should make your partitions.
Master Boot Record
The first sector of an MBR hard drive contains the master boot record (MBR), code that informs the system about installed operating systems. To clarify, hard drives that use the MBR partitioning scheme have a tiny bit of data that is also called the “master boot record.” While your computer boots up, BIOS looks at the first sector of your hard drive for instructions. At this point, it doesn’t matter which OS you use or how many partitions you have. Without this bit of code, your OS will never load.
The master boot record also contains the partition table, which describes the number and size of partitions on the disk (see Figure 9.5). MBR partition tables support up to four partitions—the partition table is large enough to store entries for only four partitions. The instructions in the MBR use this table to determine which partition contains the active operating system.

• Figure 9.5 The master boot record
After the MBR locates the appropriate partition, the partition boot sector loads the OS on that partition. The partition boot sector stores information important to its partition, such as the location of the OS boot files (see Figure 9.6).

• Figure 9.6 Using the master boot record to boot an OS
MBR partition tables support two types of partitions: primary partitions and extended partitions. Primary partitions are designed to support bootable operating systems. Extended partitions are not bootable. A single MBR disk may have up to four primary partitions or up to three primary partitions and one extended partition.
Primary Partitions and Multiple Operating Systems
Primary partitions are usually assigned drive letters and appear in Windows Explorer/File Explorer (once you format them). The first lettered primary partition in Windows is always C:. After that, you can label the partitions D: through Z:.

Only primary partitions can boot operating systems. On an MBR disk, you can easily install four different operating systems, each on its own primary partition, and boot to your choice each time you fire up the computer.
Every primary partition on a single drive has a special setting stored in the partition table called active that determines the active partition. During boot-up, the BIOS/POST reads the MBR to find the active partition and boots the operating system on that partition. Only one partition can be active at a time because you can run only one OS at a time (see Figure 9.7).

• Figure 9.7 The active partition containing Windows
To control multiboot setups, many people use a free Linux-based boot manager called Grand Unified Bootloader (GRUB), shown in Figure 9.8. When the computer boots, the boot manager software yanks control from the MBR and asks which OS you want to boot. Once a partition is set as active, the partition boot sector loads the operating system.

• Figure 9.8 GRUB in action
Extended Partitions
With a four-partition limit, an MBR disk would be limited to only four drive letters if using only primary partitions. Extended partitions were invented to get around this limit. An extended partition may contain multiple logical drives, each of which can get a drive letter (see Figure 9.9).
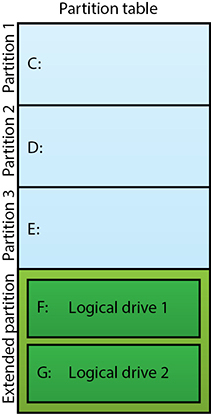
• Figure 9.9 An extended partition containing multiple logical drives
Dynamic Disks
With the introduction of Windows 2000, Microsoft defined a type of partitioning called dynamic storage partitioning, better known as dynamic disks. Still in use today, Microsoft calls a drive structure created with a dynamic disk a volume. There is no dynamic disk equivalent to primary versus extended partitions. A dynamic disk volume is still technically a partition, but it can do things a regular partition cannot do.
First off, when you turn a hard drive into a dynamic disk, you can create as many volumes on it as you want. You’re not limited to four partitions.
Second, you can create—in software—new drive structures that you can’t do with MBR drives. Specifically, you can implement RAID, span volumes over multiple drives, and extend volumes on one or more drives. Table 9.1 shows you which volume types Windows 10/11 and Windows Server support.
Table 9.1 Dynamic Disk Compatibility
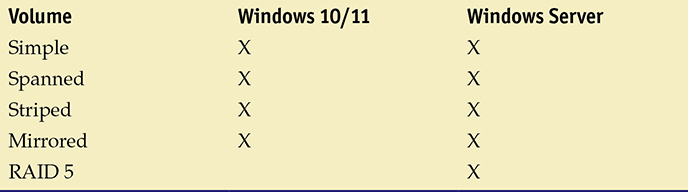
Simple volumes work a lot like primary partitions. If you have a hard drive and you want to make half of it E: and the other half F:, for example, you create two volumes on a dynamic disk. That’s it.
Spanned volumes use unallocated space on multiple drives to create a single volume. Spanned volumes are a bit risky: if any of the spanned drives fails, the entire volume is lost.
Striped volumes are RAID 0 volumes. You may take any two unallocated spaces on two separate hard drives and stripe them. But again, if either drive fails, you lose all of your data.
Mirrored volumes are RAID 1 volumes. You may take any two unallocated spaces on two separate hard drives and mirror them. If one of the two mirrored drives fails, the other keeps running.
RAID 5 volumes, as the name implies, are for RAID 5 arrays. A RAID 5 volume requires three or more dynamic disks with equal-sized unallocated spaces.
 Cross Check
RAID 5
You read about RAID 5 in Chapter 8, so turn there now and see if you can answer these questions. What type of hard drives can do RAID 5? What common phrase designates RAID 5 in the real world? How many drives do you need to implement RAID 5?
GUID Partition Table
MBR partitioning came out a long time ago, in an age where 32-MB hard drives were thought to be larger than you would ever need. While it’s lasted a long time as the partitioning standard for bootable drives, back around 2010 a new kid appeared in town with the power to outshine the aging partitioning scheme and assume all the functions of the older partition style.
The GUID partition table (GPT) partitioning scheme shares a lot with the MBR partitioning scheme, overcoming many of the MBR scheme’s limitations. Here are the big improvements:
■ While MBR drives were limited to four partitions, a GPT drive can have an almost unlimited number of primary partitions. Microsoft has limited Windows to 128 partitions.
■ MBR partitions were no larger than 2.2 TB, but GPT partitions have no such restrictions. Well, there is a maximum size limit, but it’s so large, we measure it in zettabytes. A zettabyte, by the way, is roughly a billion terabytes.
On paper, a GPT drive looks a lot like an MBR drive, except it’s arranged by LBA instead of sectors (see Figure 9.10). LBA 0, for instance, is the protective MBR. This is a re-creation of the master boot record from MBR drives so that disk utilities know it is a GPT drive and don’t mistakenly overwrite any partition data.
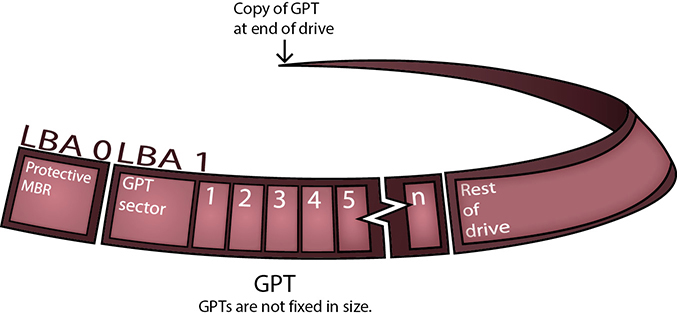
• Figure 9.10 GUID partition table
Instead of the old master boot record and partition table, GPT drives use a GPT header and partition entry array. Both are located at the beginning and end of the drive so there is a protected backup copy. The partitions on a GPT drive go between the primary and backup headers and arrays, as shown in Figure 9.10.
You can configure Windows 10 and 11 to boot from GPT only if you use a UEFI motherboard. In other words, if you’re trying to install a current version of Windows on an ancient motherboard, you’re stuck with MBR. The same is true of macOS. Most Linux distributions can boot from GPT partitions with older BIOS or UEFI firmware.
Other Partition Types
The partition types supported by Windows are not the only partition types you may encounter; other types exist. One of the most common is called the hidden partition. A hidden partition is really just a primary partition that is hidden from your operating system. Only special BIOS tools may access a hidden partition. Hidden partitions are used by some PC makers to hide a backup copy of an installed OS that you can use to restore your system if you accidentally trash it—by, for example, learning about partitions and using a partitioning program incorrectly.
A swap partition is another special type of partition, but swap partitions are found only on Linux and UNIX systems. A swap partition’s only job is to act like RAM when your system needs more RAM than you have installed. Windows has a similar function with a page file that uses a special file instead of a partition, as you’ll recall from Chapter 4.
When to Partition
Partitioning is not a common task for an already-setup system. The two most common situations likely to require partitioning are when you install an OS on a new system and when you add an additional drive to an existing system. When you install a new OS, the installation program asks you how you would like to partition the drive. When you add a new hard drive to an existing system, every OS has a built-in tool to help you partition it.
Each version of Windows offers a different tool for partitioning hard drives. For more than 20 years, through the days of DOS and early Windows (up to Windows Me), we used a command-line program called FDISK to partition drives. Modern versions of Windows use a graphical partitioning program called Disk Management, shown in Figure 9.11. You’ll find it in the Quick Links menu or Computer Management in Administrative Tools. (Windows has an advanced command-line disk management tool as well, called diskpart, discussed in detail in Chapter 16.)

• Figure 9.11 Windows 10 Disk Management tool in Computer Management
Linux uses several tools for partitioning. The oldest is called fdisk—yes, the same name as the DOS/Windows tool (though case-sensitive). That’s where the similarities end, however, as Linux fdisk has a totally different command set. Even though every copy of Linux comes with the Linux fdisk, it’s rarely used because so many better partitioning tools are available. One of the GUI Linux partitioning tools is called GParted and is even conveniently provided by Ubuntu’s live CD.
In the early days of PCs, you couldn’t change a partition’s size or type (other than by erasing it) once you’d made it with any Microsoft tools. A few third-party tools, led by PartitionMagic, gave techs the tools to resize partitions without losing the data the partitions held. Current Microsoft Windows tools allow you to resize free space. Windows enables you to resize partitions nondestructively by shrinking or expanding existing partitions with available free space.
![]()
Partition Naming Problems
So far, you’ve learned that MBR and GPT disks use partitions and that dynamic disks use volumes. Unfortunately, when you create a new partition or volume in current versions of Windows (10 and 11), the tool (Disk Management) only shows that you’re about to create a volume. See Figure 9.12.
• Figure 9.12 Note that the context menu only mentions volumes, not partitions.
When working with older MBR disks, and even though the context menu says “New Simple Volume,” you create partitions on basic disks. Figure 9.13 shows Disk Management in Windows 11 with a basic disk with four partitions. The first three (from left to right) are primary partitions. The fourth and fifth structures on the right are a logical drive and some blank, unpartitioned “Free space” in an extended partition.
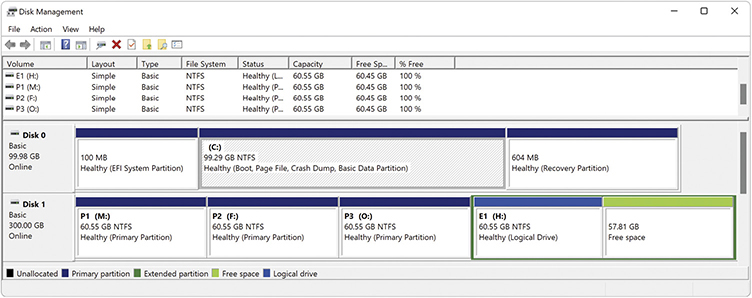
• Figure 9.13 Drive with four partitions displayed in Disk Management
■ Hard Drive Formatting
Once you’ve partitioned a hard drive, that partition is nothing more than a large number of blocks. Your operating system needs to store files, files with names like VacationMemories.mp4 or chrome.exe. We need to organize those blocks (see Figure 9.14).
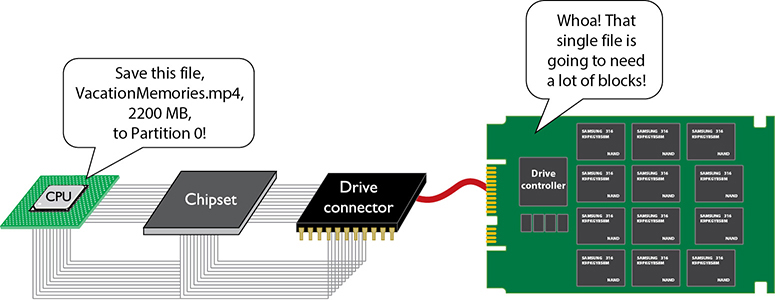
• Figure 9.14 Big files require many blocks.
Formatting, the process of making a partition into something that stores files, does two things. First, it creates a file system—an organization of all the blocks contained in that partition, enabling file storage and retrieval. Second, formatting creates a root directory in the file system to enable the partition to store folders. You must format every partition/volume so they can hold and retrieve data.
Every operating system has its own file systems. For the Apple folks, macOS uses APFS. Linux users have lots to choose from; most use ext4, but you will see others with names like BTRFS, XFS, ZFS, and so on. Windows has file systems with names like NTFS, FAT32, and exFAT. Let’s first understand what a file system does (using Windows as an example), and then we will discuss the differences.
File Systems in Windows
Every version of Windows comes with a built-in formatting utility with which to create one or more file systems on a partition or volume. The versions of Windows in current use support three Microsoft file systems: FAT32, NTFS, and exFAT (for removable media). All Windows file systems organize blocks of data into groups called clusters. The size of each cluster varies according to the file system and the size of the partition. Windows uses clusters to overcome some of the limitations in addressing inherent to each file system. (I’ll add charts with each file system to show how the clusters scale.)
FAT32
The base storage area for hard drives is a block; each block stores up to 4096 bytes of data. In a small partition, each cluster is made up of one block. If a file is larger than 4096 bytes, it will use as many clusters as needed to store the file. The OS needs a method to fill one cluster, find another that’s unused, and fill it, continuing to fill clusters until the file is completely stored. Once the OS stores a file, it must remember which cluster holds the file, so it can be retrieved later. If an OS stores a file smaller than 4096 bytes, the rest of the cluster goes to waste. We accept this waste because most files are far larger than 4096 bytes.
MS-DOS version 2.1 first supported hard drives using a data structure and indexing system to keep track of stored data on the hard drive, and Microsoft called this structure the file allocation table (FAT). Think of the FAT as nothing more than a card catalog that keeps track of which clusters store the various parts of a file. The official jargon term for a FAT is data structure, but it is more like a two-column spreadsheet.
The left column (see Figure 9.15) gives each cluster a hexadecimal number from 00000000 to FFFFFFFF. Each hexadecimal character represents four binary numbers or 4 bits. Eight hex characters, therefore, represent 32 bits. If you do the math (232), you’ll find that there are over four billion clusters that can be tracked or indexed.

• Figure 9.15 32-bit FAT
We call this type of FAT a 32-bit FAT or FAT32. And it’s not just hard drives and SSDs that have FATs. Many USB flash drives use FAT32.
The right column of the FAT contains information on the status of clusters. All hard drives, even brand-new drives fresh from the factory, contain faulty blocks that cannot store data because of imperfections in the construction of the drives. The OS must locate these bad blocks, mark them as unusable, and then prevent any files from being written to them. This mapping of bad blocks is one of the functions of high-level formatting. After the format program creates the FAT, it marches through every block of the entire partition, writing and attempting to read from each block sequentially. If it finds a bad block, it places a special status code (0000FFF7) in the block’s FAT location, indicating that the cluster is unavailable for use. Formatting also marks the good blocks with code 00000000 (see Figure 9.16).

• Figure 9.16 Bad blocks marked
FAT32 in Action
Suppose you have a system with a drive using FAT32. When an application such as Microsoft Word tells the OS to save a file, Windows starts at the beginning of the FAT, looking for the first space marked “open for use” (00000000), and begins to write to that cluster. If the entire file fits within that one cluster, Windows places the code 0000FFFF (last cluster) into the cluster’s status area in the FAT. That’s called the end-of-file marker. Windows then goes to the folder storing the file and adds the filename and the cluster’s number to the folder list. If the file requires more than one cluster, Windows searches for the next open cluster and places the number of the next cluster in the status area, filling and adding clusters until the entire file is saved. The last cluster then receives the end-of-file marker (0000FFFF).
Let’s run through an example of this process, starting by selecting an arbitrary part of the FAT: from 03213ABB to 03213AC7. Assume you want to save a file called mom.txt. Before saving the file, the FAT looks like Figure 9.17.

• Figure 9.17 The initial FAT
Windows finds the first open cluster, 03213ABB, and fills it. But the entire mom.txt file won’t fit into that cluster. Needing more space, the OS goes through the FAT to find the next open cluster. It finds cluster 03213ABC. Before filling 03213ABC, the value 03213ABC is placed in 03213ABB’s status. Even after filling two clusters, more of the mom.txt file remains, so Windows must find one more cluster. The 03213ABD cluster has been marked 0000FFF7 (bad block), so Windows skips over 03213ABD, finding 03213ABE.
Before filling 03213ABE, Windows enters the value 03213ABE in 03213ABC’s status. Windows does not completely fill 03213ABE, signifying that the entire mom.txt file has been stored. Windows enters the value 0000FFFF in 03213ABE’s status, indicating the end of file (see Figure 9.18).
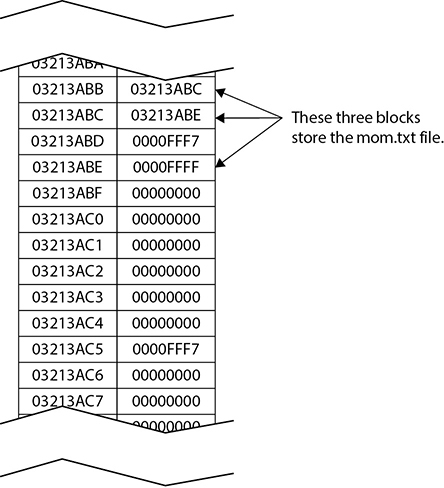
• Figure 9.18 End of file reached
After saving all of the clusters, Windows locates the file’s folder (yes, folders also are stored on blocks, but they get a different set of blocks, somewhere else on the disk) and records the filename, size, date/time, and starting cluster, like this:
![]()
If a program requests that file, the process is reversed. Windows locates the folder containing the file to determine the starting cluster and then pulls a piece of the file from each cluster until it sees the end-of-file cluster. Windows then hands the reassembled file to the requesting application.
Clearly, without the FAT, Windows cannot locate files. FAT32 automatically makes two copies of the FAT. One FAT backs up the other to provide special utilities a way to recover a FAT that gets corrupted—a painfully common occurrence.
Cluster Sizes in FAT32
Cluster sizes scale according to the file system. FAT32 offers 4-KB cluster sizes up to a partition size of 2 GB, which matches the size of a 4-KB block. Larger partitions require clusters with more blocks, thus reducing somewhat the efficiency of that drive. Table 9.2 shows the scaling effect in FAT32.
Table 9.2 FAT32 Cluster Sizes

FAT32 is still very much commonly used today, though not for operating system partitions. Rather, you’ll see it on smaller (< 32-GB) flash-media USB drives.
Fragmentation
Continuing with the example, let’s use Microsoft Word to save two more files: a letter called Important Document 31.docx and a letter named System Storage.docx. The Important Document 31.docx file takes the next three clusters—03213ABF, 03213AC0, and 03213AC1—and System Storage.docx takes two clusters—03213AC2 and 03213AC3 (see Figure 9.19).
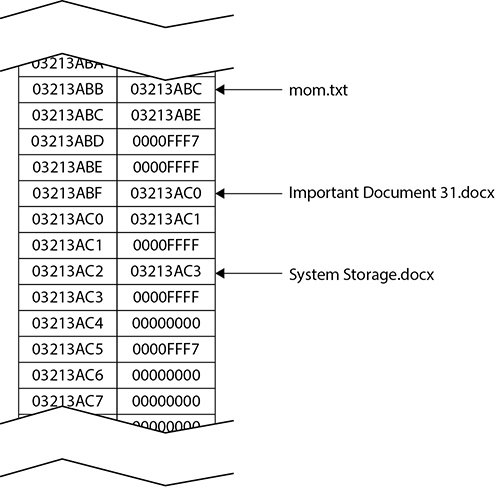
• Figure 9.19 Three files saved
Assuming these files are all in the same folder, the file information looks like this:

Now suppose you erase mom.txt. Windows does not delete the block entries in the FAT for mom.txt when it erases the file. Windows only alters the information in the folder, simply changing the first letter of mom.txt to the lowercase Greek letter σ (sigma), as shown next. This causes the file to “disappear” as far as the OS knows. It won’t show up, for example, in Windows Explorer, even though the data still resides on the hard drive for the moment.
![]()
Note that under normal circumstances, Windows does not actually delete files when you press the DELETE key. Instead, Windows moves the file listing (but not the actual blocks) to a special hidden directory that you can access via the Recycle Bin. The files themselves are not actually deleted until you empty the Recycle Bin.
Because the data for mom.txt is intact, you could use some program to change the σ back into another letter and thus get the document back. A number of third-party undelete tools are available. Figure 9.20 shows one such program at work. Just remember that if you want to use an undelete tool, you must use it quickly. The space allocated to your deleted file may soon be overwritten by a new file.

• Figure 9.20 Piriform Recuva in action
Let’s say you just emptied your Recycle Bin. You now save one more file, Taxrec.xls, a big spreadsheet that will take six clusters, into the same folder that once held mom.txt. As Windows writes the file to the drive, it overwrites the space that mom.txt used, but it needs three more clusters. The next three available clusters are 03213AC4, 03213AC6 (skipping cluster 03213AC5, which is marked bad), and 03213AC7 (see Figure 9.21).

• Figure 9.21 The Taxrec.xls file, fragmented
Notice that Taxrec.xls is in two pieces, thus fragmented. Fragmentation takes place all of the time on FAT32 systems. Although the system easily negotiates a tiny fragmented file split into only two parts, excess fragmentation slows down the system during hard drive reads and writes. This example is fragmented into two pieces; in the real world, a file might fragment into hundreds of pieces, forcing the read/write heads to travel all over the hard drive to retrieve a single file. You can dramatically improve the speed at which the hard drive reads and writes files by eliminating this fragmentation.
Windows 10 and 11 come with an app called Optimize Drives (known in older versions of Windows as Disk Defragmenter) that can rearrange the files into neat contiguous chunks (see Figure 9.22). Windows does this automatically by default. Defragmentation is crucial for ensuring the top performance of a mechanical hard drive. The “Maintaining and Troubleshooting Hard Drives” section of this chapter gives the details on working with Optimize Drives in Windows.

• Figure 9.22 Windows 10 Optimize Drives
SSDs also have fragmentation of a sort, but the nature of an SSD means almost any page is as easily accessed as any other. In the first-generation SSDs, once data was written into a memory cell, it stayed there until the drive was full. Even if the cell contained file contents from a “deleted” file, the cell was not immediately erased or overwritten, because the SSD controller had no way to know the cell’s contents were deleted as far as the OS was concerned.
Because SSD memory cells have a finite number of times that they can be written to before wearing out, the first generation of SSDs waited until all the cells of an SSD were filled before erasing and reusing a previously written cell.
SSDs have a feature called trim that enables the OS to issue commands to clean up and reuse deleted areas. Windows runs trim automatically, so there’s rarely any reason at all to defragment any SSD—but we will develop this more when we discuss troubleshooting later in this chapter.
NTFS
The Windows format of choice these days is the New Technology File System (NTFS). NTFS came out a long time ago with the first version of Windows NT, thus the name. Over the years, NTFS has undergone several improvements. NTFS uses clusters of blocks and file allocation tables, but in a much more complex and powerful way compared to FAT32. NTFS offers six major improvements and refinements: redundancy, security, compression, encryption, disk quotas, and cluster sizing.
NTFS Structure
NTFS utilizes an enhanced file allocation table called the master file table (MFT). An NTFS partition keeps a backup copy of the most critical parts of the MFT in the middle of the disk, reducing the chance that a serious drive error can wipe out both the MFT and the MFT copy. Whenever you defragment an NTFS partition, you’ll see a small, immovable chunk somewhere on the drive, often near the front; that’s the MFT (see Figure 9.23).
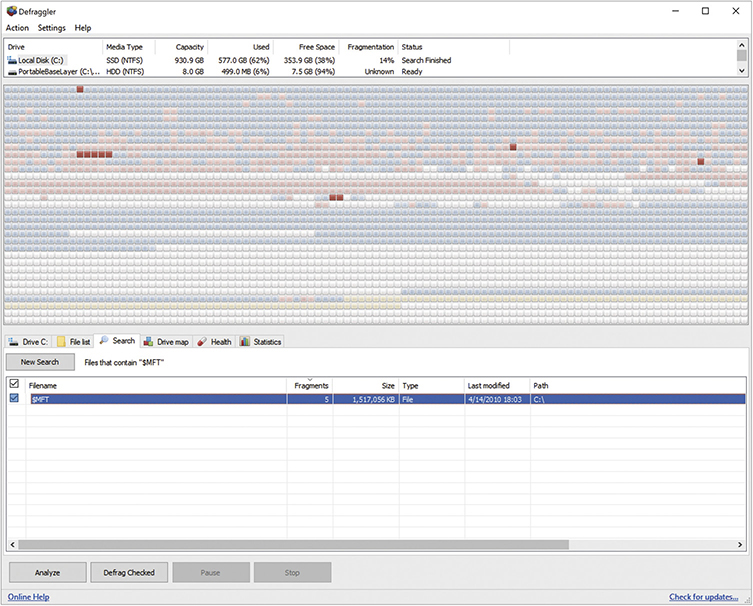
• Figure 9.23 The NTFS MFT appears in a defragmenter program as the highlighted red blocks.
Security
NTFS views individual files and folders as objects and provides security for those objects through a feature called the access control list (ACL). Future chapters go into this in much more detail.
Compression
NTFS enables you to compress individual files and folders to save space on a hard drive. Compression makes access time to the data slower because the OS must uncompress files every time you use them, but in a space-limited environment, sometimes that’s what you have to do. Windows Explorer/File Explorer displays filenames for compressed files in blue.
Encryption
One of the big draws with NTFS is file encryption, making files unreadable to anybody who doesn’t have the right key. You can encrypt a single file, a folder, or a folder full of files. Microsoft calls the encryption utility in NTFS the encrypting file system (EFS), but it’s simply an aspect of NTFS, not a standalone file system. You’ll learn more about encryption when you read Chapter 13.
Disk Quotas
NTFS supports disk quotas, enabling administrators to set limits on drive space usage for users. To set quotas, you must log on as an Administrator, right-click the hard drive name, and select Properties. In the Drive Properties dialog box, select the Quota tab and make changes. Figure 9.24 shows configured quotas for a hard drive. Although rarely used on single-user systems, setting disk quotas on multiuser systems prevents any individual user from monopolizing your hard disk space.

• Figure 9.24 Hard drive quotas in Windows 10
Cluster Sizes
NTFS uses clusters, much like FAT32. The numbers equate to block size until you get to very large partitions. Table 9.3 shows the default cluster sizes for NTFS.
Table 9.3 NTFS Cluster Sizes

By default, NTFS supports partitions up to ~16 TB on a dynamic disk (though only up to 2 TB on a basic disk). By tweaking the cluster sizes, you can get NTFS to support partitions up to 16 exabytes, or 18,446,744,073,709,551,616 bytes! That might support any and all upcoming hard drive capacities for the next 100 years or so.
With so many file systems, how do you know which one to use? In the case of internal hard drives, you should use the most feature-rich system your OS supports. For all modern versions of Windows, use NTFS. External hard drives and flash drives still often use FAT32 because NTFS features such as the ACL and encryption can make access difficult when you move the drive between systems, but with that exception, NTFS is your best choice on a Windows-based system.
exFAT
Everyone loves USB flash drives. Their ease of use and convenience make them indispensable for those of us who enjoy sharing a program, some photos, or a playlist. But people today want to share more than just a few small files, and they can do so with larger flash drives. As flash drives grow bigger in capacity, however, the file system becomes a problem.
The file system we have used for years on flash drives, FAT32, does not work on drives larger than 2 TB. Worse, FAT32 limits file size to 4 GB. Because there is frequent need to physically transport many files that are often larger than 4 GB, Microsoft developed a replacement for FAT32.
The newer file system, called exFAT, breaks the 4-GB file-size barrier, supporting files up to 16 exabytes (EB) and a theoretical partition limit of 64 zettabytes (ZB). Microsoft recommends a partition size of up to 512 TB on today’s larger USB flash drives, which should be enough for a while. The exFAT file system extends FAT32 from 32-bit cluster entries to 64-bit cluster entries in the file table. Like FAT32, on the other hand, exFAT still lacks all of NTFS’s extra features such as permissions, compression, and encryption.
File Systems in macOS
From 1998 to 2017, MacOS used Hierarchical File System Plus (HFS+). Since 2017, however, all new Macs (and existing systems upgrading macOS) use the Apple File System (APFS) by default. Unlike HFS+, APFS is optimized for SSDs, allows for full disk encryption, and enables snapshots, among other improvements. Like Windows and Linux, macOS can read and write to several different file systems, such as FAT32 and exFAT, though only read NTFS.
File Systems in Linux
Most Linux distributions use a file system known as the Fourth Extended File System (ext4) by default. Some older distros use one of its predecessors, such as ext2 or ext3. The ext4 file system supports volumes up to 1 exabyte (EB) with file sizes up to 16 TB and is backward compatible with ext2 and ext3. In other words, you can mount an ext3 volume as an ext4 volume with no problems. You don’t need to know the details of ext3 or ext4, just that they are Linux file systems and that ext4 supports volumes up to 1 EB with file sizes up to 16 TB.
Many Linux distributions, especially at the enterprise level (big data centers), use the ZFS file system or its newer cousin, BTRFS (pronounced, “butter eff ess”). Both offer powerful copy and disk management features that go well beyond the scope of CompTIA A+. For more information on ZFS and most likely the file system wave of the future, even in Windows, start with the Wikipedia article about ZFS and follow the links to the sources.
■ The Partitioning, Formatting, and Pooling Process
Now that you understand the concepts of partitioning and formatting, let’s go through the process of setting up an installed hard drive by using different partitioning and formatting tools. At the end of the section, we’ll look at the process of creating a storage pool by creating a virtual disk. If you have access to a system, try following along with these descriptions. Don’t make any changes to a drive you want to keep, because both partitioning and formatting are destructive processes. The pooling process is also destructive. You cannot follow the procedure in that discussion unless you have a few drives to erase.
Bootable Media
Imagine you’ve built a brand-new PC. The hard drive has no OS, so you need to boot up something to set up that hard drive. Any software that can boot up a system is by definition an operating system. You need an optical disc or USB flash drive with a bootable OS installed. Any removable media that has a bootable OS is generically called a boot device or boot disc. Your system boots off of the boot device, which then loads some kind of OS that enables you to partition, format, and install an OS on your new hard drive. Boot devices come from many sources. All Windows OS installation media are boot devices (see Figure 9.25), as are Linux installation media.

• Figure 9.25 Windows 10 bootable media
Boot devices may also be a medium that has an image of an installation disc. These images are usually stored as a file with a name that has an extension of “.iso.” Image files may be on a traditional boot device, such as a disc or flash drive, but they can come from anyplace, such as on a network drive.
Every boot device has partitioning tools and a way to format a new partition. A hard drive must have a partition and has to be formatted to support an OS installation.
Partitioning and Formatting with the Installation Media
When you boot up Windows installation media and the installation program detects a hard drive that is not yet partitioned, it prompts you through a sequence of steps to partition and format the hard drive. Chapter 11 covers the entire installation process, but we’ll jump ahead and dive into the partitioning part of the installation here to see how this is done.
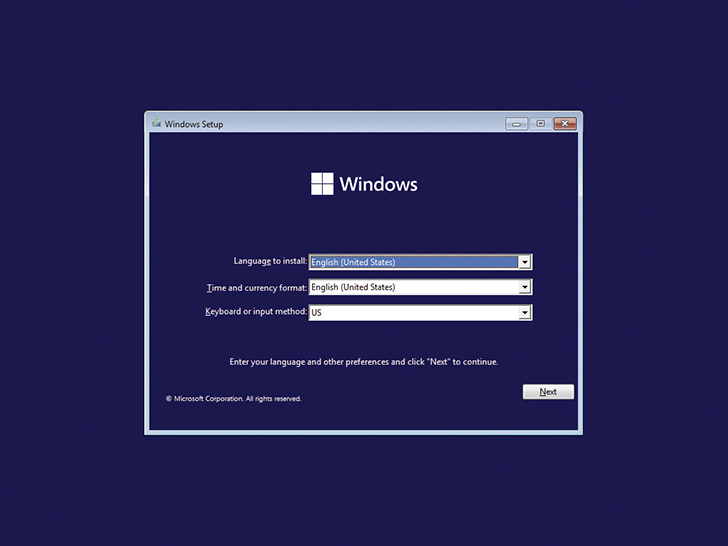
The process of partitioning and formatting when installing Windows is straightforward. You’ll go through a couple of installation screens (see Figure 9.26) where you select things such as language and get prompted for a product key and acceptance of the license agreement. Eventually you’ll get to the Where do you want to install Windows? dialog box (see Figure 9.27).
• Figure 9.26 Starting the Windows installation

• Figure 9.27 Where do you want to install Windows?
Click Next to do the most common partitioning and formatting action: creating a single C: partition, making it active, and formatting it as NTFS. Note that Windows creates three partitions: an EFI or System Reserved partition, the C: partition, and a Recovery partition. This is normal, the way the system was designed to work. Figure 9.28 shows a typical Windows installation in Disk Management.
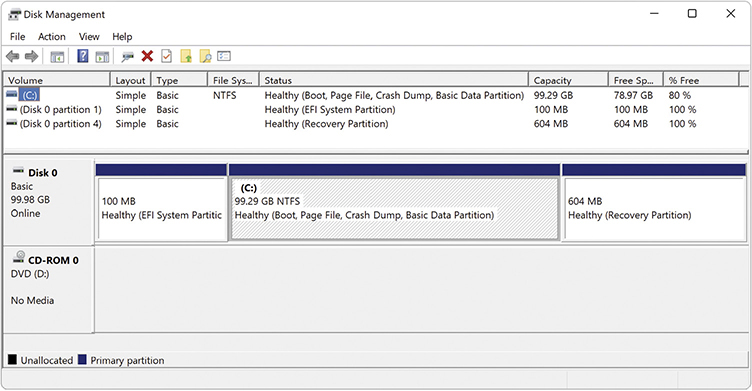
• Figure 9.28 Disk Management showing Windows 11’s default partitions
If you want to do any custom partitioning or delete existing partitions, select one of the options. To create a new partition, click the New button. Type in an amount in megabytes that you want to use for a new partition, then click Apply. You will get a notice that Windows might create additional partitions for system files. When you click OK, Windows will create the 100-MB EFI or System Reserved partition as well as the partition you specified (see Figure 9.29). On GPT drives, it will create a 16-MB Reserved MSR partition that, according to Microsoft, helps with partition management. Any leftover drive space will be listed as Unallocated Space.

• Figure 9.29 New partition with System Reserved partition and Unallocated Space
Once you create a new partition, click the Format button. The installer won’t ask you what file system to use. Newer Windows versions can read FAT32 drives, but they won’t install to such a partition by default.
The example here has a 1-TB drive with a 58-GB partition and 965 GB of unallocated space. If you’ve gone through this process and have changed your mind, now wanting to make the partition use the full terabyte, what do you have to do? You can simply click the Extend button and then apply the rest of the unallocated space to the currently formatted partition. The Extend function enables you to tack unpartitioned space onto an already partitioned drive with the click of the mouse.
Disk Management
By now, you are familiar with Disk Management, because you’ve seen it in many previous figures. Since it is the primary graphical tool for partitioning and formatting drives after installation, I want to go into more depth on some of its features. The Run Command for Disk Management, dskmgmt.msc, allows you to do just about everything you need to do to a hard drive or solid-state drive in one handy tool, including initialization, creating volumes, changing drive letters, using dynamic disks, extending drives, and more. You can find Disk Management in the Quick Links menu, under Administrative Tools, or you can just type disk management in the Start menu and open it directly (see Figure 9.30).
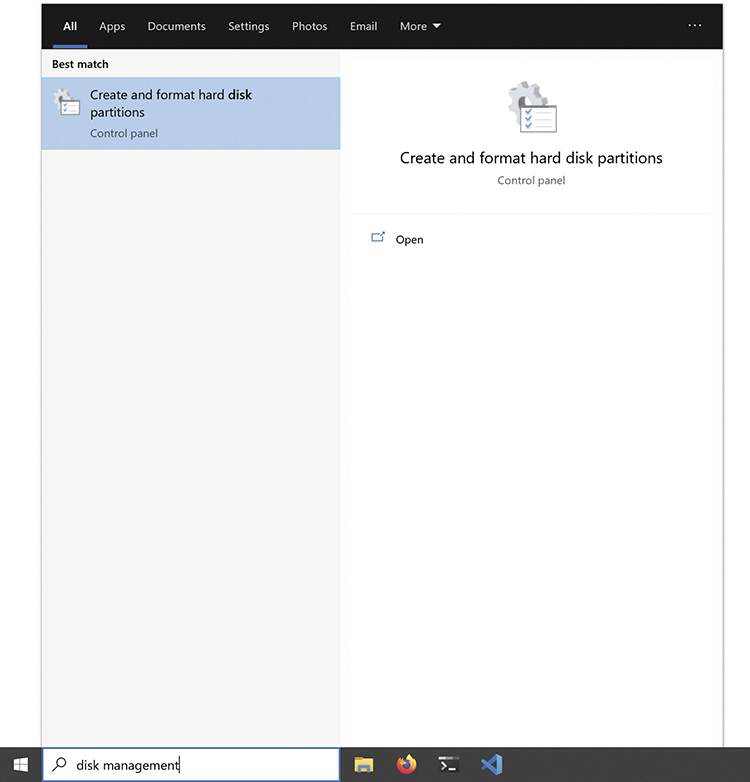
• Figure 9.30 Opening Disk Management directly (shown as Create and format hard disk partitions)
Disk Initialization
Every hard drive in a Windows system has special information placed onto the drive through a process called disk initialization. (CompTIA refers to this as initializing a disk.) This initialization information includes identifiers that say “this drive belongs in this system” and other information that defines what this hard drive does in the system. If the hard drive is part of a software RAID array, for example, its RAID information is stored in the initialization. If it’s part of a spanned volume, this is also stored there.
All new drives must be initialized before you can use them. When you install an extra hard drive into a Windows system and start Disk Management, it notices the new drive and starts the Hard Drive Initialization Wizard. If you don’t let the wizard run, the drive will be listed as unknown (see Figure 9.31).

• Figure 9.31 Unknown drive in Disk Management
To initialize a disk, right-click the disk icon and select Initialize. You will get the option to select MBR or GPT as a partition style (see Figure 9.32). Once a disk is initialized, you can see the status of the drive—a handy tool for troubleshooting.

• Figure 9.32 Initializing a drive
Disk Management enables you to view the drive status of every mass storage device in your system. Hopefully, you’ll mostly see each drive listed as Healthy, meaning that nothing is happening to it and things are going along swimmingly. You’re also already familiar with the Unallocated and Active statuses, but here are a few more to be familiar with for the CompTIA A+ exams and real life as a tech:
■ Foreign drive You see this when you move a dynamic disk from one computer to another.
■ Formatting As you might have guessed, you see this when you’re formatting a drive.
■ Failed Pray you never see this status, because it means that the disk is damaged or corrupt and you’ve probably lost some data.
■ Online This is what you see if a disk is healthy and communicating properly with the computer.
■ Offline The disk is either corrupted or having communication problems.
A newly installed drive is always set as a basic disk. There’s nothing wrong with using basic disks, other than that you miss out on some handy features.
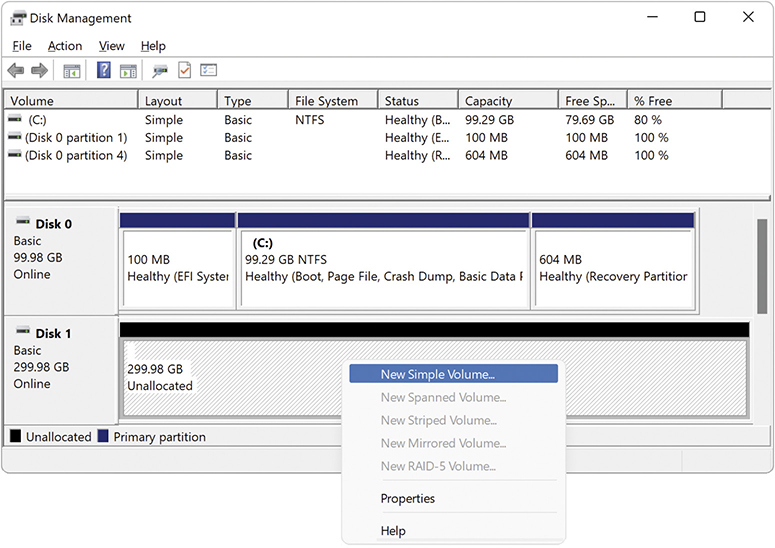
Creating Partitions and Volumes in Disk Management
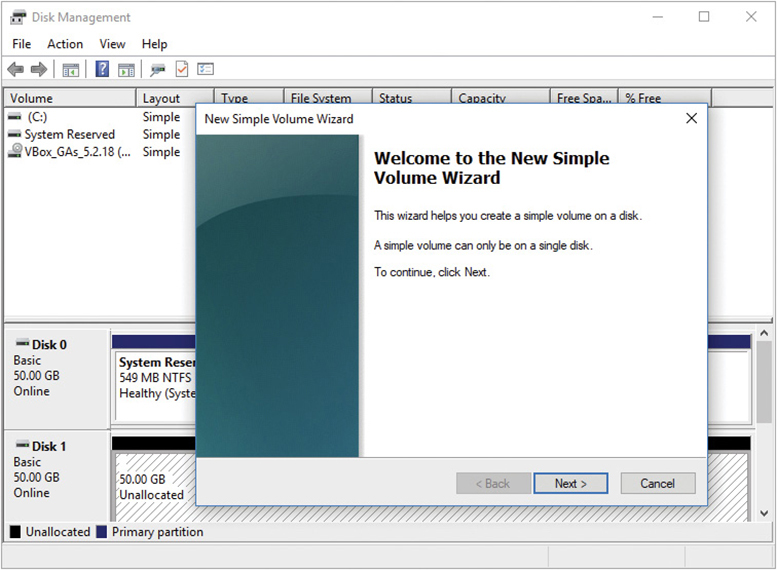
To create partitions or volumes, right-click the unallocated part of the drive and select New Simple Volume. Disk Management runs the New Simple Volume Wizard. You’ll go straight to the sizing screen (see Figure 9.33).

• Figure 9.33 Specifying the simple volume size in the New Simple Volume Wizard
Specify a volume size and click Next. The wizard will ask if you want to assign a drive letter to the volume, mount it as a folder to an existing volume, or do neither (see Figure 9.34). In almost all cases, you’ll want to give simple volumes a drive letter.

• Figure 9.34 Assigning a drive letter to a volume
 Tech Tip
Automated Partition Types
Disk Management does not enable you to specify whether you want a primary or extended partition when you create a volume on MBR drives. The first three volumes you create will be primary partitions. Every volume thereafter will be a logical drive in an extended partition. The command-line tool, diskpart, offers options not available in Disk Management. Check out Chapter 16 for more details.
The last screen of the New Simple Volume Wizard asks for the type of format you want to use for this partition (see Figure 9.35). If your partition is 32 GB or less, you can make the drive FAT32 or NTFS. Windows requires NTFS on any partition greater than 32 GB. Although FAT32 supports partitions up to 2 TB, Microsoft wants you to use NTFS on larger partitions and creates this limit. With today’s multi-terabyte drives, there’s no good reason to use anything other than NTFS in Windows. In addition to the file system selection, you are offered a checkbox to perform a quick format or a full format. A quick format does not test the blocks as part of the format process, while the full format option does. (See “Formatting a Partition” later in this chapter for more details.)

• Figure 9.35 Choosing a file system type
You have a few more tasks to complete at this screen. You can add a volume label if you want. You can also choose the size of your clusters (Allocation unit size). You can sure speed up the format if you select the Perform a quick format checkbox. This will format your drive without checking every block. It’s fast and a bit risky, but new hard drives almost always come from the factory in perfect shape—so you must decide whether to use it or not.
Last, if you chose NTFS, you may enable file and folder compression. If you select this option, you’ll be able to right-click on any file or folder on this partition and compress it. To compress a file or folder, choose the one you want to compress, right-click, and select Properties. Then click the Advanced button and turn compression on (see Figure 9.36). Compression is handy for opening up space on a hard drive that’s filling up.

• Figure 9.36 Turning on compression
Dynamic Disks
You create dynamic disks from basic disks in Disk Management. Once you convert a drive from a basic disk to a dynamic disk, primary and extended partitions no longer exist; dynamic disks are divided into volumes instead of partitions. Because current versions of Windows call partitions volumes, the change to dynamic disk isn’t obvious at all.
To convert a basic disk to dynamic, just right-click the drive icon and select Convert to Dynamic Disk (see Figure 9.37). The process is very quick and safe, although the reverse is not true. The conversion from dynamic disk to basic disk first requires you to delete all volumes off the hard drive.
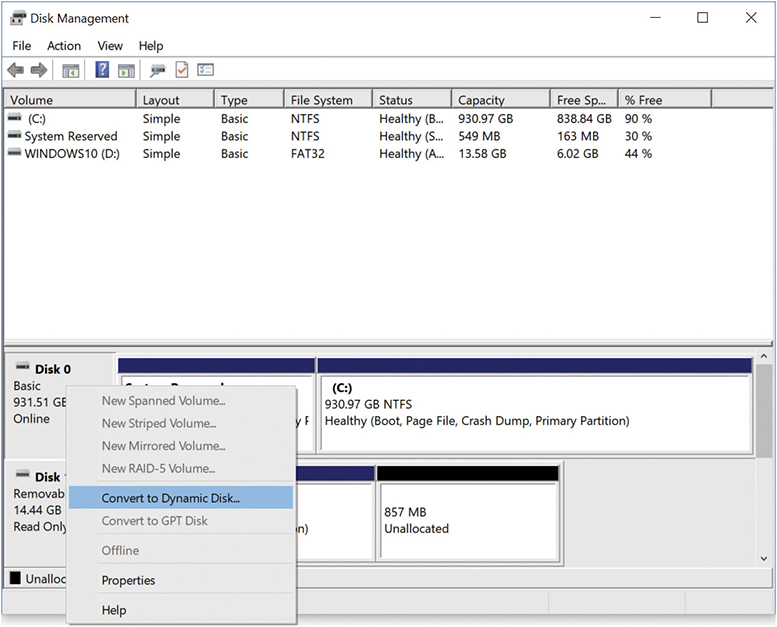
• Figure 9.37 Converting to a dynamic disk
Once you’ve converted the disk, you can make one of the five types of volumes on a dynamic disk: simple, spanned, striped, mirrored, or RAID 5. You’ll next learn how to implement the three most common volume types. The final step involves assigning a drive letter or mounting the volume as a folder.
Simple Volumes A simple volume acts just like a primary partition. If you have only one dynamic disk in a system, it can have only a simple volume. It’s important to note here that a simple volume may act like a traditional primary partition, but it is very different because you cannot install an operating system on it.
In Disk Management, right-click on any unallocated space on the dynamic disk and choose New Simple Volume to run the New Simple Volume Wizard (see Figure 9.38). You’ll see a series of screens that prompt you on size and file system, and then you’re finished. Figure 9.39 shows Disk Management with three simple volumes.
• Figure 9.38 Starting the New Simple Volume Wizard

• Figure 9.39 Simple volumes
Spanning Volumes You can extend the size of a simple volume to any unallocated space on a dynamic disk. You can also extend the volume to grab extra space on completely different dynamic disks, creating a spanned volume. This capability is very helpful if you manage an older system that needs a little more space but you don’t have time or inclination to upgrade. To extend or span, simply right-click the volume you want to make bigger, and choose Extend Volume from the options (see Figure 9.40). This opens the Extend Volume Wizard, which prompts you for the location of free space on a dynamic disk and the increased volume size you want to assign (see Figure 9.41). If you have multiple drives, you can span the volume just as easily to one of those drives.
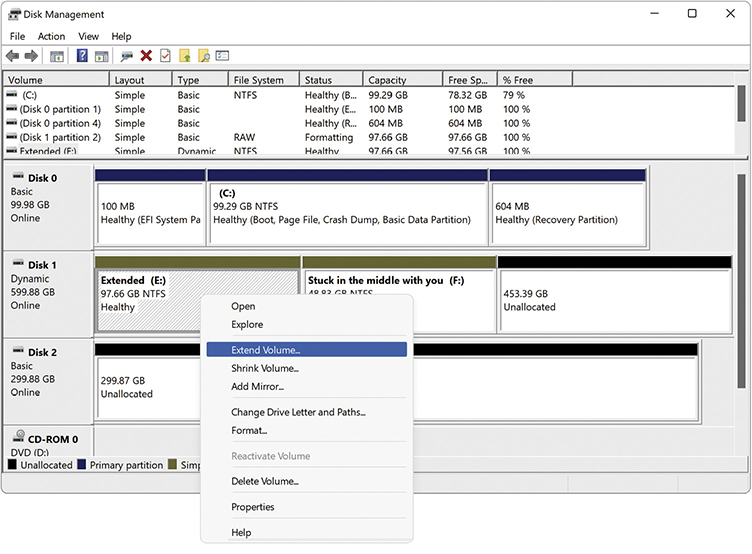
• Figure 9.40 Selecting the Extend Volume option

• Figure 9.41 The Extend Volume Wizard
The capability to extend and span volumes makes dynamic disks worth their weight in gold. If you start running out of space on a volume, you can simply add another physical hard drive to the system and span the volume to the new drive. This keeps your drive letters consistent and unchanging so your programs don’t get confused, yet enables you to expand drive space when needed.
Tech Tip
Reverting to Basic Disk
Once you convert a drive to dynamic, you cannot revert it to a basic disk without losing all the data on that drive. Be prepared to back up all data before you convert.
You can extend or span any simple volume on a dynamic disk, not just the “one on the end” in the Disk Management console. You simply select the volume to expand and the total volume increase you want. Figure 9.42 shows a simple 97.66-GB volume named Extended that has been enlarged an extra 453.39 GB in a portion of the hard drive, skipping the 48.83-GB volume in the middle of the drive. This created a 551.05-GB volume. Windows has no problem skipping areas on a dynamic disk.

• Figure 9.42 Extended volume
Striped Volumes If you have two or more dynamic disks in a PC, Disk Management enables you to combine them into a striped volume. Although Disk Management doesn’t use the term, you know this as a RAID 0 array. A striped volume spreads out blocks of each file across multiple disks. Using two or more drives in a group called a stripe set, striping writes data first to a certain number of clusters on one drive, then to a certain number of clusters on the next drive, and so on. It speeds up data throughput because the system has to wait a much shorter time for a drive to read or write data. The drawback of striping is that if any single drive in the stripe set fails, all the data in the stripe set is lost.
Tech Tip
Extending Hard Drives in Windows
You can extend and shrink volumes in current versions of Windows without using dynamic disks. You can shrink any volume with available free space (though you can’t shrink the volume by the whole amount of free space, based on the location of unmovable sectors such as the MBR), and you can expand volumes with unallocated space on the drive.
To shrink a volume, right-click on it and select Shrink Volume. Disk Management will calculate how much you can shrink it, and then you can choose up to that amount.
Extending volumes is equally straightforward. To extend, right-click and select Extend Volume.
Note that CompTIA refers to the processes as extending partitions and, in an odd pairing of grammar, shrink partitions.
To create a striped volume, right-click on any unused space on a drive, choose New Volume, and then choose Striped. The wizard asks for the other drives you want to add to the stripe, and you need to select two unallocated spaces on other dynamic disks. Select the other unallocated spaces and go through the remaining screens on sizing and formatting until you’ve created a new striped volume (see Figure 9.43). The two stripes in Figure 9.43 appear to have different sizes, but if you look closely you’ll see they are both 300 GB. All stripes must be the same size on each drive.

• Figure 9.43 Two striped drives
Mirrored Volumes Windows 10 and 11 can create a mirror set with two drives for data redundancy. You know mirrors from Chapter 8 as RAID 1. To create a mirror, right-click on unallocated space on a drive and select New Mirrored Volume (see Figure 9.44). This runs the New Mirrored Volume Wizard. Click Next to continue. Select an available disk in the Available box and click the Add button to move it to the Selected box (see Figure 9.45). Click Next to get to the by-now-familiar Assign Drive Letter or Path dialog box and select what is appropriate for the PC.
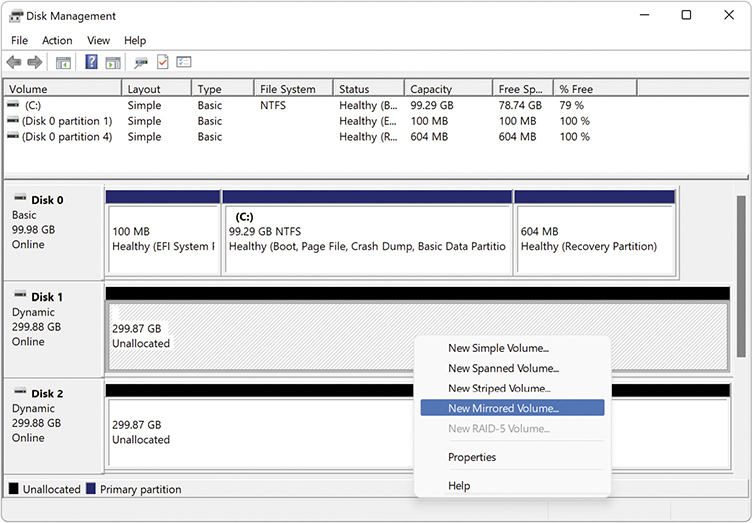
• Figure 9.44 Selecting a new mirror

• Figure 9.45 Selecting drives for the array
Other Levels of RAID Disk Management enables you to create a RAID 5 array that uses three or more disks to create a robust solution for storage. This applies to all the Professional editions of Windows. Unfortunately for users of those operating systems, you can only make the array on a Windows Server machine that you access remotely across a network. (Starting with the Professional and Enterprise editions of Windows 8, Microsoft includes Storage Spaces, an alternative way to do software pseudo-RAID in the form of pooling; one option closely resembles RAID 5. See the “Storage Spaces” section later in the chapter for more details.)
Disk Management cannot do any nested RAID arrays. So if you want RAID 0+1 or RAID 1+0 (RAID 10), you need to use hardware RAID.
Mounting Partitions as Folders
While partitions and volumes, other than the one Windows boots from, can be assigned a drive letter, D: through Z:, they can also be mounted as a folder on another drive, also known as a mount point. This enables you to use your existing folders to store more data than can fit on a single drive or partition/volume (see Figure 9.46).
• Figure 9.46 Mounting a drive as a folder
Imagine you use your Documents folder on a Windows machine to store your digital photos. As your collection grows, you realize your current 500-GB SSD is running out of space. You’re willing to buy another drive, but you have a great organizational structure in your existing Documents folder and you don’t want to lose that. You don’t have to move everything to the new hard drive, either.
After you install the new hard drive, you can mount the primary partition (or logical drive) as a folder within the existing Documents folder on your C: drive (for example, C:UsersMikeDocumentsMy Photos). At this point the drive doesn’t have a letter (though you could add one later, if you wanted). To use the new drive, just drop your files into the My Photos folder. They’ll be stored on the second drive, not the original 500-GB drive (see Figure 9.47). Amazing!

• Figure 9.47 Adding photos to the mounted folder stores them on the second hard drive.
To create a mount point, right-click on an unallocated section of a drive and choose New Simple Volume. This opens the appropriately named wizard. In the second screen, you can select a mount point rather than a drive letter (see Figure 9.48). Browse to a blank folder on an NTFS-formatted drive or create a new folder and you’re in business.

• Figure 9.48 Choosing to create a mounted volume
 Try This!
Working with Dynamic Drives and Mount Points
Play with Disk Management to experience the simplicity and elegance of the utility. Get a couple of spare drives and install them into a Windows PC. Open the Disk Management console and try the following setup options:
1. Make a mirror set.
2. Make a stripe set.
3. Make them into a single volume spanned between both drives.
4. Make a single volume that takes up a portion of one drive, and then extend that volume onto another portion of that drive. Finally, span that volume to the other hard drive as well.
5. Create a volume of some sort—you decide—and then mount that volume to a folder on the C: drive.
You’ll need to format the volumes after you create them so you can see how they manifest in Windows Explorer/File Explorer. Also, you’ll need to delete volumes to create a new setup. To delete a volume, right-click on the volume and choose Delete Volume. It’s almost too easy.
Assigning/Changing Drive Letters and Paths
Disk Management enables you to modify the drive letter, path, or mount point on currently installed mass storage devices. Right-click a drive and select Change Drive Letter and Paths. You can assign a desired drive letter to an optical drive—say, from D: to Z:, for example. Or, you can change a hard drive from D: to a non-letter-named mount point so it shows up in Windows Explorer/File Explorer as a subfolder. You have a ton of flexibility with Disk Management.
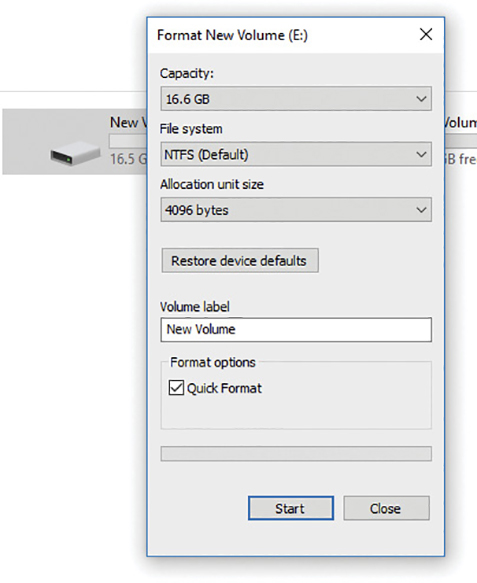
Formatting a Partition
You can format any Windows partition/volume in Windows Explorer/File Explorer. Just right-click on the drive name and choose Format. You’ll see a dialog box that asks for the type of file system you want to use, the cluster size, and a volume label (see Figure 9.49). You can also do a quick format or compress the volume. The Quick Format option tells Windows not to test the blocks and is a handy option when you’re in a hurry—and feeling lucky.
• Figure 9.49 Format New Volume dialog box
Disk Management is today’s preferred formatting tool for Windows. When you create a new partition or volume, the wizard also asks you what type of format you want to use. Always use NTFS unless you’re that rare and strange person who wants to dual-boot some ancient version of Windows.
All OS installation media partition and format as part of the OS installation. Windows simply prompts you to partition and then format the drive. Read the screens and you’ll do great.
Storage Spaces
With Windows 10 and 11, you can group one or more physical drives of any size into a single storage pool. These drives can be internal HDD or SSD or external storage connected via USB. It’s pretty sweet. Storage Spaces functions like a RAID management tool, except it goes well beyond the typical tool. Here’s the scoop.
First off, to run the tool, get to the Start screen and type storage spaces. Storage Spaces will show up in the Search. Click on it to run the program. The opening screen gives you pretty much a single option, to Create a new pool and storage space (see Figure 9.50). Click that option.

• Figure 9.50 Storage Spaces waiting to create the first pool
Storage Spaces will show you the available installed physical drives (see Figure 9.51). Select the drives you want to include in the pool and click the Create pool button.

• Figure 9.51 Drives available to use in a storage pool
Once you’ve created a pool, you need to select what Microsoft calls the resiliency mechanism, which essentially means providing one or more layers of redundancy so you can lose a hard drive or two and not lose any data. Sounds a lot like RAID, doesn’t it? Figure 9.52 shows the Create a storage space window with a Two-way mirror storage layout. Here’s where Storage Spaces gets pretty much cooler than any RAID management tool.
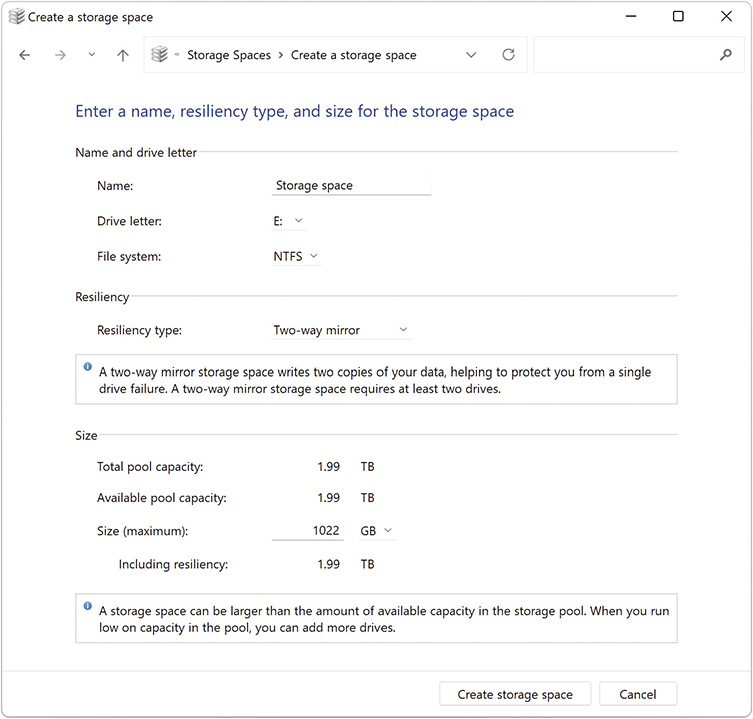
• Figure 9.52 Ready to create the storage space
Storage Spaces offers three different types of storage spaces:
■ Simple spaces are just pooled storage, like JBOD, that has multiple drives of whatever capacity added together to form a single virtual drive. Simple spaces provide no resiliency, so if a drive fails, the data goes away. These are good for temporary storage, scratch files, and the like.
■ Mirror spaces keep more than one copy of the data, like in a RAID mirror array, so you can lose one or more drives and still save your data. The number of drives in the array determines which mirror options you have. A two-way mirror requires at least two drives; a three-way mirror requires five or more. Mirror spaces work like RAID 1 or RAID 10, providing excellent redundancy and resiliency, and robust performance.
■ Parity spaces add another layer of resiliency to the array, similar to how a RAID 5 or RAID 6 provides redundancy. The added resiliency comes with both an upside and a downside. The good thing about parity spaces is that they are more space efficient than two-way mirroring. In two-way mirroring, for every 10 GB of data to be stored, 20 GB of storage must be installed. With parity spaces, for every 10 GB of stored data, only 15 GB of storage needs to be installed. The downside is that the performance overhead to manage parity spaces can have a significant impact on overall performance. Microsoft recommends using parity spaces for big files that don’t change a lot, like your movie collection. You can lose one drive and recover in a three-drive parity space. It takes a seven-drive parity space (at minimum) to enable you to recover from a two-drive loss.
When a disk fails in a space, Storage Spaces sends a warning through the standard Windows Action Center messaging. You can open Storage Spaces to reveal the failed drive and replace the drive readily.
Storage Spaces enables you to do one more very cool action: future-proof your storage needs. The thin provisioning feature means you can create a space with more capacity than your current physical drives provide. You might have a storage pool composed of two 2-TB drives and one 3-TB drive, laid out as a two-way mirror. Rather than limit your new space to a 3-TB capacity, you can assign whatever capacity you want, such as 12 TB, because you know your movie collection will grow. When you start to reach the capacity of the physical drives in the pool, Storage Spaces will tell you and enable you to add more physical capacity at that time. Thin provisioning means you don’t have to redo an array or space when you reach the limits of current hardware.
Tech Tip
SSDs and Storage Spaces
SSDs work great with some space types and not others. With a simple two-way or three-way mirror, go for it. You’ll add some speed and lots of resiliency. With parity spaces, on the other hand, the nature of how SSDs function inside might cause premature failure. It’s best to use HDDs with parity spaces.
■ Maintaining and Troubleshooting Hard Drives
Hard drives are complex mechanical and electrical devices. With platters spinning at thousands of rotations per minute, they also generate heat and vibration. All of these factors make hard drives susceptible to failure. In this section, you will learn some basic maintenance tasks that will keep your hard drives healthy, and for those inevitable instances when a hard drive fails, you will also learn what you can do to repair them.
Pay attention to the terminology used both on the CompTIA A+ exam and in the field. Current storage for drives focuses on blocks and logical block addressing. A block is one step above the physical layout of the drive, which gives a lot of flexibility in the media. Microsoft continues to use the term cluster to refer to locations in their file allocation tables. With NTFS, a cluster and a block are pretty much the same thing, a 4-KB chunk of a drive (until you get partitions larger than 16 TB). The official term for a cluster is an allocation unit. You’ll see all three terms used interchangeably in the field.
Maintenance
Hard drive maintenance can be broken down into two distinct functions: checking the disk occasionally for failed blocks, and keeping data organized on the drive so it can be accessed quickly.
Error Checking
Individual blocks on hard drives sometimes go bad. There’s nothing you can do to prevent this from happening, so it’s important that you check occasionally for bad blocks on drives. The tools used to perform this checking are generically called error-checking utilities, although the term for an older Microsoft tool—chkdsk (pronounced “checkdisk”)—is often used. Chkdsk is a command-line utility. Microsoft has a graphical version of this tool, which is called Error checking in Windows 10 and 11. macOS uses the Disk Utility. Linux offers a command-line tool called fsck. Whatever the name of the utility, each does the same job: when the tool finds bad blocks, it puts the electronic equivalent of orange cones (placing 0000FFF7 in the FAT/MFT) around them so the system won’t try to place data in those bad blocks.
Most error-checking tools do far more than just check for bad blocks. They go through all the drive’s filenames, looking for invalid names and attempting to fix them. They look for blocks that have no filenames associated with them (we call these lost chains) and erase them or save them as files for your review. From time to time, the underlying links between parent and child folders are lost, so a good error-checking tool checks every parent and child folder. With a folder such as C:TestData, for example, the tool makes sure that the Data folder is properly associated with its parent folder, C:Test, and that C:Test is properly associated with its child folder, C:TestData.
To access Error checking on a Windows system, open Windows Explorer/File Explorer, right-click on the drive you want to check, and choose Properties to open the drive’s Properties dialog box (see Figure 9.53). Select the Tools tab and click the Check or Check now button.

• Figure 9.53 The Tools tab in the Properties dialog box
In macOS, you’ll find Disk Utility in the Utilities folder. When open, you’ll get one option to try and fix any problems with your disk, First Aid (see Figure 9.54). First Aid checks for errors and will attempt to repair them if it can. You can run First Aid on a disk while macOS is booted, but sometimes Disk Utility won’t be able to work its magic on your disk because it’s in use and can’t be unmounted. If this happens, you need to reboot the system and press COMMAND-R until the Recovery partition loads. You can then load Disk Utility from here and run First Aid on the ailing disk again.

• Figure 9.54 Disk Utility options
Defragmentation
You read about fragmentation earlier in this chapter. Fragmentation of blocks increases your hard disk drive access times dramatically. It’s a good idea to defragment—or defrag—your traditional spinning drives as part of monthly maintenance. You access the defrag tool Optimize Drives the same way you access Error checking—right-click a drive in Windows Explorer/File Explorer and choose Properties—except you click the Optimize or Defragment now button on the Tools tab to open Optimize Drives.
Defragmentation is not interesting to watch but Windows today makes it a non-event by automatically defragging HDDs once a week by default (see Figure 9.55). While this takes care of dealing with spinning hard drives, what about the SSDs that most of our systems use today? In that case, Windows still needs to optimize the drive, but it will perform a retrim, which is jargon for letting the SSD know what sectors are not being used by the file system. This lets the SSD controller erase them so they can be used again in the future. Like the classic defragmentation on an HDD we discussed earlier, this is important for keeping your SSD performance at its peak.

• Figure 9.55 Optimize Drives, showing its default weekly schedule
Disk Cleanup
Did you know that the average hard drive is full of trash? Not the junk you intentionally put in your hard drive such as the terabytes of video of your cat Sparkles sitting in every box she can fit into. This kind of trash is all the files that you never see that Windows keeps for you. Here are a few examples:
■ Files in the Recycle Bin When you delete a file, it isn’t really deleted. It’s placed in the Recycle Bin in case you decide you need the file later. I just checked my Recycle Bin and found around 3 GB worth of files (see Figure 9.56). That’s a lot of trash!
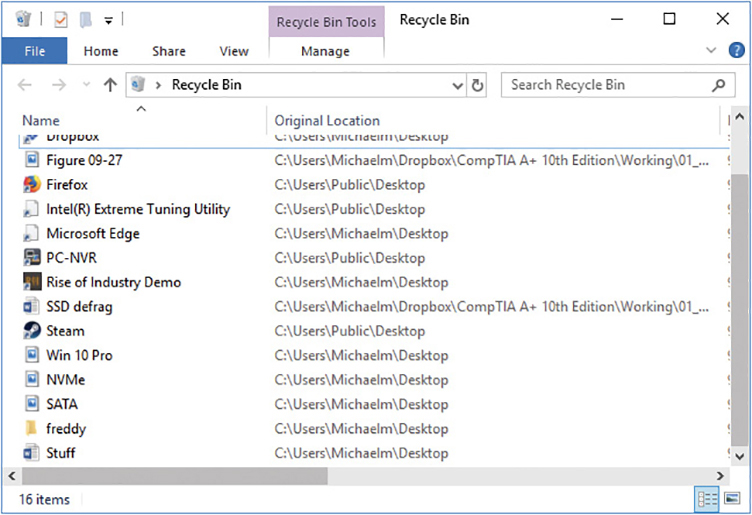
• Figure 9.56 Mike’s Recycle Bin
■ Temporary Internet files When you go to a Web site, your browser keeps copies of the graphics and other items so the page will load more quickly the next time you access it.
■ Downloaded program files This is for the legacy Web technologies of ActiveX and Java applets, so this should always be 0, but if you’re dealing with an older corporate PC, you might run across some items in here. You can see these in the Internet Options applet by clicking the Settings button under the Browsing history label. Click the View objects button on the Temporary Internet Files and History Settings dialog box. You’ll generally find only a few tiny files here.
■ Temporary files Many applications create temporary files, and for one reason or another, these temporary files sometimes aren’t deleted. The location of these files varies with the version of Windows, but they always reside in a folder called “Temp.”
Every hard drive eventually becomes filled with lots of unnecessary trash. All versions of Windows tend to act erratically when the drives run out of unused space. Fortunately, all versions of Windows have a powerful tool called Disk Cleanup (see Figure 9.57). You can access Disk Cleanup in Windows by clicking the Start button and typing disk cleanup. Click its icon to run the program.
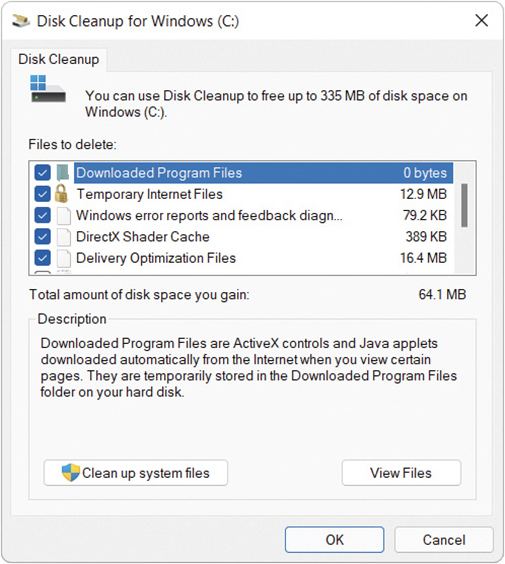
• Figure 9.57 Disk Cleanup
Disk Cleanup gets rid of the four types of files just described (and a number of others). Run Disk Cleanup once a month or so to keep plenty of space available on your hard drive.
1101
Troubleshooting Hard Drive Implementation
There’s no scarier computer problem than an error that points to trouble with a hard drive. This section looks at some of the more common problems that occur with hard drives and how to fix them. These issues fall into four broad categories: installation errors, data corruption, dying hard drives, and RAID issues.
Installation Errors
Installing a drive and getting to the point where it can hold data requires four distinct steps: connectivity, system setup, partitioning, and formatting. If you make a mistake at any point on any of these steps, the drive won’t work. The beauty of this is that if you make an error, you can walk back through each step and check for problems. The “Troubleshooting Hard Drive Installation” section in Chapter 8 covered physical connections and CMOS system setup, so this section concentrates on the latter two issues.
Partitioning Partitioning errors generally fall into two groups: failing to partition at all, and making the wrong size or type of partition. You’ll recognize the former type of error the first time you open Windows Explorer/File Explorer after installing a drive. If you forgot to partition it, the drive won’t even show up in Windows Explorer/File Explorer, only in Disk Management. If you made the partition too small, that’ll become painfully obvious when you start filling it up with files.
The fix for partitioning errors is simply to open Disk Management and do the partitioning correctly. Just right-click and select Extend Volume to correct the mistake. Remember that deleting any volume will permanently delete any data on that drive.
Formatting Failing to format a drive makes the drive unable to hold data. Accessing the drive in Windows results in a drive “is not accessible” error, and from a C:> prompt, you’ll get an “Invalid media type” error. Format the drive unless you’re certain that the drive has a format already. Corrupted files can create the invalid media error. Check the upcoming “Data Corruption” section for the fix.
Most of the time, formatting is a slow, boring process. But sometimes the drive makes “bad sounds” and you start seeing errors like the one shown in Figure 9.58 at the top of the screen. Remember, an allocation unit is another term for a block or cluster.

• Figure 9.58 The “Trying to recover lost allocation unit” error
The drive has run across a bad cluster and is trying to fix it. For years, I’ve told techs that seeing this error a few times doesn’t mean anything; every drive comes with a few bad spots. This is no longer true. Modern drives hide a significant number of extra blocks that they use to replace bad blocks automatically. If a new drive gets a lot of “Trying to recover lost allocation unit” errors, you can bet that the drive is dying and needs to be replaced. Get the hard drive maker’s diagnostic tool to be sure. Bad clusters are reported by S.M.A.R.T. (introduced in Chapter 8), one of several S.M.A.R.T. errors possible.
Mental Reinstallation Focus on the fact that all of these errors share a common thread—you just installed a drive! Installation errors don’t show up on a system that has been running correctly for three weeks; they show up the moment you try to do something with the drive you just installed. If a newly installed drive fails to work, do a “mental reinstallation.” Does the drive show up in the UEFI or traditional BIOS setup screens? No? Then recheck the data and power cables. If it does show up, did you remember to partition and format the drive? Did it need to be set to active? These are commonsense questions that come to mind as you march through your mental reinstallation. Even if you’ve installed thousands of drives over the years, you’ll be amazed at how often you do things such as forget to plug in power to a drive. Do the mental reinstallation—it really works!
Data Corruption
All hard drives occasionally get corrupted data in individual blocks. Power surges, accidental shutdowns, corrupted installation media, and viruses, along with hundreds of other problems, can cause this data loss/corruption. In most cases, this type of error shows up while Windows is running. Figure 9.59 shows a classic example.

• Figure 9.59 A corrupted data error
You may also see Windows error messages saying one of the following:
■ “The following file is missing or corrupt”
■ “The download location information is damaged”
■ “Unable to load file”
■ “… is not a valid Win32 application”
■ “Bootmgr is missing…Press CTRL+ALT+DEL to restart”
■ “Your PC ran into a problem…This problem caused your PC to restart”
■ “This app can’t run on your PC”
If core boot files become corrupted, you may see text errors at boot, such as the following:
■ “Error loading operating system”
■ “An error occurred while attempting to read the boot configuration data”
The first fix for any of these problems is to run the Error checking utility. Error checking will go through and mark bad blocks and, hopefully, move your data to a good block. If the same errors continue to appear after you run the Error checking utility, there’s a chance that the drive has too many bad blocks and may need to be recycled.
Almost all drives today take advantage of built-in error correction code (ECC) that constantly checks the drive for bad blocks. If the ECC detects a bad block, it marks the block as bad in the drive’s internal error map. Don’t confuse this error map with a FAT. The partitioning program creates the FAT. The drive’s internal error map was created at the factory on reserved drive heads and is invisible to the system. If the ECC finds a bad block, you will get a corrupted data error as the computer attempts to read the bad block. Disk-checking utilities fix this problem most of the time.
Dying Hard Drive
Physical problems are rare, thankfully, but they are devastating when they happen. If a hard drive is truly damaged physically, there is nothing that you or any service technician can do to fix it. Fortunately, hard drives are designed to take a phenomenal amount of punishment without failing. Physical problems manifest themselves in several ways. One common problem you start getting are extended read/write times, which is caused by a connection to a file being interrupted or terminated and could result in data corruption. Other signs that the hard drive might be dying is that the drive works properly but makes a lot of noise, or the drive seems to disappear. You might get a failure to boot after experiencing any of these events.
Windows will give you error messages with read/write failures. Good hard drives don’t fail to read or write. Only dying ones have these problems.
All mechanical hard drives make noise—the hum as the platters spin and the occasional slight scratching noise as the read/write heads access sectors are normal. However, if your drive begins to make any of the following sounds, it is about to die:
■ Continuous high-pitched squeal
■ Loud clicking sounds, a short pause, and then another series of clicking sounds
■ Continuous grinding noises or rumbling
Another way you can tell if your hard drive is having issues is by looking at the computer’s light-emitting diode (LED), which is located on the front of the computer case. There are LEDs that provide information on the health of the computer. The activity LED (green) and the status LED (bicolor, green/amber) can help you diagnose a hard drive problem such as if a drive has failed (or if there is a predicted failure reported by the drive), the slot is empty, the drive is rebuilding, etc.
Tech Tip
Long Warranties
Most hard drives have a three-year warranty. Before you throw away a dead drive, check the hard drive maker’s Web site or call them to see if the drive is still under warranty. Ask for a return material authorization (RMA). You’ll be amazed how many times you get a newer, and sometimes larger, hard drive for free. It never hurts to check!
If all else fails, back up your critical data and replace the drive. Windows comes with a decent backup utility, but don’t be afraid to research third-party options if it doesn’t meet your needs. The cloud backup services are particularly nice options because they provide off-site protection in addition to backing up your data.
You’ll know when a drive simply dies. If it’s the drive that contains your operating system, the system will lock up. When you try to restart the computer, you’ll see this error message or something similar to it:
Bootable Device Not Found
If it’s a second drive, it will simply stop showing up in Windows Explorer/File Explorer. The first thing to do in either case is to access the system setup program and see if autodetect sees the drive. If it does, you do not have a physical problem with the drive. If autodetect fails, shut off the system and remove the data cable, but leave the power cable attached. Restart the system and listen to the drive. If the drive spins up, you know it is getting good power. This is usually a clue that the drive is probably good. In that case, you need to look for more mundane problems such as an unplugged data cord or jumpers incorrectly set (PATA only). If the drive doesn’t spin up, try another power connector. If it still doesn’t spin up and you’ve triple-checked the jumpers and data cable, you have a problem with the onboard electronics and the drive is dead.
If the drive is an SSD, the troubleshooting process is similar: either the power or motherboard controller is bad, a power or data cable has failed, or the drive electronics are dead. Start with the power cable, changing it for a known-good one. Then try a known-good data cable using the original motherboard connection. Next, try a different motherboard connector. Still haven’t got it? It’s likely a bad drive, but you should confirm so by testing it in another known-good computer to see if it is detected by UEFI/BIOS and then by Windows Disk Management.
Troubleshooting RAID
For the most part, drive problems in a RAID array are identical to those seen on individual drives. There are a couple of errors unique to RAID, however, that need their own separate discussion.
Drive Not Recognized If you’re using hardware RAID and the configuration firmware doesn’t recognize one of the drives, first check to make sure the drives are powered and that they are connected to the proper connections. This is especially true of motherboards with onboard RAID that require you to use only certain special RAID connectors.
Tech Tip
Data Rescue Specialists
If you ever lose a hard drive that contains absolutely critical information, you can turn to a company that specializes in hard drive data recovery. The job will be expensive—prices usually start around $1000 (USD)—but when you have to have the data, such companies are your only hope. Do a search for “data recovery” for companies in this line of business.
RAID Stops Working When one of the drives in a RAID array fails, several things can happen depending on the type of array and the RAID controller. With RAID 0, the effect is dramatic. Many enthusiasts use RAID 0 for their OS drive to make it snappier. If you’re running such a rig that then loses a drive, you’ll most likely get a critical stop error that manifests as some sort of proprietary crash screen. Windows will show a Blue Screen of Death (BSoD), for example. On reboot, the computer will fail to boot or you’ll get a message such as Missing Drive in OS or Bootable device not found. You lose all your data because there’s no redundancy on a stripe set. You may see error messages before the crash related to read/write failures. On macOS machines, a failing drive or array may result in the Spinning Pinwheel of Death (SPoD). If there are no other systemic problems such as low RAM or low disk space, it’s time to break out RAID- or disk-diagnostic tools such as S.M.A.R.T. reader software.
All the other levels of RAID tend to do nothing extraordinary when one drive in the array fails. When you reboot the system, that’s when the RAID controller (if hardware) or Windows (if you’ve used the built-in tools) will squeal and tell you that a drive has failed.
Often, the failure of a drive will cause access to the contents of the drive to slow to a crawl, and that slow performance is your clue to check Device Manager or the RAID controller firmware. Some drive failures will cause the computer to crash. Others will show no effects until you get the error messages at reboot.
Regardless of the reason a RAID stops working or the effects, the fix is simple. Replace the failed drive and let the RAID rebuild itself. Life is good. If you need to know the reason for the failure, trying running S.M.A.R.T. reader software on the failed drive. If the drive electronics have some functionality, you may get results.
RAID Not Found The CompTIA A+ 220-1101 exam objectives use the term “RAID not found,” which doesn’t really exist as an error but instead implies a series of errors where an existing RAID array suddenly fails to appear. The problem with these errors is that they vary greatly depending on the make and model of hardware RAID or (heaven forbid) if you used software RAID.
A properly functioning hardware RAID array will always show up in the configuration utility. If an existing array stops working and you enter the configuration utility only to find the array is gone, you have big trouble. This points to either dead drives or faulty controllers. In either case they must be replaced.
If the array is gone but you can still see the drives, then the controller may have broken the array on its own. This is a rare action that some controllers take to try to save data. You should at least try to rebuild the array using whatever tools the controllers provide.
Chapter 9 Review
■ Chapter Summary
After reading this chapter and completing the exercises, you should understand the following about implementing mass storage.
Explain the partitions available in Windows
■ Modern magnetic hard drives feature 4096-byte Advanced Format sectors for storage. Solid-state drives have 4096-byte pages for storage. The controller on the HDD or SSD presents storage spaces as a set of blocks using logical block addressing. The operating system organizes storage based on the blocks rather than the internal structures of the drives.
■ Partitions are electronic subdivisions of physical drives. After partitioning, each partition must be formatted before it can be used to store files. Windows supports three partitioning schemes: master boot record (MBR), dynamic storage partitioning, and GUID partition table (GPT).
■ The MBR partitioning scheme uses a master boot record and a partition table to enable the partition with a valid operating system to boot.
■ MBR uses primary and extended partitions. Windows limits each MBR hard drive to a maximum of four partitions, with no more than one extended partition. Primary partitions can receive drive letters and support bootable operating systems. Extended partitions, which do not receive drive letters, house logical drives, which can receive drive letters.
■ Every partition contains a partition boot sector in its first sector. During boot-up, a hard drive’s MBR finds the active partition and uses the partition’s boot sector to load the OS.
■ Only active primary partitions can boot an operating system. Only one primary partition per hard drive can be marked as active.
■ Hard drives that use the dynamic storage partitioning scheme are called dynamic disks by Microsoft. Dynamic disks use volumes rather than partitions. There are no primary or extended volumes—a volume is simply a volume.
■ Dynamic disks support a total of five types of volumes: simple, spanned, striped, mirrored, and RAID 5. A simple volume is similar to a primary partition in that it can store files and can receive a drive letter or be mounted to a folder. Spanned volumes combine space from several volumes and treat them as a single volume. After one volume is full, files are written to the next volume in the span. Striped volumes are similar to spanned volumes, but files are deliberately split across volumes to improve read/write access time. Neither spanned nor striped volumes are fault tolerant. RAID 1, or mirrored volumes, uses exactly two volumes that are exact duplicates of each other. You suffer a slight performance hit but make up for it with fault tolerance. RAID 5 requires at least three same-size volumes, enjoys the speed boost of striping, and is fault tolerant.
■ The GUID partition table (GPT) partitioning scheme fixes several of MBR’s limitations. GPT drives can have as many partitions as needed, although Windows imposes a limit of 128. GPT partitions can be larger than MBR’s maximum of 2.2 TB.
■ GPT includes a protective MBR to keep older utilities from damaging the partition information.
■ GPT includes primary and backup copies of its GPT header and partition array.
■ Other partition types are hidden partitions and swap partitions. Hidden partitions are not visible to the operating system and are often used by PC manufacturers to store emergency restore images of the system partition. Swap partitions are used by Linux and UNIX systems for virtual memory and function much the same as Windows page files.
■ Most operating systems enable you to create partitions during the installation process. To create partitions at other times, you use a dedicated partitioning tool. Older versions of Windows shipped with the command-line program FDISK for this purpose. Windows now ships with a graphical tool called Disk Management (dskmgmt.msc) to manage partitions, convert basic disks to dynamic disks, and manage volumes. Windows also has an updated command-line tool called diskpart. Linux uses several partitioning tools, such as fdisk (same name, but different from the Windows version) and GParted.
Discuss hard drive formatting options
■ After a drive has been partitioned, it must be formatted before it can be used. Formatting creates a file system and root directory. You can use the Disk Management tool to format a partition or volume. Current versions of Windows support three file systems: FAT32, NTFS, and exFAT.
■ The base storage area for hard drives is a block, which can store up to 4096 bytes of data. Each cluster is made up of one block. If a file is smaller than 4096 bytes and does not fill a cluster, the rest of the cluster remains unused because only one file can reside in any one cluster. If a file is more than 4096 bytes, the file is split into pieces, with each piece residing in a different cluster. If the clusters containing all of the pieces of a single file are not contiguous, the file is said to be fragmented.
■ Current versions of Windows use FAT32 and exFAT. The number indicates how many bits are available in the “left side of the FAT spreadsheet.” Hard drives can use FAT32, while exFAT is designed for USB flash drives.
■ After the format program creates the FAT, it marches through every block of the entire partition, writing and attempting to read from each block sequentially. If it finds a bad block, it places a special status code (0000FFF7) in the block’s FAT location, indicating that the cluster is unavailable for use. Good blocks are marked with code 00000000. When an application saves a file, the OS starts writing the file to the first available cluster marked as good. If the entire file fits in the cluster, the OS places the end-of-file marker (0000FFFF) in the cluster’s status area. If the file does not fit entirely in a single cluster, the OS searches for the next available cluster. Once found, its location is written to the status area of the preceding cluster holding a piece of the file, and the OS writes the next 4096 bytes of the file in the available cluster. This continues until the file has been completely written and the final cluster in the chain receives the status code 0000FFFF in the FAT. After saving the entire file, the OS lists the filename and starting cluster in the file’s folder.
■ As a file is split across multiple noncontiguous clusters, the file becomes fragmented. Fragmentation slows read/write access because the OS has to piece together the many fragments of the file. Every version of Windows comes with a defragmentation program that reorganizes the clusters of hard drive data so files are stored wherever possible in contiguous clusters. Windows 10 and 11 use Optimize Drives, while previous versions used Disk Defragmenter.
■ The New Technology File System (NTFS) was introduced with Windows NT and has gone through several versions. NTFS does not use a FAT as with FAT32, but instead uses a master file table (MFT).
■ NTFS offers several major improvements over FAT, including redundancy, security, compression, encryption, disk quotas, and cluster sizing. A backup copy of the most critical parts of the MFT is stored in the middle of the disk, where it is less likely to become damaged.
■ With NTFS, you can protect individual files and folders by allowing only certain users or groups access to them. You can compress individual files or folders to save hard drive space and can encrypt files or folders so they are unreadable to anyone but you. You can also limit the amount of drive space per user by enforcing disk quotas. Finally, you can adjust cluster sizes to allow support of partitions up to 16 exabytes (EB), though by default the limit is 16 TB.
■ Current versions of macOS use the Apple File System (APFS) by default. Older systems used Hierarchical File System Plus (HFS+) by default. The latest versions of macOS can read and write to FAT32 and exFAT, though only read NTFS.
■ Most Linux distributions use a file system known as the Fourth Extended File System (ext4) by default. Some older distros use one of its predecessors, such as ext2 or ext3. The ext4 file system supports volumes up to 1 EB with file sizes up to 16 TB and is backwardly compatible with ext2 and ext3.
Partition and format hard drives
■ When you boot up Windows installation media and the installation program detects a hard drive that is not yet partitioned, it prompts you through a sequence of steps to partition (and format) the hard drive. You’ll go through a couple of installation screens where you select things such as language and get prompted for a product key and acceptance of the license agreement. At this point you can simply click Next, and Windows partitions your drive with a small System Reserved partition and the rest as one large primary partition, formatted as NTFS.
■ All additional hard drives must be initialized by Disk Management before you can use them. The initialization process places information on the drive identifying it as part of a particular system. New drives are always initialized as basic disks but can be converted to dynamic disks by right-clicking and choosing Convert to Dynamic Disk. Once initialized, you can add partitions or volumes to the drive.
■ Once a drive has been initialized and partitioned, you can format it. Microsoft requires using NTFS for any partition larger than 32 GB. Performing a quick format skips the checking of blocks, which results in a faster format but is risky.
■ Once you’ve converted disks to dynamic, you can use Disk Management to create a number of drive structures. You can extend a volume across multiple drives, for example, or create one or more software RAID structures, such as a stripe or mirror.
■ To create a mount point, right-click on an unallocated section of a drive and choose New Simple Volume. This opens the appropriately named wizard. In the second screen, you can select a mount point rather than a drive letter. You’ll need to pick an empty folder or create a new one.
■ You can format any partition/volume in Windows Explorer/File Explorer by right-clicking on the drive and choosing Format. Alternatively, you can format partitions/volumes from the Disk Management tool. Both methods offer you options to perform a quick format and enable compression.
■ With Windows 10 and 11, you can group one or more physical drives of any size into a single storage pool. These drives can be internal HDD or SSD or external storage connected via USB. Storage Spaces offers three different types of storage spaces: simple, mirror, and parity. Simple spaces connect multiple drives; mirrors and parity offer resiliency with two or more drives.
Maintain and troubleshoot hard drives
■ Hard drive maintenance can be broken down into two distinct functions: checking the drive occasionally for failed blocks and keeping data organized on the drive so it can be accessed quickly.
■ Microsoft offers Error checking for scanning hard drives. It checks for bad blocks and, if found, marks them as bad so no data gets written to those areas of the hard drive. Additionally, it looks for invalid filenames and attempts to fix them, and it searches for and erases lost cluster chains.
■ To run Error checking in Windows, right-click on a drive to view its Properties dialog box, choose the Tools tab, and click the Check or Check now button.
■ macOS has the Disk Utility that you can use to verify drives. If you have a problem with the startup disk, you need to run the Recovery partition tool on a reboot, holding COMMAND-R.
■ The Disk Cleanup utility deletes files from the Recycle Bin, temporary Internet files, copies of downloaded applets, and other temporary files on your hard drive. Run Disk Cleanup once a month.
■ Hard drive problems fall into four broad categories: installation errors, data corruption, dying hard drives, and RAID issues. Installation errors can happen at any of the four steps: connectivity, system setup, partitioning, or formatting. When troubleshooting, you should always walk back through each step and check for problems.
■ Partitioning errors generally fall into two groups: failing to partition at all and making the wrong size/type of partition. You’ll recognize the former type of error the first time you open Windows Explorer/File Explorer after installing a drive. If you forgot to partition it, the drive won’t even show up in Windows Explorer/File Explorer, only in Disk Management. If you made the partition too small, that’ll become painfully obvious when you start filling it up with files. The fix for partitioning errors is simply to open Disk Management and do the partitioning correctly.
■ If you try to access a drive that’s not formatted, Windows displays a drive “is not accessible” error, while you’ll get an “Invalid media” error from a C: prompt. Format the drive unless you’re certain that the drive has already been formatted. Corrupted files can also create the “Invalid media” error.
■ The “Trying to recover lost allocation unit” error means the drive has bad blocks. Time to replace the drive.
■ If a newly installed drive fails to work, do a “mental reinstallation.” If the drive does not show in the UEFI or traditional BIOS setup screens, recheck the cables and power. If it shows up, make sure you remembered to partition and format it. Remember, the drive must be marked as Active to be bootable.
■ Power surges, accidental shutdowns, corrupted installation media, and viruses are among the causes of data loss/corruption in individual sectors. These errors usually show while Windows is running. If core boot files become corrupted, you may see text errors such as “Error loading operating system” or “An error occurred while attempting to read the boot configuration data.” The first fix for any of these problems is to run the Error checking utility.
■ Almost all drives today have built-in error correction code (ECC) that constantly checks the drive for bad blocks. If the ECC detects a bad block, it marks the block as bad in the drive’s internal error map so it’s invisible to the system. If the ECC finds a bad block, however, you will get a corrupted data error when the computer attempts to read the bad block.
■ If a hard drive is truly physically damaged, it cannot be fixed. Physical problems manifest themselves in several ways: you start getting extended read/write times, the drive works properly but makes a lot of noise, or the drive seems to disappear. If you hear a continuous high-pitched squeal; a loud clicking noise, a short pause, and then another series of clicks; or a continuous grinding or rumbling, your hard drive is about to die. Back up your critical data and replace the drive. If the drive that contains your operating system disappears, the system will lock up or you’ll get the error message “Bootable Device Not Found” when you try to reboot. If the problem is with a second drive, it simply stops showing up in Windows Explorer/File Explorer.
■ If your drive makes clicking sounds, grinding noises, or disappears, first run the system setup program to see if autodetect sees the drive. If it does, the drive doesn’t have a physical problem. If autodetect fails, shut down the system and remove the data cable, but leave the power cable attached. Restart the system and listen to the drive. If the drive spins up, the drive is getting good power, which usually means the drive is good. Next, check for an unplugged power cord (or incorrectly set jumpers on ancient PATA drives). If the drive doesn’t spin up, try another power connector. If it still doesn’t spin up and you’ve triple-checked the jumpers and data cable, you have a problem with the onboard electronics and the drive is dead.
■ Another way you can tell if your hard drive is having issues is by looking at the computer’s light-emitting diode (LED), which is located on the front of the computer case. There are LEDs that provide information on the health of the computer. The activity LED (green) and the status LED (bicolor, green/amber) can help you diagnose a hard drive problem such as if a drive has failed (or if there is a predicted failure reported by the drive), the slot is empty, the drive is rebuilding, etc.
■ For an SSD, if the drive disappears (it won’t make noise), check the power, data cable, and motherboard controller. Try the SSD in a known good computer.
■ For the most part, drive problems in a RAID array are identical to those seen on individual drives. If you’re using hardware RAID and the configuration firmware doesn’t recognize one of the drives, first check to make sure the drives are powered and that they are connected to the proper connections. Regardless of the reason a RAID stops working or the effects, the fix is simple. Replace the failed drive and let the RAID rebuild itself.
■ Key Terms
active partition
Apple File System (APFS)
basic disk
block
Bootable device not found
chkdsk
cluster
data loss/corruption
data structure
defragment
Disk Cleanup
disk initialization
Disk Management (dskmgmt.msc)
disk quota
Disk Utility
dynamic disk
encrypting file system (EFS)
Error checking
error correction code (ECC)
exFAT
extended partition
FAT32
file allocation table (FAT)
file system
format
formatting
Fourth Extended File System (ext4)
fragmentation
fsck
GUID partition table (GPT)
high-level formatting
logical block addressing (LBA)
logical drive
master boot record (MBR)
master file table (MFT)
mirror set
mirror space
mirrored volume
mount point
New Technology File System (NTFS)
parity space
partition
partition boot sector
partition table
partitioning
primary partition
RAID 5 volume
simple space
simple volume
spanned volume
stripe set
striped volume
storage pool
Storage Spaces
thin provisioning
volume
■ Key Term Quiz
Use the Key Terms list to complete the sentences that follow. Not all terms will be used.
1. The MBR checks the partition table to find the __________________ or bootable partition.
2. If a file is not stored in contiguous clusters, you can improve hard drive performance by using a tool to __________________ the drive.
3. Instead of using a FAT, NTFS uses a(n) __________________ with a backup copy placed in the middle of the disk for better security.
4. On modern versions of Windows, the best file system to choose is __________________.
5. The Windows tool that attempts to fix invalid filenames, erases lost clusters, and seals off bad clusters is called __________________ (or chkdsk).
6. The __________________ partitioning scheme enables you to create more than four primary partitions without needing to use dynamic disks.
7. A logical drive must be created inside a(n) __________________.
8. Only a single __________________ may be set to active on one drive.
9. The __________________ utility is useful for purging your system of unnecessary temporary files.
10. A(n) __________________ requires exactly two volumes and is extremely fault tolerant.
■ Multiple-Choice Quiz
1. What can power surges, accidental shutdowns, corrupted installation media, and viruses cause to happen?
A. Driver loss
B. Data loss/corruption
C. Clicking sounds
D. Grinding noises
2. You hear clicking sounds and grinding noises coming from your computer. What part of the computer is having issues?
A. LED
B. Extended partition
C. Storage drive
D. Disk Manager
3. Which of the following error messages would you likely see if one of the drives in a RAID array fails?
A. Extended read/write times
B. Missing drives in OS
C. This drive has not been partitioned
D. Bootable device not found
4. You receive an “Invalid media” error when trying to access a hard drive. What is the most likely cause of the error?
A. The drive has not been partitioned.
B. The drive has not been set to active.
C. The drive has not been formatted.
D. The drive has died.
5. What does NTFS use to provide security for individual files and folders?
A. Dynamic disks
B. ECC
C. Access control list
D. MFT
6. What graphical program does Microsoft include with Windows to partition and format a drive?
A. Format
B. Disk Management console
C. Disk Administrator console
D. System Commander
7. Which of the following statements apply to MBR drives? (Select two.)
A. Maximum partition size of 2.2 TB
B. Unlimited number of partitions
C. Cannot span partitions across multiple drives
D. Can stripe partitions across multiple drives
8. How can you effectively expand the capacity of an NTFS drive?
A. Create an extended partition to extend the capacity.
B. Install a second drive and mount it to a folder on the original smaller NTFS drive.
C. Convert the drive to a dynamic disk and create a mirrored set.
D. Format the drive with the NFTS option.
9. Which storage option in Windows 10 or 11 offers the best mix of resiliency and performance with two drives?
A. Simple space
B. Two-way mirror space
C. Three-way mirror space
D. Parity space
10. Jaime wishes to check her hard drive for errors. What tool should she use?
A. FDISK
B. Format
C. Disk Manager
D. Error checking
11. To make your files unreadable by others, what should you use?
A. Clustering
B. Compression
C. Disk quotas
D. Encryption
12. Martha the tech gets a frantic call from a junior engineer who says he seems to be losing files and thinks maybe his hard drive is bad. After some discussion, it turns out the engineer’s system runs Ubuntu Linux. In such a scenario, which tool should Martha run (or have the engineer run) to scan his hard drive for errors?
A. chkdsk
B. Disk Management
C. Error checking
D. fsck
13. Which two terms identify a bootable partition?
A. Primary, FAT
B. Primary, exFAT
C. Primary, Active
D. Primary, NTFS
14. For what purpose can you use disk quotas?
A. Limit users to a specific drive
B. Extend the capacity of a volume
C. Manage dual-boot environments
D. Limit users’ space on a drive
15. Martha the tech adds a new hard drive to a user’s system for extra storage. She’s installed the drive, and it shows up in the system setup utility. When she opens File Explorer, naturally the drive does not appear. What’s her next step?
A. Run Disk Management and format the drive.
B. Run Disk Management and initialize the drive.
C. Run Disk Management and partition the drive.
D. Reboot the computer. Windows will prepare the drive automatically.
■ Essay Quiz
1. You discover that your boss’s computer is using two old hard drives formatted using FAT32. To deal with such a scenario, write a two- to three-paragraph memo that explains the virtues and benefits of NTFS over FAT32.
2. You’ve been tasked by your supervisor to teach basic hard drive partitioning to a couple of new hires. Given such a scenario, write a short essay describing the difference between simple volumes, spanned volumes, and striped volumes. What’s better? When would you use one and not the other?
3. One of your employees doesn’t quite get it when it comes to computers and keeps complaining that his hard drive is stopped up, by which he most likely means “full.” He installed a second hard drive by using some steps he found on the Internet, but he claims it doesn’t work. On closer examination, you determine that the drive shows up in CMOS but not in Windows—he didn’t partition or format the drive! Given such a scenario, write a short essay describing partitioning and formatting, including the tools used to accomplish this task on a second hard drive.
4. Your office has a PC shared by four people to do intensive graphics work. The hard drive has about 1 TB of free space. Write a memo on how you could use disk quotas to make certain that each user takes no more than 25 percent of the free space.
5. Your office has several computers with three 1-TB drives in them in addition to the C: drive. Write a short essay that describes how you could use spanning and mount points to make the extra drives more easily usable for your users.
Lab Projects
• Lab Project 9.1
Grab a test system with multiple drives and experiment with the partitioning tools in Windows Disk Management. Create various partition combinations, such as all primary or all extended with logical drives. Change basic disks into dynamic disks and create volumes that span multiple drives. Add to them. You get the idea—experiment and have fun!
• Lab Project 9.2
Partitioning gets all the glory and exposure in tech classes because, frankly, it’s cool to be able to do some of the things possible with the Disk Management console. But the experienced tech does not forget about the other half of drive preparation: formatting. Windows offers you at least two different file systems. In this lab, you’ll put them through their paces.
In at least one OS, partition a drive with two equal partitions and format one as FAT32 and the other as NTFS. Then get a couple of monster files (larger than 50 MB) and move them to those partitions. Did you notice any difference in transfer speed? Examine the drives in Windows Explorer/File Explorer. Do they show the same amount of used space?