chapter 17
Display Technologies
“Video killed the radio star Video killed the radio star In my mind and in my car We can’t rewind, we’ve gone too far”
—THE BUGGLES, “VIDEO KILLED THE RADIO STAR,” THE AGE OF PLASTIC

In this chapter, you will learn how to
■ Summarize different display technologies
■ Understand how computers display and capture video
■ Install and configure video
■ Troubleshoot basic video problems
The term video encompasses a complex interaction among numerous parts of personal computing devices, all designed to put a picture on the screen. The monitor or video display shows you what’s going on with your programs and operating system. It’s the primary output device for most devices. The display adapter handles communication between the CPU and the monitor or display (see Figure 17.1). The operating system needs to know how to handle communication between the CPU and the display adapter, which requires installing drivers specific to each card.

• Figure 17.1 Typical monitor and video card
All of these components fall into the category of display technologies. This chapter explores monitors, video displays, and display adapters; discusses how to troubleshoot a variety of display issues; and closes with a look at some topics you won’t find on the exam—including a review of the display qualities and features you should know in order to understand and compare product listings.
1101
■ Video Displays
Video displays for computing devices come in three varieties: flat-panel displays, projectors, and virtual reality headsets. Almost every modern personal computer uses a flat-panel display, and there’s a pair of similar display panels mounted inside serious virtual reality headsets. You’ll find projectors in boardrooms and classrooms, splashing a picture onto a screen. This section explores the technology variations in video displays and describes the connection options.
Flat-Panel Displays
Almost every computing device today uses some sort of flat-panel display as the primary visual output component. Because standalone monitors don’t have to be replaced along with the rest of the computer, it’s good to keep in mind that there are always some pretty old displays still in service.
The industry is always hard at work to create displays that are thinner, faster, prettier, and more efficient, but the biggest leaps usually come after an innovative new display technology is finally good enough or cheap enough to dominate the market. Once we hit that tipping point, things can change quickly! This also means we can see exciting headlines about new display technologies for years—decades, even—without them ever becoming common in desktop monitors.
When the first desktop computers stole our hearts, they did it despite bulky, heavy monitors with tiny (by modern standards) cathode-ray tube (CRT) displays—the same technology used in TVs at the time. CRTs ruled our desktops for decades—from the 1970s up through the early 2000s—when flat-panel displays dethroned them (a little over a decade after the first models appeared).

The early flat-panel displays incorporated a liquid crystal display (LCD) panel—and LCD monitors still hold the crown despite a healthy challenge from organic light-emitting diode (OLED) panels. Let’s take a closer look at both of these panel technologies.
LCD Panels
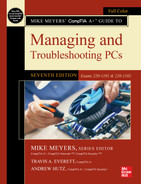
A color LCD screen is composed of tiny liquid crystal molecules (called sub-pixels) arranged in rows and columns between polarizing filters. When electric current is applied to the liquid crystal molecules, they act as a shutter to enable light to pass through. A translucent sheet above the sub-pixels is colored red, green, or blue. Each tiny distinct group of three sub-pixels—one red, one green, and one blue—forms a physical pixel, as shown in Figure 17.2.

• Figure 17.2 LCD pixels
Current LCD monitors use some form of thin film transistor (TFT) or active matrix technology (see Figure 17.3) with one or more tiny transistors to control each color dot, providing faster picture display, crisp definition, and much tighter color control than the earliest LCD panels could provide.
• Figure 17.3 Active matrix display
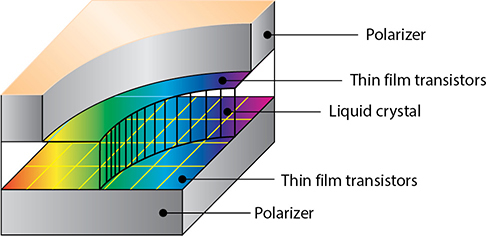
The typical LCD monitor is composed of two main components: an LCD panel to create the image, and a backlight to illuminate the image so you can see it. Some older models need inverters to send power to backlights that require alternating current (AC) electricity. Figure 17.4 shows a typical layout for the internal components of an older LCD monitor.
• Figure 17.4 LCD components
LCD Panel Technologies LCD panel manufacturers use a lot of variation in things like the orientation of the liquid crystal molecules within the glass substrates and the underlying electronics to try to create displays that respond quickly to user demands and show accurate color and details. The three most common panel types today are twisted nematic (TN), in-plane switching (IPS), and vertical alignment (VA).
Technically, TN panels are the fastest but offer adequate color; IPS panels display beautiful color at slower speeds; and VA panels fall somewhere in between the two in terms of responsiveness and color accuracy. In reality, the steady march of technological improvement has left us with IPS displays that are fast enough for most purposes.
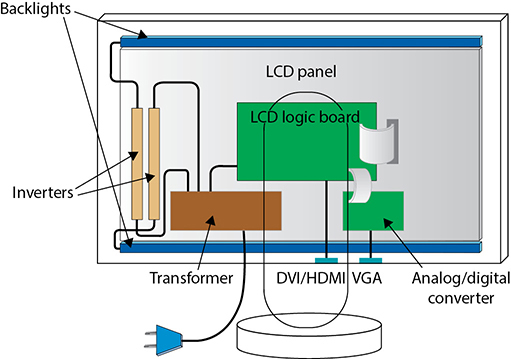
Backlights Backlights light up the panel, as mentioned, but vary according to the technology used and the implementation of the lighting. Current LCDs use light-emitting diode (LED) technology for backlights; early generations used cold cathode fluorescent lamp (CCFL). These modern monitors are marketed as LED displays to differentiate them from the older CCFL panels. LEDs took over from CCFLs because LEDs use DC electricity (just like the logic boards and panels in LCDs), consume much less electricity, and give off little heat. LEDs enable super thin screens like you see on almost every computing device today, from smartphones to tablets to desktop monitors. Figure 17.5 shows an illustration of a typical modern LCD (note the inverters missing from the previous figure).
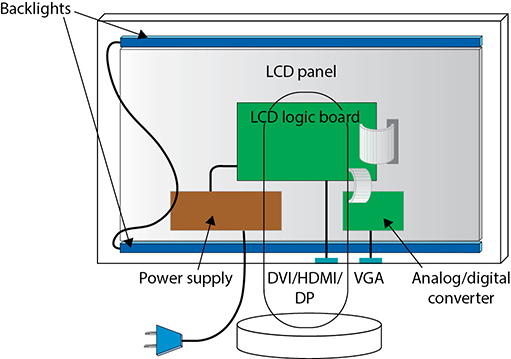
• Figure 17.5 Modern LCD internals
The LCD illustrated in Figure 17.5 has two backlights: one at the top and one at the bottom. That’s a typical implementation for backlights, called edge LED backlighting. The drawback is that you can sometimes see that the edges are a little brighter than the center.
Direct LED backlighting puts a bank of LEDs behind the panel, providing better uniformity of image. This is more expensive and uses more electricity than edge backlighting, but it’s becoming more common on higher-end LCD televisions and filtering into computer monitors as well.
OLED Panels
OLED screens use organic compounds between the glass layers that light up when given an electrical charge. Since they emit their own light, they don’t require backlight—and this makes them perfect for ultra-thin, energy-efficient displays. OLED pixels can turn off completely, enabling pure black and thus phenomenal contrast compared with LCD panels.
OLED is generally more expensive than LCD, so much of its success has been limited to a small number of niches. Since OLED first started appearing in teeny-tiny displays in the early 2000s, it has built up three niches where it is most competitive: high-end televisions, viewfinders for mirrorless interchangeable lens cameras, and small mobile/wearable devices (including smart watches, smartphones, and virtual reality headsets).
After a few false starts, OLED panels finally started turning up in a growing number of laptops and desktop monitors in the late 2010s and early 2020s. There’s a decent chance you’ll need to support users with OLED displays, but the continued evolution of LCD technology makes me skeptical that OLED will ever wear the crown.
Projectors
Projectors generate an image in one device and then use light to throw (or project) it onto a screen or some other object. You’ll mostly encounter front-view projectors, which shoot an image out the front and count on you to place a screen in front at the proper distance. Front-view projectors connected to PCs running Microsoft PowerPoint have been the cornerstone of every meeting almost everywhere since the 1990s (see Figure 17.6). This section deals exclusively with front-view projectors that connect to PCs.
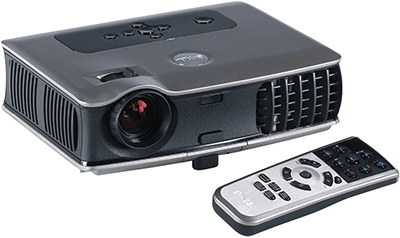
• Figure 17.6 Front-view projector (photo courtesy of Dell, Inc.)
Much like monitors, projector technologies evolve over time. Their two main needs are also similar: generating an image, and generating enough light to project the image onto distant objects. I’ll give you a quick overview of the most-common image technologies, and then we’ll focus a little more closely on three things you should understand about the process of generating and projecting tons of light: lumens, throw, and light sources.
Image Technologies
It may sound like the exciting part of the process, but most modern projectors generate the image in one of two ways, and you’re already pretty familiar with one of them by now! Given that light shines through an LCD panel, LCD projectors (see Figure 17.7) are a natural fit for front projection. Just like their monitor equivalent, LCD projectors have a specific native resolution.

• Figure 17.7 LCD projector (photo courtesy of ViewSonic)
The other main option, proprietary Digital Light Processing (DLP) technology from Texas Instruments, uses an array of tiny mirrors to project a front-view image. The technology differs substantially from LCD. DLP projectors produce better color and a softer image than LCD. DLP projectors also tend to weigh less than LCD projectors.
Lumens
The brightness of a projector is expressed in lumens, a measure of the amount of visible light given off by a light source. A higher number of lumens means a brighter projector, but the “right” lumen rating depends on the size of the room and how dark it will be when the projector is in use. There’s no single answer, but use this as a rough guide: If you use a projector in a small, dark room, 1000 to 1500 lumens will work well. If you use a projector in a mid-sized room with typical lighting, you’ll need at least 2000 lumens. Projectors for large rooms have ratings over 10,000 lumens and are very expensive.
Throw
A projector’s throw indicates the size of the image at a certain distance from the screen. All projectors have a recommended minimum and maximum throw distance that you need to take into consideration. Throw is expressed in terms of the distance required to fill a 80-inch diagonal screen. A standard-throw projector needs to be 11 to 12 feet away from the projection surface. A short-throw projector needs just 4 feet, and an ultra-short-throw projector needs a mere 15 inches away (although such a lens is expensive). Figure 17.8 illustrates the different throw distances.
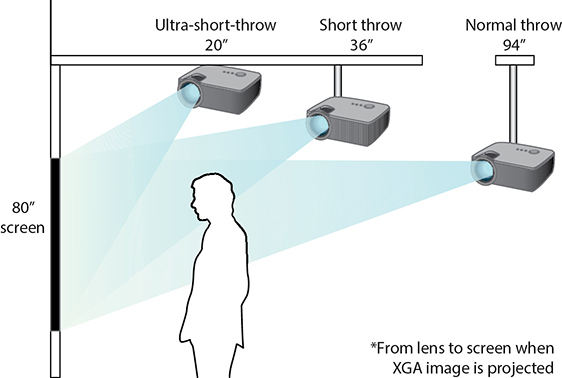
• Figure 17.8 Projector throw variations
Light Sources
Most projectors use one of three light sources: powerful light bulbs, LEDs, or lasers.
Lamps—light bulbs that produce a lot of lumens in a small form factor—have been the standard for a long time. They’re also the bane of traditional projectors. They produce tons of heat, have to warm up before you can use them, need a noisy fan to cool them off both while the projector runs and after you turn it off, and only last about 3000 hours. Replacement lamps are also expensive, usually in the range of a few hundred dollars (U.S.).
LED-based projectors don’t generate as much heat, so their fans are smaller and quieter. LED projectors used to cost more than lamp-based ones, but that price difference has narrowed. They haven’t historically offered nearly as many lumens (they typically require a much darker room), but they have also narrowed this gap over the years. LED light sources also have long lifespans of 30,000+ hours.

Laser-based projectors produce vibrant, high-contrast images. Laser-based projectors are currently more expensive than competing technologies, but the price is coming down, and a laser light source can last 20,000+ hours.
Common Display Features
All standalone video displays share characteristics that you need to know for purchase, installation, maintenance, and troubleshooting. They vary in connection types, on-screen controls for adjustments, mounting brackets, and additional features such as built-in USB hubs, webcams, speakers, and microphones.
Connections
Standalone displays have one or more connectors (most often on the back) for connecting them to a video source. I want to zoom out to talk about connector versions, and then I’ll show you each of the connectors you’re likely to see in the wild.
Much like USB, modern video connector standards (HDMI, DisplayPort, and Thunderbolt) are occasionally updated with new versions as the technology improves. You don’t need to know about these versions for the CompTIA A+ exams, but you will need to have them in mind any time you’re purchasing, installing, or troubleshooting displays.
To take full advantage of the bandwidth and features of the latest version of a standard, your display, cable, and video source must all support at least that version. You should also pay careful attention to the bandwidth and features supported by the different connectors on both the video source and display. For example, a given video source or monitor might have three different connectors, but only one may support the device’s highest refresh rate and resolution—and only if the video source, cable, and display all support this refresh rate and resolution.
VGA Video Graphics Array (VGA) is as old as the hills by this point, but you’ll still find a 15-pin, three-row, D-type connector (see Figure 17.9) on quite a few monitors. This legacy connector has a lot of names, including D-shell and D-subminiature, but most people simply call it the VGA connector. VGA is the oldest and least-capable monitor connection type.
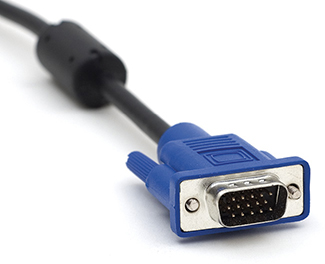
• Figure 17.9 A VGA connector
DVI The Digital Visual Interface (DVI) standard helped build a bridge between the world of old analog displays and modern digital ones (and even served as the foundation of HDMI, which we’ll discuss next). DVI is actually three different connectors that look very much alike: DVI-D (digital), DVI-A (analog), and DVI-A/D or DVI-I (interchangeable—it accepts either a DVI-D or DVI-A).
As a legacy standard, DVI appears on fewer and fewer new devices—but DVI-D and DVI-I connectors (which may be single-link or dual-link) can still power low-end displays. Single-link DVI can drive a display with a resolution of 1920 × 1080 at a refresh rate of 60 Hz, and dual-link DVI (see Figure 17.10) can drive a 2048 × 1536 display at 60 Hz. (We’ll take a closer look at resolution and refresh rate later in the chapter.)

• Figure 17.10 Dual-link DVI-I connector
HDMI Many monitors, projectors, and VR headsets connect to a computer via the High-Definition Multimedia Interface (HDMI) connector, which carries both video and audio signals (see Figure 17.11). The latest version of HDMI can handle just about any resolution, but keep in mind that an older version may not.

• Figure 17.11 HDMI port on a monitor
DisplayPort, Thunderbolt, and USB Type-C Using DisplayPort (DP), Thunderbolt, and USB Type-C connections are increasingly common ways to supply video and audio to displays.
Each of these is technically its own standard with different capabilities, but I’m lumping them together here for a reason. Full-sized DP connections are common these days, like with my Dell monitors (see Figure 17.12). These connect to full-sized DP ports on display adapters, as you would expect.

• Figure 17.12 DisplayPort connection on monitor
Thunderbolt 1 and Thunderbolt 2 adopted the same connector type that’s used for the small version of DisplayPort, called Mini DisplayPort (mDP). Thunderbolt 3 and 4, however, use the USB Type-C connector. USB 3 and 4 also both support using the Type-C connector to drive a display without Thunderbolt.
If that isn’t confusing enough, buckle up: you’ll find monitors that connect mDP-to-mDP without using Thunderbolt 1 or 2, and many USB Type-C connectors and cables lack Thunderbolt 3 or 4 support. If you’re lucky, you’ll find a little Thunderbolt symbol next to the ports (see Figure 17.13) to distinguish them—but it isn’t always present. Your best bet is to consult the manufacturer’s documentation!
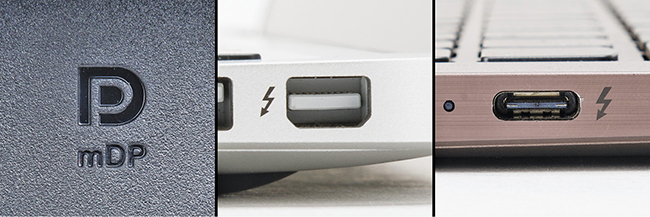
• Figure 17.13 Logos for plain mDP (left), Thunderbolt 2 mDP (center), and Thunderbolt 3/4 USB Type-C (right)
HDBaseT Some projectors use a connection technology called HDBaseT (see Figure 17.14) that enables long-range connectivity for uncompressed HD video and audio over Cat 5a or Cat 6 network cables (we’ll talk about network cabling in Chapter 18). This enables you to connect a projector in a conference room via runs of up to 100 meters. HDBaseT isn’t on the CompTIA A+ 1101 exam, but you might encounter it in the real world.

• Figure 17.14 HDBaseT port on a projector
Adapters You will most likely find yourself in a situation where you need to connect a display and video source that don’t have a connector in common. In such a case, you can use a small adapter device, like the DVI-to-VGA adapter in Figure 17.15. There are tons of these things out there.

• Figure 17.15 DVI-to-VGA adapter
Using an adapter is a good solution if you already have a cable for connecting the devices, but if you don’t, getting a cable with different end connectors may be more convenient. Figure 17.16 shows a typical DVI-to-HDMI cable.
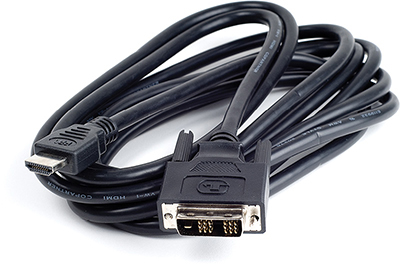
• Figure 17.16 DVI-to-HDMI cable
Adjustments
It’s almost always possible to fiddle with a range of display properties to adjust a display’s color balance, brightness, contrast, and so on—but the process differs from display to display. All monitors have an On/Off button; additional buttons may enable you to select among multiple inputs, directly control features like brightness, contrast, and volume, or bring up and navigate the onscreen display (OSD) menu (see Figure 17.17).

• Figure 17.17 Typical OSD menu controls
Every monitor maker provides a different way to access its OSD menu, but each provides at least two functions: physical screen adjustment (bigger, smaller, move to the left, right, up, down, and others) and image adjustments like brightness, contrast, and color. Make sure the user understands how to adjust these settings.
VESA Mounts
Almost every monitor these days has a standardized bracket option for mounting the monitor on the wall or on a special stand called a VESA mount. Figure 17.18 shows the bracket option on a monitor. Figure 17.19 shows a stand for mounting two monitors side-by-side. VESA mounts vary with size—big televisions need a larger mounting bracket than 24-inch computer monitors.

• Figure 17.18 VESA mounting option on monitor
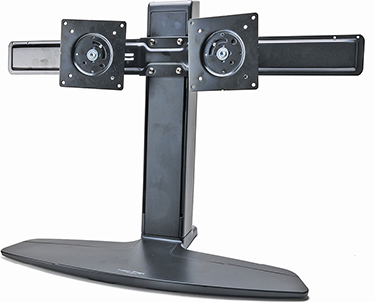
• Figure 17.19 Dual-monitor stand that uses VESA mounts
Add-on Features
Some monitor manufacturers add extra features to their products, such as USB hubs, speakers, webcams, and microphones. These are supported by an upstream USB port on the monitor that you connect to a USB port on the computer. On newer devices, both ends usually use Type-C connectors. Figure 17.20 shows USB ports on the side of a monitor—it’s a very handy feature!

• Figure 17.20 USB ports on monitor
■ Display Adapters
The video source for most monitors is a computer’s display adapter (also called a graphics card or video card). This device handles a number of video-related chores for the computer—though the most fundamental is processing information from the CPU and sending it to the display. The display adapter is a complex set of devices. A graphics processor of some type processes data from the CPU and outputs commands to the display. Like any other processor, the graphics processor needs RAM. The graphics processor needs fast connectivity between it, the CPU, and system RAM. The display adapter must have a connection compatible with the monitor.
Traditionally, and still quite commonly in Windows PCs, the display adapter was an expansion card that plugged into the motherboard (see Figure 17.21). Although many new systems have the display adapter circuitry built into the CPU and motherboard, most techs still call it the video card, so we’ll start there. This section looks at five aspects that define a video card: motherboard slot, graphics processor, video memory, integrated GPUs, and connections.

• Figure 17.21 Typical video card
Motherboard Slot
Every current discrete video card plugs into the PCIe slot on a motherboard. As mentioned, many CPUs/motherboards have the display adapter built-in. I’ll discuss integrated graphics after talking about graphics processors and memory types, at which point the topic will make more sense. For now, let’s look at PCIe.
PCIe
The PCI Express (PCIe) interface was developed to replace the older Peripheral Component Interconnect (PCI) and Accelerated Graphics Port (AGP) interfaces. PCIe was a natural fit for video because it is incredibly fast. All PCIe video cards use the PCIe ×16 connector (see Figure 17.22). PCIe replaced AGP as the primary video interface almost overnight.

• Figure 17.22 PCIe video card connected in PCIe slot
 Cross Check
PCIe Versions
You first encountered PCIe as a motherboard connector type way back in Chapter 6, so cross check your memory now. What is the significant difference between PCIe 3.x and 4.x?
Graphics Processor
The graphics processor handles the heavy lifting of taking commands from the CPU and translating them into coordinates and color information that the monitor understands and displays. Most techs today refer to the device that processes video as a graphics processing unit (GPU).
Video card discussion, at least among techs, almost always revolves around the graphics processor the video card uses and the amount of RAM onboard. A typical video card might be called an MSI Ventus GeForce GTX 3080 Ti 12-GB 384-bit GDDR6X PCI Express 4.0, so let’s break that down. (Product listings vary—you won’t always see the elements in exactly the same order.) MSI is the manufacturer of the video card; Ventus is one of a few different MSI product lines; GeForce GTX 3080 Ti is the graphics processor; 12-GB 384-bit GDDR6X describes the dedicated video RAM and the connection between the video RAM and the graphics processor; and PCI Express 4.0 describes the motherboard expansion slot the card requires.
 Tech Tip
HDCP-Ready Video Cards
Many video cards come with a digital anti-theft technology called High-bandwidth Digital Content Protection (HDCP). HDCP stops audio and video copying between high-speed connections, such as HDMI, DisplayPort, and DVI. The technology also stops playback of HDCP-encrypted content (like Netflix) on devices designed to circumvent the system.
Many companies make the hundreds of different video cards on the market, but only three companies produce the vast majority of graphics processors found on video cards: NVIDIA, AMD, and Intel. NVIDIA and AMD make and sell graphics processors to third-party manufacturers who then design, build, and sell video cards under their own branding. Intel has long focused on building integrated GPUs into its processors, but it returned to the dedicated GPU market in 2021. Figure 17.23 shows an NVIDIA GeForce RTX 3080 Ti on a board made by EVGA.

• Figure 17.23 NVIDIA GeForce RTX 3080 Ti
Low-end graphics processors usually work fine for the run-of-the-mill user who wants to write letters or run a Web browser. High-end graphics processors are designed for demanding tasks such as powering high-end displays and rendering beautiful 3-D graphics (whether that’s for professionals such as graphic designers, animators, architects, and engineers—or for, you know…games!).
Video Memory
When you’re working with demanding graphics applications (such as rendering special effects for a movie or playing a game with high-quality assets), video memory can prove to be a serious bottleneck in three ways: data throughput speed, access speed, and simple capacity. Manufacturers address these bottlenecks by upping the width of the bus between the video RAM and video processor, adding more and more total RAM, and developing special-purpose RAM.
Specialized types of video RAM (VRAM)—namely Graphics DDR (GDDR) and High Bandwidth Memory (HBM)—exist to meet these high speed and bandwidth demands. You’ll generally find a recent generation of special-purpose video RAM—such as GDDR6X or HBM3—in the latest high-end graphics cards, but keep in mind that you may run into low-budget graphics cards that use a recent generation of generic DDR RAM.
Integrated GPUs
Some motherboards support CPUs with integrated GPUs and provide HDMI and/or Display ports along with the usual mix of USB, Ethernet, and other I/O connectors. When a system uses the CPU’s internal GPU, we often say it has integrated graphics.
Traditionally, integrated GPUs aren’t very powerful—but they are still fairly common in laptops because integrating them saves a lot of space and power. That said, gradual innovation driven by the popularity of mobile devices and laptops is starting to overturn this old assumption.
AMD and NVIDIA both make integrated GPU chips, Intel has long integrated the Intel Graphics Media Accelerator (GMA) into its chipsets, and Apple has recently made a splash with its M1 processor family, which combines a powerful CPU and GPU on the same chip.
The best of these now rival any CPU/discrete graphics card combination that you’d find in a comparable portable computer and are good enough for casual gaming. Even Intel’s integrated graphics, which have long been a bit of a joke for anything beyond basic desktop productivity, have made big strides in recent years. NVIDIA’s Tegra line is focused on gaming (Nintendo Switch) and automotive entertainment systems.
Connector Types and Associated Cables
Display adapters have one or more connectors you can use to connect them to a video display—make sure you’re familiar with each of the connectors we looked at earlier in the chapter:
■ VGA
■ DVI
■ HDMI
■ DisplayPort
■ Thunderbolt (including mDP Thunderbolt 1 and 2 ports and USB Type-C Thunderbolt 3 and 4 ports)
■ USB Type-C
You can also find video cards (especially older ones) with a number of connector types for interfacing with other media devices such as cameras, projectors, television sets, and so on. The video card shown in Figure 17.24 has three connectors: VGA, DVI-I, and a once-common S-video connector. In the days before HDMI, an S-video connector like this was a decent way to connect your computer to a standard definition TV.
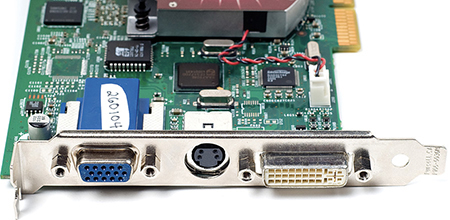
• Figure 17.24 Video card connectors: VGA, S-video, and DVI-I
The video card in Figure 17.25, in contrast, offers four connectors: HDMI and DP (×3). And yes, in case you were wondering, the card can drive four 4K monitors simultaneously!

• Figure 17.25 Video card connectors: HDMI and DisplayPort
■ Installing and Configuring Video
As long as you have the right connection to your video card or integrated graphics, installing a monitor is straightforward. Installing the video card itself can be trickier.
During the physical installation of a video card, watch out for three possible issues: long cards, the proximity of the nearest expansion card, and the presence of power connectors. Some high-end video cards simply won’t fit in certain cases or will block access to needed motherboard connectors such as the SATA sockets. Unless your case includes a special mounting bracket for mounting the card in a different orientation, there’s no clean fix for such a problem—you simply have to change at least one of the components (video card, motherboard, or case).
Because high-end video cards run very hot, you don’t want them sitting right next to another card; make sure the fan on the video card has plenty of ventilation space. I leave the slot next to the video card empty to allow better airflow (see Figure 17.26).

• Figure 17.26 Installing a video card
 Try This!
Install a Video Card
You know how to install an expansion card from your reading in earlier chapters. Installing a video card is pretty much the same, so try this!
1. Refer to Chapter 6 for the steps on installing a new card and refer to Chapter 7 for a visual on video power connectors.
2. Plug the monitor cable into the video card port on the back of the PC and power up the system. If your PC seems dead after you install a video card, or if the screen is blank but you hear fans whirring and the internal speaker sounding off long-short-short-short, your video card likely did not get properly seated. Unplug the PC and try again.
More powerful video cards have massive heat sinks and large cooling fans, so you don’t have any choice but to take up double or triple the space. Midrange to high-end video cards typically require at least one (or two) additional PCIe power connectors because they use more power than the PCIe slot can provide. Make sure that your power supply can provide adequate power and has the correct type (6- or 8-pin) of PCIe power connectors.
Once you’ve properly installed the video card and connected it to the monitor, you’ve fought half the battle for making the video process work properly. You’re ready to tackle the drivers and tweak the operating system, so let’s go!
Software
Configuring your video software is usually a two-step process. First you need to load drivers for the video card. Then you need to open Display Settings and Personalization Settings. Let’s explore how to make the video card and monitor work in Windows, then look briefly at display options in macOS and Linux.
Drivers
Just like any other piece of hardware, a video card needs drivers to function. Display adapter drivers install pretty much the same way as all the other drivers we’ve discussed thus far: Windows has the driver already; insert the installation media that came with the card; or download the latest driver from the Internet.
Video card makers are constantly updating their drivers. Odds are good that any video card more than a few months old has at least one driver update. If possible, check the manufacturer’s Web site and use the driver located there if there is one. If the Web site doesn’t offer a driver, it’s usually best to use the installation media. Always avoid using the built-in Windows driver as it tends to be the most dated.
We’ll explore driver issues in more detail after we discuss the Display Settings and the Personalization Settings. Like so many things about video, you can’t fully understand one topic without understanding at least one other!
1102
Using Display and Personalization
With the driver installed, you’re ready to configure your display settings. The Display Settings or Personalization Settings provide convenient, central locations for all of your display settings, including resolution, refresh rate, driver information, and color depth.
Display Settings The Display Settings in Windows enable adjusting most display options. Open Display Settings by clicking Start | Settings | System. Figure 17.27 shows the default initial Display Settings screen (on a dual-monitor system). Each monitor attached to the system gets a number, and you can drag and drop them to change the location. Figure 17.28 shows a different system with two monitors stacked vertically.

• Figure 17.27 Display Settings in Windows 11

• Figure 17.28 Vertically stacked monitors in Windows 10 Display Settings
The two options in Windows 10 under Color are Night light and Color profile. Enabling the Night light setting helps to reduce eye strain for those of us who tend to work or play after dark. You can set it to change the screen automatically during the evening, reducing the blue in the default screen, turning the “white” into a vaguely pale orange color. This isn’t on the exam, but it’s a helpful feature. Color profile enables you to select a profile—a set of parameters specific to a monitor—to get the precise color on screen that you’ll see in print (assuming the print device is calibrated for proper color as well). The Color profile in Figure 17.28 is dimmed because no profiles are installed (in Windows 11 the option will only appear if at least one of your monitors has the capability). Check the Color Management applet in Control Panel to adjust further (see Figure 17.29).

• Figure 17.29 Windows 10 Color Management applet in Control Panel
Scrolling down in Display Settings reveals more advanced options (see Figure 17.30). You can change the scale of text, icons, and more with a drop-down menu. This helps with high-resolution monitors and people who need things a little bigger to navigate the screen options. Changing scaling is preferable to changing resolution, because the interface remains at the default (and best) resolution.

• Figure 17.30 More Display Settings options in Windows 10
In some scenarios, you’ll need to adjust the resolution or orientation of the monitor. The Resolution drop-down menu enables you to change the resolution (to match a projector, for example, so the presentation you see on the monitor looks the same as your audience will see). The Orientation drop-down menu enables you to change from the default Landscape mode to Portrait mode if you have a monitor that swivels (see Figure 17.31).
• Figure 17.31 Windows 10 showing monitor in portrait mode
Tech Tip
Multiple Displays
You can readily add additional displays to a system. In years past, you would add a second video card to the system and plug the second monitor into it, then go to the Display Settings to extend the displays. Almost all video cards you can buy today have more than one port, often of different types. Get a cable that matches and plug it in for better computing.
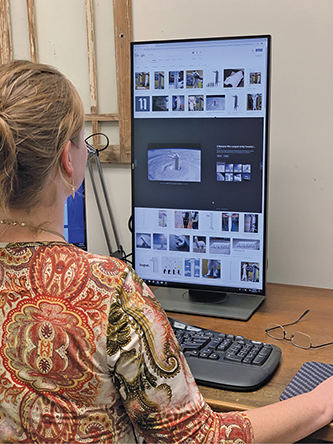
The Multiple displays option gives you control over what shows on the second (or more) screen. The default is Extend these displays, which gives you more desktop space for workflow. Figure 17.32 shows my editor working with extended displays configured. You can also duplicate the main display, so the same image shows on all connected monitors, or blank one or the other monitor.

• Figure 17.32 My editor hard at work with two monitors
Click the Advanced display option for specific information about the monitor(s) connected. Figure 17.33 shows the settings for Display 2, an AORUS gaming monitor. Note the screen shows the resolution, refresh rate, and bit depth of the panel (as well as color format and color space, which we’ll discuss in Beyond A+).
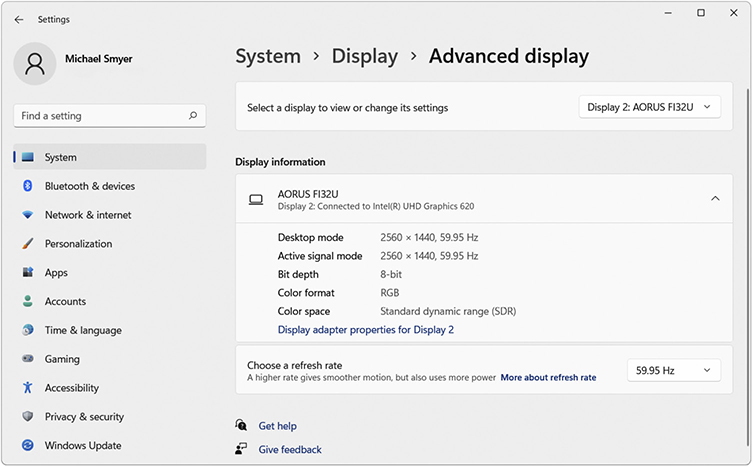
• Figure 17.33 Windows 11 Advanced display
This screen also enables you to open the general Properties for the display adapter and monitor by clicking Display adapter properties (see Figure 17.34). The Adapter tab shows information about the adapter, such as GPU and RAM. Clicking the Properties button will open a dialog box to update or roll back the driver. See “Working with Drivers” a bit later in this chapter for more information.
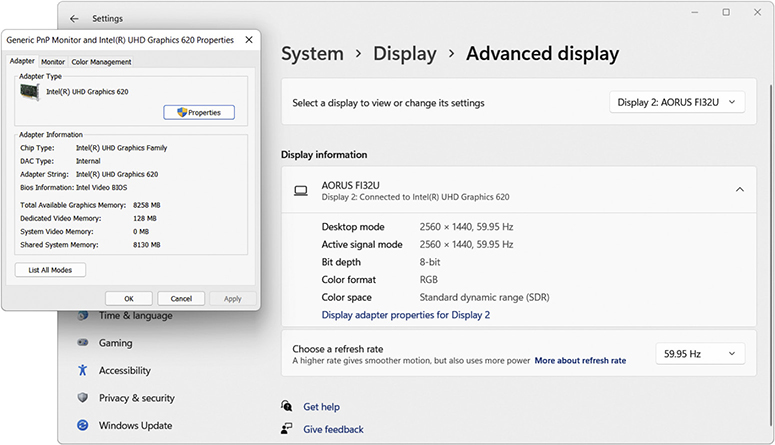
• Figure 17.34 Properties dialog box with Adapter, Monitor, and Color Management tabs in Windows 11
Personalization Settings Personalization-branded tools handle user preferences, such as background picture, colors of various interface elements, and that sort of thing. Figure 17.35 shows the Personalization Settings background screen. The changes you can make are pretty obvious: make your background a solid color or pick a picture; you can use one of the images that come with Windows or choose your own.
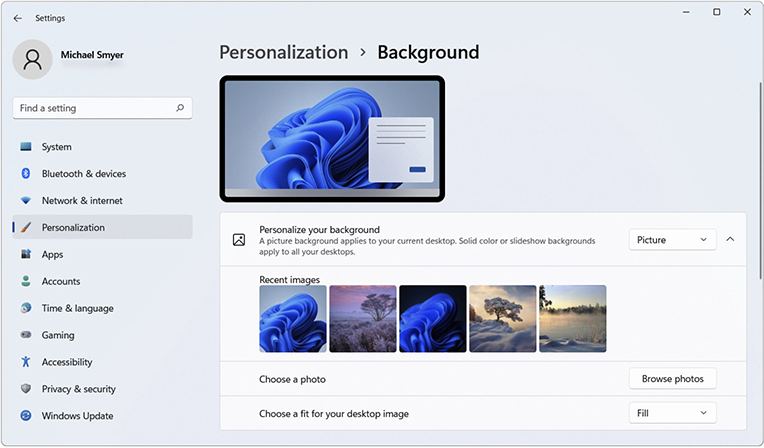
• Figure 17.35 Windows 11 Personalization background settings
The list on the left gives you many more options for tweaking the look and feel of Windows, such as customizing a theme (the overall look and feel), changing the default font, and adjusting the Start menu and Taskbar. The Related Settings at the bottom can help people who have trouble with the default interface, with High contrast settings. The Sync your settings (Windows 10) or Windows backup (Windows 11) option under Accounts enables you to synchronize multiple Windows machines that you log on to with your Microsoft account (see Figure 17.36).
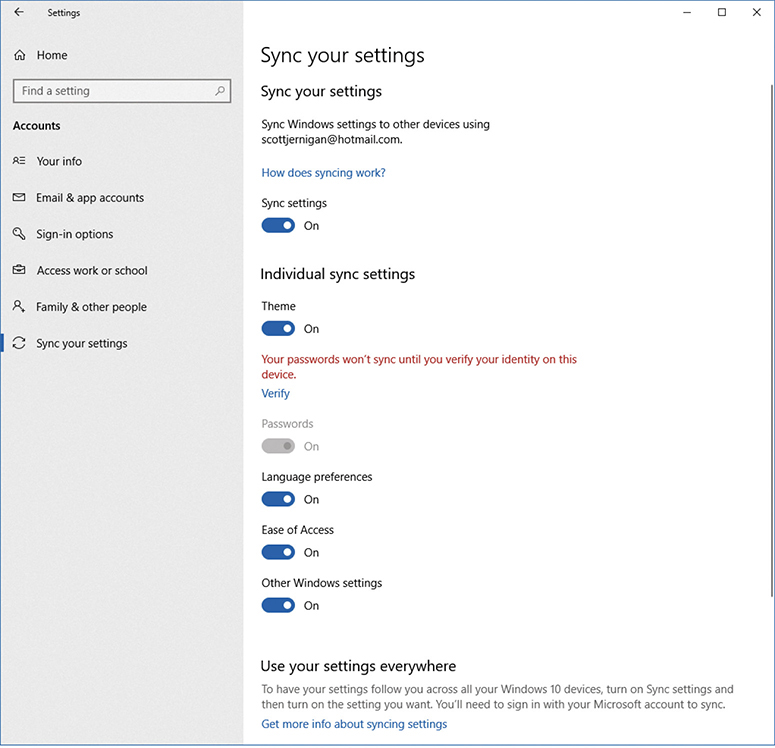
• Figure 17.36 Windows 10 Sync your settings options
Display Options in macOS and Linux
macOS and most modern Linux distros offer clear options for changing display settings. To no one’s surprise, you’ll find the options in macOS in System Preferences (see Figure 17.37). The General settings enable you to change color schemes. You can change the Desktop background in Desktop & Screen Saver.

• Figure 17.37 System Preferences in macOS
Click the Dock & Menu Bar option to access a screen that enables you to change the user experience a lot (see Figure 17.38). The Dock resides by default along the bottom of the screen. You can make the icons tiny and less distracting. You can move the Dock to the right or left. You can change the default animation behavior for mouseovers.
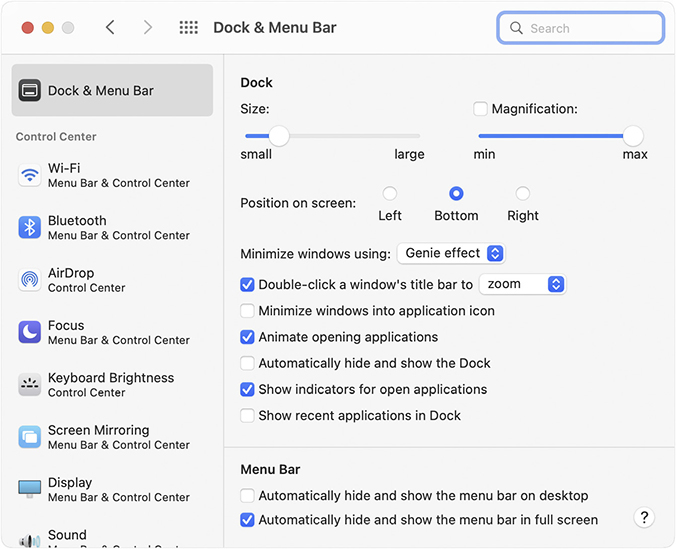
• Figure 17.38 Dock & Menu Bar options
Different Linux distros put the display options in various places, but you’ll commonly find one or more utilities in the System Settings. Figure 17.39 shows the Settings app in Ubuntu, for example, where you can alter most of your system settings, including the background, theme, and Launcher icon size.

• Figure 17.39 Changing the system appearance in Ubuntu’s Settings app
All the things you can modify in Windows, you can modify in Linux. You just might have to do a little hunting.
Working with Drivers
Now that you know the locations of the primary video tools within the operating system, it’s time to learn about fine-tuning your video. You need to know how to work with video drivers from within Settings, including how to update them, roll back updates, and uninstall them.
When you update the drivers for a card, you have a choice of uninstalling the outdated drivers and then installing new drivers—which makes the process the same as for installing a new card—or you can let Windows flex some digital muscle and install the new ones right over the older drivers.
To get to the adapter settings, as you’ll recall from earlier, open the Display Settings, click Advanced display, and click the Display adapter properties link to open the Monitor and Adapter Properties dialog box. Click the Properties button on the Adapter tab to open the Adapter Properties dialog box (see Figure 17.40). (Note that the “Adapter” in the dialog box will be the specific video card.) The General tab gives some information about the card, but the Driver tab gets to the heart of things.

• Figure 17.40 Adapter Properties dialog box with Driver tab selected
![]()
To update drivers, click the Update Driver button. Windows will give you the option of searching for updated drivers on both your computer and the Internet or just on your computer (see Figure 17.41). The former option these days is pretty magical, as long as the computer is connected to the Internet, of course.

• Figure 17.41 Windows looking for driver updates
1101
■ Troubleshooting Video
Users might temporarily ignore a bad printer or other device, but will holler like crazy when the screen doesn’t look the way they expect. Some video problems always point to a specific component, but others have more than one potential cause. To fix the latter kind of video problems quickly, a good place to start is by isolating where, between the computer and the display, the problem lies.
When you run into common problems that could easily be caused by settings built into a monitor, give them a quick check first. If a display turns on but doesn’t show anything (or shows the incorrect data/video source), flip through video sources (you might need to do this through an on-screen menu, a physical button, or a remote). If the image is a little bright, dark, washed out, or has incorrect color display issues such as a consistent tint, double-check the image adjustment settings.
The process is similar when audio issues are the only problem—usually that the audio isn’t working at all or is coming through the wrong device. Start by making sure the expected output device isn’t muted and that the volume is at an appropriate level. If that’s fine, check the device’s audio/sound output settings to make sure the correct output device is selected. The location differs by OS, but each has an option to test a specific output device by playing a tone. If you don’t see the correct output, ensure the devices are cabled correctly and that they all support audio. Keep in mind that VGA and DVI cables won’t carry sound, and some displays have no speakers.
For rare, obvious visual problems such as a flashing screen, streaking, smearing, missing colors, and strange visual distortions, check the cable and connections for physical cabling issues first. Confirm the connectors are seated properly. Try another cable. If another cable works, replace the bad cable. If another cable doesn’t work, double-check the ports on both ends for any debris or damage. If the cable is particularly long, it’s also worth trying a shorter cable just in case you’re getting bit by signal loss.
Connect the display to another system. If the cable isn’t the culprit and the display works fine on another system, suspect the video card (see the upcoming “Troubleshooting Video Cards and Drivers” section). If the display’s problem persists on another system, see the “Troubleshooting Monitors” section (and also the “Troubleshooting Projectors” section, if appropriate).
Troubleshooting Monitors
This section assumes you’ll leave display repair to trained professionals and concentrates instead on giving a support person the information necessary to fix basic problems and decide whether a trouble ticket is warranted.
Common Display Problems
I don’t recommend opening a monitor to work on it unless you’ve been trained how to do it safely, but you can still fix many display problems yourself. The following list describes the most common monitor problems and tells you what to do—even when that means sending it to someone else.
■ As displays age, they lose brightness. If the brightness control is turned all the way up and the picture seems dim, you’ll have to replace the backlight, display, or the entire device. This is a good argument for using the power switch or OS power-management options to turn off displays whenever your systems are idle.
■ A display panel may have bad pixels. A bad pixel is any single pixel that does not react the way it should. A pixel that never lights up is a dead pixel, a pixel that is stuck on pure white is a lit pixel, and a pixel that is always some other specific color is a stuck pixel. If you discover bad pixels on a monitor under warranty, the best course of action is to contact the manufacturer. (Fair warning: The warranty of every panel manufacture requires a certain number of bad pixels to be present for the warranty to cover replacement even on a brand-new monitor! You need to check the warranty for your monitor and see how many bad pixels must be present before you may return it.) If the monitor isn’t under warranty, you can try to revive the pixel using techniques discussed online, learn to live with the bad pixels, or replace the monitor.
■ If a display panel cracks, it is not repairable and must be replaced.
■ A flickering image usually points to a problem with the backlight or internal circuits. The exact fix will depend on the technologies in use—but you’ll probably have to replace the backlight, display panel, or the whole monitor.
■ A dim image, especially on only the top or bottom half of the screen, points to a dead or dying backlight.
■ If the LCD goes dark but you can still barely see the image under bright lights, you lost either the backlight or the inverter. In many cases, especially with super-thin panels, you’ll replace the entire panel and backlight as a unit.
■ If an older LCD with a CCFL backlight makes a distinct hissing noise, an inverter is about to fail. You can replace the inverter, but at this point I recommend replacing the display.
■ If an image displayed for a long time (common with interface elements in operating systems and games) leaves a shadow or impression, you’re seeing image persistence. Most persistence problems these days are temporary and should go away if you turn the display off for at least as long as it was on. If not, it may be permanent display burn-in. Early generations of each new display technology tend to struggle with burn-in, so it’s a good idea to protect them with time-tested solutions: configure the OS to turn off idle displays or protect them with an animated screen saver. Monitors particularly prone to burn-in (such as OLEDs) may also have menu options that help minimize the likelihood or appearance of burn-in. If the burn-in doesn’t go away and you can’t live with it, you’ll have to replace the display.
Bottom line on fixing displays? You can find companies that sell replacement parts, but repairing displays is difficult, and there are folks who will do it for you faster and cheaper than you can. Search for a specialty display repair company. Hundreds of these companies exist all over the world.
Dealing with High-Resolution Monitors
High-resolution monitors offer beautiful visuals, but can make screen elements—buttons, menus, stuff for navigating operating systems and applications—too small for some viewers. If you recall from earlier in the chapter, display panels have a default resolution; the picture will degrade (and may look a little fuzzy) if you set the resolution lower than the default. But that’s what a lot of people do, because it makes the screen elements bigger and thus useable. That’s not the solution!
The best way to deal with the scenario of tiny screen elements is through the Display Settings. Every version of Windows enables you to change the size of screen elements directly, making the screen elements appear larger (or smaller). The resolution doesn’t change; only the size of the screen elements changes. Figure 17.42 shows the drop-down menu options in Windows 11. Note that changing the size of text, apps, and other items from 100 percent to 125 or 150 percent is a simple selection.

• Figure 17.42 Changing the size of text, apps, and other items in Windows 11
Try This!
Scaling the UI
Most of you have access to a Windows computer, so try this! Open Display Settings and experiment with the element size settings. This is something you absolutely need to understand to help users with high-resolution monitors.
Cleaning Monitors
Cleaning monitors isn’t like scrubbing a sink or even cleaning a window—you can’t just pick whatever cleaning solution and rag are lying around and go to town. Even when a display is protected by a layer of glass, it’s still likely to have delicate coatings that reduce glare and resist grime.
Before you dive in, consult your display’s manual or other documentation for any special precautions, recommendations, or equipment. Here’s what I recommend—as long as your display’s documentation doesn’t disagree!
■ Do not directly spray any liquid onto the screen. If it runs and leaks into any electronics, you could hurt yourself and fry the display.
■ Don’t use any cleaners or solvents. Multiple display manufacturers explicitly caution against all of them—even common electronics cleaners such as alcohol.
■ Don’t use prepackaged disposable wipes marketed for cleaning things like lenses or electronics. Some of the ones made specifically for cleaning monitors might be fine, but it isn’t always easy to figure out what’s in them—and many of them contain alcohol.
■ Start with a clean, dry microfiber cloth and gently wipe dirt and grime off the display. Don’t push hard, scrape, or scrub—remember the delicate coatings!
■ If the screen still has grime on it, apply just enough water to dampen part of the microfiber cloth and continue to gently wipe the screen. This can be frustrating, but it’s better to be patient and persistent than to damage an expensive display with force! Promptly dry the screen with the dry portion of your cloth.
Privacy with Multiple Monitors
Adding a second or third monitor to your setup can have a couple of downsides. The added viewing area can increase the potential for glare or reflection from other objects, making optimal monitor placement difficult. The extra visual real estate and viewing angles also make it easy for even casual passersby to see what you’re viewing.
Monitor peripheral vendors address these problems with privacy screens. The screens fit over and slightly around the display. They stop wide-angle viewing of the screen and also drop the glare caused by external object reflection.
Tech Tip
Multiple Monitor Mishaps
Video cards can handle multiple monitors that differ from one another in size or resolution, but this can create problems. Connecting an older 4:3 aspect ratio projector to a widescreen laptop for a presentation when you’re mirroring the displays, for example, can create a pretty bizarre misalignment in layout. Using monitors with different orientation—landscape and portrait—can also produce undesirable effects. Try variations before your presentations!
Also, Windows enables you to designate which monitor is right or left or top or bottom. Making an alignment error here can cause problems when extending a display. You might drag the cursor to the right side of the left monitor, for example, and hit a wall because the “right” monitor is supposed to be on the left. These kinds of issues require a trip to the Display Settings.
Troubleshooting Projectors
Many of the concepts for troubleshooting traditional monitors also apply when you need to troubleshoot a projector, but there are also a few special points to keep in mind.
■ Projector lamps can produce a lot of heat. If your projector has a lamp, let it cool off before you work on it. After you turn it off, the fan will run for a while to cool the lamp. If that isn’t an option, be very careful where you touch to avoid burning yourself.
■ Projector lamps have a relatively short life (usually a few thousand hours) compared to most other display components. They’re expensive, but otherwise simple to replace. Keep a spare lamp on hand; not only will you be ready to save the day when one burns out before a big executive meeting, but a spare lamp will help you rule out lamp issues when troubleshooting a projector. You might (depending on the device) be able to do the same with LED or laser light engines (though you won’t need to replace them nearly as often).
■ Speaking of replacement parts, keep some spare batteries around for the remote. Most projectors are mounted in a hard-to-reach location. If the projector won’t respond, try swapping out the remote’s batteries before you break out a ladder to reach the projector’s physical buttons.
■ Projectors have a fan to cool off the lamp. If the fan goes out or the filter gets clogged, the lamp could overheat. The screen may suddenly go black if it goes into an overheat shutdown. If users haven’t figured out that this is heat-related, they might describe random, occasional, or intermittent projector shutdowns. Trying to turn the projector immediately back on to troubleshoot the issue may not work at all. If it does, it certainly won’t help the main problem. Clean dust out of the fans, filters, and vents—and confirm that the fan is working.
■ Like any display that goes unused for long enough, a projector might go into sleep mode. It’ll usually wake up if you use the computer or press the right button on the remote. If the projector is clearly running but there’s no image on the screen, you may have to reboot it.
■ If you notice incorrect color display issues such as a strong tint that aren’t fixed by color adjustments or replacing the cables, an LCD or DLP component has failed and the projector will need service or replacement.
■ If the projector throws a fuzzy image, the lens might be dirty or out of focus (if its focus is adjustable), or the projector may not be at the intended distance from the screen. Check for dust and dirt, try adjusting the focus, and consult the documentation to ensure it’s at the right distance from the screen.
Above all else, don’t get too focused on the fact that you’re dealing with a projector when you have to troubleshoot one. It’s easy to jump straight to projector-specific solutions and miss simple problems like a poorly connected cable, or a laptop that isn’t configured to extend or mirror its display to the projector.
Troubleshooting Video Cards and Drivers
Video cards rarely go bad, so the majority of video card and driver problems are bad or incompatible drivers or incorrect settings. Always make sure you have the correct driver installed. If you’re using an incompatible driver, you might get a Blue Screen of Death (BSoD) as soon as Windows starts to load. A system with a suddenly corrupted driver usually doesn’t act up until the next reboot. If you reboot a system with a corrupted driver, Windows will do one of the following: default into a lower resolution, blank the monitor, lock up, or display a garbled screen with weird patterns, incorrect color patterns, or a distorted image.
Whatever the output, reboot into Safe mode and roll back or delete the driver. The drivers may manifest as installed programs under Apps and Features, so check there first before you try deleting a driver via Device Manager. Download the latest driver and reinstall.
Video cards are pretty durable, but they have two components that do go bad: the fan and the RAM. Lucky for you, if either of these goes out, it tends to show the same error—bizarre screen outputs followed shortly by a screen lockup. Usually Windows keeps running; you may see your mouse pointer moving around and windows refreshing, but the screen turns into a huge mess (see Figure 17.43).

• Figure 17.43 Serious video problem
Bad drivers sometimes also make this error, so always first try going into Safe mode to see if the problem suddenly clears up. If it does, you do not have a problem with the video card!
Excessive heat inside the case, even with the video card fan running at full blast, can create some interesting effects. The computer could simply shut down due to overheating. You’ll recognize this possible cause because the computer will come back up in a minute or two, but then shut down again as you push it hard enough to heat it up again. Sometimes the screen will show bizarre artifacts or start distorting. Check your case fans and make sure nothing is too close to the video card. You might need to take the whole system outside to blow dust out of its filters, vents, fans, and heatsinks.
Beyond A+
■ Evaluating Monitors
The CompTIA A+ exam no longer addresses the technical properties that you’ll need to know to help your customers find the right monitor for their needs. The popularity of portable and mobile devices with built-in displays has made this skill a little less important over the years, but I still think any tech that supports desktop users—or even laptop users that need a second or third screen—need to know this stuff! Let’s look at the most important properties.
Resolution
A resolution, such as 2560 × 1440, describes the number of pixels on a display (in this case, 2560 pixels across and 1440 pixels down). Displays are designed to run at a single native resolution. You can’t run a display at a resolution higher than the native resolution, and running it at a lower than native resolution degrades the image quality. The display has to use an edge-blurring technique called interpolation to soften the jagged corners of the pixels when running at lower than native resolution, which simply does not look as good. The bottom line? Always set the display at native resolution!
The number of pixels arranged on the screen define the aspect ratio of the picture, such as 16:9 or 21:9 (see Figure 17.44). A typical widescreen monitor running at 1920 × 1080 is an example of 16:9 aspect ratio. An ultrawide monitor running at 3440 × 1440 is an example of 21:9. You can change the aspect ratio of many monitors in the operating system tools, such as Display in Windows, but the quality of the picture will degrade.

• Figure 17.44 Various aspect ratios compared
Modern computing devices use different aspect ratios. Many smartphones stick to 16:9, but a lot of newer Android and iPhone models have gone wider with aspect ratios like 18:9 and 19.5:9. Most Apple iPads, in contrast, have a 4:3 aspect ratio screen; the Microsoft Surface laptop uses a 3:2 screen.
Monitor marketing has always been a mess, but display manufacturers usually mention at least the physical size of the display. They often go on to indicate the panel technology, resolution, aspect ratio, and maybe one or two of its most important features.
Once upon a time, a display’s native resolution was usually indicated by the name (technically an initialism) of the corresponding video mode—such as the ancient VGA (640 × 480) and SVGA (800 × 600) formats. These days, displays are usually marketed with some combination of shorthand borrowed from TV (such as HD, 1080p, FHD, UHD) or film (2K, 4K, 8K, and so on). These formats are easier to remember (mostly because there aren’t as many), but it’s good to know that these designations (especially the film-style ones) are applied to multiple similar resolutions.
Memorizing every possible resolution isn’t a good use of your time (there are a ton of resolutions out there), but it is a good idea to be able to recognize the patterns in case you see them in the real world. Table 17.1 shows a mix of these terms and corresponding properties.
Table 17.1 Display Resolution Shorthand

PPI
The combination of the resolution and physical size of a display determines the pixels per inch (PPI) of a panel. The higher the PPI, the finer the picture a monitor can produce. That means, in practical terms, that a smaller high-resolution monitor will look substantially better than a much larger monitor running at the same resolution. A 24-inch 1080p monitor, for example, looks good at just under 100 PPI. A 32-inch 1080p monitor looks kind of grainy, because its PPI is sub-70. This PPI number is part of what makes a MacBook Pro laptop so crisp. The 15.4-inch screen has a resolution of 2880 × 1800, which puts it at 220 pixels per inch. That’s sweet! Modern smartphones have outrageous PPI levels, which again is why they look so much better than a typical desktop monitor.
Brightness
The strength of any display’s light-emitting components (the backlight, for an LCD, or the LEDs themselves in an OLED display) determine the brightness of the monitor. The brightness is measured in nits. Display panels vary from 100 nits on the low end to over 1000 nits or more on the high end. Average displays are around 300 nits, which most monitor authorities consider excellent brightness. Higher brightness levels also make it easier to view displays in bright rooms.
Try This!
Test the Viewing Angle
Take a trip to your local computer store to look at displays. Don’t get distracted looking at all the latest graphics cards, CPUs, motherboards, and RAM—well, actually, it’s okay to look at those things. Just don’t forget to look at monitors!
Stand about two feet in front of a display. Look directly at the image on the screen and consider the image quality, screen brightness, and color. Take a small step to your right. Compare the image you see now to the image you saw previously. Continue taking small steps to the right until you are no longer able to discern the image on the display. You’ve reached the edge of the viewing angle for that panel.
Do this test with a few different monitors. Do smaller panels, such as 20-inch displays, have smaller viewing angles? Do larger displays have better viewing angles? You might also want to test the vertical viewing angles of some monitors. Try to find a monitor that is on your eye level; then look at it from above or below—does it have a large viewing range vertically? There’s also a curved monitor variant not discussed in this chapter, but worth looking at. What kind of viewing angle do they have?
Viewing Angle
Flat-panel displays have a limited viewing angle, meaning the screen fades out when viewed from the side (or any angle not dead center). Note the viewing angle when shopping for a monitor. Wider is better for typical users. Narrow isn’t necessarily bad—especially when you want to limit what anyone but the user can see on the monitor.
Response Rate
A display’s response rate is the amount of time it takes for all of the sub-pixels on the panel to change from one state to another. Manufacturers measure these response rates in milliseconds (ms), with lower being better. There are a few ways manufacturers measure this change. One is black-to-white (BtW): how long it takes the pixels to go from pure black to pure white and back again. The most common is gray-to-gray (GtG): how long it takes the pixels to go from one gray state to another.
The GtG time will always be faster than the BtW time. A typical modern display has an advertised response rate of less than 5 ms. The manufacturer will almost always advertise the GtG response time, though some publish more than one measure. You might find older displays in use with response times over 20 ms—slow enough that you might notice image smearing if you try to watch a movie or play a fast-paced game.
Refresh Rate
The refresh rate for a display refers to how often a screen can change or update completely. Think of the refresh rate as a metronome or timer and you’ll be close to how it works in a display. For most computing purposes, 60 Hz is fine and that’s been the standard for the industry. Higher refresh rates smooth out movement and reduce lag, which is most important in fast-moving games. Common higher-end monitors today, though, go well beyond, offering refresh rates like 144 Hz, 165 Hz, 240 Hz, and so on.
Contrast Ratio
A good contrast ratio—the difference between the darkest and lightest spots that the monitor can display—is 450:1, although a quick trip to a computer store will reveal displays with lower levels (250:1) and higher levels (1000:1).
Display manufacturers market a dynamic contrast ratio number for their monitors, which measures the difference between a full-on, all-white screen and a full-off, all-black screen. This yields a much higher number than the standard contrast ratio. My Samsung panels have a 1000:1 contrast ratio, for example, but a 20,000:1 dynamic contrast ratio. Sounds awesome, right? In general, the dynamic contrast ratio doesn’t affect viewing on computer monitors. Focus on the standard contrast ratio when picking displays.
Color Depth
The typical human eye can see an astonishing variety of colors, luminance (aka brightness), and contrast. Scientists interested in what people see have defined this visual variety into graphs known technically as chromaticity diagrams or, more commonly, color spaces (see Figure 17.45).

• Figure 17.45 Example of a chromaticity diagram
Computers only display a fraction of what people can see and thus use more limited color spaces. Matching color spaces among devices provides some consistency in color output. Several standards define the color space for the IT industry, though sRGB has long been the standard for displays. The color depth of a display panel indicates how precisely it can replicate colors within the color space it can display.
Very old TN monitors, for example, used a 6-bit panel. That meant that each color channel—red, green, and blue—had 64 (26) color variations. Most monitors today use an 8-bit panel, with 256 (28) colors per channel. This translates in marketing as 24-bit color, meaning the monitor can display 16.7 million color variations. At the higher end, manufacturers have 10-bit panels that display 1024 (210) color variations per channel, providing over 1 billion color variations. High levels of precision are especially important if you do a lot of photo editing or video color grading.
Panel Technology
At this point, the vast majority of users will go with an IPS panel with an edge-lit backlight. You’ll have amazing color and viewing angle. Size and resolution will be determined by your budget and space considerations.
Once you move beyond the average user, though, things get tricky. Because the exact panel technologies in a given display can have a big impact on its resolution, brightness, contrast, color fidelity, and price, you’ll have to spend some time understanding the user’s needs and squaring them with the budget. If your budget isn’t tight, a full LED backlight or Mini LED backlight can improve the color quality, brightness, and contrast.
High Dynamic Range
Have you watched the sun rise or set, with the phenomenal difference in brightness between the vibrant sunlit clouds and deep shadows around the trees? That vista encompasses—from its darkest points to its brightest—a very broad dynamic range. The world around us has a very broad (or high dynamic) range, but photographers and filmmakers have to take special steps to capture enough visual information to get anywhere close.
The standard 8-bit panel uses standard dynamic range (SDR), and that’s good enough for almost every computing need, from movies to games to productivity applications. To accurately render high dynamic range (HDR) content, displays need to be very bright—at least 400 nits for OLEDs and 600 nits for LCDs—plus support special HDR image formats. The rich details and sparkling highlights make HDR photographs and videos more lifelike—almost like looking out a window!
Adaptive Sync
When a graphics card is working hard, the number of frames it can generate in any given second fluctuates wildly. When the display and graphics card are out of sync, different parts of the screen may show different frames. This jarring effect is called tearing, and the people who make graphics cards and displays have been working on this problem for years.
An early approach to this problem, vertical sync (V-sync), avoids tearing by using a fixed refresh cycle—at the expense of higher latency. Adaptive sync addressed this tradeoff by enabling a display to synchronize its refresh rate with the graphics card’s refresh rate. NVIDIA developed proprietary adaptive sync technology it calls G-Sync, and in response, AMD developed a royalty-free adaptive sync technology called FreeSync. Both technologies are entering their second generations with HDR support: FreeSync Premium Pro and G-Sync Ultimate.
These technologies are a big improvement for gaming, but there’s a downside: minimal cross-compatibility. To take advantage of adaptive sync, your graphics card and monitor either both need to support FreeSync or both need to support G-Sync (although NVIDIA has very recently announced support for a handful of FreeSync monitors via their G-Sync Compatible program). If you want adaptive sync, research the compatibility of your components carefully!
■ Additional Display Topics
Display technologies play such a huge role in modern computing that it’s hard to believe people used computers for years without anything like a modern display. The rapid growth and development of computing technology is nowhere more visible than in the ever-growing selection of super-thin, curved, astonishingly clear, ultra-wide, blazing-fast, efficient, jaw-droppingly huge displays.
The pace of change in display technologies is so fast that it’s hard to keep up, but some of these new bells and whistles cost an arm and a leg. A good tech needs to keep up with these developments in order to pick out displays with features that are meaningful to their users and avoid blowing the budget on features they could live without. With that in mind, let’s look at a few additional display topics that you won’t find on this edition of the exam, but you’re bound to run into in the real world: microLED displays and external GPUs.
MicroLED
Starting in the early 2010s, microLED (µLED) displays, which form pixels using groups of microscopic LEDs, have been looming on the horizon. This display technology threatens to outperform both LCD and OLED panels on key qualities like energy efficiency, brightness, contrast, response time, and durability. There’s no definite timeline, but several companies have hundreds of engineers working on microLED technology, including heavyweights such as Sony, Samsung, and Apple. It’s already mature enough to show up in niche real-world uses such as (projector-less!) movie theater screens and large video walls—but not yet in mass-produced display panels.
eGPUs
Manufacturers have taken advantage of the blistering throughput of the latest USB and Thunderbolt buses to create external graphics processing units (eGPUs), standalone boxes with video cards for video processing and gaming. eGPUs enable you to edit 4K on the go and then play graphics-intensive games on portable computers, such as ultrabooks and MacBook Pros. The portables stay thin and light, unlike dedicated gaming portables. Plus, if you want to edit or game but need an ultra-portable computer, you don’t need to shell out for a dedicated video production or gaming machine in addition.
You’ll find two main types of eGPUs: those that include a GPU and empty enclosures you can install your own GPU in. Recent versions of the Gigabyte AORUS Gaming Box wrap a high-end Gigabyte-branded NVIDIA gaming card in an enclosure that includes a power supply, water cooling, and several ports for video and peripherals. It has HDMI and DP ports for video, USB ports for key peripherals like a mouse and keyboard, an Ethernet port for wired network access, and a Thunderbolt port for connecting to your computer. This lone Thunderbolt port is powerful enough to supply all of these to a laptop—and even charge it!
Empty enclosures have a similar set of features, but you’ll have to do a little research to ensure that your card(s) and enclosure are compatible.
Chapter 17 Review
■ Chapter Summary
After reading this chapter and completing the exercises, you should understand the following about display technologies.
Summarize different display technologies
■ The term video encompasses a complex interaction among numerous parts of personal computing devices, all designed to put a picture on the screen. The monitor or video display is the primary output device and shows you what’s going on with your programs and operating system. The video card or display adapter handles all the communication between the CPU and the monitor or display. Video displays come in two main varieties today: flat-panel displays and projectors.
■ Almost every computing device today uses a flat-panel display, and most of these screens use a liquid crystal display (LCD) panel as the primary visual output component.
■ An LCD screen is composed of tiny liquid crystal molecules called sub-pixels. Today’s LCD panels use active matrix technology.
■ The typical LCD monitor is composed of an LCD panel to create the image and a backlight to illuminate that image. Some older models also include an inverter to convert AC wall current into DC that some backlights require.
■ The most common LCD panel types today are twisted nematic (TN), in-plane switching (IPS), and vertical alignment (VA). TN panels are (technically) faster; IPS panels have better color; VA panels fall in the middle for both responsiveness and color accuracy. In reality, IPS panels have slowly improved over time and now are fast enough for most purposes.
■ Current LCDs use light-emitting diode (LED) backlights. Early LCD backlights used cold cathode fluorescent lamp (CCFL) technology. CCFLs required high-frequency AC electricity and so required the use of an inverter to convert the DC from the monitor’s power supply.
■ Cheaper edge LED backlighting uses two backlights at the top and bottom of the panel, while direct LED backlighting uses a bank of LEDs directly behind the panel.
■ OLED displays use organic light-emitting compounds that don’t require a separate backlight (enabling thin, energy-efficient panels). OLED pixels can turn off completely, enabling pure black and better contrast than LCD panels. OLED has built up three niches where it is most competitive: high-end televisions, viewfinders for mirrorless interchangeable lens cameras, and small mobile/wearable devices (including smart watches, smartphones, and virtual reality headsets).
■ Projectors generate an image and use light to throw (or project) it onto a screen or other object. Most of these are front-view projectors, which shoot an image from the front and are widely used during computer presentations.
■ LCD projectors, like LCD monitors, have a native resolution and are lightweight. Digital Light Processing (DLP) projectors offer a slightly less crisp display than LCD, but better contrast, with pure blacks possible. DLP projectors are lighter than LCD projectors, but they also use more electricity.
■ Projector brightness is measured in lumens. Larger numbers are brighter and better, with 1500 lumens being sufficient for a small, dark room. The size of the projected image at a certain distance from the screen is the projector’s throw. LCD can have multiple light sources including lamps, LEDs, and lasers. Lamp-based projectors need internal fans to cool the lamp. Lamps (which last around 3000 hours) are costly to replace. LED and laser light sources generate less heat and have long life spans over 20,000 hours—but may not be replaceable.
■ Displays have one or more connectors for connecting them to a video source. Modern connectors (such as HDMI, DisplayPort, Thunderbolt, and USB) are updated with new versions as the technology improves, and failing to ensure your video source, cables, and display are compatible with the right versions can limit their performance or available features. Modern connectors supply both audio and video signals.
■ Legacy connectors such as the VGA connector (a 15-pin, three-row, D-type connector—also known by names like D-shell and D-subminiature) and DVI do not have versions. DVI is still fast enough to power low-end displays, though it is appearing on fewer new devices.
■ Thunderbolt versions 1 and 2 used the Mini DisplayPort (mDP) connector, while Thunderbolt 3 and 4 use the USB Type-C connector. Only some mDP ports and USB Type-C ports are Thunderbolt-capable. These are often (but not always) marked with the Thunderbolt symbol.
■ Some projectors use a connection technology called HDBaseT that enables long-range connectivity for uncompressed HD video and audio over Cat 5a or Cat 6 network cables.
■ When you need to connect a display and video source that don’t share a connector, you can use a small adapter device or a cable that has a different connector on each end.
■ Monitors have adjustment controls for brightness, contrast, image size and position, and color adjustment. These controls are usually accessed via an onscreen display (OSD) menu system rather than with hardware knobs or dials.
■ Most monitors have a standardized mounting bracket based on the appropriate VESA mount standard for a display of its size. Larger displays have different mount points than smaller panels.
■ Some monitors have built-in features such as speakers, USB hubs, webcams, microphones, and so on. You’ll need to connect additional cables to the computer to enable these add-ons.
Understand how computers display and capture video
■ A computer’s display adapter (also called a graphics card or video card) handles video-related chores for the computer (including processing information from the CPU and sending it to the display). The display adapter is a complex set of devices, including its own graphics processor and RAM.
■ PCI Express video cards currently dominate the market for all systems. PCIe was a natural fit for video because it is incredibly fast. PCIe video cards use the PCIe ×16 connector.
■ Video cards are identified by their manufacturer, model number, graphics processor, amount of video RAM, and the slot to which they connect. Although a number of companies produce video cards, the three major manufacturers of graphics processors are NVIDIA, AMD, and Intel.
■ Low-end graphics processors are fine for basic productivity, but high-end graphics processors are essential for demanding tasks like powering high-end displays and rendering 3-D graphics for professionals and gamers alike.
■ To overcome the bottlenecks of data throughput speed, access speed, and capacity of video RAM, manufacturers increase the bus width, add more and more total RAM, and develop special-purpose RAM. Common video memory technologies include Graphics DDR (GDDR) and High-Bandwidth Memory (HBM). The latest high-end graphics cards tend to have a recent generation of this special-purpose RAM (such as GDDR6X or HBM3), but low-budget cards may use a recent version of generic DDR RAM.
■ A lot of current motherboards have integrated GPUs or are ready for a CPU with an integrated GPU. You might run into AMD and NVIDIA chips powering the GPU. Intel has long integrated the Intel Graphics Media Accelerator (GMA) into its chipsets. Apple’s M1 processor family combines a powerful CPU and GPU on the same chip. Integrated graphics is traditionally limited, but gradual innovation in mobile devices and laptops is starting to overturn this old assumption.
■ Much like with displays, you can find a variety of connector types on video cards. Common connectors and cables include VGA, DVI, HDMI, DisplayPort, Thunderbolt, and USB Type-C. You’ll also find similar collections of video connectors on capture cards, which exist to enable users to record, stream, or watch video from another video source. They may also have an output connector for passing a signal on to a display for simultaneous viewing.
Install and configure video
■ During the physical install of a video card, watch out for three issues: long cards, the proximity to other PCIe cards, and the presence of power connectors. Long cards simply don’t fit in some cases, and close proximity to other expansion cards can cause overheating.
■ Video adapter drivers install pretty much the same as all other drivers: Windows has the driver already; insert the installation media that came with the card; or download the latest driver from the Internet.
■ The Display Settings or Personalization Settings provide convenient, central locations for all of your display settings, including resolution, refresh rate, driver information, and color depth.
■ Adding extra monitors to a system can radically alter a user’s workflow. The Display Settings enable you to modify how multiple monitors function.
■ macOS and most modern Linux distros offer clear options for changing display settings. You’ll find the options in macOS in the System Preferences; Linux distros vary, but check System Settings first.
■ When you update drivers, you can either uninstall the old drivers before installing the new ones or let Windows install the new ones right over the old. You can do this from the Driver tab within the Monitor and Adapter Properties dialog box, or you can click on the Properties button on the Adapter tab to open the Monitor and Properties dialog box.
Troubleshoot basic video problems
■ Some video problems always point to a specific component, but others can have more than one cause. A good way to troubleshoot the latter kind is to start by isolating where, between the computer and the display, the problem is.
■ If the problem could easily be caused by a setting built into the display, start there. Check the display’s video source setting if it turns on but shows nothing. Check the image adjustments if the image is a little bright, dark, washed out, or tinted.
■ If the only problem is an audio issue, make sure the expected output device isn’t muted and has an appropriate volume level. Next, check the computer’s audio/sound output settings to ensure the correct output is selected. Each OS also has a way to play a test tone over the device to confirm it works. If you don’t even see the right output, ensure the devices are cabled correctly and all support audio. Keep in mind that VGA and DVI cables don’t carry sound and some displays lack speakers.
■ For rare, obvious visual problems like streaking, smearing, flashing, flickering, missing colors, and distortions, check the cables. Make sure they’re connected properly. Try another cable (and replace it if the other cable works). Otherwise, check the ports on both ends for debris or damage. If the cable is very long, try a shorter one to rule out signal loss.
■ Connect the display to a different system. If you confirm the cable is fine and the display works on another system, focus on the video card. If the display’s problem persists, focus on monitor or projector issues.
■ Displays lose brightness as they age, so a dim display with maxed-out brightness controls means it’s time to replace the backlight, display, or device. Minimize how long your displays are on while your system is idle by manually turning them off or using OS power-management options.
■ If enough pixels are dead or stuck, the manufacturer may replace the display. Otherwise, you can follow online guides to try to revive them, learn to live with the bad pixels, or replace the device.
■ Many internal issues will entail replacing a component or the whole device. A cracked display panel must be replaced. A flickering or very dim image both point to backlight or circuit problems that may entail replacing the backlight, panel, or device. An older display making a hissing noise may have a failing inverter; you can replace the inverter, but I recommend replacing the device.
■ Images displayed for a long time (like interface elements in an OS or game) can persist. This is usually temporary, but permanent burn-in can happen (especially on early generations of a newer technology). Displays prone to burn-in, such as OLED displays, may have menu items to help minimize the likelihood or appearance of burn-in. If it won’t go away, you’ll have to live with it or replace the device.
■ High-resolution monitors can render some screen elements too small for some users. Don’t change the screen resolution (which can make the entire picture a little fuzzy)—use the Settings and increase the size of text, apps, and other items from 100 percent to resize these elements.
■ Check the manufacturer’s recommendations before cleaning a display, but generally: don’t spray any liquid onto the screen and don’t use solvents or cleaning solutions (directly or by using prepackaged wipes containing them). Use a clean, dry, microfiber cloth to gently wipe the display. Dampen part of the cloth with water for stubborn grime, use patience instead of force, and promptly dry the screen with the dry portion of the cloth.
■ Privacy screens reduce glare and limit the angles from which passersby can read whatever’s on your screen.
■ Projectors have most of the same troubleshooting issues as monitors, but they also have a few additional problems relating to the lamp and remote. Be careful with the lamp to avoid getting burned. Keep a replacement lamp and batteries on hand to make troubleshooting easier. If the projector cuts off after a while, check the fan and filter. Try rebooting the projector in case it entered sleep mode.
■ If you notice the projector has incorrect color display issues like a strong tint that isn’t fixed by other steps, an LCD or DLP component inside the projector may have failed. The projector will need service or replacement.
■ If the projector throws a fuzzy image, check the lens for dust, try adjusting the focus (if it is adjustable), and consult the documentation to ensure the projector is the correct distance from the screen.
■ Video cards are pretty durable, so most problems are caused by drivers or settings. Make sure the correct driver is installed. If so, try rolling it back or reinstalling it. If components such as the fans or RAM fail, the screen will likely glitch and lock up. Bad drivers can cause this, too, so it’s worth seeing if the problem reappears in Safe mode. Excessive heat can cause bizarre visual artifacts, but it should usually just cause the computer to shut down for safety. Make sure fans are working, nothing is too close to the video card, and check filters, vents, fans, and heatsinks for dust.
■ Key Terms
active matrix
adapter
aspect ratio
backlight
color depth
contrast ratio
Digital Light Processing (DLP)
Digital Visual Interface (DVI)
direct LED backlighting
display adapter
DisplayPort (DP)
Display Settings
edge LED backlighting
graphics processing unit (GPU)
HDBaseT
High Definition Multimedia Interface (HDMI)
in-plane switching (IPS)
inverter
lamp
LCD panel
light-emitting diode (LED)
liquid crystal display (LCD)
lumen
Mini DisplayPort (mDP)
monitor
native resolution
nit
organic light-emitting diode (OLED)
PCI Express (PCIe)
Personalization Settings
pixel
pixels per inch (PPI)
projector
refresh rate
resolution
response rate
sub-pixel
thin film transistor (TFT)
throw
Thunderbolt
twisted nematic (TN)
USB Type-C
vertical alignment (VA)
VGA connector
video display
Video Graphics Array (VGA)
viewing angle
■ Key Term Quiz
Use the Key Terms list to complete the sentences that follow. Not all terms will be used.
1. The fastest of the three common panel types is the__________________.
2. The traditional D-subminiature connector on a video card is called a(n) __________________.
3. A color LCD screen is composed of tiny liquid crystal molecules called _________________which are arranged in rows and columns between polarizing filters.
4. Flat-panel displays have a limited _________________________, meaning the screen fades out when viewed from the side (or any angle not dead center).
5. The __________________ bus is the most common expansion slot for video cards.
6. Two common projector technologies are LCD and __________________.
7. The brightness of a projector is expressed in __________________, a measure of the amount of visible light given off by a light source.
8. Apple Macs use either the Mini DisplayPort or ________________________ display connector type.
9. A(n) __________________ handles the video processing chores in modern systems.
10. The size of the projected image at a specific distance from the screen is defined as the projector’s __________________.
■ Multiple-Choice Quiz
1. If one of the colors is missing on the monitor and you cannot fix the problem by adjusting the front controls, what should you then check for?
A. A refresh rate that is set higher than that recommended by the manufacturer
B. A corrupted video driver
C. A bad or poorly connected cable
D. A distinct hiss from the inverter
2. Which of the following resolutions should you set your OS to use with a 4K monitor for the best picture quality?
A. 3840 × 2160
B. 4096 × 2160
C. 7680 × 4320
D. Its native resolution
3. Which of the following problems will require replacing a component or the whole monitor?
A. Accidentally corrupting the video driver
B. A cracked display panel
C. Accidentally changing the native resolution
D. A burnt-out light engine
4. What do we call the time it takes for all of the sub-pixels on the panel to change from one state to another?
A. Refresh rate
B. Redraw rate
C. Response rate
D. Vertical refresh rate
5. Dudley works in a library that has a community activity room with an old projector that doesn’t have any modern video connectors. He’s tried informing presenters to bring their own adapter, but often they don’t. There’s no money in the budget to replace the projector, but he got permission to build a small adapter kit. Which of these is most likely to belong in his kit?
A. BNC to DVI
B. Mini DisplayPort to HDMI
C. Mini-HDMI to USB Type-C
D. USB Type-C to VGA
6. Which of these is equivalent to 1080p?
A. HD
B. FHD
C. UHD
D. WQHD
7. What is the processor on a video card called?
A. CPU
B. GPU
C. GDDR
D. MPU
8. Which projector produces the brightest image?
A. One with the longest throw lens
B. One with the largest lamp or light engine
C. One with the cleanest lens
D. One with the highest lumen rating
9. Marie’s organization wants to put a vertical monitor on the wall between the elevators to post a list of upcoming events, and they’ve asked her to figure out what they’ll need. What should she look for?
A. Monitor stands make it impossible to safely mount one on the wall. She’ll have to look for a television or projector instead.
B. Since each monitor manufacturer does it differently, she should check the manufacturer’s list of accessories to see if they make a wall mount for the device.
C. All monitors have built-in saw-tooth mounting hangers much like a picture frame. She just needs to pick out a monitor, obtain a pair of wall anchors and screws that are rated to support the monitor’s weight, and confirm she has access to basic tools.
D. As long as she picks a monitor with a VESA mount, she just needs to double-check which mount standard it uses, pick out a matching mount, and confirm she has access to basic tools.
10. Which of these limits the jarring visual effect called tearing?
A. Adaptive sync
B. A wide viewing angle
C. High Dynamic Range (HDR)
D. Lowering the refresh rate
11. On modern PCs, which of the following may have an integrated GPU built in?
A. CPU
B. Motherboard
C. Monitor
D. Webcam
12. What should you keep around for cleaning monitor screens?
A. Microfiber cloths
B. A bottle of rubbing alcohol
C. Disinfectant wipes
D. A bottle of window cleaner
13. If a user complains that the interface elements and text on a new high-resolution display are too small, what should you try first?
A. Help the user install a desk-mounted magnifying glass.
B. Help the user change the scale of OS elements such as icons, menus, and text.
C. Help the user install an app to selectively magnify parts of the screen.
D. Help the user lower the display resolution.
14. Which Windows settings enable you to change the Windows theme and settings that determine the colors of boxes and other visual items?
A. Display
B. Personalization
C. System
D. Visualization
15. Which of the following is not an advantage of OLED over LCD display panels?
A. OLED panels can be thinner than LCD panels.
B. OLED panels are more energy-efficient than equivalent LCD panels.
C. The organic elements in OLED panels help them retain images better than LCD.
D. The ability to turn off individual pixels makes OLED panels much higher contrast than LCD panels.
■ Essay Quiz
1. You’ve been tasked to write a guide for new users of Windows, specifically, how to tailor their screens to suit their eyes and sensibilities. Write a short essay discussing the appropriate Display Settings and the various things they can do.
2. Your company just hired two new technicians. You’ve been tapped to teach them what they can and cannot do to troubleshoot and repair an LCD monitor. What will you tell them?
Lab Projects
• Lab Project 17.1
If you just received a $500 bonus and decided to buy a new video system for your computer, what would you select? Go to the local computer store or to Web sites such as https://www.newegg.com and pick out the best combination of monitor and video card that you can buy with your bonus. Now imagine that you also received a $200 birthday gift and have decided to purchase an even better graphics card and monitor. Which ones will you select now that you have $700 to spend?
• Lab Project 17.2
Monitors are not the only output device for the computer. Research one of the following devices and prepare a short essay for the class about how the device works and its features, cost, and connections:
■ VR headset
■ Artist’s pen display
■ Touchscreen