chapter 14
Maintaining and Optimizing Operating Systems
“Chaos is inherent in all compounded things. Strive on with diligence.”
—BUDDHA

In this chapter, you will learn how to
■ Perform operating system maintenance tasks
■ Optimize operating systems
■ Prepare for problems
Every computer running a modern operating system (OS) requires both occasional optimization to keep the system running snappily and ongoing maintenance to make sure nothing goes wrong. The people who develop Windows, macOS, and the many Linux distros use decades of experience with operating systems to find ways to make the tasks of maintaining and optimizing surprisingly easy and automatic, but there’s still plenty to know about how to keep things humming along.
This chapter covers maintenance and optimization, so let’s make sure you know what these two terms mean. Maintenance is work you do from time to time to keep the OS running well, such as running utilities to clean up junk on your mass storage devices. An optimization is a change you make to a system to make it better—a good example is adding RAM or installing a useful program. This chapter covers the standard maintenance and optimization activities performed on Windows, macOS, and Linux, and the tools techs use to perform them.
Even the best maintained, most perfectly optimized computer is going to run into trouble. Hard drives crash, careless coworkers delete files, and lightning strikes. The secret isn’t to try to avoid trouble, because trouble will find you, but rather to make sure you’re ready to deal with problems when they arise. This is one area that very few users do well, and it’s our job as techs to make recovery from trouble as painless as possible. OS developers give us plenty of tools to prepare for problems—we just need to make sure we use them.

1102
■ Maintaining Operating Systems
Operating systems need patching to support the latest hardware and defend against newly discovered security problems. Systems also need regular maintenance to stay in good working order. Today, operating systems handle many of these jobs automatically. This section looks at the most common maintenance jobs that techs need to understand on modern systems and the tools that make it happen.
Patch Management
There’s no such thing as a perfect operating system. First, all operating system makers come up with new features and improvements. Second, bad actors discover weaknesses and generate malware to take advantage of those weaknesses. The process of keeping software updated in a safe and timely fashion is known as patch management (because it entails installing patches to fix one issue or another). Microsoft regularly releases updates to Windows to head off malware attacks, fix code errors, support new hardware, add new features, and so on. Patch management isn’t only for Windows. Both macOS and Linux require patch management, and I’ll cover those needs as well.
Windows Patch Management
In modern Windows, updates are handled through the appropriately named Windows Update. In Windows 11 it has its own top-level category in the Settings app, but it’s nestled in the Update & Security category in Windows 10. Since its introduction over two decades ago, Windows Update has gone through many iterations; fortunately, CompTIA cares only that you know how it works on Windows 10 and newer.

Windows has two types of updates. Quality updates are the classic problem-fixing patches that you know and love. Feature updates essentially are new versions of Windows released once or twice a year. Here is a rundown of key points you need to know about feature updates:
■ They are a reinstall of Windows.
■ They used to be named by year and month (such as 1703 and 1809) and have marketing names, like Creators update or November 2019 Update. Since 2020, the names have indicated which half of the year they came out in (20H2, 21H1, 21H2, and so on) and the marketing names have indicated the month and year of release, like November 2021 Update.
■ They are controlled by what channel you are on: Insiders, Semi-Annual Channel (Targeted), Semi-Annual Channel, or Long-Term Servicing Branch. The LTSB is only available in the Enterprise license.
Users can’t turn off updates, though they can pause them for up to five weeks and set an active-hours window during which the OS won’t reboot to install updates. Users cannot prevent Windows updates, although they may uninstall some non-system updates via Control Panel | Programs and Features | View installed updates. (There’s also a link to this interface from Settings | Update & Security | Windows Update | View update history in Windows 10 and Settings | Windows Update | Update history in Windows 11.)
Patch Management in macOS and Linux
Like Windows, both macOS and Linux take an automated approach to patching and alert you when software needs to be updated. With macOS 12.4, for example, you access updates through the Software Update pane in System Preferences (see Figure 14.1). Most desktop-focused Linux distros have a GUI updating tool like the Software Updater in Ubuntu (see Figure 14.2).

• Figure 14.1 Software Update advanced options in macOS

• Figure 14.2 Software Updater in Ubuntu Linux
Scheduling Maintenance
Maintenance only works properly when you do it at regular intervals. In the early days of computing, techs and system administrators had a whole arsenal of maintenance tools—some bundled with the operating system and others made by independent vendors—that they used to keep their systems in good order. In that world, it was important to know how to schedule critical maintenance tasks to run regularly.
Over the years, modern operating systems have gotten pretty good at automatically performing essential maintenance on their own internal schedules. I’m much less sure that you’ll put this knowledge to use—but I (and CompTIA) want to make sure you know where to start if your organization needs you to schedule an internal script or third-party tool for regular maintenance.
Scheduling Maintenance in Windows
Modern versions of Windows use a single Administrative Tool (and MMC snap-in), Task Scheduler (taskschd.msc), to schedule maintenance. You can choose an executable program and define when you want that program to run. The key to running scheduled maintenance is to know the names of the executable programs and any special switches you may need to enter.
Task Scheduler divides tasks into triggers, actions, and conditions. Triggers are actions or schedules that start a program. Actions are steps that define both the program to run and how it is to run. Conditions are extra criteria that must be met for the program to run. (Is the system idle? Is it connected to the Internet?) To create a basic task, all you need to do is name it, set how often it should run, and decide what it should do.
Many Windows utilities include built-in scheduling options. Here’s the twist, though: they’re still using Task Scheduler (although Windows won’t let you directly edit the schedule for many built-in programs in Task Scheduler). You can open up Task Scheduler and see the scheduled task for Disk Defragmenter, for example, but to change it you must use the scheduler built into Optimize Drives, as shown in Figure 14.3.

• Figure 14.3 Optimize Drives scheduler and corresponding task in Task Scheduler
Scheduling Maintenance in macOS and Linux
Unix-like operating systems—including macOS and Linux—have two main ways to run all sorts of tasks automatically. The first is cron, which provides a simple (and fairly universal) mechanism for running a command or program at some fixed interval.
The second option is something called an init system, which is basically in charge of all the processes running on a Unix-like OS. The idea of the init system is universal, but there are actually quite a few different ones out there. The two you’re most likely to encounter are launchd on macOS and systemd on Linux. There aren’t any hard-and-fast rules here, but an init system will give you some way to register a new task, set it to run on a schedule, and configure settings that dictate exactly when, why, and how it should run.
Controlling Autostarting Software
A lot of software loads when you boot up any computing device, such as small programs that provide support for the various functions of the operating system. As you add applications and peripherals to a system, some of them also add software that loads automatically at startup. Most of the time these autostarting programs are welcome—you want that latest peripheral to work, right? Sometimes, though, autostarting programs will slow down your system or even keep the OS from loading cleanly.
Every OS gives you the capability to stop autostarting applications, processes, and services. Windows has the Task Manager. On macOS, autostarting programs usually manifest as either account-specific Login Items or as launchd tasks. In Linux, you may find them in the Startup Applications folder or as tasks registered with the init system (usually systemd).
Controlling Autostarting Software in Windows
Startup applications and services have been in the Task Manager (press CTRL-SHIFT-ESC) since Windows 8. This gives you a quick way to see the status (enabled or disabled) of each application and a handy guide to the startup impact that program has (see Figure 14.4). As you might imagine, programs that require syncing of a lot of files across the Internet will have a higher impact than applications that just load local files.

• Figure 14.4 Startup tab in Task Manager
To enable or disable an application, right-click it and select the corresponding option. When you reboot the system next, the behavior of the application will be changed according to your previous action.
![]()
Controlling Autostarting Software in macOS and Linux
The main user-friendly way to set up autostarting software in macOS is by adding a Login Item to the user’s account. You can add and remove Login Items by selecting the desired user in the Users & Groups pane of System Preferences and selecting the Login Items tab (see Figure 14.5).

• Figure 14.5 Login Items in Users & Groups pane
Some Linux distros, such as Ubuntu, have something very similar. To access the preferences, open the applications menu, type startup, and launch Startup Applications. From there, deselect the checkbox next to a program you don’t want to start at boot and you’re done (see Figure 14.6).

• Figure 14.6 Disabling an autostarting program in Startup Applications Preferences
On Unix-like systems (including macOS and Linux), some autostarting software will just register a task with the init system and configure it to run when the system starts. Init systems aren’t as easy to control without getting your hands messy—the main way to control them is from the command line. On macOS you’ll control launchd with a command called launchctl, and on any Linux distro that uses systemd you can control it with a command called systemctl.
■ Optimizing Operating Systems
Maintenance means keeping the performance of an OS from degrading with time and use. Of course, you don’t just want to keep trouble at bay—you want to make your systems better, stronger, faster! Anything you do that makes Windows better than it was before, such as adding a piece of software or hardware to make something run better, is an optimization.
Installing and Removing Software
Installing and removing software is part of the normal life of any computing device. Each time you add or remove software, you make changes and decisions that can affect the system beyond whatever the program does, so it pays to know how to do it right. This section looks at software requirements, how software is distributed, how it can impact an organization and its systems, and how to install and remove it.
Software Requirements
They may not always be stated clearly, but all software has requirements—a list of things you need before you can run the software. When application developers state the requirements clearly, they often list the minimum requirements to run it at all, the suggested requirements for it to perform well, or both. Less frequently, the developers may break out requirements for different features (a video app, for example, may have different requirements for low- and high-quality video). The CompTIA A+ 1102 objectives focus on the most common hardware and OS requirements, so I’ll break each one down.
CPU Requirements The most common kind of CPU requirements focus on the processor’s speed. Once upon a time speed requirements almost always stated a specific clock speed, but these numbers have become less useful after clock speeds stopped growing rapidly in the early 2000s.
These days, speed requirements can be surprisingly vague. Here are a few patterns you might see:
■ They often state the processor line/family (“Intel Core i5 or equivalent”) and may mention the processor generation (“An Intel 7th generation Core or newer CPU, or AMD Ryzen CPU”).
■ Less-intensive applications may set a low bar like “1 GHz or faster” (or not even mention the processor).
■ They may give a specific reference point like “a 2.4GHz Intel Core 2 Duo or faster.”
The next most common kind of CPU requirements focus on 32-bit versus 64-bit support. If the software is 64-bit, you’ll need a 64-bit CPU. If the software is 32-bit, it’ll depend on your OS (Windows still supports 32-bit software, but macOS stopped supporting 32-bit software in 2019).
From time to time, you’ll also run into software with two more kinds of CPU requirements for a certain number of CPU cores, or specific CPU features (such as the multimedia extensions, streaming extensions, and virtualization support we discussed in Chapter 3).
Graphics Requirements Many graphically demanding applications (video games, graphics and video editors, video players, and so on) state specific graphics requirements. These requirements often take the form of a comparison to a popular graphics card (such as “GeForce GTX 1070 or equivalent”), but the CompTIA A+ 1102 objectives focus on something more specific: dedicated graphics cards versus integrated ones.
Back in Chapter 3 we talked about CPUs that have a built-in graphics processing unit (GPU)—and we’ll take a closer look at both dedicated and integrated GPUs in Chapter 17—so for now we’ll just focus on how this difference manifests in software requirements.
The main things to understand here are that integrated GPUs tend to be less powerful (but more efficient) than dedicated ones and that some software demands a lot from your GPU without really pushing your CPU very hard. When the GPU is integrated with the CPU, applications like this may require a CPU that is much newer and more powerful than what they require if the GPU is dedicated.
Figure 14.7 shows part of the requirements for streaming very high-quality video in Netflix’s Windows app. Note that they don’t even specify a specific CPU if you have dedicated (“discrete”) graphics—Netflix assumes any CPU will do the job if you have a dedicated GPU!

• Figure 14.7 Integrated and discrete GPU requirements for Netflix
For the same reason, the requirements for very demanding software like video games often assume dedicated graphics. You may need to do your own research to figure out whether a system with integrated graphics can keep up. If the requirements say how much system RAM and video RAM (VRAM) the program requires, remember that systems with integrated GPUs generally have to share a single pool of RAM for the system and graphics. Requirements like this may just refer to a specific card (such as “AMD Radeon RX 400 series or newer”) or may even spell out the amount of video RAM (as in “Nvidia GeForce GTX 1050 or higher with at least 3 GB of video RAM”).
RAM Requirements Since RAM stores working data and code for running applications, software requirements often state how many megabytes or gigabytes of RAM you’ll need. For example, Netflix suggests a minimum of 3 GB for HD video streaming. Understanding what kind of applications users will use—and which ones they’ll need to run simultaneously—is one key to ensuring their system will be up to the task.
Storage Requirements Every bit of software you install on a system (including the OS) will take up some storage space—so most software will state how much storage space it requires. Much like RAM, this will usually be some number of megabytes or gigabytes. For example, the current version of the Mozilla Firefox Web browser requires at least 200 MB of storage, while a recent game such as Battlefield 2042 will tie up a massive 100 GB!
Application and OS Compatibility Applications need to be developed to fit the way each OS does things, so few applications support every OS. Newer versions of the OS may have changes that prevent older software from running. Newer software also tends to take advantage of new OS features that keep it from working on older versions of an OS.
Each developer ends up making its own decisions about how much time and effort it wants to invest in supporting multiple platforms. You can find tons of small apps out in the world made by one person or a small company that only support macOS or Windows (or any other OS). An app may also only have resources to ensure it works on the latest version of the supported operating systems. Major software developers are more likely to support the last few versions of an OS and to support more than one OS.
Mere support isn’t always the end of the story. Some software won’t perform as well on an older OS, or it may have some features that only work on newer versions. In this case, the developers often specify which version they recommend.
External Hardware Tokens One constant over the long history of commercial software is piracy. Users and software publishers have been battling each other at least since Bill Gates wrote his now-famous letter to the Home Brew Computer Club back in the 1970s. This protracted war has led to many anti-piracy technologies over the years, with some being more onerous than others for us techs to deal with.
Many computer users are likely familiar with common practices like “CD” or license keys and monthly subscriptions tied to an account. The CompTIA A+ 1102 objectives mention another anti-piracy technique that you probably haven’t seen—though it is very common in applications for musicians and artists. These programs often require an external hardware token: a USB device containing software licenses that must be plugged into the system for the software to run. A common brand is iLok, whose latest USB-C–based token can hold up to 1500 authorizations.
Distribution Methods
The methods for distributing software have morphed over the years. For a long time, most software was distributed on removable media like floppy disks (back when I still had a full head of hair) or optical discs (first CD-ROMs and later DVD-ROMs). These days, we download most application software from the Internet. If it’s still distributed on physical media, it’ll almost certainly be on a USB flash drive.
Most of the time, the thing you download is an application installer. Less frequently, it may be a standalone executable or an ISO image (which your OS can mount as if it were a disc in an optical drive). In all of these cases, it can also be wrapped up in a container file such as .zip or .tar or .gz. If so, you’ll need to extract the actual application or its installer from the container file.
Other Considerations for New Applications
An important part of considering whether to install a new application is coming to grips with how it will impact the devices you install it on, the networks those devices are connected to, the people in your organization, and the organization as a whole. Taken together, these considerations underscore the importance of carefully thinking through how new software might impact all corners of your organization before you start installing.
Impact on Devices Installing a new application on a device unavoidably changes it. Not only will the device have less storage and some new capabilities, that new application might add an always-running service that reduces battery life, causes performance problems, or creates security vulnerabilities that could ultimately compromise the device.
Impact on Network Every application you install on a device could also affect any networks the device joins. A new application that uses the network might unexpectedly trigger security rules, making you rethink whether to keep the security rules or ditch the software. Some applications will need new firewall exemptions, and an administrator will have to decide whether or not to add them.
You should also weigh how many systems you expect to run the new application—and how all of them running it at once will go. An app that regularly scans your network for other devices it knows how to interact with may not cause trouble when it’s only installed on one computer, but it might slow the network to a crawl when a hundred computers run it. A new video-conferencing app may work fine when you test it with five systems, but then clog the office’s Internet connection when everyone tries to join the same remote meeting from their workstation.
Impact to Operation New applications can affect your organization’s operations in a number of different ways. Here are a few potential scenarios:
■ Installing a new application may interrupt whatever the users and technicians would otherwise be doing, creating a backlog or affecting deadlines—especially if the installation causes problems.
■ A new application may add to your organization’s ongoing workload. It might just lead to more support requests, require extra account or configuration management, and add to the list of OS compatibility tests your organization needs to perform.
■ If the organization has a limited number of licenses for an application, you may need new processes to keep track of which users have which license key, enable users to request access, and decide what to do if there isn’t one available when they need it.
Impact on Business Assessing how a new application might impact your organization and the business it carries out entails understanding how the new application might impact the organization’s devices, networks, and people—and considering whether the risks and benefits are acceptable.
Is it acceptable if machines perform worse after an installation? If a new application will perform poorly on the oldest devices in the office, should they be replaced before rolling out the application? Should you abort the deployment of a video-conferencing application if it causes bandwidth problems in some offices, or plan to upgrade each office’s Internet connection instead? If someone needs temporary access to an expensive application that you don’t have a spare license for, should you deny the request, purchase a new license, or ask someone already using a license if they can live without it for a few months?
The answers to these questions can save or cost a business money, affect whether important work gets done or not, and potentially compromise the organization’s security. In short, all of these concerns bubble up—where applications should support (or at least not undermine) the organization’s ability to meet its long-term goals.
Installing Software in Windows
Many moons ago, Windows used a feature called AutoRun to—wait for it—automatically run a program on any removable media you inserted. This was convenient, but it also made inserting a strange optical disc or flash drive really risky! These days, Windows just asks what you’d like to do if you insert removable media that contains an installer (look for the option to Install or run program from your media).
If your application comes as an ISO image, double-clicking it will cause Windows to mount it and show you the contents in File Explorer. From here, you can run the installer (if there are many executables, it may not be clear which one you should run—you can open the “autorun” file in Notepad to see which executable it would have run). If you downloaded the installer directly, just double-click it.
User Account Control (UAC) in Windows complicates the installation process a bit. You will most likely be prompted by UAC when installing an application, giving you time to review what is happening to your system in case you did not intend to install the program. If you are using an administrator account, you can simply click Yes or Continue and finish the installation (see Figure 14.8).

• Figure 14.8 Installation UAC
If you are logged in with a less privileged account, you will need to enter a username and password of an account with administrative privileges. Some installers have trouble letting UAC know that they need more privileges and simply fail no matter what account you are logged in with. In those cases, it is best to right-click the installer icon and select Run as administrator to give the installer the access it expects from the start.
Assuming all is well, you typically must accept the terms of a software license before you can install an application. These steps are not optional; the installation simply won’t proceed until you accept all terms the software manufacturer requires (see Figure 14.9). You may also be asked to make several decisions during the installation process. For example, you may be asked where you would like to install the program and if you would like certain optional components installed. It is best to accept the suggested settings unless you have a very specific reason for changing the defaults.

• Figure 14.9 Accepting software terms
Modern versions of Windows also come with the Microsoft Store. Microsoft tests Store applications to ensure they’re malware-free and safe for use (see Figure 14.10). The Microsoft Store represents only a small percentage of application installations; most people prefer to use more traditional methods of software installation for Windows systems.

• Figure 14.10 Microsoft Store
Installing Software in macOS
You have a couple of options for installing software in macOS. One method involves the Mac App Store, which you can get to via the Apple menu. Installing via the App Store is just like installing an app on your phone. You click a button, and the app installs (see Figure 14.11). Alternatively, you can directly download an installer. Let’s look at the most common patterns.

• Figure 14.11 Affinity Designer offered on the Mac App Store in macOS
Most of the time, you’ll end up with an Apple Disk Image (.dmg) file—a collection of files that macOS can mount as a volume visible within Finder. This volume often contains a macOS application bundle (.app) file containing all of the app’s executables, resources, and other files. You can run the application it contains by double-clicking the file, but that won’t install it. To install it, you need to drag it to the Applications folder. Disk images that include an .app file often include a shortcut to the Applications folder—and usually some kind of nudge to remind you to drag the .app bundle over, as shown in Figure 14.12.

• Figure 14.12 Installing a new app by dragging it to the Applications folder
If the disk image doesn’t contain an .app file, it’ll probably contain an application installer (.pkg) file. Double-clicking this installer will launch an installer program similar to those that are common in Windows.
Installing Software in Linux
Linux distros differ in the process of installing applications (packages in Linux parlance). Many distros such as Pop! OS have a “store” similar to the Microsoft Store or the Mac App Store (see Figure 14.13). These stores can differ from distro to distro—some also handle updating and patching your applications, and some do not. Another way to install applications in many distros is to download a package file, double-click it, and select Install from the options.

• Figure 14.13 Pop!_Shop app store
But the most common way to install new apps is through a built-in package manager like Ubuntu’s Advanced Package Tool (APT). You can use it via the apt-get or apt command from the Terminal. (See Chapter 15 for more details on the Terminal interface.) As an interesting side note, Ubuntu’s “store” actually uses APT underneath its GUI.
Removing Software
Each installed program takes up space on a computer’s hard drive, and programs that you no longer need waste space that could be used for other purposes. Removing unnecessary programs is an important piece of optimization.
You remove a program from a Windows PC in much the same manner as you install it. That is, you use the application’s own uninstall program, when possible. You normally find the uninstall program listed in the application’s folder in the Start menu, as shown in Figure 14.14.

• Figure 14.14 Uninstall me!
If an uninstall program is not available, use the Programs and Features applet in the Control Panel (see Figure 14.15) or Apps & features in Settings to remove the software. You select the program you want to remove and click the Uninstall/Change button. Windows displays a message warning you that the program will be permanently removed from your PC. If you’re certain you want to continue, click Yes.

• Figure 14.15 Programs and Features applet
You may then see a message telling you that a shared file that appears to no longer be in use is about to be deleted and asking your approval. Generally speaking, it’s safe to delete such files. If you do not delete them, they will likely be orphaned and remain unused on your hard disk forever. In some cases, clicking the Uninstall/Change or Change/Remove button starts the application’s uninstall program (the one you couldn’t find before). This is a function of the program you’re attempting to remove. The end result should be the removal of the program and all of its pieces and parts, including files and Registry entries.
Uninstalling applications in macOS varies based on how they were installed. Mac App Store apps are removed very similarly to apps on your phone. First, open the Launchpad app from the Dock or Applications folder (it looks like a rocket ship), then click and hold on any app icon until all the icons start to wiggle. As shown in Figure 14.16, an × in a circle will appear on the upper left of any app that can be removed. Click the × to remove the app. If you accidentally remove an app you wanted, you can re-download it from the Mac App Store.

• Figure 14.16 Uninstalling App Store�purchased applications using the Launchpad app
For all other macOS apps, removing them comes down to two options. Drag the app to the Trash or run the uninstaller if the app came with one. Of the two, the first option of just deleting the app is the most common, with a dedicated uninstaller only being available for some of the larger (and often cross-platform) apps like Photoshop. Be aware that deleting an app can leave behind various files on the system, most often a few user preference files and other customizations in the user’s Library folder.
Removing software in mainstream Linux distros is just as easy as installing it. Open the software manager, find the app, and then click Uninstall (see Figure 14.17). The underlying package manager, which we’ll work with directly in Chapter 15, will handle all the deleting and cleanup for you.

• Figure 14.17 Removing an application in Ubuntu Linux
Adding or Removing Windows Components/Features
When you installed Windows, it included certain features by default. It installed Notepad, network support, and games on your computer. You can remove these Windows components from your system if you like and add other components as well.
The old way to do this is to open the Programs and Features applet in the Control Panel, and then click the Turn Windows features on or off link on the left. Click Yes or Continue if prompted by UAC, and you will be presented with the Windows Features dialog box. To toggle a feature on or off, simply click its checkbox.
Microsoft’s new ways, however, never cease to amaze me! In the Settings app, Microsoft has tucked away the option to Turn Windows features on or off under Apps | Optional features | More Windows features—and added a whole new alternative. The Optional features page itself lists a lot of optional features that are very similar to—but different from—the list you’ll find under More Windows features or Turn Windows features on or off. Figure 14.18 shows both of these optional-feature interfaces side by side.

• Figure 14.18 The Windows Features dialog box (left) and Optional features settings page (right)
Performance Options
One optimization you can perform on Windows is setting Performance Options. Performance Options are used to configure CPU, RAM, and virtual memory (page file) settings. To access these options right-click on the Start button and select System (which will open the System | About page in the Settings app), and then scroll down and click the Advanced system settings link. This opens the Advanced tab of the System Properties dialog box; click the Settings button in the Performance section.
The Performance Options dialog box has three tabs: Visual Effects, Advanced, and Data Execution Prevention (see Figure 14.19). The Visual Effects tab enables you to adjust visual effects that impact performance, such as animations, thumbnails, and transparencies. Try clicking the top three choices in turn and watch the list of settings. Notice the tiny difference between the first two choices (Let Windows choose what’s best for my computer and Adjust for best appearance). The third choice, Adjust for best performance, turns off all visual effects, and the fourth option is an invitation to make your own adjustments.

• Figure 14.19 Windows 10 Performance Options dialog box
If you’re on a computer that barely supports Windows, turning off visual effects can make a huge difference in the responsiveness of the computer. For the most part, though, just leave these settings alone.
The Advanced tab, shown in Figure 14.20, has two sections. Under the Processor scheduling section, you can choose to adjust for best performance of either Programs or Background services. The Virtual memory section of this tab enables you to modify the size and location of the page file.

• Figure 14.20 Advanced tab of Performance Options dialog box
Data Execution Prevention (DEP) works in the background to stop viruses and other malware from taking over programs loaded in system memory. It doesn’t prevent viruses from being installed on your computer, but it does make them less effective. By default, DEP is only enabled for critical operating system files in RAM, but the Data Execution Prevention tab enables you to turn on DEP for all running programs. It works, but you might take a performance hit or find that some applications crash with DEP enabled for all programs. Like other options in Performance Options, leaving the default DEP settings is the best option most of the time.
■ Preparing for Problems
Techs need to prepare for problems. You must have critical system files and data backed up and tools in place before trouble inevitably strikes. Every modern operating system has options for backing up data and, as you might imagine, they all offer different features. Windows offers System Restore to recover from problems, too. This section focuses first on backups generally—concepts that apply regardless of how big or small your organization is, what kind of data it has, how many different operating systems you support, and so on. From there, we’ll look at specific tools.
Backup and Recovery Options
This section focuses on broad questions like what to back up, where to put it, and how long to keep older backups. There aren’t perfect answers to these questions for everyone—the answers depend on a ton of factors including how you work, what kind of data you work with, how critical the data is, how fast it changes, what kind of problems you need to recover from, how quickly you need to be back up and running, and how much money you can throw at the problem.
All of the backup options involve trade-offs between the risk of data loss on one hand and convenience, cost, and effort on the other. A few things are true no matter which options you choose:
■ Making multiple copies of data ensures that it is safe. However, making multiple copies is more expensive and increases the odds of a data leak.
■ Similar to how investors limit risk by diversifying their investment portfolio, you can reduce the risk of data loss by taking separate backups with more than one backup program, keeping copies in different regions, and storing them on a mix of different hardware.
■ Storing backups off-site reduces the risk of complete loss, but it also increases the time it takes to recover unless you also keep an on-site copy.
■ Automatic backups take a little more work to set up, but they beat the socks off manual backups once you’ve got everything ironed out. Manual backups are better than nothing, but people will forget to do them.
Another big question is how much data you can afford to store. Storage is cheap, but the cost of storing many copies of frequent backups still adds up fast. Different backup methods and software use many strategies—such as compression, deduplication, incremental backups that only record changes since the previous backup, and so on—to cut down on the amount of data stored.
Types of Backup
The CompTIA A+ 1102 objectives want you to know about four specific types of workstation backup:
■ A full backup is a snapshot of a workstation’s files at some point in time. It takes a while to copy all the files, but recovering from a complete copy is faster than recovering using more than one type of backup.
■ Once you have a full backup, some software can capture an incremental backup that only stores what has changed since the last incremental backup. Each incremental backup is faster and wastes less space. The downside is that you’ll need the full backup and every incremental backup to restore (and stepping through each slows the restore process down a little). Each incremental backup is faster than normal backups.
■ Instead of storing the changes since the previous backup (as an incremental backup does), a differential backup includes all changes since the last full backup. Differential backups are a great deal if your data doesn’t change rapidly—but each differential backup will be slower than the last if your data does change rapidly.
■ A synthetic backup (also known as a synthetic full backup) is created by merging the previous full backup and all subsequent incremental backups to create a backup that is identical to a new full backup. The goal is being able to restore as quickly as you could from a full backup without taking the time and resources to take a full backup every time.
Backup Media
The CompTIA A+ 1102 objectives have surprisingly little to say about what kind of media your backups get saved to, but you should have an idea of what the main options are. Organizations may not choose just the fastest or cheapest media—they may back up to more than one media to increase the odds that critical data won’t get lost. You might recall Chapter 10 covers storage.
Hard Drives Traditional magnetic hard drives and SSDs are often used for backups, though they’ll often be mounted in an external enclosure or connected to a storage server of some sort. Don’t use a partition on the same drive the data is on—one of the risks you want to protect against is the device failing! It’s a little more reasonable (but not ideal) to back up to a secondary internal drive; it will protect against a drive failure, but not against a burst pipe that drowns the whole system. SSDs are very fast, but traditional large hard drives are more cost-efficient.
Magnetic Tapes Ages ago, using magnetic tapes was the main option for serious data backup. A lot of people think tape is dead, but it’s still there, chugging along. It’s a rock-solid solution for organizations that archive gobs of data and aren’t in a hurry to replace it.
Optical Discs The waning popularity of optical drives and their media is making these less used—and they generally don’t store enough data to play a role in large-scale backup operations. Some optical formats have surprisingly short lives, while others should still be readable in several decades if stored with care. Given this, you might see optical media used for personal backups or to archive important data.
Flash Media In my experience, flash devices such as USB thumb drives and SD cards can fail unexpectedly, so I wouldn’t depend on them alone for backups. They can be a good way to back up data on a device in the field that isn’t connected to a network—but I would transfer the backups to a more durable media as soon as possible.
Online (Cloud) Storage We’ll take a closer look at the cloud in Chapter 22, so for now I’ll focus on the basics. Cloud storage services entail paying someone else (such as Amazon Web Services) to host near-infinite amounts of data. You put your data in the bucket and pay based on your usage, and the provider deals with the details of managing the massive fleet of storage devices that power the service. Online storage is a simple way to store a copy of your data offsite if you don’t have another secure location, but recovering the data can take longer when you have to download it.
For the same reasons, cloud storage can be tedious for very large backups. With a sustained 10-Mbps speed, it would take over a day to upload even a terabyte of data. This may not be a big deal for your parent’s photo collection, but it is such a big deal that organizations looking to transfer gobs of data into or out of cloud storage can throw stacks of cash at Amazon to have a few of their finest rumble up to their doorstep in an AWS Snowmobile—a semi-truck hauling a shipping container stuffed to the gills with over 100,000 terabytes of data storage capacity. If they really mean business, Amazon will even throw in a security escort vehicle.
Backup Testing
Expect a question or two on the CompTIA A+ 1102 exam about backup testing or verifying a backup. The rule is simple: always verify your backups. You could easily invest a dozen years of time and money taking daily backups and following best practices like storing encrypted copies in multiple physical locations and cloud accounts, only to discover—when disaster strikes—that you can’t successfully recover the data the backups contain. Backup strategies that don’t involve verifying your backups are just fanciful. You might as well leave your failed hard drives under your pillow for the tooth fairy.
Unfortunately, verifying backups isn’t as simple as it sounds. The gold standard is being able to restore whatever you backed up—whether files or disk images—and end up with exactly what you expect to have. Reality is tricky, though. Imagine, as soon as you take a backup, you compare the backup with the files on disk to make sure they’re identical. If files on your disk are corrupt, verifying the backup just guarantees that you’ve meticulously copied the corrupt files.
Backup tools worth your time and money will provide a way to verify that a backup hasn’t changed since it was saved, but this is no substitute for periodically verifying that you can restore and actually use backups of any critical system images, applications, files, and data. In practice, this means
■ If your backup software can verify backups, do this every time you back up.
■ No matter what your backup software does, regularly test the actual backups. Systems should restore and boot, and all critical applications should run. It’s hard to check everything, but critical files should open correctly in appropriate software. Critical applications should be carefully tested to make sure essential settings, configuration, and data are working.
Backup Rotation Schemes
Early in this section I mentioned that all the backup options involve trade-offs between the risk of data loss on one hand and cost, convenience, and effort on the other. After weighing these trade-offs, organizations often settle on a set of practices that they think will help them meet their goals. Since backups tend to take up a lot of storage space, these practices often entail a backup rotation scheme (or strategy) that dictates which kind of backups to take, when to take them, what media to store them on, and where to keep those media. The backup rotation scheme choreographs the whole process of taking backups, moving them to safer locations, and eventually overwriting the old backups once they aren’t needed.
The key to understanding backup rotation schemes is knowing the risk and benefit of overwriting. If you never overwrite any of your old backups, you’ll constantly accumulate new storage devices. This would be great for your ability to roll back the clock to the day before trouble started, but you’d need a lot of money—and a lot of space for your growing archive of backups. A scheme for how often to overwrite old backups enables you to use a smaller number of storage devices.
Every organization must decide which backup rotation scheme works best for its needs. However, a good place to start is with the 3-2-1 backup rule: keep at least three copies of your data on at least two different types of media (i.e., hard drives, tapes, optical disks, cloud storage) and store at least one copy off-site. Let’s think through how to design a scheme based on this rule.
Why not just buy an SSD and two hard drives, use a different one each day, and keep one off-site? This would satisfy the 3-2-1 backup rule on the cheap—but it also means that you’d be overwriting all copies of your data every three days. If an important file gets corrupted or deleted and you don’t notice before the third backup starts, you won’t be able to recover the data!
There’s one specific rotation scheme CompTIA wants you to know for the A+ 1102 exam, so let’s look at how it works and consider how it satisfies the 3-2-1 backup rule without falling into this trap.
A basic grandfather-father-son (GFS) rotation scheme might use the SSD to back up four days a week, use one of the hard drives on the last day of each week, and use the other hard drive on the last day of each month—and store the monthly copy off-site. A scheme like this gives us at least a week to notice trouble. We can extend the scheme to buy more time by adding storage devices to each backup cycle (like using nine devices to keep three daily backups, three weekly backups, and three monthly backups) and by adding more cycles (like a yearly backup).
Backing Up Personal Data
The most important data on your computer is personal data: your documents, e-mail messages and contacts, Web favorites, photographs, and other files. To handle backing up personal data, Windows offers several backup utilities. macOS and Linux, of course, have backup tools as well.
Windows Backup and Restore
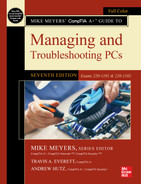
Windows includes the automated and simple Backup and Restore Control Panel applet. The process begins by asking where you want to save your backup (see Figure 14.21).
• Figure 14.21 Backup options
After you choose the backup location and click Next, Windows asks what you want to back up. As you can see in Figure 14.22, there are two choices: Let Windows choose (recommended) and Let me choose.

• Figure 14.22 What do you want to back up?
If you select Let Windows choose (recommended), you’ll back up each user’s personal data. Assuming you have enough space in your backup location, Windows will automatically add a system image that includes the entire Windows operating system, every installed program, all device drivers, and even the Registry.
Selecting Let me choose is equally interesting. Windows enables you to pick individual users’ files to back up (see Figure 14.23). This can be handy when you store important files outside of the folders the Let Windows choose option covers.

• Figure 14.23 Backup showing a list of users
By selecting a user, you can choose libraries or the user’s personal folders to back up, as shown in Figure 14.24. Also note the checkbox that gives you the option to make a system image, just as if you selected the Let Windows choose (recommended) option.

• Figure 14.24 Showing some of a single user’s libraries/folders
 Tech Tip
Windows System Images
You can also choose to create just a system image. From the Backup and Restore applet, select Create a system image on the left side of the screen.
Once you complete the wizard, Windows starts backing up your files. While the backup runs, you can monitor its progress with an exciting progress bar (see Figure 14.25). If you can’t handle that much excitement, you can close the backup window while the OS backs up files. The process can take many hours on a system with a large hard drive.

• Figure 14.25 Backup in progress . . .
Windows File History
The File History Control Panel applet focuses on backing up your personal files and folders (see Figure 14.26) and includes the ability to restore previous versions of individual files. File History requires a second drive and is not enabled by default. You can use any type of HDD or SSD as the second drive, internal or external. (You could choose to back up to a second partition on the same drive, I suppose, but what would be the point?)

• Figure 14.26 Windows File History
Note that File History won’t back up all your personal files unless you either add them to the default libraries or create custom libraries. File History does not replace full system backups!
Time Machine in macOS
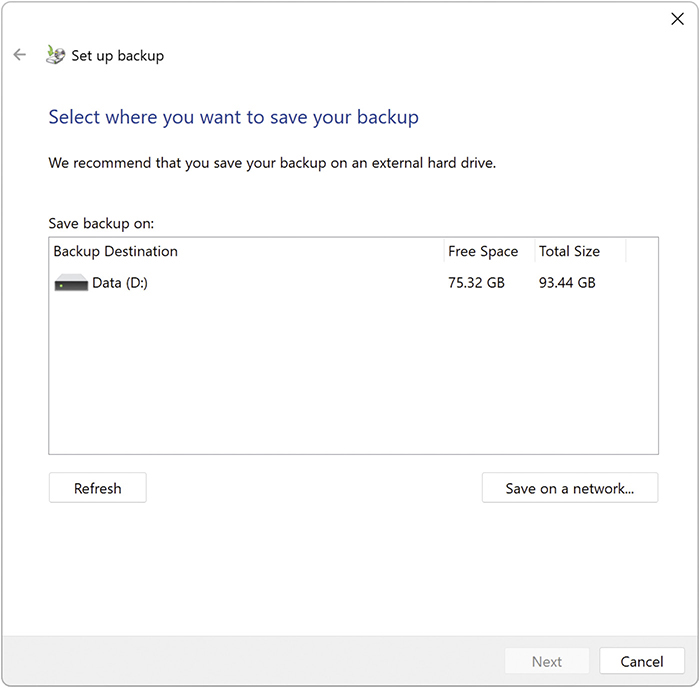
macOS includes Time Machine to create full system backups (see Figure 14.27). These backups are called local snapshots. Time Machine enables you to recover some or all files in the event of a crash; it also enables you to restore deleted files and recover previous versions of files. Time Machine requires an external HDD or SSD, or you can use a shared network drive. Find Time Machine in System Preferences.
• Figure 14.27 Time Machine
Backups in Linux
Different Linux distros offer different tools for backing up files, folders, and drives. Ubuntu Linux uses Déjà Dup, although the name of the app is Backups (see Figure 14.28). Déjà Dup will happily back up your files to wherever you tell it, such as an external drive, network share, or even a folder on your main hard drive (not recommended if you care about your files!). Déjà Dup backs up a user’s Home folder by default; that’s where most users store all personal documents. Déjà Dup will store files and versions of files permanently, as long as the storage location has sufficient space.

• Figure 14.28 Backups app in Ubuntu Linux
System Restore in Windows
Every technician has war stories about the user who likes to add the latest gadget and cool software to his computer. Then the user is amazed when things go very, very wrong: the system locks up, refuses to boot, or simply acts weird. This guy also can’t remember what he added or when. All he knows is that you should be able to fix it—fast.
The System Restore tool enables you to create a restore point, a snapshot of a computer’s configuration at a specific point in time. If the computer later crashes or has a corrupted OS, you can restore the system to its previous state, specifically restore system files and settings.
When System Restore is turned on, it makes a number of restore points automatically. To make your own restore point, right-click the Start button and select System, and then scroll down the About page and click the System protection link. The System Properties dialog box opens with the System Protection tab showing. Click the Create button to open the dialog box shown in Figure 14.29. Name your restore point appropriately and then click Create.

• Figure 14.29 Creating a manual restore point in Windows
After your new restore point is created, you can locate it by clicking the System Restore button on the System Protection tab to open the System Restore window, which might also show restore points that have already been made for you automatically (see Figure 14.30).

• Figure 14.30 Restore points in Windows
The System Restore tool creates some restore points automatically, including every time you install new software. If installing a program causes your computer to malfunction, simply restore the system to a point before you installed it. During the restore process, only settings and programs are changed (it won’t touch user files). This feature is absolutely invaluable for overworked techs. A simple restore fixes many user-generated problems. To restore to a previous time point, return to the System Restore window as previously described, select the restore point you want to return to, and click Next.
To turn System Restore on or off or change the space usage, return to the System Protection tab of System Properties and click the Configure button to change System Restore configuration settings (see Figure 14.31).

• Figure 14.31 System Restore settings and disk space usage options
Beyond A+
Third-Party Backup Tools
The backup tools built into an operating system are often enough for your average single-system user, but many power users and organizations will find themselves using third-party backup tools to meet specific needs. These needs can be simple, like wanting to use a single tool to back up and restore on multiple operating systems. They can also be quite complex, like keeping continuous off-site backups of all of an organization’s critical systems.
There are countless backup tools in the world, but they all fall more or less into three main categories: tools, applications, and services.
A backup tool is a program (command line or graphical) that can capture some type of backup and save it to a local device or network location. There are tons of backup tools with different features, but in general they give you a lot of control over your backups. This control means you’ll usually have to make a lot of decisions beyond just picking out a tool, but it can also help reduce costs and minimize the risk of losing access to your old backups if the vendor goes out of business.
A backup appliance is an all-in-one combination of hardware and software from some provider built for the exact purpose of making and storing backups. A backup appliance might live right next to the device(s) it backs up, in a nearby server rack, or in a remote data center—but the key is that backup appliances are a lot less do-it-yourself than a simple backup tool. These appliances store a copy of your data inside the device, and they can often upload one or more copies of the data to off-site locations.
A backup service is a little bit like a backup appliance minus the dedicated local hardware. These all-in-one backup services include software for working with backups that is integrated with the provider’s online (cloud) backup storage service. These services are usually very simple to set up and get started with, but they do come with an ongoing subscription cost—and could leave your organization at the provider’s mercy if it goes out of business or increases rates.
Chapter 14 Review
■ Chapter Summary
After reading this chapter and completing the exercises, you should understand the following about maintaining and optimizing operating systems.
Perform operating system maintenance tasks
■ The developers of Windows, macOS, and various Linux distros update their operating systems regularly. Techs should set up computers they deal with to incorporate those updates, an action called patch management.
■ Windows has two types of updates. Quality updates are the classic problem-fixing patches, and feature updates essentially are new versions of Windows released one or two times a year.
■ macOS computers update automatically, though you can also update them manually through the Software Update pane in System Preferences. Most Linux distros have a GUI updating tool such as the Software Updater in Ubuntu.
■ Maintenance only works properly when it’s done at regular intervals. You can use Task Scheduler to schedule regular maintenance on your computer, though many utilities include built-in scheduling interfaces.
■ macOS and most Linux distributions use one of two scripting tools to run all sorts of tasks automatically in the background. Both macOS and Linux can schedule a command or program to run at a fixed interval with cron. macOS and Linux also have an init system that can schedule tasks—though different Linux distros sometimes use a different init system. The init system on macOS is launchd, and the most common init system on Linux is systemd.
■ On Windows, the Task Manager enables techs to edit and troubleshoot operating system and program startup processes and services.
■ In the Users & Groups pane of System Preferences in macOS, you can select or deselect the Login Items that load with specific user accounts. With Ubuntu Linux, you can access the Startup Applications Preferences dialog box by clicking the Search button, typing startup, and clicking the Startup Applications icon. On both macOS and Linux, startup applications may also be set up in the init system.
Optimize operating systems
■ Application installation in any OS requires the tech to think about a host of things, such as software requirements (CPU, graphics, RAM, storage space, OS version compatibility, and licensing).
■ There are distribution methods we use today, but downloading applications from the Internet via application installers is by far the most popular. Other methods include distribution on a USB flash drive, an ISO image, or wrapped up in a .zip or .tar. or gz.
■ How applications will impact the devices you install them on, the networks those devices are connected to, the people in your organization, and the organization as a whole are important considerations when thinking through how new software might impact all corners of your organization before you start installing.
■ You most likely will be prompted by UAC when installing an application in Windows. This is to give you time to review what is happening to your system in case you did not intend to install the program.
■ You have a couple of options for installing software in macOS. One method involves the Mac App Store, which you access via the Apple menu. Alternatively, you can download installation programs, often .dmg files, that you open by double-clicking them. Inside you find either the .app file itself, which you drag to the Applications folder to install, or a .pkg installer that walks you through a wizard to install the program.
■ Linux distros can differ when it comes to the process for installing applications or packages. Many distros have a store similar to the Microsoft Store or Mac App Store. The stores may differ—some handle patching and updating, and some do not. You can also download a package file directly, double-click it, and select Install from the options. The most common way to install apps is by using the built-in package manager (such as APT) from the command line.
■ Each installed program takes up space on a computer’s hard drive, and programs that you no longer need simply waste space that could be used for other purposes. Removing unnecessary programs is an important piece of optimization.
■ In Windows, you remove programs by using the application’s uninstall feature. Alternatively, use the Programs and Features applet in the Control Panel or Apps & features in Settings. Select the desired program from the list of installed programs and click Uninstall.
■ In macOS, you can uninstall software installed via the App Store from the Launchpad app. Click and hold on the app icon until the icons all start to wiggle and an × in a circle appears, and then click the × to remove the app (if the icon isn’t present, you can’t remove the app this way). Other software can be removed with an uninstaller if present, or by simply dragging the app to the Trash.
■ Removing software on most Linux distros is as simple as finding it in the software manager and clicking Remove.
■ Another function of the Programs and Features applet is to add or remove Windows components and features. Open the applet and click the Turn Windows features on or off option. In the Settings app, a similar feature exists at Apps | Optional features | More Windows features.
■ One optimization you can perform on Windows is setting Performance Options, which are used to configure CPU, RAM, and virtual memory (page file) settings. The Performance Options dialog box has three tabs. The Visual Effects tab enables you to adjust visual effects that impact performance. The Advanced tab has three sections: Processor scheduling, Memory usage, and Virtual memory. The Data Execution Prevention (DEP) tab has options for DEP, which works in the background to stop viruses and other malware from taking over programs loaded in system memory. DEP doesn’t prevent viruses from being installed on your computer, but makes them less effective.
Prepare for problems
■ Backups are a complex topic because everyone makes their own decisions about the trade-offs between the risk of data loss on one hand and convenience, cost, and effort on the other.
■ Making multiple copies of data ensures that it is safe. However, making multiple copies is more expensive and increases the odds of a data leak. You can reduce the risk of loss by using multiple backup programs, keeping copies in different regions, and storing them on different types of hardware. Off-site backups reduce the risk of loss but take longer to recover from than an on-site copy. Configuring automatic backups takes work but ensures you won’t forget to take backups.
■ A full backup is a snapshot of a workstation’s files at some point and time. An incremental backup stores only what changed since any previous backup. A differential backup is similar, but stores everything that changed since the last full backup. A synthetic (full) backup attempts to synthesize a full backup from an existing set of full and incremental backups.
■ Backup media you might see in use include hard drives, magnetic tapes, optical disks, flash media (USB thumb drives and SD cards), and online/cloud storage.
■ Backup testing is absolutely essential for ensuring that you aren’t wasting precious time and resources taking backups that won’t work when disaster strikes. Some tools will enable you to verify the integrity of the backup files themselves, but the gold standard is still using your backups to restore a real system and confirm the data and applications you need are present and in working order.
■ Since it isn’t cost-effective for most organizations to save every backup to brand-new backup media, they often use a backup rotation scheme to specify a pattern for regularly cycling through a specific number of backup media. A good place to start is to follow the 3-2-1 rule: keep at least three copies of the data on at least two different media and keep at least one copy off-site. Rotation schemes such as grandfather-father-son (GFS) split the media up into a few sets that rotate at different rates to ensure that there is a mix of recent and older backups. Having a few older backups protects you against data loss that you don’t notice for a few weeks or months.
■ The most important data on your computer is the personal data: your documents, e-mail messages and contacts, Web favorites, photographs, and other files. To handle backing up personal data, every version of Windows comes with some form of backup utility.
■ Windows comes with two tools to back up essential files and folders: Backup and Restore focuses on backing up the whole system, while File History gives you the ability to roll back individual files to previous versions.
■ macOS provides Time Machine to create full system backups called local snapshots. Time Machine enables you to recover some or all files in the event of a crash; it also enables you to restore deleted files and recover previous versions of files.
■ You can use the System Restore tool to create a restore point, a copy (or snapshot) of a Windows computer’s configuration at a specific point in time. If the computer later crashes or has a corrupted OS, you can restore the system to its previous state. During the restore process, only settings and programs are changed. No data is lost. Your computer will include all programs and settings as of the restore date. Starting in Windows 10, System Restore is no longer enabled by default.
■ Many organizations use third-party backup tools to meet specific needs. These may be do-it-yourself backup tools that give you a lot of flexibility, all-in-one backup appliances that combine hardware and software, or all-in-one services that include software that is integrated with the provider’s online (cloud) backup storage service.
■ Key Terms
Apps & features
Backup and Restore
cron
differential backup
File History
full backup
grandfather-father-son (GFS)
incremental backup
maintenance
optimization
patch management
Performance Options
Programs and Features
restore point
Software Update
synthetic backup
System Restore
Task Manager (taskmgr.msc)
Task Scheduler (taskschd.msc)
Time Machine
Windows Update
■ Key Term Quiz
Use the Key Terms list to complete the sentences that follow. Not all terms will be used.
1. In Windows, you use the __________________ Control Panel applet to uninstall, change, or repair programs.
2. In macOS, you access updates through the __________ pane in System Preferences.
3. To change which programs and services start with Windows, you would use the ___________________________.
4. On macOS, you can use __________________ to restore files to a previous version.
5. A snapshot of all of a workstation’s files as they existed at one point in time is also known as a(n) ___________________.
6. You can use __________________ to disable certain graphical flourishes, such as animations, transparencies, and more.
7. macOS and most Linux distributions can all use __________________ to run all sorts of tasks automatically in the background.
8. The process of keeping software updated in a safe and timely fashion is known as __________________.
9. A(n) __________________ includes all changes since the last full backup.
10. The ________________ tool enables you to create a(n) _______________, a snapshot of your computer’s configuration at a specific point in time.
■ Multiple-Choice Quiz
1. What tool enables you to modify which programs start when Windows starts?
A. msstartup
B. msinfo32
C. msconfig
D. Task Manager
2. What are software storage requirements?
A. The amount of shelf space you’ll need to store the removable media that contains the application’s installer
B. The minimum amount of spare hard drive capacity the device will need to install the program
C. The amount of spare hard drive capacity the device needs to keep free at all times in order to install program updates
D. The amount of spare hard drive capacity the user should keep free for temporary files that the program creates when you run it
3. Marsha the tech has been tasked to support a set of macOS computers. Upon examining the first few, she realizes the core operating system on the machines is two generations out of date. Given such a scenario, what should she do?
A. Open System Preferences and open the Update pane.
B. Open System Preferences and open the Software Update pane.
C. Open System Preferences and open the App Store pane.
D. She needs removable installation media to update the core operating system in a Mac.
4. What tool enables you to correct a corrupted Windows operating system by reverting your computer to a previous state?
A. Windows Restore
B. Restore State Manager
C. Time Machine
D. System Restore
5. Which of the following backup features does Windows include? (Select two.)
A. Backup and Restore
B. Déjà Dup
C. Time Machine
D. File History
6. What program can you use to keep your systems patched and up to date?
A. Windows Dispatcher
B. Windows Patcher
C. Windows Update
D. Windows Upgrade
7. What tool is used in macOS to perform full system backups?
A. Backup and Restore
B. System Update
C. Time Machine
D. Backups
8. What tool is used in Ubuntu Linux to perform full system backups?
A. Backup and Restore
B. System Update
C. Time Machine
D. Backups
9. Which of the following is not a benefit of a good backup rotation scheme?
A. Spreads the responsibility of backing up systems among multiple techs
B. Limits how much an organization will have to spend on backup media
C. Helps ensure the availability of some newer and some older backups
D. Specifies which kinds of backups to take and when to take them
10. Which of the following was not discussed as a software requirement?
A. Internet connection bandwidth
B. VRAM
C. Compatibility with the operating system
D. Dedicated graphics
11. What feature included in Windows enables you to regularly back up your important files and folders?
A. System Configuration
B. Time Machine
C. AutoRun
D. File History
12. Which of the following commands opens the System Information tool?
A. msconfig
B. msinfo
C. msinfo32
D. mscnfg32
13. Mary wants to regularly run a custom script that performs some maintenance on her Windows clients. What tool enables her to accomplish this goal?
A. Task Scheduler
B. Task Manager
C. cron
D. Init system
14. Chuck wants to configure a Windows workstation to defragment its hard drive daily. Which tool enables him to set Windows to do this automatically?
A. Disk Defragmenter
B. Optimize Drives
C. Task Manager
D. Task Scheduler
15. On a modern Windows system, where is the option to relocate the virtual memory?
A. The Virtual Memory applet in the Control Panel
B. The Advanced tab of the System applet in the Control Panel
C. The Advanced tab of the Performance Options dialog box
D. The Virtual Memory tab of the System applet in the Control Panel
■ Essay Quiz
1. A group of your coworkers has asked for permission to install applications for some streaming services such as Netflix and Hulu to the list of allowed applications, for use on their lunch break. Your boss is fine with this but wants to understand the likely impacts of allowing everyone to install the software. Write a brief essay that lays out how you would set about assessing the impact.
2. Your friend Steve got a refurbished Windows 10 computer, but it’s so loaded with trial-version software from the manufacturer that it confuses him. He wants to unload some of these useless programs, but he doesn’t want to trash his new PC. Write a brief essay describing the tool(s) he needs to use to uninstall the programs and clean up afterward.
Lab Projects
• Lab Project 14.1
You learned that restore points are copies of your system’s configuration at a specific point in time. You know that Windows automatically creates some restore points. But there may be situations when you would like to have a copy of the current system configuration. That’s why Microsoft also allows users to create a restore point at any time. Review the process, ensure System Restore is enabled, decide on a description, and then create a restore point. Note that it automatically includes the date and time you created it.
• Lab Project 14.2
After reading this chapter you know how critical it is to install updates to help the computer stay healthy and to protect it from viruses that may exploit flaws in the operating system. Now’s a good time to investigate some of the recent updates to Windows and try to understand what they changed. Open Windows Update in the Settings app and navigate to the Update history. Go through the first several updates one by one, click the See what’s new link, and read about what is in the update. Keep a tally of how many improvements, bug fixes, and security patches you find.