chapter 16
Troubleshooting Operating Systems
Finn: “We’ll figure it out. We’ll use the Force!”
Han Solo: “That’s not how the Force works!”
—STAR WARS: THE FORCE AWAKENS

In this chapter, you will learn how to
■ Perform common Windows OS troubleshooting steps
■ Identify symptoms of and troubleshoot common Windows OS problems
■ Identify symptoms of and troubleshoot problems related to motherboards, RAM, CPU, and power
As we have discussed in previous chapters, you can perform regular maintenance, keep your system updated, and be vigilant with respect to security, but inevitably something will go wrong. Sometimes the cause is human error, but quite often things simply go wrong with both software and hardware. Knowing what to check and how to address issues will be a very large part of your job.
In this chapter we’ll look first at some common Windows troubleshooting procedures that can serve as a good foundation for dealing with all kinds of issues. From there, we’ll consider a list of more specific symptoms that you should know about. Finally, we will wrap up with talking about how to identify and troubleshoot hardware-related issues. All of these are major themes on the CompTIA A+ 1101 and 1102 exams, so take time to digest this material.
1102
■ Common Windows Troubleshooting Procedures
Learning how to troubleshoot and fix specific problems efficiently is part of becoming a great troubleshooter, but in my mind it’s even more important to know how to hit the ground running when you honestly have no clue why a system is acting up. In this section we’ll look at several troubleshooting procedures for Windows that you can fall back on to get your systems up and running in a pinch. Buckle up!

Turning Things Off and Back On
For as long as we’ve had computers, turning them off and back on has been an important troubleshooting procedure. Because software and hardware can both have tiny defects, the longer a system runs without a reboot, the more likely it is to run into trouble. One common cause of this slow descent into chaos is programs that don’t properly clean up and release the resources they’ve been using, preventing the system from allocating those resources to other applications. This is most common with memory—so common, in fact, that we have a special term for it: a memory leak.
You can waste a lot of time trying to figure out what’s going wrong only for a reboot to instantly clear up the problem. As long as there isn’t a good reason not to reboot a system, I’d reboot it any time you run into a problem that you don’t recognize, just to see if it clears up. You might feel like rebooting is throwing up your hands in defeat, but there will always be problems that we have to manage with reboots until some developer or manufacturer releases an update.
 Cross Check
Rebooting a Remote System
In Chapter 15 I showed you how to reboot a remote computer with only command-line access, so let’s make sure it sticks! Which Windows command enables you to reboot a system? Do you remember which command switch causes it to trigger a reboot?
Don’t think these kinds of problems just apply to programs that you run as a user. Long-running services wear a lot of important hats in modern operating systems. Compared to in-your-face desktop applications, it’s easy to forget all about services when they behave themselves. But they are still software—and most software has bugs and defects.
No matter which app you are using, when some general feature of your OS stops working—maybe it can’t connect to the network, print a document, or find files that you know are there—there’s a decent chance a misbehaving or crashed service is to blame. In the “Services Not Starting” section later in this chapter, I’ll show you how Windows will warn you if a particularly important service fails to start when you boot the system.
One way to troubleshoot cases like this is to try to restart services to see if the problem goes away. In my opinion, you’ll often be able to reboot a system when you run into a problem like this. It is rarely even obvious which service to restart! The main time you’d want to go to the effort of restarting services is when there’s a good reason you can’t reboot—perhaps the system is acting as a database server or in the middle of processing a massive print job.
CompTIA, however, wants you to know that restarting services is a common troubleshooting procedure (especially if Windows notifies you that a critical service failed to start). It’s possible the service failed for a temporary reason and giving it a swift kick may get it going again.
System File Check
Most of the time Windows will either work just fine or collapse in a heap, but if you use it long enough, you’ll eventually run into cases where it’s acting strange. Whenever problems like this persist even after I reboot, the hair tends to stand up on my arms. As you’ll see in Chapter 27, erratic behavior is one of the telltale signs of a malware infestation. But there are still some simpler explanations to rule out before you panic.
Back in Chapter 15 I showed you a cool little Windows utility called sfc (System File Checker). It’ll search your system files to ensure they’re all present and not corrupted—and try to replace the files if there’s a problem. It isn’t the best thing since sliced bread, but running it is a good idea to rule out these kinds of issues if a system’s misbehaving.

Uninstall/Reinstall/Update Applications
From time to time, an application will just break on you. Most of the time it’ll be broken from the moment you install it or break right after you update the application or your OS. Once in a blue moon, the application will just break for no obvious reason. It’ll work fine one time, and then…not at all.
If a program isn’t working quite right, a good first step is to see if it has any updates available and, if so, apply the updates and confirm you still see the problem on the newest version. If the program destabilizes the system, you should uninstall it before doing anything else.
If the program broke after you updated it or the OS, either one might have a bug or might no longer be compatible with the other. Verify that the program and OS are still compatible. If not, you might need to update the OS to a newer version, or even set aside a system to run an older (compatible) version of the OS. It’s also possible that the software requirements have changed—make sure to verify them.
Less frequently, a program may just stop working out of the blue even though nothing’s changed recently. Many programs read and write data to files on the system as they run, and even the tiniest problem in these data files could crash the program. These incompatibilities can be caused by things like an application crash, the power going out, or restoring older copies of the data files. Uninstalling and reinstalling the program may clear the bad data and get you on your way.
Some programs store data files in locations that aren’t deleted when you uninstall the program, so they’ll keep right on failing after you reinstall them. In this case, you’ll need to research the file locations (they differ from program to program) and manually delete them.
If none of these steps help—especially if you know the software is running fine on similar systems—the failure may actually be an early sign of hardware trouble. The specifics can vary from program to program, but an application that tickles your system just right can easily turn up early signs of failure in almost any component or peripheral plugged into your system!
Resource Requirements
When a system or its applications start misbehaving out of nowhere, it’s natural to focus on the exact program or feature that isn’t working, or recent changes such as updates. That’ll usually lead you in the right direction, but it can also blind you to the obvious.
Our systems are constantly changing in ways that can affect the resources available to our programs and OS. Every new application we install takes more resources. Every file we create or download takes up a little storage space. Every time the OS or an application automatically updates, it may use more resources, fewer resources, or just a different balance of them.
When we’re having unexplained trouble, good techs aren’t afraid to ask simple questions like whether the device meets the system requirements for the OS and programs the user is trying to run. If the answer is no, the solution is usually to move the user to a newer system or add resources (upgrade the RAM, storage, processor, graphics card, and so on) to the existing one.
Recovering When Windows Breaks
When things get hairy enough that Windows can’t even load or work right, you can usually get the system running again with a special set of tools called the Windows Recovery Environment.
WinRE includes an impressive, powerful set of both automated and manual utilities that collectively diagnose and fix all but the most serious of Windows boot problems. Although WinRE does all the hard work for you, you still need to know how to access and use it. When faced with a failure-to-boot scenario in modern versions of Windows, WinRE is one of your primary tools.
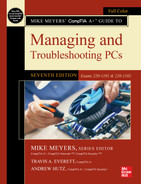
In Windows, you can access WinRE in a few ways depending on the state of your system. First, if your system boots, you can hold SHIFT while clicking the Restart button on the Start menu or login screen. Alternatively, from the Settings app, open the Update & Security category (System category in Windows 11), click Recovery, and then click Restart now in the Advanced startup section. But if you can’t boot Windows, you can boot from the Windows installation media and select Repair your computer (see Figure 16.1).
• Figure 16.1 Repair your computer option on the Windows 11 installer
You can also create Windows installation media by downloading it directly from Microsoft (https://www.microsoft.com/software-download/) and making a bootable USB drive. If you’re already using a Windows machine, select the version of Windows you want to install and download the corresponding Windows media creation tool. Insert a USB drive and run the media creation tool to create a bootable USB drive. (If you aren’t already using a Windows machine, you’ll need to download the ISO file and look up how to create a bootable USB drive on your OS.)
Using the advanced startup options to boot into WinRE usually works, so it’s a good place to start. You should access WinRE from the Windows installation media if your system is too messed up to boot WinRE or you think the system may have malware.
WinRE offers few choices initially, so you’ll have to click around a bit to find the good stuff. Don’t be surprised if you see something different than what’s shown in the screenshots in this section—Microsoft likes to fiddle with the options from version to version, and they can also differ from system to system. In Windows 11, the main menu starts (see Figure 16.2) with a few options:

• Figure 16.2 Recovery Environment main screen in Windows 11
■ Continue
■ Use a device
■ Troubleshoot
■ Turn off your PC
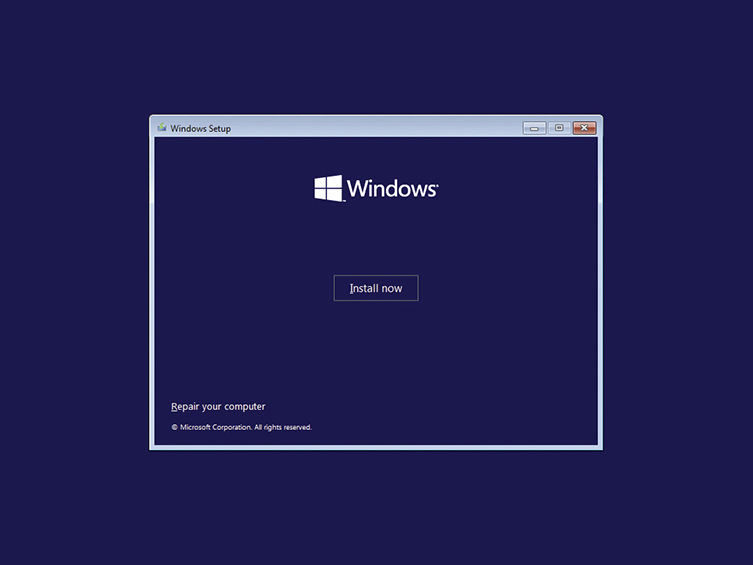
Click the Troubleshoot option to see a couple more options, as shown in Figure 16.3. (If you boot from the installation media, clicking Troubleshoot will take you directly to the Advanced options screen discussed next.)
• Figure 16.3 WinRE Troubleshoot screen
■ Reset this PC
■ Advanced options
Clicking Advanced options reveals another menu (see Figure 16.4) that shows a lot of options (you may have to click See more recovery options to see them all). I want to discuss seven of these (you may see them in a different order):

• Figure 16.4 WinRE Advanced options screen
■ System Restore
■ Startup Settings
■ Uninstall Updates
■ System Image Recovery (not shown in Figure 16.4)
■ Startup Repair
■ Command Prompt
■ UEFI Firmware Settings (if your system has UEFI)
Let’s look at the details of these options plus Reset this PC.
System Restore
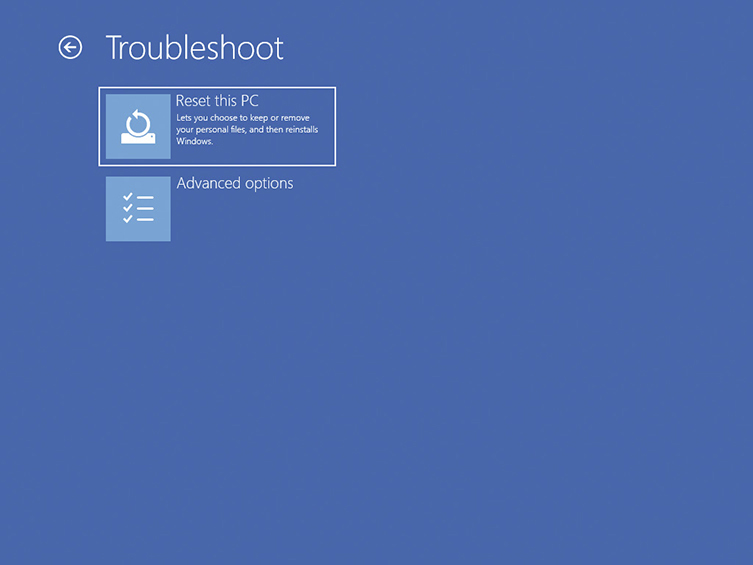
System Restore enables you to go back to a time when your computer worked properly. This option gives those of us who make many restore points—snapshots of a system at various points in time—a handy way to return a system to a previous state (see Figure 16.5).
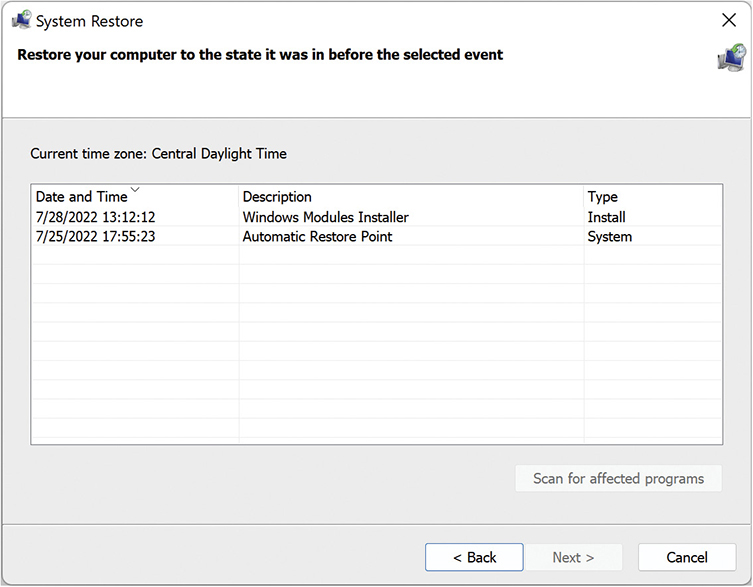
• Figure 16.5 System Restore list of restore points
Startup Settings
It isn’t in the CompTIA A+ 1102 exam objectives, but the Startup Settings option enables you to control some special troubleshooting and developer modes that Windows can start up in. Sooner or later, there’s a good chance you’ll need to use these settings to access Safe Mode (a staple of Windows troubleshooting for decades)!
Uninstall Updates
Use the Uninstall Updates option in the very off chance that Microsoft pushes out an update that breaks things in your system. It’s happened in the past, so Microsoft includes this option just in case. You’ll likely never need to use it.
System Image Recovery
Use the System Image Recovery tool to restore a system after a catastrophe. This is a great tool if you manage a set of uniform systems, typical in many workplaces. Keep a default image on hand, including OS settings, network settings, and applications, and you can quickly reimage a borked computer to get clients up and running. You can keep a simpler image as well, one that reloads the OS for further customization.
If you have the drive containing the system image plugged in when you first run the wizard, it should detect your latest backup and give you the option to restore it. After you select the image you want to restore, the utility presents you with some additional options that affect how it will reimage your system.
After you click Finish on the confirmation screen, which also contains a final warning, the restore process begins. The utility removes the old system data and then copies the backed-up system image to the hard drive(s). Once the process completes, your system reboots and should start up again with all of your data and programs just where you left them when you last backed up.
Startup Repair
The Startup Repair utility serves as a one-stop, do-it-all option (see Figure 16.6). When run, it performs a number of repairs, including
• Figure 16.6 Startup Repair’s rather bare-bones interface for Windows 11 in action
■ Repairs a corrupted Registry by accessing the backup copy on your hard drive
■ Restores critical boot files
■ Restores critical system and driver files
■ Rolls back any non-working drivers
■ Rolls back updates
■ Runs chkdsk
■ Runs a memory test to check your RAM
Startup Repair fixes almost any Windows boot problem (Windows can even start it automatically if it detects a boot problem). In fact, if you have a system with one hard drive containing a single partition with Windows installed, you’d have trouble finding something Startup Repair couldn’t fix. Upon completion, Startup Repair will let you know whether it succeeded and where to find a log file called srttrail.txt that lists exactly what the program found, what it fixed, and what it failed to do. Its content may look cryptic, but you can type anything you find in this file into a search engine and easily find more information.
Command Prompt
The nerdiest option in the WinRE menu is Command Prompt. The WinRE command prompt functions similarly to the regular cmd shell in Windows, covered in Chapter 15. WinRE’s command prompt enables you to do some low-level rocket surgery on your system in order to recover from thorny problems.
The WinRE command prompt contains utilities for repairing or modifying the low-level structure that points to the files your system needs to boot up (bootrec and bcdedit), utilities for working with your system’s storage devices and file systems (diskpart, fsinfo, fsutil), and more. Luckily for you, the CompTIA A+ 1102 objectives cover many fewer of these utilities than previous versions of the CompTIA A+ objectives. Know that these tools are here in case you need them someday—but for now I’ll focus on the only one you’ll see on the exam: diskpart.
The diskpart utility is a fully featured partitioning tool. It lacks many of the safety features built into Disk Management (covered in Chapters 8 and 9), so proceed with caution. You can, for example, delete any partition of any type at any time. Starting diskpart opens a special command prompt as shown here:
C:Windowssystem32>diskpart
Microsoft DiskPart version 10.0.17134.345
Copyright (C) Microsoft Corporation.
On computer: MIKESPC
DISKPART>
You can list volumes (or partitions on basic disks):

Select a volume to manipulate (you may also select an entire drive):
DISKPART> select volume 1
Volume 1 is the selected volume.
DISKPART>
You can run commands at the diskpart prompt to add, change, or delete volumes and partitions on drives, mount or dismount volumes, and even manipulate software-level RAID arrays. Use the format command to format a newly created volume.
Run the clean command at the diskpart prompt to wipe all partition and volume information off the currently selected disk. This tool handles nasty corruptions that simply won’t let Windows boot and serves as my last-ditch step before I toss a drive.
UEFI Firmware Settings
Getting into system settings in UEFI-based motherboards can be a challenge. Although pressing the DELETE key repeatedly works sometimes, the opportunity flashes by very quickly. The UEFI Firmware Settings option enables you to access the system setup utility when you restart your computer via the Recovery option in Settings. Use the UEFI Firmware Settings option when you’re tweaking things like CPU or RAM timings, or you want to change the boot order for some reason.
Reset This PC
When less aggressive options (such as Startup Repair or System Restore) fail to get you back up and running, you may need to bite the bullet and reinstall Windows. Luckily, Microsoft makes this pretty easy—it’s exactly what the Reset this PC option mentioned earlier in this section does. As a reminder, to access it from the main WinRE menu, click Troubleshoot and you’ll find it listed with Advanced options (refer to Figure 16.3). Reset this PC has two suboptions with dramatically different outcomes:
■ Keep my files Reinstalls Windows but preserves your files and settings and any applications purchased from the Windows Store. Note well: this option deletes every other application on your system.
■ Remove everything Nukes your system—all apps, programs, user files, user settings—leaving you with a fresh installation of Windows. Use it as a last resort when troubleshooting a PC. And back up your data first.
Rebuild Windows Profiles
Each user account on a Windows machine has an associated user profile that records settings such as Desktop preferences (like background and color), shortcuts, and other icons. A corrupt profile can block a user from logging in and getting access to his or her stuff. Corrupt profiles can also manifest as very slow profile load times. Anti-malware software can sometimes corrupt a profile, as can upgrading from one version of Windows to another. You have two options to rebuild a Windows profile: perform several direct Registry edits or create a new user account and copy the old profile settings to the new account.
The Registry edits are a little complex, so here are the steps. The first step is to get into Safe Mode (you’ll find this in the WinRE Advanced options | Startup Settings discussed earlier). Once in Safe Mode, access an elevated command prompt. (Type cmd in the Search field, right-click the Command Prompt option, and select Run as administrator.) Type regedit and press ENTER to open the Registry Editor. Navigate to the following string to get to the screen shown in Figure 16.7:

• Figure 16.7 ProfileList in Registry
HKEY_LOCAL_MACHINESOFTWAREMicrosoftWindows NTCurrentVersionProfileList
Click the ProfileList arrow on the left to see a set of entries that start with S-1-5. Select the one that matches the messed-up profile. Figure 16.7 shows a user named Scott (which you can barely make out in the ProfileImagePath on the right pane). At the bottom of the right pane, double-click the State entry, set the value to 0 (see Figure 16.8), and click OK.
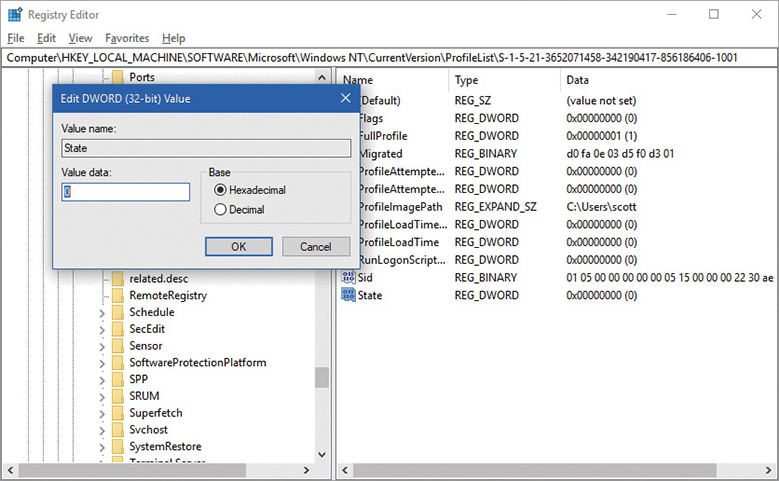
• Figure 16.8 Setting the State to 0
Here’s the last step. If you have an option for RefCount on the right, double-click it and set the value to 0. If you don’t have that entry, create it: Edit | New | DWORD (32-bit) Value. Close the Registry Editor and reboot the computer. That profile should work.
If the profile doesn’t work, then the next option is to create a new user account and essentially duplicate the earlier profile. Boot back into Safe Mode and open an elevated command prompt. You need an administrator account to create a new user, so that’s what you’re about to access. To activate the super-secret-hidden local administrator account, the command to use is net user. Type the net user command and press ENTER:
net user administrator /active:yes
Reboot the computer and log in as the local administrator you just activated. Create a new user account: Settings | Accounts | Other users | Add someone else to this PC (see Figure 16.9). Give the account a unique name. Go to the Users folder of the corrupted account and copy all the contents to the new account’s Users folder, but do it one folder at a time to avoid copying any of the corrupted hidden files.
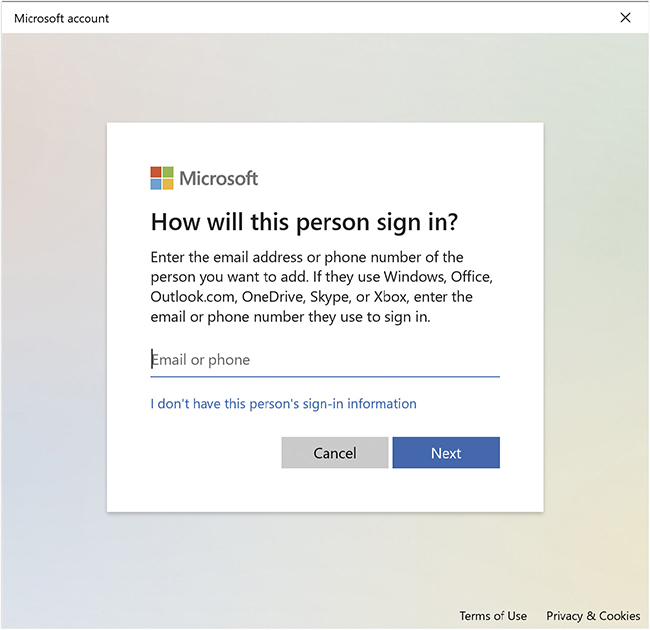
• Figure 16.9 Creating a new user account in Windows 10
When you reboot the computer, you should be able to log on to the newly created account and access all the old/corrupt accounts files. Once verified, log back on as administrator, delete the corrupted account, and rename the new account to the same as the old account.
Both processes for recovering a corrupted user profile are clunky, but they work. Expect to see a question or two on this topic on the CompTIA A+ 1102 exam.
■ Troubleshooting Common Windows OS Symptoms
If you have used the same PC for any period of time, you know things will inevitably go wrong. An application might crash, the system drags along incredibly slowly, or it might present you with the dreaded BSoD! This is when most users reach for tech support. But we’re not most users, we’re techs! In this section, we are going to cover the most common symptoms that crop up when using Windows and how to troubleshoot them.
Blue Screen of Death
Device driver problems that stop Windows from loading look pretty sad. Figure 16.10 shows a Windows Stop error, better known as the Blue Screen of Death (BSoD). The BSoD only appears when something causes an error from which Windows cannot recover. The BSoD is not limited to device driver problems, but device drivers are one of the reasons you’ll see the BSoD.

• Figure 16.10 BSoD in Windows 10
Whenever faced with a scenario where you get a BSoD, read what it says. Windows BSoDs tell you the name of the file that caused the problem and usually suggest a recommended action (aside from the automatic restart). Once in a while these are helpful.
BSoD problems due to device drivers almost always take place immediately after you’ve installed a new device and rebooted. Take out the device and reboot. If Windows loads properly, head over to the device manufacturer’s Web site. A new device producing this type of problem is a serious issue that should have been caught before the device was released. In many cases, the manufacturer will have updated drivers available for download or will recommend a replacement device. If Windows doesn’t load properly, try the Startup Repair procedure discussed earlier.
Sluggish Performance
One day you realize that your once blazingly fast computer now runs at snail’s pace. What happened? Where did the almost instantaneous startup go? Why are you watching apps load up in minutes rather than in seconds?
Like humans, computers tend to accumulate clutter over time. By the time you notice it, it’s usually already started to affect your computer’s performance. One source of clutter is programs that start automatically when you boot the device and consume resources that you’d probably rather use for something else. We talked about controlling autostarting software in Chapter 14, and that’s exactly the cure for this disease.
To stop these unwanted programs from wasting time and resources, bring up the Task Manger’s Startup tab (see Figure 16.11) and review the enabled applications for any you don’t need. This tab shows the publisher of the app, whether autostart is enabled or disabled, and even an estimate of how much resource impact the app has at startup. If you aren’t sure what a program is, you can right-click it and either select Properties to open its Properties dialog box or select Search online to find more information on the Web. As a bonus, the Startup tab can also be a useful place to look if you suspect your system may have some malware, but we’ll save that discussion for a little later.

• Figure 16.11 Startup tab in Task Manager
Once you’ve reviewed the list and decided which apps are essential to run at startup, it’s time to get your computer back up to “ludicrous speed” where it belongs. It’s as simple as right-clicking the app you want to disable and clicking Disable. Don’t worry if you decide later that you want to use the app after all; you can always launch it normally from the Start menu or a desktop shortcut.
Boot Problems
Most failed-boot scenarios require you to determine where the fault occurred: with the hardware and configuration, or in Windows. Boot problems are pretty straightforward. Imagine that a user calls and says “My PC won’t boot” or “My computer is dead.” At this point, your best tools are knowledge of the boot process and asking lots of questions. Here are some I use regularly:
■ “What displays on the screen—if anything—after you press the power button on the case?”
■ “What do you hear—if anything—after you press the power button on the case?”
■ “Is the PC plugged in?”
■ “Do you smell anything weird?”
Hardware problems can give you a blank screen on boot-up, so you follow the tried-and-true troubleshooting methodology for hardware. Make sure everything is plugged in and turned on.
If the user says that the screen says “No boot device detected” and the system worked fine before, it could mean something as simple as the computer has attempted to boot to an incorrect device, such as to something other than the primary hard drive. This scenario happens all the time. Someone plugs a thumb drive into a USB port and the CMOS is configured to boot to removable media before hard drives—boom! “No boot device detected” error. The first few times it happened to me, I nearly took my machine apart before experiencing that head-slapping moment. I removed the thumb drive and then watched Windows boot normally.
Frequent Shutdowns
If you have used Windows for any amount of time, there is about a 99 percent chance that you have experienced a sudden shutdown. This can be extremely frustrating, not only because of lost time, but also because it poses the very real possibility of lost work. The problem gets worse when you start to experience frequent shutdowns. There are several possible causes, but on the software side there are three biggies.
Fast Startup
Windows has a feature called fast startup that, as the name implies, allows your computer to boot up quicker than normal. However, fast is not always better. One example of this has to do with drivers. If your system has a lot of drivers installed, fast startup may not give them all enough time or resources to boot properly and, as a result, they will crash. In turn, this will cause Windows to shut down at some random point thereafter. You can disable fast startup but you have to go through a bit of a maze to get there, so let’s walk through it together.
In Windows 10, go to Settings | System | Power & sleep. Once you’re in the Power & sleep menu, look for the Related settings section and click Additional power settings. In the Power Options window that opens, click Choose what the power buttons do on the left and then click Change settings that are currently unavailable. Under Shutdown settings, uncheck the Turn on fast startup (recommended) checkbox (see Figure 16.12) and then click the Save changes button to save your changes. See what I meant when I said it was a bit of a maze? That was a lot of different menus!
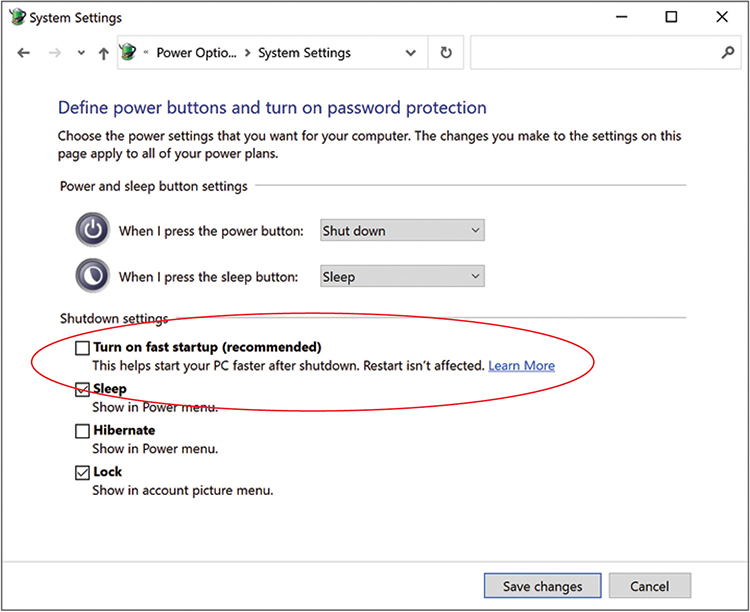
• Figure 16.12 Turning off fast startup
Sleep Mode
Sleep mode is intended to save power when you are away from your computer. However, sometimes your computer might shut down instead of going to sleep. So, if you notice that Windows is shutting down while you are away from your computer, this is the likely culprit. When this is the case, you will want to disable sleep mode.
To do this in Windows 11, go to Settings | System | Power & battery. On this screen you will see two drop-down menus under Screen and sleep: On battery power, PC goes to sleep after and When plugged in, PC goes to sleep after. Set both menus to Never, as shown in Figure 16.13.

• Figure 16.13 Setting sleep mode to Never
Driver Problems
If neither of the previous solutions resolves the issue of frequent shutdowns, it is likely that you have an issue with a driver. Specifically, you may have a driver that needs updating or you have a driver that has become corrupted. Follow the same procedure you used for unruly drivers back in the “Blue Screen of Death” section.
Services Not Starting
Windows loads many services as it starts. In a scenario where a critical service fails to start, Windows informs you with an error message. The important word here is critical. Windows will not report all service failures at this point. If a service that is less than critical to Windows doesn’t start, the OS usually waits until you try to use a program that needs that service before it prompts you with an error message (see Figure 16.14).
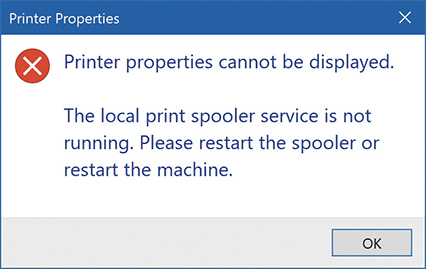
• Figure 16.14 Service error
To work with your system’s services, go to the Control Panel | Administrative Tools | Services and verify that the service you need is running. If not, restart the service. Also notice that each service has a Startup Type—Automatic, Manual, or Disabled—that defines when it starts. It’s very common to find that a service has been set to Manual when it needs to be set to Automatic so that it starts when Windows boots (see Figure 16.15).
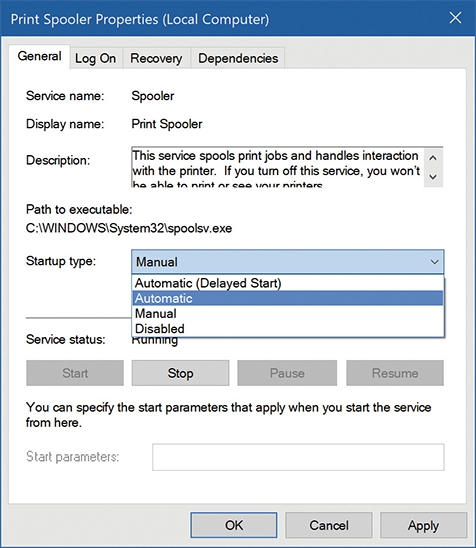
• Figure 16.15 Autostarting a service
Applications Crashing
Occasionally, an application gets released that isn’t ready for prime time, and bugs in the code cause the application or even the operating system to crash. I’ve seen this most often with games rushed to market near the winter holidays. The results of this rushed code can be pretty spectacular. You’re right in the middle of a thrilling fight with the bad guy and then what happens? A crash to desktop (CTD).
Applications crashing can have awful effects on you and your clients. Some of the scenarios caused by such programs are the computer locking up or unexpectedly shutting down. The system might spontaneously shut down and restart. That kind of improper shutdown can cause problems—especially if a program was in the middle of editing an important file!
The problem here is that these crashes can also be caused by hardware. You’ve got to keep in mind all of these things as you approach troubleshooting a crash. Look out for more on hardware causes later in the chapter.
Low Memory Warnings
Imagine you are listening to music, writing a report in Word, and have a few dozen too many browser tabs open for research. All of a sudden you get a low memory warning, or more specifically, a message pops up that says “Your computer is low on memory.”
Wait. How can that be? Is my RAM going bad? The answer is usually that the running programs are using nearly all of your system’s available memory. So, what do you do? The easiest thing is to close tabs and applications that you don’t need—but if an open program is suffering from a memory leak, you may have to reboot to get a fresh start.
There is also a more precise way of evaluating what is hogging your system’s memory. Open the Processes tab in the Task Manager and click the Memory column head to arrange running processes by the amount of RAM they are using. If you locate an app that is using too much memory, right-click on it and select End task.
USB Controller Resource Warnings
Sometimes you will see USB controller resource warnings, or more specifically, a message pops up that says “Not Enough USB Controller Resources.” Most of the time there is a very simple reason for this message—you have too many things plugged into your USB ports. This happens because USB controllers have a fixed number of communication channels, each of which is known as an endpoint. Think of endpoints as lanes on a highway.
On a highway that is ten lanes wide, traffic will flow normally as long as the amount of traffic does not exceed the ten-lane capacity. Some devices will require more than one lane to travel on this “highway.” So, imagine that you have three pieces of hardware that each require four lanes and they are trying to run on the ten-lane highway—at this point you don’t have enough USB controller resources.
To fix the problem, you will have to assess what devices you have connected and potentially disconnect some. If your system has a mix of USB versions, it may help to move some USB 3.0 devices to a USB 2.0 port or vice versa. If you have to choose, reserve the higher-version ports for high-bandwidth devices like storage drives or video interfaces.
System Instability
System instability is something of a catch-all term. Even in perfectly configured systems there will be occasional errors, but when those errors start to become more frequent and more diverse, we can say that the system is unstable. These types of errors can be occurring in the OS, apps, or various other places. Plus, the older a system gets, the more likely it is to experience stability issues.
It’s easy enough to know if your own system is unstable by just paying careful attention to it. But how do you determine this if it’s not your system? Fortunately, Reliability Monitor in Windows can give you a quick overview of how often the system locks up or crashes. To open it, go to the Control Panel | Security and Maintenance, click the Maintenance drop-down arrow, and click View reliability history. Reliability Monitor generates a report and displays it in the default Days view (see Figure 16.16). This lets you see all the errors that have occurred on each day over the last few weeks.

• Figure 16.16 Reliability Monitor
As shown on the right side of Figure 16.16, the graph has several categories, including Application failures, Windows failures, Miscellaneous failures, Warnings, and Information. In addition to the types of errors, you will also be able to see when they are occurring and get additional information. In short, blue circle icons with an i are informational and not indicative of problems. A red circle icon with an × indicates where something bad went wrong. A yellow triangle icon with an ! denotes where a warning occurred. Therefore, when you see lots of recuring red and yellow icons, it’s a clear indication that a system is potentially unstable. Checking Reliability Monitor isn’t a perfect way gauge system stability, but it is a good place to keep tabs on the general health of your system and diagnose emerging problems.
No OS Found
The first time you see this error message, it will likely make you panic a little—I sure did! It’s pretty unnerving to think that your OS and data might be gone, but the key is to remain calm and work through this systematically.
 Tech Tip
Stay Cool Under Pressure
Back in Chapter 14 we discussed the single best way to beat back this sense of dread: regularly back up your data and confirm that you can recover a working system from it. Having rock-solid confidence that you’ll be able to recover whatever was on the system makes it way easier to focus on the problem.
Back in Chapter 5, we discussed how the system firmware (aka BIOS) looks for an OS to boot from. If it can’t find one, then it displays an “Operating system not found” error. Some causes are relatively simple to resolve, like bad BIOS configurations, while others can be related to a dying or dead hard drive. Here are a few common tactics/steps that you can use to troubleshoot and fix the underlying problem.
First, verify whether you (or someone else) left any new removable media (such as a flash drive or optical disc) in the system. If so, see if the system boots correctly without it connected. If it boots right up, the system is trying to boot from removable media that isn’t bootable. If it doesn’t, you should reboot and enter the system setup utility to confirm that the hard drive containing your OS comes first in the boot sequence (which is also called the boot priority or boot order).
As a quick refresher, accessing the system setup utility varies from manufacturer to manufacturer. It usually requires pressing ESC, DEL, or one of the FN keys during the boot process. A quick search online should identify which key your PC uses. For more details on accessing the system setup utility and changing the boot sequence, refer back to Chapter 5.
If the correct drive is already first in the boot sequence, the master boot record we talked about back in Chapter 9 may be corrupt and need to be rebuilt. First, boot to a Windows recovery drive (or installation media) and navigate to the System Recovery Options that you read about earlier in this chapter in the “Recovering When Windows Breaks” section. From here, you have two options: the easy way and the quick way.
The easy way is to just launch the Startup Repair utility and go do something else while it runs. I recommended the easy way, but if you’re feeling impatient, you can do this a little faster if you’re willing to roll up your sleeves and learn the bootrec and bcdedit commands. I’m not going to go into detail here because you won’t see these commands on the CompTIA A+ 1102 exam.
Slow Profile Load
As I discussed earlier in the “Rebuild Windows Profiles” section, user profiles are a very useful part of Windows, but they can start to load slowly (or not at all) if they get corrupted. This can be a drag on its own, but combine it with some of the causes of sluggish performance we dealt with earlier in the chapter, and it becomes a real nuisance.
Earlier, in the “Frequent Shutdowns” section, we discussed how sometimes Fast startup can cause problems because there are too many processes trying to start at once. That is also a possibility here, so first disable Fast startup if it’s enabled and see if this makes any difference in load time.
Another possibility is that there is too much stuff on your desktop. We have all been there—it is easy to create a new file and place the copy on your desktop, swearing that you will put it in the proper folder later. However, later never seems to come and the next thing you know you have a few gigs of data on your desktop. Try temporarily moving these files into a folder that isn’t on your desktop to see if it helps.
If none of these did the trick, it’s time to turn to the procedure that I laid out in the “Rebuild Windows Profiles” section earlier in the chapter.
Time Drift
A lot of people who haven’t looked under the hood take the concept of “time” for granted. If you’ve ever noticed the time on something like a wall or stove clock drifting slowly out of step with the time your cellphone shows, you’ve brushed up against a fundamental truth: all clocks drift apart, and the best we can do is resynchronize them occasionally.
The clock inside every computer is subject to time drift (also known as clock drift) and slowly diverges from the actual time (and may do so more rapidly when the system works hard). Since many applications are dependent on precise time measurements, time drift can cause applications to not start, crash, or perform poorly. Because security protocols frequently use keys that expire after a certain amount of time, it can also cause security and login problems.
To keep their clocks mostly right, modern operating systems regularly (once a week for Windows) synchronize with time servers that exist just for this purpose. Microsoft has set up its own at time.windows.com. As long as time drift isn’t causing trouble, it’s usually okay to ignore it between syncs. If you have systems suffering enough time drift to cause problems—or you notice that the gap continues to grow—there are a few things to consider.
If the systems are continuing to drift beyond a week, they may not be configured (or able) to communicate with the time server. The easy way to check this is to open the Time & Language category in the Settings app, ensure that Set time automatically is enabled, and click Sync now to see if the process completes. If it can’t reach the time server, it’ll show a spinner for a few minutes and then a “Time synchronization failed” message (as shown in Figure 16.17); this likely indicates that the system is offline or network settings need adjustment (which we’ll discuss in detail in Chapters 18 through 21).
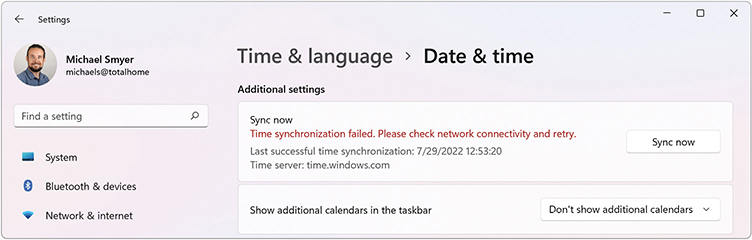
• Figure 16.17 A failed time synchronization
If the time synchronizes just fine but the system keeps experiencing time-related problems, it may be a hardware issue (see the upcoming “Inaccurate System Date/Time” section).
1101
■ Troubleshooting Problems Related to Motherboard, CPU, RAM, and Power
So far in this chapter, we have discussed problems related to the OS and applications from a software perspective. Unfortunately, trouble with the hardware in your system can cause many of the same symptoms—and to be a good troubleshooter, you need to be able to recognize when you can and can’t rule out hardware problems.
In the early chapters of this book, we discussed how computers are built and how each component plays a critical role in maintaining the overall health of the system. We covered CPUs in Chapter 3, RAM in Chapter 4, motherboards in Chapter 6, and power supplies in Chapter 7. Each chapter included a “Troubleshooting” section in which I called out common symptoms and problems related to the component covered in that chapter. For easy review, I want to close out this chapter by taking a moment to sweep up several hardware problems related to motherboards, CPUs, RAM, and power that you’ll need to recognize for the 1101 exam.
Power-On Self-Test
As we discussed in Chapter 5, when you start your PC, it runs through the power-on self-test (POST) that checks your computer’s hardware to make sure everything is working correctly before booting the OS. If the computer passes the POST, you will mostly likely hear a single beep and then Windows will start booting. If a component fails the POST, you will either hear a beep code (a sequence of beeps) or, on some of the more recent motherboards, see the power light or internal LED blinking. Check your motherboard’s manual for details on what the beep codes, also known as POST codes, mean for your PC and then start troubleshooting the problem component.
Proprietary Crash Screens
In the first part of this chapter, we discussed the BSoD from a software perspective, with an emphasis on bad drivers or applications. However, a BSoD that occurs during the initial boot sequence could also be caused by bad hardware, with drivers being a leading culprit. As was the case with software, be systematic in testing components, removing only one at a time, starting with any that were recently installed. macOS systems display a spinning pinwheel (also called a beachball) to indicate an issue.
Black Screen
Though it is far from the worst thing that could go wrong, a black (or blank) screen can be extremely frustrating because it provides absolutely no information suggesting what the problem might be. So, if your computer is powered on but you are seeing a black screen, where do you start?
If the computer was running fine earlier and the screen has suddenly gone black, confirm that the monitor is plugged in, turned on, and properly connected to your computer. These may seem like no-brainer checks, but modern video cables don’t have screw mounts like the old ones—a pet or a user with restless legs can easily knock one loose.
If it’s not the monitor, see if it comes back on after a reboot. If so, leave it alone until it happens regularly. A one-time occurrence could be the computer’s fault, but it can also be caused by something like a power fluctuation. It’s annoying, but it’s worse to spend tons of time troubleshooting and fiddling with options, think you’ve fixed it, only to be confused when it happens few months later during a bad storm.
If the cables seem fine and the monitor is powered on, connecting it to a different system is a quick way to sort out whether the display or the computer is to blame. It’s also worth trying a different set of known-good cables in case those are the problem. If it’s the cables, replace them. If it’s the display, stay tuned for more display-specific troubleshooting in Chapter 17.
When it seems like the computer is the problem, a black screen usually indicates that some hardware is misconfigured, misconnected, or not working. If you are hearing or seeing any of the POST codes discussed earlier, follow the procedure for troubleshooting POST codes.
If you don’t hear or see a POST code but you’ve been tinkering inside your case lately, ensure any components you touched are properly connected. If you added a component, see if the display comes on without it. Booting a system with the RAM mis-seated (or with no RAM at all), for example, can cause the computer to power on, issue no POST codes, but never boot up.
We’ll talk more about the difference between integrated and dedicated graphics in Chapter 17, but one more common issue arises when you’re trying to use a video connector on the motherboard but the integrated graphics are disabled in the system setup. In this case, consult your motherboard manual and perform a CMOS reset (this will restore the default settings, which should have the integrated graphics enabled).
No Power
You press the power button and nothing happens. What do you do now? First, make sure that that wall socket is getting electricity, your computer is plugged in, surge suppressors are turned to the on position, and the power cord is properly plugged in to the computer.
Next, open your system and verify that the CPU and motherboard cables are connected. If all of these things are hooked up correctly and nothing happens when you press the power button, look for indicator lights on the motherboard. If you don’t see anything, then you likely have a bad power supply.
If you do see indicator lights on the motherboard, things get a little more complicated. However, you should move on to checking that your front-panel button is connected properly. Look inside your case near the front panel for a small bundle of wires that connects to your motherboard to enable the power button, front USB ports, and any number of other ports and features your specific case may have. The connector typically has two rows of pins and is encased in a plastic box. Remove the side panel on your computer and make sure the cable is tightly connected.
If your system starts but fails to boot, refer to the previous section on POST. If nothing happens, you likely have additional hardware issues and may need to take a closer look at the hardware.
Sluggish Performance
In the first part of this chapter, we discussed how preventing apps from running at startup can improve performance. Unfortunately, just about every component in a computer can fail suddenly or fail slowly—and slowly failing components often cause performance or stability problems.
If the sluggishness started after you installed new hardware, disconnect the new device and uninstall the associated driver. If your system speeds up, you have found the cause. The manufacturer’s Web site may provide a new driver or another workaround so that you can go on happily using their product.
If you haven’t changed anything and the sluggishness is new, you’ll want to check up on your existing components. Since overheating can cause sluggish performance, a good place to start is by following the recommendations in the next section, “Overheating.” Beyond heat issues, you need to see if individual components are failing.
I like to keep in stock some spare known-good components like RAM modules, CPUs, hard drives, and motherboards for both emergency repairs and troubleshooting unexplained performance problems. I also keep a spare working system to swap the components into. Work one component at a time. I like to start with the RAM because it’s easiest—but go with your gut after that.
Tech Tip
Know Your Performance Baseline
If you want to make an investment in your own future sanity, pick out one or more computer performance benchmark suites, occasionally run them on your systems, and keep a copy of the results. It’s a bit of extra work, but having a few snapshots of how the device used to perform can enable you to diagnose a failing component by just rerunning the benchmark suite and comparing the results.
Overheating
If your computer starts freezing up, randomly shutting down or restarting, making strange noises, or displaying strange graphical glitches, and you can feel heat radiating off of it, you are probably dealing with overheating. When a computer starts to overheat, ensure it is well ventilated. Check that all the vents are clear and not blocked by pet hair or other obstructions. (May you never see the matted mess that cat hair can make of a computer’s vents and heatsinks!)
Make sure you’re grounded, as discussed in Chapter 1, and open the computer to give it a good cleaning. Dust and hair building up over the years can form a component-smothering blanket. Use a can of compressed air to give the system a good cleaning, paying particular attention to areas around the vents, fan, and power supply.
Once all the vents and fans are clean and clear and the system has had a good cleaning, ensure that there aren’t other sources of heat near the system.
If a good dusting doesn’t help, check the fans (not just your case fans—but also any on components inside). Over time, fans can begin to run slowly and seize up. An easy way to tell if your fan is bad is to unplug it and spin it with your finger. If it stops suddenly or slows down too quickly, you likely need a new one. Other signs are if the fan makes any strange noise, visibly wobbles, or obviously runs slower than other fans in the case. The good news is that fans are cheap.
If the system is running hot, you should also notice the fans spinning faster as it warms. Listen closely when you’re gaming or doing other processing-intensive tasks; can you hear the fans spin up and get louder? If not, make sure the system setup utility is set to ramp up fan speeds when things start to get hot.
Once you’ve made sure that the PC is clean and the fans are spinning and installed correctly, it’s a good idea to keep an eye on the actual temperature of the CPU and GPU (these generate a lot of heat and are most likely to be damaged by overheating). You can usually check the CPU temp in the system setup utility, but you can’t really do this while you’re playing a game or editing a movie. There are many free utilities you can use to keep an eye on the CPU and GPU temps when performing processing-intensive tasks. One of my favorites is HWiNFO64.
Burning Smell
When overheating reaches a critical stage, you may notice a burning smell. It may remind you of an electrical fire, melting plastic, some combination of the two, or another “hot” smell. Regardless, your nose will tell you when something is on fire. This can be a symptom of both extreme overheating and a sudden electrical failure.
If you’re in the room when this happens, disconnect the system from power ASAP and observe it for long enough to know whether opening the case is safe. Don’t open it if it’s actively smoking (and get your handy-dandy Class C fire extinguisher ready).
Once you’re sure nothing is on fire, open the case to investigate (but be careful—accumulated dust or a critically overheated component could catch fire when exposed to the inflow of oxygen). Move your hand around the components without touching them to identify any hot spots (focus on the CPU, GPU, and anything else with a fan). If nothing feels unusually hot, see if you can sniff out where the offending smell is coming from.
If there was smoke but neither of these steps locates a source, you need to visually inspect any dust for signs of burning, dust the computer out, break it down, and visually inspect every component for scorch marks (often around connectors and capacitors). You do not want to try to boot up a computer with electrical damage, so I recommend treating everything in the computer as a loss unless you can locate an obvious cause of the smoke.
Frequent Shutdowns
Earlier in this chapter we looked at several software issues that can cause frequent shutdowns, but hardware issues can cause the same problem. Rule out the easy things first. If a system starts to overheat, it should thermal throttle or even shut itself down to avoid damage or fire. These measures might not be enough, so it’s still a good idea to check for overheating.
Since most systems will automatically reboot after they encounter a proprietary crash screen such as a BSoD, it’s a good idea to investigate whether these crashes are at fault. Shutdowns can also be a side effect of instability caused by problems in the motherboard firmware. If random or frequent reboots have always been a problem, or they start right after a firmware update, look for a newer version or flash the firmware you were using previously. (For more on this process, refer to “Flashing the ROM” in Chapter 5.)
Just like sluggish performance, frequent shutdowns can also be a sign of slowly failing hardware, so the recommendations in the “Sluggish Performance” section may help identify a troublesome component.
If none of the previously described items are the cause of frequent shutdowns, check all connections to make sure there is not a short or loose connector. Finally, dust and corrosion can wreak havoc long before that. Dust or corrosion in motherboard slots (mainly RAM and PCIe) or on the component pins themselves can also cause flaky connections and occasional shutdowns. This is where careful cleaning comes in. Depending on the contaminant, the cleaning tool of choice might be compressed air and a microfiber cloth, a cotton swab with a dab of isopropyl alcohol on it, or even a pencil eraser (it can help clean the gold-plated contacts, but I always treat this as a last recourse).
Application Crashes
We looked at software issues that can cause application crashes earlier in the chapter, but hardware issues can cause the same problem. Suppose you’re playing a graphically intensive game, when the screen and Windows both lock up. As we saw earlier, the program might just be buggy, but it could also be the case that the video card is slowly failing and throws a fit when you push it too hard. It could be that the system accessed a section of RAM that has gone bad.
You’ve already confirmed that software isn’t causing the problem, so you should rule out problems like overheating and loose connectors. If the problem is happening regularly, the best way to figure out which component is causing the problem is to swap them out one by one with a known good component until the problem goes away.
Grinding Noise
You turn on your computer and you hear a grinding noise. Nothing strikes fear in the heart of both car and computer owners like unexpected metallic grinding noises. Luckily, there are only two things in modern computers that make this type of noise: fans and traditional magnetic hard drives.
If you have only solid-state drives, then you immediately know it is a fan—you don’t have to worry about a catastrophic loss of data. If you have a traditional magnetic hard drive or more than one fan, you’ll need to open the case and listen carefully to identify where the grinding is coming from. It can also help to place a finger on the outside of a hard drive or fan to feel for vibrations.
In both cases, the result is the same: the component is on its way out and you should promptly replace it.
Capacitor Swelling
In the world of motherboards, a capacitor is a tiny electrical component that helps regulate the voltage going to other components, like video cards and hard drives, to prevent power spikes from damaging them. Age, overcurrent, and design or manufacturing defects can all cause capacitors to bulge (usually at the top)—and the CompTIA A+ 1101 exam objectives refer to this as capacitor swelling. Capacitors can even split open and leak some of the chemicals inside.
As part of routine cleaning, you should examine capacitors on the motherboard for bulges. If you see any, it is time to either replace the motherboard or send it off for service. (You can technically replace a capacitor yourself if you’re comfortable with a soldering gun—but that’s well beyond what you’ll need to know for the CompTIA A+ 1101 exam!)
Inaccurate System Date/Time
Small discrepancies between the time your computer and other devices report usually come down to time drift, covered earlier in this chapter, but large discrepancies (months or even years) tend to have a completely different cause: the CMOS battery. As we discussed back in Chapter 5, the CMOS battery powers the storage for a number of values—including the time—while the system is completely off. Refer back to the procedure in the “Losing CMOS RTC Settings” section in Chapter 5 for more details on how to replace the CMOS battery.
Chapter 16 Review
■ Chapter Summary
After reading this chapter and completing the exercises, you should understand the following about troubleshooting operating systems and hardware-related issues.
Perform common Windows OS troubleshooting steps
■ Having a solid foundation of general troubleshooting procedures can help you fix unfamiliar problems quickly.
■ Turning things off and back on—like rebooting a system or restarting a service—plays an important role in managing software that has memory leaks and other problems that accumulate the longer the system is up.
■ The sfc (System File Checker) utility will search your system files to ensure they are present and haven’t been corrupted. It’ll also try to replace them with good copies if there’s a problem.
■ When it comes to getting an unruly application working again, uninstalling, reinstalling, and updating it can all help clear out inconsistent data and get you on your way.
■ When a system or its applications start misbehaving, it can help to question the obvious—does the system still meet the requirements of the OS or application? If not, you may need to move the user to a new system or add resources (upgrade the RAM, storage, processor, graphics card, and so on) to the existing one.
■ When Windows breaks, the Windows Recovery Environment (and specifically its System Recovery Options) plays a big role in mending the system. System Restore enables you to roll system files back to an earlier restore point. Startup Settings enables you to access special boot-up modes such as Safe Mode. Uninstall Updates enables you to roll back a bad Windows update that breaks your system. System Image Recovery enables you to restore (or reimage) from a full system image. Startup Repair runs a number of utilities in an attempt to fix files (and other items) that are critical for the boot process. Command Prompt enables you to implement lower-level fixes for problems that the generic options aren’t able to handle. Reset this PC enables you to reinstall Windows (with or without your existing user files).
■ When a Windows user profile gets corrupted, you have to either perform a few Registry edits in an attempt to fix it or create a new user account and copy important settings from the old profile to the new account.
Identify symptoms of and troubleshoot common Windows OS problems
■ Device driver problems (among others) can cause a Windows Stop error, better known as a Blue Screen of Death (BSoD), from which Windows cannot recover. The error generally includes information that you can use to track down the problem.
■ At the OS level, sluggish performance is often caused by accumulated clutter, such as autostarting software, and can be managed by disabling autostart for unnecessary applications.
■ Problems booting Windows often come down to hardware problems which should be troubleshooted as such. They can also be simple mistakes such as leaving removable media plugged in while the system setup utility is configured to try to boot from them.
■ As far as software problems go, frequent shutdowns often come down to problems with the system’s Fast Boot feature or sleep mode feature, or problems with installed drivers.
■ Windows loads many services as it starts, and when a critical one fails, Windows shows you an error message. In this case, you can open the Services snap-in and try to restart the service. (You may also have to set a service to start automatically if it has been mistakenly set to Manual.)
■ Crashing applications can be caused by a lot of different issues. Faulty drivers, software compatibility issues, or just a corrupted installation could all be to blame. Making sure the app is updated or uninstalling and reinstalling it could solve the problem.
■ A low memory warning can precede an application crash, or just disrupt your work by causing your system to chug. It usually indicates that you have too many running programs consuming all of your system’s available memory (though it can also be a symptom of a memory leak). Free up the RAM by stopping the programs or rebooting.
■ When too many USB devices are connected at once (i.e., they consume a greater number of endpoints than your system has available), you’ll have to assess which devices to prioritize and either disconnect some devices or move them to less-crowded ports.
■ System instability indicates that a system is regularly experiencing errors in the OS or applications. Reliability Monitor can provide a helpful overview of recent events that may help you understand how stable or unstable the system is.
■ When the system tells you it can’t find an OS, it means that it’s trying to boot from unbootable media. This might mean that your boot sequence is pointing it at some non-bootable removable media, that the boot sequence is just wrong, or that the boot device’s master boot record is corrupt.
■ A slow profile load is generally a sign that the user profile is corrupt, though it can also be a sign that there are just too many large files saved to the user’s desktop.
■ All clocks—including those in computers—experience time drift that must be fixed by occasionally synchronizing the clock with another. This clock drift can cause problems with time-sensitive applications and services (especially authentication services).
Identify symptoms of and troubleshoot problems related to motherboards, RAM, CPU, and power
■ The power-on self-test (POST) checks a computer’s internal hardware for faults before booting the OS. If the computer passes the POST, you will usually hear a single beep. If a component fails the POST, you will hear a beep code or see the power LED blinking. These beeps vary from motherboard to motherboard, so have your motherboard book or quick Internet access handy to diagnose the hardware that is causing the problem.
■ Proprietary crash screens (such as the Windows BSoD and macOS pinwheel) can be caused by both software and hardware issues. If a crash screen caused by bad hardware or a bad driver appears during the boot process, you’ll generally need to test connected components one by one.
■ A black screen can have many causes. If the computer was already booted, it could just be a failure to properly wake from sleep. If the display still doesn’t come on, verify none of the connectors have come loose before rebooting. See if the display works when you move it to another system. If it seems like the computer itself is to blame, a black screen generally indicates that some hardware is misconfigured, misconnected, or not working. Check for POST codes and ensure components (such as RAM) are connected securely. If you are trying to use the integrated graphics and they have been disabled, you may need to perform a CMOS reset.
■ If your computer has no power when you press the power button, check to see that it’s plugged in, check that the power supply is switched on, check to ensure the outlet is providing power, and, if all else fails, check the front panel connectors on the inside of your case. These connectors connect to the motherboard and allow the front I/O and power button to work.
■ If sluggish performance isn’t being caused by software (or insufficient resources), it is likely being caused by slowly failing hardware. Keeping spare components or a spare system around is helpful so that you can swap items out to test them one by one (usually starting with the simplest—RAM).
■ Overheating has a lot of possible symptoms. Freezing, random shutdowns, and graphical glitches are symptoms of overheating. If you suspect that your system is overheating, check ventilation, make sure the fans are working, and verify that the computer isn’t overly dusty or placed near another heat source.
■ Extreme overheating and sudden electrical failures can both cause a burning smell. Unplug the system and observe it for long enough to know if it’s safe to open. (It’s not safe if it’s actively smoking!) If you’re lucky, some dust started smoldering and you’ve caught it in time. If you aren’t so lucky, you may be replacing a CPU, GPU, power supply, or hard drive. If you’re really unlucky, you may be replacing multiple parts.
■ Frequent shutdowns can be caused by overheating, application/OS crashes, slowly failing hardware, firmware problems, connectors that are loose or shorting, and even dusty or corroded slots and connectors.
■ In addition to their software causes, application crashes can also be caused by hardware problems such as a failing video card or bad RAM.
■ Grinding noises could indicate a fan problem or a problem with your traditional magnetic hard drive. If your system has only SSDs, you’ll know that a fan is the source of the grinding sound, and fixing a fan is relatively easy. If the grinding noise turns out to be your hard drive, you’ll have to make some decisions based on whether you did a recent backup, whether there is critical data on the drive, and whether you may be able squeeze enough life out of the doomed drive to do a backup and save the data.
■ Capacitor swelling is caused over time by age, voltage spikes that the capacitors are there to deal with, and manufacturing defects. They can bulge and even split, making them ineffective and leaving your precious components vulnerable. In a desktop, check the motherboard capacitors whenever you do a routine cleaning.
■ Large discrepancies between real-world and system time can indicate that the CMOS battery is low or dead. Replace it!
■ Key Terms
applications crashing
Blue Screen of Death (BSoD)
capacitor
capacitor swelling
diskpart
endpoint
Fast startup
low memory warning
net user
overheating
power-on self-test (POST)
Reliability Monitor
restore point
sfc (System File Checker)
Startup Repair
Startup Settings
System Restore
time drift
user profile
Windows Recovery Environment
■ Key Term Quiz
Use the Key Terms list to complete the sentences that follow. Not all terms will be used.
1. The __________________ checks a computer’s internal hardware for compatibility and connection before continuing with the boot process.
2. __________________ enables you to return your system to a previous state.
3. __________________ is when your computer’s clock starts to deviate from the actual time.
4. The __________________ command detects and tries to repair corrupt or missing operating system files.
5. The ___________________ only appears when something causes an error from which Windows cannot recover.
6. USB controllers have a type of communication channel called a(n) _________________.
7. Random restarts, shutdowns, and graphical glitches are common symptoms of ____________________.
8. Opening one too many browser tabs could cause a(n) ____________________.
9. You can access Safe Mode from WinRE by using the ____________________ option.
10. A(n) __________________________ stores account settings and preferences such as the desktop background.
■ Multiple-Choice Quiz
1. What is the more commonly used name for a Windows Stop error?
A. Blue Screen of Death
B. Black screen
C. Spinning Pinwheel of Death
D. Crash screen
2. System Restore lets you save software, Registry, and driver configurations in a __________.
A. System Configuration utility
B. Snapshot Manager
C. Restore point
D. System image
3. Dave booted up his desktop this morning and started hearing a grinding sound. The fans seem to be working normally, so what should Dave check next?
A. HDD
B. GPU
C. SSD
D. Motherboard
4. Which Windows utility enables a user to force quit programs and services that are using up too many resources?
A. Reset this PC
B. POST
C. Task Manager
D. Force Quit
5. An “Operating system not found” error can be caused by which of the following issues?
A. Damaged master boot record
B. Overheating
C. Bad RAM
D. Malware
6. What is the least-disruptive way to free up RAM after getting a low memory warning?
A. Restart the computer
B. Close unneeded browser tabs and apps
C. Add more RAM
D. Uninstall applications
7. Which of the following are most likely to cause a computer to overheat? (Select two.)
A. Dust build-up
B. Obstructed vents
C. High RAM usage
D. Faulty drivers
8. Slow profile loading can indicate that the ______________________ profile has been corrupted.
A. Master boot record
B. BIOS
C. Driver
D. User
9. Which of the following is most likely to be the cause of an application crashing?
A. Incompatible drivers
B. Time drift
C. Buggy code
D. CPU failure
10. Which of the following problems is a likely side effect of overheating?
A. Buggy applications
B. Bad RAM
C. Applications crashing
D. Capacitor swelling
11. Melissa inserts a device into one of her computer’s USB ports and receives a USB controller resource warning message on her screen. Why is this happening?
A. Two USB keyboards are conflicting over which one can control the computer.
B. Too many of the USB drives are trying to access the same file at once.
C. The connected devices require more endpoints than the controller has available.
D. She needs to add more RAM to the USB controller to support the extra device.
12. If you boot a system and you receive the Windows Error Recovery screen, what happened?
A. The computer automatically rebooted after a Windows Stop error.
B. Windows recorded an error and wants permission to send an error report to Microsoft.
C. Windows detected a problem in the startup process.
D. Windows failed to start the Windows Recovery Environment.
13. Pinwheel is an informal term used for describing stop errors in which OS?
A. macOS
B. Windows
C. ChromeOS
D. Linux
14. Which potential cause of a black or blank screen might be fixed by a CMOS reset?
A. Disabled integrated graphics
B. Failure to wake from sleep mode
C. Mis-seated RAM
D. Wrong input selection
15. When you power on a user’s system to investigate a problem they reported with frequent crashes, you hear a strange noise and see a puff of dark smoke waft out of the fan vent. What should you do next?
A. Pull the battery out of the smoke detector so you can think.
B. Unplug the computer.
C. Get the nearest Class C fire extinguisher.
D. Pull the nearest fire alarm and exit the building.
■ Essay Quiz
Write an essay that describes what you would do if a system you are working on emits a faint burning smell but you don’t see any smoke.
Lab Projects
• Lab Project 16.1
On your test system, put the Windows recovery tools to the test. You can do this project in either Windows 10 or 11. Back up the system. Create a system image. Create a system repair disc. Make some catastrophic change to Windows, then boot to the system repair disc and run through the recovery process.
• Lab Project 16.2
Similar to Lab Project 16.1, put the System Restore tool in Windows 10 to the test. Delete some files. Right-click the folder they were deleted from and select Restore previous version. What happens? Go further. Delete a whole folder, then select Restore previous version from the folder in which that deleted folder resided. What happens? Try both exercises again, but this time empty the Recycle Bin before trying to restore. What happens now?