chapter 11
Installing and Upgrading Operating Systems
“Create with heart; build with the mind.”
—CRISS JAMI

In this chapter, you will learn how to
■ Recognize current Windows editions
■ Install and upgrade Windows
■ Describe Windows post-installation best practices
This chapter’s title is slightly deceptive, as it might be more accurate to call it “Installing and Upgrading Microsoft Windows.” With that being said, there are operating systems out there other than Windows. Linux installations use a similar general installation process as Windows and are easily upgraded through the command line. ChromeOS and macOS come preinstalled on devices and are upgraded through regular software updates rather than by the release and installation of entirely new versions like you’d see with Windows (for example, Windows 10 to 11). The odds of you manually installing either of these are next to zero, and that’s by design.
There’s a good reason to make this chapter mainly about Windows. Microsoft Windows comes in many variations compared to macOS, ChromeOS, or any individual version of Linux (there are many different versions of Linux, known as distributions or “distros,” but these are each separate projects). It’s also installed on something like 90 percent of all the desktop, laptop, and server computers in the world, so understanding Windows is always a great skill to possess.
This chapter puts together a lot of what you know about hardware from the previous ten chapters and layers on the essential component that makes Windows PCs so excellent: Windows. We’ll start by exploring the different Windows versions and editions and then turn to installing and upgrading Windows. The final section covers post-installation tasks.
1102
■ Windows Versions and Editions
There’s an interesting page at Wikipedia.org titled “List of Microsoft Windows versions” that lists every version of Windows from the original Windows 1.0 back in 1985 to Windows 11 today. A quick scan of that page lists over 40 PC versions of Windows over the years! Fortunately, the CompTIA A+ 1102 exam objectives define only one version: Microsoft Windows 10. The Windows 10 operating system is designed to run on classic personal computers, both desktop and laptop systems, which are still the cornerstone for many of us.
Let’s take a moment to differentiate between Windows versions and Windows editions. Windows 10 is a version. Windows 11 is another version. Each version of Windows is in turn broken down into editions that address specific needs. Windows 10 is available in multiple editions, with names such as Windows 10 Home and Windows 10 Enterprise. CompTIA A+ 220-1102 exam objective 1.1 specifies exactly four Windows 10 editions:
■ Windows 10 Home
■ Windows 10 Pro (not “Professional”)
■ Windows 10 Pro for Workstations
■ Windows 10 Enterprise
What About Windows 11?
Every CompTIA A+ update has always been basically—almost comically—one version behind the latest version of Windows since Windows 7. With the introduction of the CompTIA A+ 220-1101/1102 exams, CompTIA added the following note to the A+ 1102 exam objectives:
NOTE ON WINDOWS 11
Versions of Microsoft® Windows® that are not at the end of Mainstream Support (as determined by Microsoft), up to and including Windows 11, are intended content areas of the certification. As such, objectives in which a specific version of Microsoft Windows is not indicated in the main objective title can include content related to Windows 10 and Windows 11, as it relates to the job role.
There’s a little room for interpretation here, but my 30 years of working with CompTIA gives me some insight. I interpret CompTIA’s note to mean that, other than very specific questions that point exactly to only Windows 10, Windows 10 and 11 are so similar that if a question says “Windows,” then it doesn’t matter which edition of Windows you’re thinking in your head, as the question applies to both Windows 10 and 11—so don’t worry about the version!

Windows 10 Home
Windows 10 Home is the most basic of the Windows 10 editions listed in CompTIA A+ 220-1102 exam objective 1.1. Designed for home users, Windows 10 Home lacks many features that are offered in the other three editions that we’ll review. The important point to remember about Windows 10 Home is that it only supports 128 GB of RAM. That might sound like a lot of RAM to you, but Microsoft doesn’t want you to use Windows Home for anything even remotely resembling a server, so it hobbles Home to make sure you don’t use it for anything but a basic home system.
Workgroups vs. Domains
Speaking of keeping your Windows Home at home, it also lacks another very important feature: the ability to log on to a Windows domain. Windows domains require a special version of Windows called Windows Server. If you have a home network that lacks a Windows Server system (like almost all home networks), your network devices are members of a workgroup. Let’s examine both workgroups and domains, as understanding these concepts is important to help you choose the Windows edition you need.
Workgroups
A workgroup is the most fundamental network organization used in Windows networks. In a workgroup, every computer stores all its own users and passwords (see Figure 11.1). These are known as local usernames. A workgroup setup is inexpensive because it doesn’t require an expensive server system running expensive Windows Server software, nor does it require any special skills. It just works.

• Figure 11.1 In a Windows workgroup every system has its own usernames and passwords.
Domains
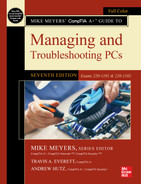
A Windows domain is a much more complex and powerful setup than a workgroup. First, you need a dedicated server system. This system usually sits in a rack in a closet and does nothing but…serve. This system runs Windows Server, a powerful and expensive (thousands of dollars per copy) version of Windows (see Figure 11.2).
• Figure 11.2 Windows Server 2019 with the Server Manager console displayed
Possibly the most popular feature of Windows Server is the domain. In a Windows domain, the individual computers log on to the server itself. This server stores its own set of “domain” usernames and passwords that are completely separate from the local usernames. Using domains instead of workgroups has too many advantages to list here, but one of them is single sign-on (SSO), which lets you use the same username and password to sign on to any computer in the domain (see Figure 11.3). There are many more advantages to Windows domains that make the added cost worthwhile.

• Figure 11.3 Windows domain
Windows domains are fantastic, but purchasing Window Server is beyond the pocketbook of many home users. Windows Home systems cannot become part of a domain; to do that, you’ll need something like Windows Pro.
Windows 10 Pro
The limits of Windows Home make it unattractive for anything but the most basic home user. If you want to see what Windows is all about, you need to start with Windows 10 Pro. For starters, Windows 10 Pro supports up to 2 TB of RAM and is the most basic edition of Windows that supports joining a Windows domain (see Figure 11.4). Once you step up to Windows Pro and beyond, you gain access to some very powerful features. Here are some of those features and how they work.

• Figure 11.4 Unlike Windows 10 Pro, Windows 10 Home can’t use a Windows domain.
Group Policies
Microsoft Windows has some amazing features when it comes to security. You can require users to use complex passwords, you can limit when people log on, you can control whether they are allowed to install applications…and the list goes on to thousands of security features. To configure these features, you use group policies. A single group policy might be something like “This person cannot log on remotely to their system” or “Your login password must be at least ten characters.”
You configure group policies by using the Group Policy Editor, gpedit.msc. To open it, simply type gpedit in the Windows Search bar, press ENTER, and you’ll see a screen that looks something like Figure 11.5.

• Figure 11.5 Default Local Group Policy Editor window
With a little practice, you can drill down and make practical changes such as configuring who may change the date and time on a system (see Figure 11.6).

• Figure 11.6 Date and time permissions in Group Policy Editor
Group policies are an important topic and one you’ll see again and again in this book. Head to Chapter 13 to read more about group policies.
BitLocker
BitLocker is an incredibly powerful drive encryption technology that Microsoft added way back in Windows 7. A drive encrypted with BitLocker is practically impossible to break, and the encryption is completely transparent to the user: when the user logs off, the drive is encrypted, and when the user logs on, the drive is unencrypted.
Be careful! If you want to use BitLocker, make sure you choose any Windows edition other than Windows Home, which lacks BitLocker support.
Remote Desktop Protocol
Remote Desktop Protocol (RDP) is the primary tool for remote connectivity between individual Windows systems. A great example is Windows Server systems. Most servers running Windows Server either sit in a rack system in a closet (for smaller organizations), sit in a data center (for larger organizations), or exist in the cloud (for everything in between). Because you’re likely not going to be standing in front of a Windows server, you need to have some kind of remote connection tool to communicate with that server.
RDP allows different tools to make that remote connection. Figure 11.7 shows the most popular tool, Remote Desktop Connection. This tool has been around for decades with very little changes, making easy, graphical, remote connections with other Windows systems.

• Figure 11.7 Remote Desktop Connection
According Microsoft’s documentation, Windows Home lacks Remote Desktop Protocol support. Although you’ll find the Remote Desktop Connection program in Windows Home, it doesn’t work! There are weird workarounds to make RDP work on Windows 10 Home…but maybe you should just avoid the Home edition if you want to do remote connections.

Windows 10 Pro for Workstations/Windows 10 Enterprise
The last two Windows 10 editions you need to know for the CompTIA A+ 1102 exam are Windows 10 Pro for Workstations and Windows 10 Enterprise. These two editions are so similar that it makes sense to talk about them in one shot. First, both editions support domain membership, group policies, BitLocker, and Remote Desktop Protocol. Second, both editions support up to 6 TB of RAM, far more than most motherboards can support. These are powerful, high-end operating systems designed to support the most powerful workstation systems available.
The only significant difference between Windows 10 Pro for Workstations and Windows 10 Enterprise is a special feature unique to Windows 10 Enterprise called long-term servicing branch (LTSB). LTSB has three major features: it turns off automatic updates, as it assumes your hosts are being administered in house; it removes the Microsoft Store; it skips installing the Edge web browser. If you want real control over your system, get Windows Enterprise.
Well, there’s one small problem with Windows 10 Enterprise—it’s not available to the retail market. You must purchase Enterprise through a Microsoft sales representative.
What Version of Windows Do I Have?
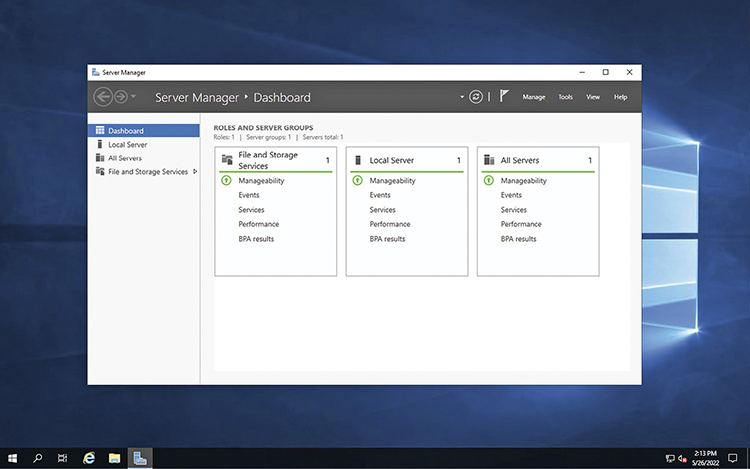
There are many ways to identify your Windows version and edition, but one of the easiest is to run the System Information Utility (msinfo32.exe) (see Figure 11.8).
• Figure 11.8 Version and edition details in System Information
Use the following table as a quick reference of the pertinent Windows 10 editions:

■ Installing and Upgrading Windows
You’re not really a true PC tech until you’ve installed your first version of Windows, so let’s get to installing! This section looks at media selection, types of installation, then the installation and upgrade process. It completes with a discussion on troubleshooting installations.
Media Sources
At its most basic, a Windows installation has two steps. First, boot the system from the OS installation media. Second, answer the installation wizard’s initial queries and let it do its thing. At the end of the 20- to 40-minute process, you’ll be looking at a Welcome screen (see Figure 11.9) and be ready to begin your love affair with the PC.

• Figure 11.9 Windows 10 Welcome screen
Windows offers a surprising number of boot methods, giving you many options to get the process started. The most common way to start—historically at least—is to insert a Windows installation DVD, change the boot order in the system setup utility, and power up the system.
Today we usually boot to a drive inserted into a USB port. That includes flash drives or external drives. Any number of external/hot-swappable drives will do the job. Microsoft will even sell you a Windows 10 installation thumb drive (see Figure 11.10).

• Figure 11.10 Windows flash installation media
Don’t feel like plugging something into the computer? No problem. You can access Windows installation files over a network. See “Installing Windows over a Network,” a little later in this chapter, for details.
Finally, many system builders add a small, hidden partition to the primary hard drive containing an image of the factory-fresh version of Windows. In the event of a corrupted or very messy instance of Windows, you can reboot, access this recovery partition, and reinstall Windows. Chapter 16 covers recovery partitions and other forms of restoration in some detail.
Types of Installation
You can install Windows in several ways. A clean install of an OS involves installing it onto an empty hard drive or completely replacing an existing installation. An upgrade installation means installing an OS on top of an earlier installed version, thus inheriting all previous hardware and software settings. You can combine versions of Windows by creating a multiboot installation. Let’s look at all the options.
Clean Install
A clean install means your installation ignores a previous installation of Windows, wiping out the old version as the new version of Windows installs. A clean install is also performed on a new system with a completely blank mass storage drive. The advantage of doing a clean install is that you don’t carry problems from the old OS over to the new one. The disadvantage is that you need to back up and then restore all your data, reinstall all your applications, and reconfigure the desktop and each application to the user’s preferences. You typically perform a clean install by setting CMOS to boot from the optical drive or USB before the hard drive or SSD. You then boot off a Windows installation disc/drive, and Windows gives you the opportunity to partition and format the hard drive or SSD during the installation process.
Upgrade Installation
For decades, if you wanted to take advantage of a new version of some operating system, you had to grab (usually purchase) the new version and go through a process called an upgrade installation. You might find yourself in a situation where you need to upgrade an older version of Windows to Windows 10 or 11, so let’s talk about an upgrade installation.
In an upgrade installation, the new OS installs into the same folders as the old OS, or in tech speak, the new installs on top of the old. The new OS replaces the old OS, but retains data and applications and also inherits all of the personal settings (such as font styles, desktop themes, and so on). The best part is that you don’t have to reinstall your favorite programs. Figure 11.11 shows the start of the Windows 10 installation, asking if you want an upgrade installation.

• Figure 11.11 Windows installation
Before you begin an upgrade of Windows, always back up all user data files! You can use the backup tools in Windows or a third-party tool, but don’t skip this step. You should also make sure that applications and drivers have support or are backward compatible. Naturally, you should double-check to ensure that your hardware is compatible with the Windows version you’re installing.
To begin the upgrade of Windows, you should run the appropriate program from the optical disc or USB drive. This usually means inserting a Windows installation disc/disk into your system while your old OS is running, which autostarts the installation program. The installation program will ask you whether you want to perform an upgrade or a new installation; if you select new installation, the program will remove the existing OS before installing the new one.
Other Installation Methods
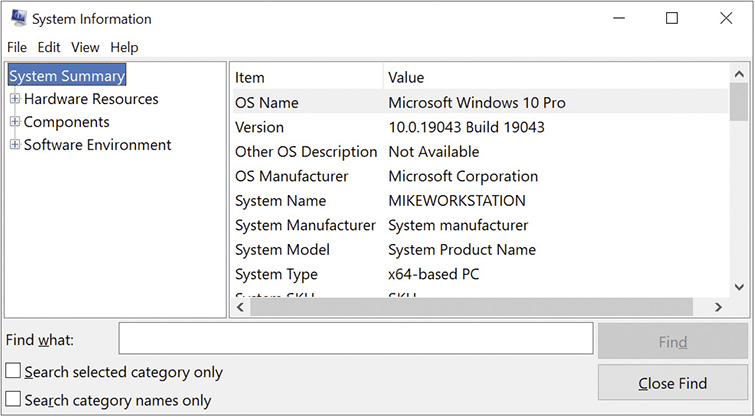
In medium to large organizations, more advanced installation methods are often employed, especially when many computers need to be configured identically. A common method is to place the source files in a shared directory on a network server. Then, whenever a tech needs to install a new OS, he or she can boot up the computer, connect to the source location on the network, and start the installation from there. This is called generically a remote network installation (see Figure 11.12). We’ll go deeper into this type of installation later in the chapter. This method alone has many variations and can be automated with special scripts that automatically select the options and components needed. The scripts can even install extra applications at the end of the OS installation, all without user intervention once the installation has been started. This type of installation is called an unattended installation.
• Figure 11.12 Remote network installation
Another type of installation that is very popular for re-creating standard configurations is an image deployment (see Figure 11.13). An image is a complete copy of a hard drive volume on which an operating system and any desired application software programs have been preinstalled. Images can be stored on servers, optical discs, or flash-media drives, in which case the tech runs special software on the computer that copies the image onto the local hard drive or SSD. Images can also be stored on special network servers, in which case the tech connects to the image server by using special software that copies the image from the server to the local HDD or SSD. A leader in this technology for many years was Norton Ghost, which was available from Symantec. That Symantec is no more, but the enterprise-focused Symantec Ghost Solution Suite continues on as a product offered by Broadcom. Other similar programs are Clonezilla and Acronis True Image.
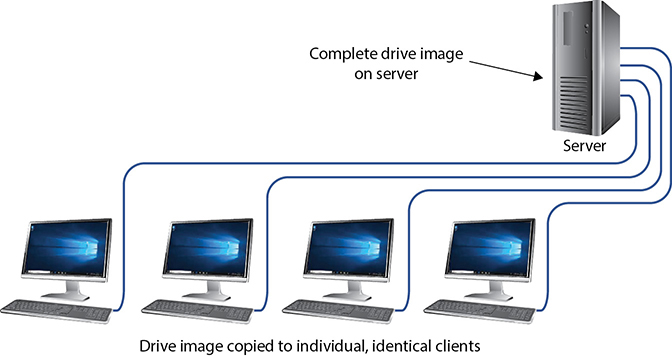
• Figure 11.13 Image deployment over a network
The OS Installation Process
At the most basic level, installing any operating system follows a standard set of steps. You turn on the computer, insert an operating system disc/disk into the optical drive or USB port, or access the media some other way, and follow the installation wizard until you have everything completed. Along the way, you’ll accept the end-user license agreement (EULA)—the terms and conditions for using the OS—and enter the product key that says you’re not a pirate. The product key is invariably located on the installation disc’s case or USB packaging. Ah, but there is a devil in the details!
First, you need to decide on a clean install, an upgrade install, or a multiboot install. Review the steps covered earlier in this chapter to make your decision. The following is an example of a clean install of Windows.
Second, Windows isn’t the only operating system out there. Even though the following example uses Windows, keep in mind that both macOS and all Linux desktop distributions share similar installation steps.
Windows 10 Clean Install Process
Start by booting your computer from some sort of Windows 10 installation media, which you can create with the free Media Creation Tool from Microsoft. This tool lets you select the language, edition, and architecture for the Windows install you are performing (see Figure 11.14). With those details out of the way, you can then create either an ISO file or write directly to a USB flash drive.
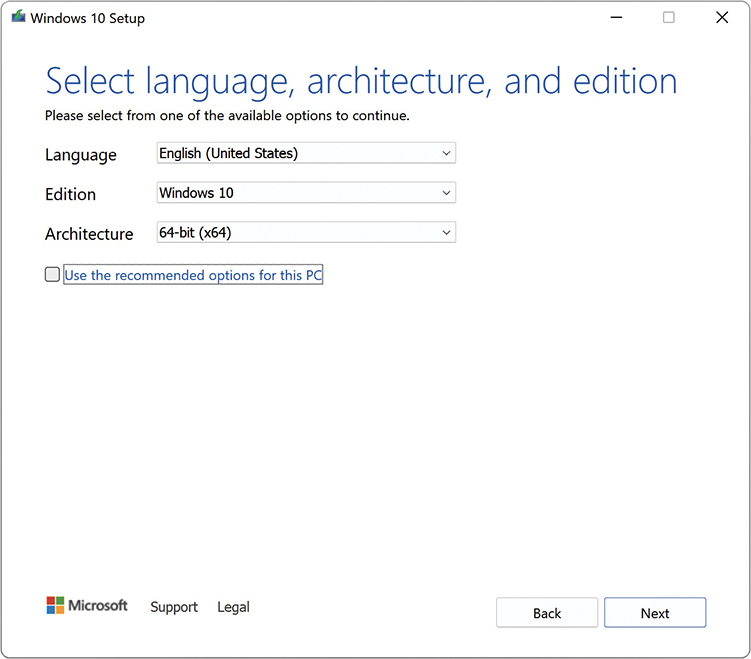
• Figure 11.14 Windows Media Creation Tool
Once you’re booted into the installer, Windows will ask for language, time and currency, and keyboard settings, as shown in Figure 11.15. These are sometimes called regional settings. Click Next to proceed.
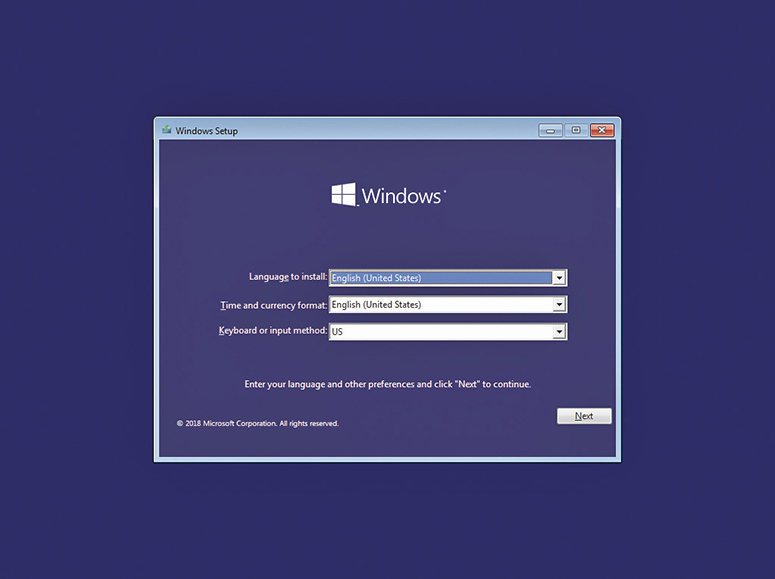
• Figure 11.15 Windows regional settings
The next screen starts the installation process, but note the lower-left corner. This screen also enables techs to start the installation disc’s repair tools (see Figure 11.16). You’ll learn more about those tools in Chapter 16, but for now all you need to know is that you click where it says Repair your computer to use the repair tools. Because you’re just installing Windows in this chapter, click Install now.
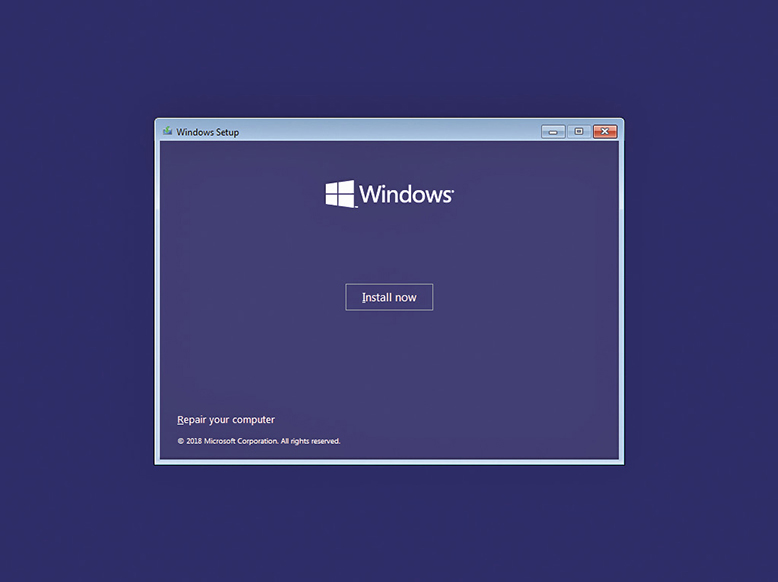
• Figure 11.16 The Windows Setup welcome screen
The next screen prompts you to enter your product key before you do anything else, as you can see in Figure 11.17. The product key comes with the installation media. You should never lose it.

• Figure 11.17 The Windows product key screen
Every Windows installation disc/disk contains all of the available editions within a version. The product key not only verifies the legitimacy of your purchase; it also tells the installer which edition you purchased.
If you click the I don’t have a product key link, you will be taken to a screen asking you which version of Windows you would like to install (see Figure 11.18).

• Figure 11.18 Choosing the edition of Windows you want to install
Lest you start to think that you’ve discovered a way to install Windows without paying for it, you should know that doing this simply installs a 30-day trial of the operating system. After 30 days, you will no longer be able to boot to the desktop without entering a valid product key that matches the edition of Windows you installed.
After you enter the product key and click Next, you’ll encounter Microsoft’s EULA, shown in Figure 11.19. You must accept the license terms and click Next to proceed.
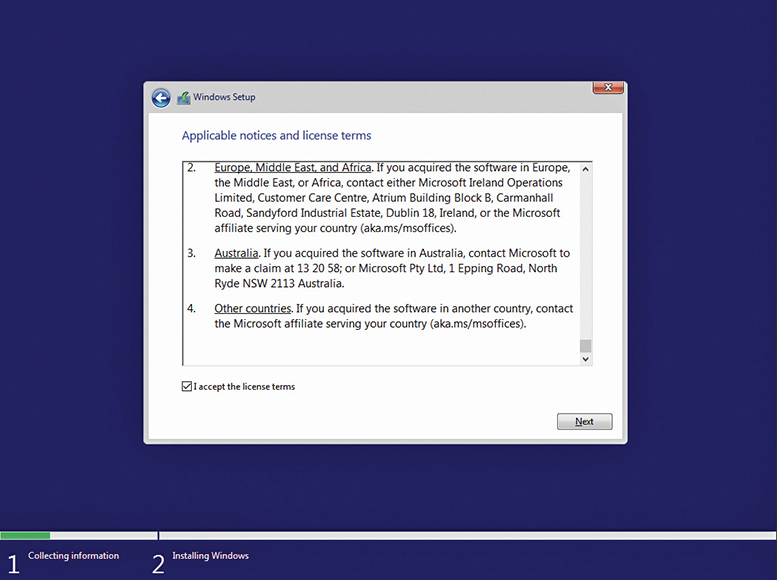
• Figure 11.19 The Windows EULA
On the next page, you get to decide whether you’d like to do an upgrade installation or a clean install. Windows calls the clean install a Custom installation, as you can see in Figure 11.20. This option enables customization of various items, such as partitions.

• Figure 11.20 Choose your installation type.
Figure 11.21 shows how you can partition hard drives and choose a destination partition for Windows. From this screen, you can click the New link to display a variety of partitioning options.

• Figure 11.21 The partitioning screen

• Figure 11.22 Choosing personal or organization
Once you’ve partitioned drives and selected a partition into which to install Windows, the installation process takes over, copying files, expanding files, installing features, and just generally doing lots of computerish things. This can take a while, so if you need to get a snack or read War and Peace, do it during this part of the installation.
When Windows has finished unpacking and installing itself, it lights up the oh-so-irritating Cortana to help you finish up the installation. Figure 11.22 shows where you configure a system to work in a workgroup (personal use) or in an organization. Note that the latter option does not join the computer to a classic Windows Active Directory domain, but it is useful if the company uses subscription services like Microsoft 365.
This following screen (see Figure 11.23) asks you to set up a username and password for your main user account. All operating systems require the creation of this account. Cortana asks you to choose a username and tries to get you to open a Microsoft account if you don’t already have one. I skip the Microsoft account and simply create a regular local account on the computer. My editors use Microsoft accounts. Choose the option that works best for you.

• Figure 11.23 Choosing a username
Microsoft also adds another installation feature at this point, privacy settings (see Figure 11.24). Turning everything off on this screen still doesn’t prevent Microsoft from taking some amount of information.

• Figure 11.24 Choosing privacy settings for your device
Once you’re past the privacy settings screen, Windows gets to work on the installation (see Figure 11.25) and warns you that it may take some time and that you should not turn off your PC. Awfully polite for a piece of software, don’t you think?

• Figure 11.25 Okay, Windows, thanks for the warning!
 Tech Tip
Mandatory Activation
Activation is mandatory, but you can skip this step during installation. You have 30 days in which to activate the product, during which time it works normally. If you don’t activate it within that time frame, the OS will be labeled as not genuine and you won’t receive updates. Don’t worry about forgetting, though, because once it’s installed, Windows frequently reminds you to activate it with a balloon message over the tray area of the taskbar. The messages even tell you how many days you have left.
Installing Windows over a Network
Techs working for big corporations can end up installing Windows a lot. When you have a hundred PCs to take care of and Microsoft launches a new update of Windows, you don’t want to have to walk from cubicle to cubicle with an installation disc, running one install after the other. You already know about automated installations, but network installations take this one step further.
Imagine another scenario. You’re still a tech for a large company, but your boss has decided that every new PC will use an image with a predetermined set of applications and configurations. You need to put the image on every workstation, but most of them don’t have optical drives. Network installation saves the day again!
The phrase “network installation” can involve many different tools depending on which version of Windows you use. Most importantly, the machines that receive the installations (the clients) need to be connected to a server. That server might be another copy of regular Windows, or it might be a full-fledged server running Windows Server. The serving PC needs to host an image, which can either be the default installation of Windows or a custom image, often created by the network administrator.
All of the server-side issues should be handled by a network administrator—setting up a server to deploy Windows installations and images goes beyond what the CompTIA A+ exams cover.
On the client side, you’ll need to use the Preboot Execution Environment (PXE). PXE uses multiple protocols such as IP, DHCP, and DNS to enable your computer to boot from a network location. That means the PC needs no installation disc or USB drive. Just plug your computer into the network and go! Okay, it’s a little more complicated than that.
To enable PXE, you’ll need to enter system setup; in CompTIA speak, you need to configure the BIOS (on-board NIC) for PXE boot. Find the screen that configures your NIC (see Figure 11.26). If there is a PXE setting there, enable it. You’ll also need to change the boot order so that the PC boots from a network location first.
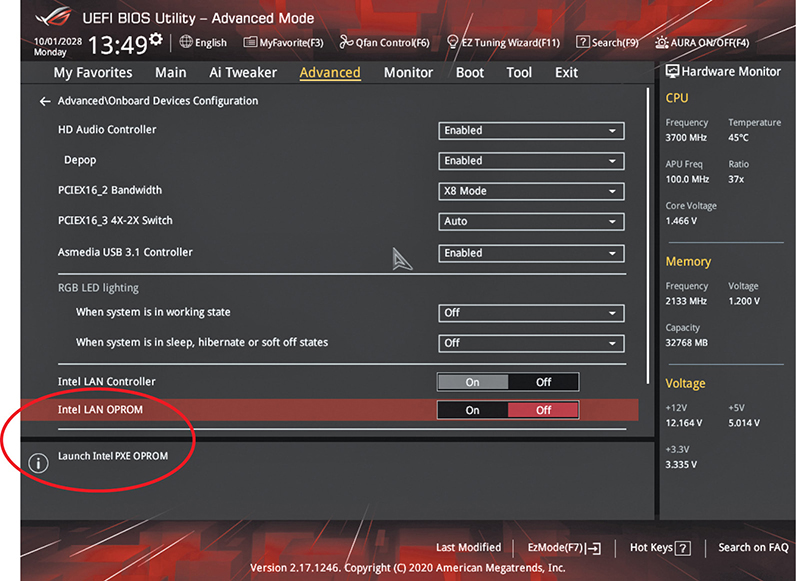
• Figure 11.26 Setting up PXE in system setup
When you reboot the PC, you’ll see the familiar first screens of the boot process. At some point, you should also see an instruction to “Press F12 for network boot.” (It’s almost always F12.) The PC will attempt to find a server on the network to which it can connect. When it does, you’ll be asked to press F12 again to continue booting from the network, as you can see in Figure 11.27.
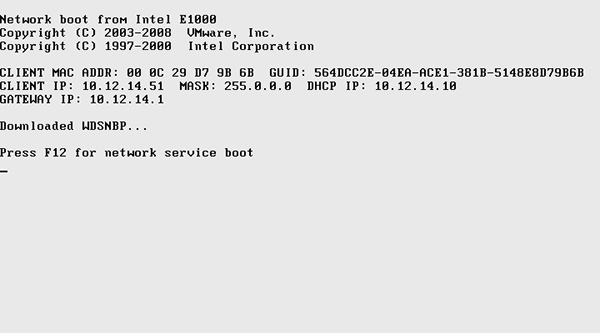
• Figure 11.27 Network boot
Depending on how many images are prepared on the server, you’ll either be taken directly to the Windows installation screen or be asked to pick from multiple images. Pick the option you need, and everything else should proceed as if you were installing Windows from the local optical drive.
Troubleshooting Installation Problems
The term “installation problem” is rather deceptive. The installation process itself almost never fails. Usually, something else fails during the process that is generally interpreted as an “install failure.” Let’s look at some typical installation problems and how to correct them.
Media Errors
If you’re going to have a problem with a Windows installation, have a media error, like a scratched DVD or a corrupted USB drive. It’s always better to have the error right off the bat as opposed to when the installation is nearly complete.
No Boot Device Present When Booting Off the Windows Installation Disc
Either the installation media is bad or the system setup is not set to look at that installation media first. Access the system setup utility as discussed in Chapter 5.
Graphical Mode Errors
Once the graphical part of the installation begins, errors can come from a number of sources, such as hardware or driver problems. Failure to detect hardware properly by any version of Windows Setup can be avoided by simply researching compatibility beforehand. Or, if you decided to skip that step, you might be lucky and only have a hardware detection error involving a noncritical hardware device. You can troubleshoot this problem at your leisure. In a sense, you are handing in your homework late, checking out compatibility, and finding a proper driver after Windows is installed.
Lockups During Installation
Lockups are one of the most challenging problems that can take place during installation, because they don’t give you a clue as to what’s causing the problem. If your system locks up during installation, you should unplug it and attempt to restart the process. Here are a few things to check if you get a lockup during installation.
Disc, Drive, or Image Errors Bad media can mess up an installation during the installation process (as well as at the beginning, as you read earlier). Bad optical discs, optical drives, or hard drives may cause lockups. Similarly, faults on a USB-based drive can stop an installation in its tracks. Finally, problems with a downloaded ISO image—also part of the media—can cause lockups. Check each media component. Check the optical disc for scratches or dirt, and clean it up or replace it. Try a known-good disc in the drive. If you get the same error, you may need to replace the drive or perhaps the ISO.
Log Files Windows versions before Windows 10 generate a number of special text files called log files that track the progress of certain processes. Windows creates different log files for different purposes. The Windows installation process creates about 20 setup log files, organized by installation phase. Each phase creates a setuperr.log file to track any errors during that phase of the installation. Windows 10 creates a setup.etl file (among others) in the %WINDIR%/Panther folder that you can open with Event Viewer.
 Try This!
Locating Windows Setup Log Files
1. If you are using a pre–Windows 10 version, go to the following Microsoft Web site: https://technet.microsoft.com/en-us/library/Hh824819.aspx. For Windows 10 and 11, check out https://docs.microsoft.com/en-us/windows-hardware/manufacture/desktop/windows-setup-log-files-and-event-logs.
2. Identify the specific log file locations and descriptions.
3. Using Windows Explorer or File Explorer on your PC, navigate to the specific log file locations and see if you can find your setup log files.
Who knows, you may be on your way to becoming a Microsoft log file reader!
Windows stores these log files in the Windows directory (the location in which the OS is installed). These operating systems have powerful recovery options, so the chances of ever actually having to read a log file, understand it, and then get something fixed because of that understanding are pretty small. What makes log files handy is when you call Microsoft or a hardware manufacturer. They love to read these files, and they actually have people who understand them. Don’t worry about trying to understand log files for the CompTIA A+ exams; just make sure you know the names of the log files and their location. Leave the details to the übergeeks.
■ Post-Installation Tasks
You might think that’s enough installation work for one day, but your task list has a few more things. They include updating the OS with patches, upgrading drivers, restoring user data files, and migrating and retiring systems.
Windows Updates
Someone once described an airliner as consisting of millions of parts flying in close formation. I think that’s also a good description for an operating system. And we can even carry that analogy further by thinking about all of the maintenance required to keep an airliner safely flying. Like an airliner, the parts (programming code) of your OS were created by different people, and some parts may even have been contracted out. Although each component is tested as much as possible, and the assembled OS is also tested, it’s not possible to test for every possible combination of events. Sometimes a piece is simply found to be defective. Generically, the fix for such a problem is a corrective program called a patch.
In the past, Microsoft provided patches for individual problems. They also accumulated patches up to some sort of critical mass and then bundled them together as a service pack, but Windows 7 was the last version to get one. Today, Windows simply sends individual updates to your system via the Internet.
Immediately after installing Windows, Windows will install the latest updates on the computer. The easiest way to accomplish this task it to turn on Windows Update. Chapter 14 covers this process more thoroughly.
Upgrading Drivers
During installation, you may decide to go with the default drivers that come with Windows and then upgrade them to the latest drivers after the fact. This is a good strategy because installation is a complicated task that you can simplify by installing old but adequate drivers. Maybe those newest drivers are just a week old—waiting until after the Windows installation to install new drivers gives you a usable driver to go back to if the new driver turns out to be a lemon.
 Cross Check
Driver Rollback
You learned about driver rollback way back in Chapter 6, so check your memory now. How do you roll back a driver? When should you roll back a driver?
Restoring User Data Files (If Applicable)
Remember when you backed up the user data files before your upgrade installation? You don’t? Well, check again, because now is the time to restore that data. Your method of restoring depends on how you backed up the files in the first place. If you used a third-party backup program, you need to install it before you can restore those files, but if you used Backup and Restore, you are in luck, because they are installed by default. If you did something simpler, such as copying to optical discs, USB or other external drive, or a network location, all you have to do is copy the files back to the local hard drive. Good luck!
Installing Essential Software
The final step in the post-installation process is to install the software that makes the computer work the way you or your client wants. If you install software that requires a license key, have it ready. Similarly, if you install subscription software such as Microsoft Office 365, make sure you have accurate usernames and passwords available. Don’t forget to install Steam and download essential leisure applications!
Migrating and Retiring Systems
Seasons change and so does the state of the art in computing. At a certain point in a computer’s life, you’ll need to retire an old system. This means you must move the data and users to a new system or at least a new hard drive—a process called migration—and then safely dispose of the old system. Microsoft offers a few tools to accomplish this task, and because it’s important to know about them for the CompTIA A+ exams (not to mention for your next new computer purchase), I’m going to go over them.
Third-Party Migration Tools
Windows has always been pretty good about providing tools to make migration of single systems fairly straightforward.
User State Migration Tool
If you’re the sort of computer user who demands maximum functionality and power from your operating system, you’ll probably want to use the User State Migration Tool (USMT). The USMT’s primary use is in businesses because it has to be run in a Windows Server Active Directory domain. If you need to migrate many users, the USMT is the tool.
Migration Practices
When talking about migration or retirement in terms of security, you need to answer one question: What do you do with the old system or drive?
All but the most vanilla new installations have sensitive data on them, even if it’s simply e-mail messages or notes-to-self that would cause embarrassment if discovered. Most PCs, especially in a work environment, contain a lot of sensitive data. You can’t just format C: and hand over the drive.
Follow three principles when migrating or retiring a computer. First, migrate your users and data information in a secure environment. Until you get passwords properly in place and test the security of the new system, you can’t consider that system secure. Second, remove data remnants from hard drives that you store or give to charity. Third, recycle the older equipment; don’t throw it in the trash. PC recyclers go through a process of deconstructing hardware, breaking system units, keyboards, printers, and even monitors into their basic plastics, metals, and glass for reuse.
The easiest way for someone to compromise or access sensitive data is to simply walk up and take it when you’re not looking. This is especially true when you are in the process of copying information to a new, unprotected system. Don’t set a copy to run while you go out to lunch, but rather be there to supervise and remove any remnant data that might still reside on any mass storage devices, especially hard drives.
Data Destruction
You might think that, as easy as it seems to be to lose data, you could readily get rid of data if you tried. That’s definitely not the case with magnetic media such as hard drives. When you delete something in Windows, or even empty the Recycle Bin, the “deleted” data remains on your storage device until new data overwrites it, or replaces it. (This “deleted” data is also what you see as free space in Windows.) This can be a big security hole when you dispose of a drive.
Cleaning a drive completely is very difficult. You can either physically destroy the hard drive or sanitize it using a software utility. Physical destruction isn’t complicated—you bust up the drive into tiny little bits or melt it. Methods to accomplish physical destruction include drilling, shredding, and degaussing (reducing or removing the magnetic fields that store data on HDDs). Incineration pretty much clears all data. Keep in mind that, as hard drives advance and pack more data into smaller spaces, you’ll need to break the hard drive into smaller pieces to prevent anyone from recovering your data.
Sanitizing your drive means the hard drive will still function once the data has been destroyed. There are several more or less effective ways to do this. The CompTIA A+ exam wants you to know the difference between a standard format and a low-level format. You already learned about standard formatting back in Chapter 9, so how is low-level formatting different? With older drives (pre-1990s), low-level formatting would create the physical marks on the disk surface so that the drive knew where to store data; in the process, it erased the data from the drive. This was initially done at the factory, but utilities existed to repeat this operation later. As drives became more complex, hard drive manufacturers disabled the ability to perform low-level formats outside the factory.
Today, the term “low-level formatting” is often used to describe a zero-fill or overwrite operation. This process returns the drive to a state as close to like-new as possible by writing zeros to every location on the drive.
There are a number of erasing/wiping utilities to erase any old, deleted data that hasn’t been overwritten yet. Simply put, this overwrites the free space on your drive with junk data that makes the original data harder to recover. There are literally hundreds of drive wiping tools you can use in Windows. Figure 11.28 shows a popular utility called CBL Data Shredder.

• Figure 11.28 CBL Data Shredder in action
Recycle
An important and relatively easy way to be an environmentally conscious computer user is to follow recycling or repurposing best practices. Recycling products such as paper and printer cartridges not only keeps them out of overcrowded landfills but also ensures that the more toxic products are disposed of in the right way. Safely disposing of hardware containing hazardous materials, such as computer monitors, protects both people and the environment.
Anyone who’s ever tried to sell a computer more than three or four years old learns a hard lesson: they’re not worth much, if anything at all. It’s a real temptation to take that old computer and just toss it in the garbage, but never do that!
First of all, many parts of your computer—such as various circuit boards—contain hazardous materials that pollute the environment. Luckily, thousands of companies now specialize in computer recycling and will gladly accept your old computer. If you have enough computers, they might even pick them up. If you can’t find a recycler, call your local municipality’s waste authority to see where to drop off your system.
An even better alternative for your old computer is donation. Many organizations actively look for old computers to refurbish and to donate to schools and other organizations. Just keep in mind that the computer can be too old—not even a school wants a computer more than five or six years old.
No Installation Is Perfect
Even when the installation seems smooth, issues may slowly surface, especially in the case of upgrades. Be prepared to reinstall applications or deal with new functions that were absent in the previous OS. If things really fall apart, you can go back to the previous OS. Or, if you have an OEM computer (one built by, for example, Dell or HP instead of by you), your computer likely came with a special recovery partition on its hard drive, a recovery disc, or a recovery USB flash drive; you can use any of these to restore your operating system to its factory settings. You usually invoke a system recovery by pressing a certain key during boot-up—usually F10 or F11—and then following a set of prompts.
The procedures I’ve laid out in this chapter may seem like a lot of work—how bad could it be to grab installation media, fling a copy of Windows onto a system, and, as the saying goes, let the chips fall where they may? Plenty bad, is how bad. Not only is understanding these procedures important for the CompTIA A+ certification exams, but these procedures can also save your, ah, hide once you’re a working PC tech and tasked to install the latest version of Windows 10 on the boss’s new computer!
Chapter 11 Review
■ Chapter Summary
After reading this chapter and completing the exercises, you should understand the following about building a custom PC and installing and upgrading Windows.
Recognize current Windows editions
The CompTIA A+ 220-1102 exam concentrates on four versions of Windows 10/11:
■ Windows 10 Home
■ Windows 10 Pro
■ Windows 10 Pro for Workstations
■ Windows 10 Enterprise
Use the following table to review the different features of each edition of Windows.

Install and upgrade Windows
■ A Windows installation has two steps. First, boot the system from the OS installation media. Second, answer the installation wizard’s initial queries and let it do its thing. You can boot to the installation DVD, bootable USB thumb drive, or ISO file, or access the media over a network. Since you’re working with Windows 10 or 11, you’ll most likely to be downloading the ISO image and writing it to a USB drive.
■ A clean install of an OS involves installing it onto an empty mass storage drive or completely replacing an existing installation. An upgrade installation means installing an OS on top of an earlier installed version, thus inheriting all previous hardware and software settings. You can combine versions of Windows by creating a multiboot installation.
■ During the clean install process you have the opportunity to partition and format the primary hard drive. You also choose a username and password and activate the OS.
■ A remote network installation of Windows can be automated using scripts, what’s called an unattended installation. Installing Windows over a network requires you to boot to the Preboot Execution Environment (PXE), which you might need to enable in system setup.
■ An image deployment installs the OS from a previously generated copy of the OS. This can happen with local media, such as a flash drive, or remotely with the image stored on a server.
■ Although the installation process itself rarely fails, you may encounter an installation failure caused by something else. You could have a damaged installation disc or a corrupted USB drive, for example, or a RAID array driver missing.
■ A bad disc, optical drive, or hard drive can cause an installation lockup. You can check the setup log files—notably the setuperr.log files (earlier versions of Windows) or setup.etl file (Windows 10 and later)—to review specific installation steps and track errors.
Describe Windows post-installation best practices
■ The first essential tasks post installation include updating Windows by allowing Windows Update to install the latest updates from Microsoft automatically and updating drivers for hardware to the latest and hopefully most stable versions. Install all essential applications for the user.
■ When migrating data to a new computer, it’s important to follow three principles: migrate in a secure environment, remove data remnants when disposing of hard drives, and recycle old equipment.
■ Completely removing data from a hard drive is difficult. You can either physically destroy the drive or use utilities that wipe or overwrite any data on the drive.
■ When getting rid of old computer parts, it’s important to recycle or donate them. This is helpful not only to the environment but also to the community.
■ Key Terms
BitLocker
boot method
clean install
domain
End User License Agreement (EULA)
group policy
image deployment
local username
log files
Long-Term Servicing Branch (LTSB)
migration
multiboot installation
patch
Preboot Execution Environment (PXE)
recovery partition
Remote Desktop Protocol (RDP)
remote network installation
unattended installation
update
upgrade installation
User State Migration Tool (USMT)
Windows 10 Enterprise
Windows 10 Home
Windows 10 Pro
Windows 10 Pro for Workstations
■ Key Term Quiz
Use the Key Terms list to complete the sentences that follow. Not all terms will be used.
1. _______________ is a Microsoft solution that provides whole disk encryption. It is supported on all Windows 10 editions except for Windows Home.
2. A(n) _______________ is a remote network installation of Windows that can be automated using scripts.
3. A(n) _______________ installs the OS from a previously generated copy of the OS. This can happen with local media, such as a flash drive, or remotely with the image stored on a server.
4. Installing Windows over a network requires you to boot to the _______________, which you might need to enable in system setup.
5. A(n) _______________ of an OS involves installing it onto an empty hard drive or completely replacing an existing installation.
6. A(n) _______________ is a fix for a single problem with Windows.
7. If you wish to have only one OS and keep the applications and configuration of the current system, you should choose to do a(n) _______________ of the new OS.
8. During the Windows installation, you will need to agree to a legal document called the _______________.
9. Windows tracks the installation progress with a set of text files called _______________.
10. Windows 10 uses the __________________ for migrating user files and settings.
■ Multiple-Choice Quiz
1. Cindy’s client wants a new graphics workstation. The client’s small business has ten current workstations connected in a Windows domain and she wants the new graphics workstation to be part of that domain. What edition of Windows 10 should Cindy install on the new computer to accomplish this goal and provide the best value?
A. Windows 10 Starter Edition
B. Windows 10 Home
C. Windows 10 Pro
D. Windows 10 Enterprise
2. What tool enables installing Windows 10 over a network?
A. Windows DVD
B. NetBoot
C. PXE
D. Windows can’t be installed over a network.
3. When you install an operating system alongside an existing operating system, what do you create?
A. A clean install
B. An upgrade installation
C. A multiboot installation
D. A network installation
4. If you do not complete the activation process for Windows, what will happen to your computer?
A. Nothing. Activation is optional.
B. The computer will work fine for 30 days and then Windows will warn you that it’s not genuine.
C. Microsoft will not know how to contact you to provide upgrade information.
D. It will work if you check the “I promise to pay for Windows later” box.
5. If Windows locks up during the installation, how can you determine at what point it locked up?
A. Reboot and start the installation process. Pay attention to the text in the lower third of the screen and write down the error message revealed.
B. Push the Reset button to restart the installation process. Pay attention to the text in the lower third of the screen and write down the error message revealed.
C. Reboot and start the installation process. After it starts, press the ESC key to cancel the installation process and show the previous installation notes.
D. Review the setup.etl files to track any errors discovered.
6. When getting rid of old computer parts, it’s important to ____________ or donate them. This is helpful not only to the environment but also to the community.
A. Destroy
B. Recycle
C. Sell
D. Update
7. Your boss has decided to retire several systems and tasks you to make absolutely sure the data on the drives is obliterated. In such a scenario, how could you best demonstrate that you have fulfilled the task?
A. Run a software utility to wipe the drives. Show the boss the empty drives.
B. Partition and format the drives. Show the boss the empty drives.
C. Take the drives to a professional hard drive disposal service and request incineration.
D. Take the drives to a professional hard drive disposal service and insist on a certificate of destruction when they finish the job.
8. Which of the following can lead to lockups or disc, drive, or image errors during the OS installation process?
A. A failing hard drive
B. A bad optical drive
C. A bad ISO image
D. All of the above
9. If you need to migrate many users, you should use which tool?
A. Windows easy transfer
B. PXE
C. User State Migration Tool
D. BitLocker
10. You’ve been asked to retire an old operating system. This means you must move the data and users to a new system or at least a new hard drive. What is this process called?
A. Migration
B. PXE
C. OS Push
D. NetBoot
■ Essay Quiz
You’ve been tasked to teach some new hires how to do a rollout of the latest version of Windows. Write a short essay that outlines what the newbies need to know to upgrade ten machines. You can assume that the network roles, language, and locale settings will stay the same. Make an argument for a clean upgrade.
Lab Project
• Lab Project 11.1
On a non-essential PC, try upgrading from Windows 7 to Windows 10 (if you have the media). This isn’t usually recommended, but see what sort of oddities you pick up along the way. Create a user account in Windows 7. Does it survive in Windows 10 or Windows 11? Do your documents, photos, and other data remain in the same folders in each OS, or do they move? Experiment with different features in each version and see how things have changed.