chapter 23
Portable Computing
“The great thing about a computer notebook is that no matter how much you stuff into it, it doesn’t get bigger or heavier.”
—BILL GATES, BUSINESS @ THE SPEED OF THOUGHT

In this chapter, you will learn how to
■ Describe the many types of portable computing devices available
■ Explain ways to expand portable computers
■ Manage and maintain portable computers
■ Upgrade and repair portable computers
■ Troubleshoot portable computers
There are times when the walls close in, when you need a change of scenery to get that elusive spark that inspires greatness . . . or sometimes you just need to get away from your coworkers for a few hours because they’re driving you nuts! For many occupations, that’s difficult to do. You need access to your documents and spreadsheets; you can’t function without e-mail or the Internet. In short, you need a computer to get your job done.
Portable computing devices combine mobility with accessibility to bring you the best of both worlds; portables enable you to take some or even all of your computing capabilities with you when you go. Featuring all the bells and whistles of a desktop system, many portables offer a seamless transition from desk to café table.
This chapter looks at the classic portable computer, essentially a desktop transformed into a mobile format. Classic portables usually run the same operating systems as their desktop counterparts—Windows, macOS, or Linux. However, there are some operating systems—like Chrome OS, based on Linux—that are unique to portable computers.
Historical/Conceptual
■ Portable Computing Devices
All portable devices share certain features. For output, they use LCD screens, although these vary from 20-inch behemoths to diminutive 10-inch displays. Portable computing devices employ sound of varying quality, from bland mono playback to fairly nice faux-surround reproductions. All of them run on DC electricity stored in batteries when not plugged into an AC outlet.
When asked about portable computing devices, most folks describe the traditional clamshell notebook computer, such as the one shown in Figure 23.1, with built-in LCD monitor, keyboard, and input device (a trackpad, in this case). The notebook is also called a portable or a laptop. All the terms are synonymous. A typical laptop functions as a fully standalone computer, but there are always trade-offs that come with portability. Common trade-offs are price, weight, size, battery life, computing power, input devices, ports, drives, support for hardware upgrades, storage capacity, durability, and the quality of any warranty/support programs. Finding the right portable is easier if you can figure out what it will be used for and narrow your search to only devices with essential features and exclude those with unacceptable trade-offs.

•Figure 23.1 An older notebook computer
Taxonomy
The companies making mobile and portable devices experiment a lot, so the terms we use to describe these devices are always in flux. New device categories and their related marketing terms may flood the market and blur the lines between existing categories one year, only to fall out of use within a few years.
The CompTIA A+ objectives don’t focus on these terms and categories, but it’s still a good idea to keep up with them. Knowing how to categorize portable and mobile devices makes it easier to identify devices that are a good fit for specific uses. It also helps you apply the best troubleshooting procedures for a given device. These categories can be slippery, so don’t think of them as mutually exclusive. Sometimes more than one of these terms apply to a single device.
Portable vs. Mobile
Over the years, the lines between portable computing devices such as laptops and mobile devices such as smartphones have blurred. Smartphones have become more powerful, laptops have incorporated touchscreens and smaller form factors, and many tablets allow the use of external keyboards and mice. Despite these blurred lines, portable computing devices and mobile devices are separate concepts, with unique use cases and applications. A good rule of thumb is to look at the operating system that the device uses. If it uses the same operating system as its desktop counterparts, it is a portable device. If it uses a dedicated mobile operating system like Android, iOS, or iPadOS, it is a mobile device.
Types of Laptops
There are many terms that address the size or purpose of traditional clamshell laptops/notebooks, but over time, a lot of these distinctions have become less important. As the technology has been developed, use cases for many laptops have started to overlap. Terms like ultrabook, thin and light, and business laptop are mostly for marketing at this point, because apart from the examples I’m about to mention, laptops in general are a lot thinner, lighter, and more powerful than they were when many of these terms were coined (see Figure 23.2).
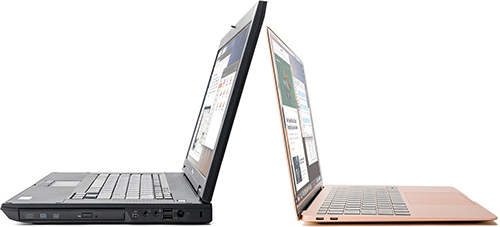
•Figure 23.2 Older full-size laptop (left) versus the thin-slice aesthetic of the MacBook Air (right)
■ Gaming laptops, which tend to have flashy designs, typically come loaded with the latest top-end processors, graphics cards, RAM, SSDs, and large, high-quality displays. They also tend to come with thoughtful touches like RGB lighting.
■ A Chromebook is a portable computer running Google’s Linux-based Chrome OS. Chrome OS is a proprietary Linux-based operating system developed by Google. Thanks to Chrome OS, Chromebooks offer an experience focused on Web applications by making use of virtually unlimited data storage in the cloud and Software as a Service (SaaS) applications available over the Web. Using primarily cloud-based applications and storage allows users to get by with less powerful hardware, and as a result saves on cost. Because they offload so much work, Chromebooks have a reputation for being cheap and light, but premium Chromebooks are increasingly common.
■ 2-in-1s are touchscreen computers somewhere along the spectrum from laptop-and-tablet to tablet-and-laptop. We’ll take a closer look at pure mobile tablets (such as the Apple iPad and various Android tablets) in Chapter 24. Some 2-in-1s have removable screens that separate from the rest of the laptop to function as a tablet (see Figure 23.3). Others have special hinges that enable you to fold the entire device up and use it in tablet form. 2-in-1s are also sometimes referred to as convertibles or hybrids.

•Figure 23.3 Microsoft Surface Pro 6 with its keyboard cover (Used with permission from Microsoft)

1101
Input Devices
Portable computers come with a variety of input devices. Most have a fully functional keyboard and a device to control the mouse pointer.
Keyboard Quirks
Laptop keyboards differ somewhat from those of desktop computers, primarily because manufacturers have to cram all the keys onto a smaller form factor. They use the QWERTY format, but manufacturers make choices with key size and placement of the non-alphabet characters.
Almost every portable keyboard uses a Function (FN) key to enable some keys to perform an extra duty. You’ll either hold the FN key to access the extra function, or you’ll hold it to access the traditional function (the latter is more common with extra functions on the F1–F12 keys). On some systems, you can also configure this behavior. Figure 23.4 compares a laptop keyboard with a standard desktop keyboard. Note that the former has no separate number pad on the right and is a more compact layout.

•Figure 23.4 Keyboard compariso
Pointing Devices
Portables need a way to control your mouse pointer, but their smaller size requires manufacturers to come up with clever solutions. Beyond the built-in solutions, portables usually have USB ports and can use every type of pointing device you’d see on a desktop. Early portables used trackballs, often plugged in like a mouse and clipped to the side of the case. Other models with trackballs placed them in front of the keyboard at the edge of the case nearest the user, or behind the keyboard at the edge nearest the screen.
The next wave to hit the laptop market was IBM’s TrackPoint device, a joystick the size of a pencil eraser, situated in the center of the keyboard (see Figure 23.5). With the TrackPoint, you can move the pointer around without taking your fingers away from the “home” typing position. You use a forefinger to push the joystick around, and then click or right-click, using two buttons below the spacebar. This type of pointing device has since been licensed for use by other manufacturers, and while it continues to appear on some business-focused laptops today, it has primarily been replaced by our next link in the pointing device chain.

•Figure 23.5 IBM TrackPoint
By far the most common laptop pointing device found today is the trackpad (see Figure 23.6)—a flat, touch-sensitive pad just in front of the keyboard. To operate a trackpad, you simply glide your finger across its surface to move the pointer, and tap or press the surface once or twice to single- or double-click. You can also click by using buttons just below the pad on some older devices. Most people get the hang of this technique after just a few minutes of practice. The main advantage of the trackpad over previous laptop pointing devices is that it uses few moving parts—a fact that can really extend the life of a hard-working laptop.
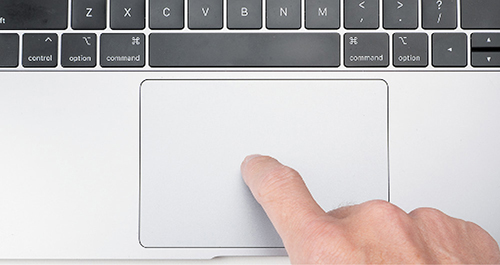
•Figure 23.6 Trackpad on a laptop

Many manufacturers today include a multitouch trackpad that enables you to perform gestures, or actions with multiple fingers, such as scrolling up and down or swiping to another screen or desktop. The Multi-Touch trackpad on Apple’s laptops pioneered such great improvements to the laptop-pointing-device experience that the lack of a mouse is no longer a handicap on many laptops.
Continuing the trend of mobile’s influence on more traditional portables, a number of laptops come equipped with a touchscreen like you would find on a smartphone or tablet, again relying heavily on gestures to enable users to fluidly perform complex actions. In some cases these are otherwise very traditional laptops that happen to include a touchscreen, but in other cases they are devices that are intended to be used as both a tablet and a laptop. Many of these touchscreens are designed to take advantage of dedicated touch pens, also known as a stylus. These pens enable users to be more precise with their touchscreen interactions, hand write notes, draw, and keep the screen free of fingerprints. We’ll take a closer look at touchscreens when we discuss mobile devices in Chapter 24.
Webcams and Microphones
The ability to communicate with others through real-time video is such a common expectation of mobile and portable devices these days that most of these devices (including laptops) come equipped with some sort of front-facing video camera—a webcam in the case of laptops—and one or more built-in microphones. A single microphone may be suitable for picking up the user’s voice, and additional microphones can help noise-cancellation routines improve the audio quality.
Even though most of us may just use the microphone in conjunction with the webcam, a growing number of programs support voice commands. Microsoft, for example, promotes its Cortana functionality built into Windows 10 (and optionally added to Windows 11). Any Windows 10 or 11 user on a system with a microphone, as long as they can live with letting Windows listen in on them, can perform voice searches and other actions from anywhere within earshot (mic-shot?) of their device.
The downside of these input devices becoming ubiquitous is the security risk they pose. It might be bad enough if a nefarious hacker or government agency (from any country) managed to get malware into my computer to see everything I click or type, but the risks are amplified if they can also hear and see anything going on near the device. It’s common enough for webcams to include a light that indicates when they’re recording, but built-in microphones don’t do the same. In some cases, vulnerabilities allow the recording indicator to be disabled anyway.
Display Types
Laptops come in a variety of sizes and at varying costs. One major contributor to the overall cost of a laptop is the size of the LCD screen. Most laptops offer a range between 10.1-inch to 17.3-inch screens (measured diagonally), while a few offer just over 20-inch screens.
In the past, 4:3 aspect ratio screens were common, but these days it’s hard to find one on anything but special-purpose or ruggedized laptops; almost all regular laptops come in one of two widescreen format ratios. Aspect ratio is the comparison of the screen width to the screen height, as you’ll recall from Chapter 17. While widescreens can have varying aspect ratios, almost all of the screens you find in present-day laptops will be 16:9 or 16:10.
Laptop screens typically come with one of two types of finish: matte or high-gloss. The matte finish was the industry standard for many years and offered a good trade-off between color richness and glare reduction. The better screens have a wide viewing angle and decent response time. The major drawback for matte-finished laptop screens is that they wash out a lot in bright light. Using such a laptop at an outdoor café, for example, can be very difficult without a bright enough display.
Manufacturers released high-gloss laptop screens more than a decade ago, and they rapidly took over many store shelves. The high-gloss finish offers sharper contrast, richer colors, and wider viewing angles when compared to the matte screens. The drawback to the high-gloss screens is that, contrary to what the manufacturers claim, they pick up lots of reflection from nearby objects, including the user! So, although they’re usable outside during the day, you’ll need to contend with increased reflection as well. Higher-end laptops include various anti-reflective solutions to mitigate this issue, with varying degrees of success.
With the advent of LED backlighting for LCD panels, many manufacturers have switched back to an anti-glare screen, though they’re not quite the matte screens of old. When the LED brightness is up high, these are lovely screens. (See the “Troubleshooting Portable Computers” section, later in this chapter, for issues specific to LED-backlit portables.)
As with other LCD technologies that you’ll recall from Chapter 17, most LCD/LED screens initially used twisted nematic (TN) technology. Most modern laptop screens use in-plane switching (IPS) panels for the greater viewing angle and better color quality. You’ll mostly find TN panels on older portables.
Organic light-emitting diode (OLED) displays are becoming more common on laptops (originally, due to their cost, they were limited primarily to large desktop monitors and TVs). OLED screens sip energy when compared to LCDs, and while less expensive and more common than they used to be, you’ll mostly find them on smartphones and tablets today. Chapter 24 discusses OLED screen technology.
■ Extending Portable Computers
In the dark ages of mobile computing, you had to shell out top dollar for any device that would operate unplugged, and what you purchased was what you got. Upgrade a laptop? Connect to external devices? You had few, if any, options, so you simply paid for a device that would be way behind the technology curve within a year and functionally obsolete within two.
Portable computers today offer a few ways to enhance their capabilities. Most feature external ports that enable you to add completely new functions, such as attaching a scanner, mobile printer, or both. You can take advantage of the latest wireless technology breakthrough simply by slipping a card into the appropriate slot on the laptop.
I’ll first describe single-function ports, and then turn to networking options. Next, I’ll cover card slots, and then finish with a discussion of general-purpose ports.
Single-Function Ports
All portable computers come with one or more single-function ports. You’d have a hard time finding a portable computing device that doesn’t have an audio jack, for example. Laptops often provide a video port for hooking up an external monitor, though wireless screen sharing and screencasting are gaining popularity as an alternative.
Ports work the same way on portable computers as they do on desktop models. You plug in a device to a particular port and, as long as the operating system has the proper drivers, you will have a functioning device when you boot.
Audio
Most portable computers have a 3.5-mm audio jack that is used for audio-out. This jack is quite often a combined headset jack that also supports microphone-in on the same three-ring plug. Older laptops might have a similarly sized microphone-in jack (see Figure 23.7), though built-in microphones are most common. You can plug in headphones, regular PC speakers, or even a nice surround sound setup to enable the laptop to play music just as well as a desktop computer can.

•Figure 23.7 3.5-mm audio jacks
You can control the sound (both out and in) through the appropriate Settings app area or Control Panel applet in Windows, System Preferences in macOS, or some kind of switches on the laptop. The portable shown in Figure 23.8, for example, enables you to mute the speakers by pressing a special mute button above the keyboard. Other portables use a combination of the FN key and another key to toggle mute on and off, as well as to play, pause, fast-forward, and rewind audio (or any other media options). Most portables have volume up/down controls in the same location.

•Figure 23.8 The mute button on a laptop
As Bluetooth wireless headphones have increased in popularity, some laptop manufacturers have excluded a dedicated 3.5-mm audio jack altogether. This isn’t a common or particularly popular move, but if you encounter a portable device with no dedicated audio jacks, you won’t be surprised because you heard about it here first.
Display
Most laptops support a second monitor via a digital port of some sort. There are many of these—you may find HDMI (including Mini-HDMI and Micro-HDMI) or DisplayPort (including USB Type-C and Thunderbolt); on ancient or special-purpose portables, there’s even a chance you may still find a VGA or DVI port. With a second monitor attached, you can duplicate your screen to the new monitor, or extend your desktop across both displays, letting you move windows between them. Not all portables can do all variations, but they’re more common than not.
Most portables use the FN key plus another key on the keyboard to cycle through display options. To engage the second monitor or to cycle through the modes, hold the FN key and press F8 (see Figure 23.9).

•Figure 23.9 Laptop keyboard showing Function (FN) key that enables you to access additional key options, as on the F8 key
You can control what the external monitor shows by adjusting your operating system’s display settings. In Windows 10/11, this is all contained in the Display area of the Settings app. Open the Settings app and navigate to System | Display; from there scroll down till you find the Multiple displays section (see Figure 23.10). You’ll see a drop-down menu with several options. Extend these displays makes your desktop encompass both the laptop and the external monitor. Duplicate these displays places the same thing on both displays. You’d duplicate these displays for a presentation, for example, rather than for a workspace.

•Figure 23.10 Multiple-display options menu in Windows 1
Near-Field Scanner
It isn’t really a port, but you’ll find some portable computers—especially ones designed for and marketed to business users—with a very thin slot the width of a credit card on one side or the other. No, it isn’t an expansion or memory card slot—it’s a smart card reader. If you’ve seen a credit or debit card with a little metallic chip (see Figure 23.11), you’ve seen a smart card. Smart card readers make use of a near-field scanner. While smart cards have tons of uses, what matters here is that you can log in to a portable device (if it has a built-in or USB smart card reader) using your smart card and a PIN number. We’ll go into a little more detail on the use of smart cards for authentication in Chapter 27.

•Figure 23.11 Smart card
Networking Options
Rarely will you find a portable computer without at least one network connection option. Today’s portables come with some combination of 802.11, Bluetooth, and wired Ethernet connections. Generally they work exactly as you’ve seen in previous chapters, but you may stumble into a few issues that are unique to portables. (Mobile devices—tablets, smartphones—have even more options, as you’ll see in Chapter 24.)
802.11 Wireless
Most portables today have Wi-Fi built directly into the chipset for connecting the device to a wireless access point (WAP) and from there to a bigger network, such as the Internet. The 802.11n standard is common on older laptops; newer portable computers use 802.11ac (Wi-Fi 5) or 802.11ax (Wi-Fi 6).
Bluetooth
802.11 isn’t the only wireless technology commonly found in portable devices. Nearly all modern portables use Bluetooth as well. Bluetooth is really handy on a laptop because, as you may recall from Chapter 20, it enables you to add wireless peripherals such as mice, keyboards, and headsets, as well as communicate with smartphones, speakers, and other Bluetooth devices.
Hardware Switches
Portable computers that come with wireless technologies such as 802.11, mobile broadband, GPS, or Bluetooth have some form of on/off switch to toggle the antenna off or on so that you may use the laptop in areas where emissions aren’t allowed (like a commercial aircraft, hence the term “airplane mode”). The switch may be hardwired on older devices, like the one shown in Figure 23.12, or if you’re using a more modern machine, will be a toggle of the FN key plus another key on the keyboard. Also, if you’re not using Wi-Fi or Bluetooth, turn them off to save some electricity and lengthen the portable’s battery life.

•Figure 23.12 Wireless switch
Wired Ethernet
Some full-size laptops have an RJ45 wired Ethernet connection like the one shown in Figure 23.13. These work exactly like any other Ethernet jack—they have link lights and connect via UTP cable. Be aware, however, that wired Ethernet is one of the things many smaller contemporary laptops leave out.
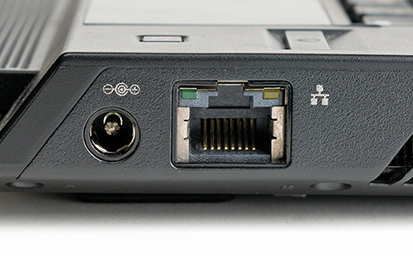
•Figure 23.13 Ethernet port on laptop
There are two issues with RJ45s on laptops. First, they do not have an on/off switch like the 802.11 and Bluetooth connections. You can turn them off just like you would turn off the NIC on a desktop: disable the NIC in Device Manager or turn the NIC off in BIOS. The other issue is the relative weakness of the physical connection. If you ever plug a laptop into a wired network and the OS doesn’t see a connection, check the RJ45 port.
Portable-Specific Expansion Slots
The makers of portable computers have developed methods for you to add features to a portable via specialized connections known generically as expansion slots. For many years, the Personal Computer Memory Card International Association (PCMCIA) established standards involving portable computers, especially when it came to expansion cards and slots. Once a common feature on laptops, these specialized expansion slots are almost impossible to find due to the dominance of USB. The last standard was called ExpressCard.
Storage Card Slots
Many portable computers offer one or more flash memory card slots to enable you to add storage to the portable. Particularly popular with photographers and videographers, these slots also enable the fast transfer of data from the card to the portable, and vice versa. They come in the standard varieties that you already know from Chapter 10, such as SD or microSD.
General-Purpose Ports
Portable computers rarely come with all of the hardware you want. Today’s laptops usually include at least USB-A or USB-C ports to give you the option to add more hardware. A few special-purpose laptops may still provide legacy general-purpose expansion ports (PS/2, RS-232 serial ports, eSATA, FireWire, and so on) for installing peripheral hardware, but these are increasingly less common. Most portables focus on more modern ports like USB-C or Thunderbolt. If you’re lucky, you will have a docking station or port replicator so you don’t have to plug in all of your peripheral devices one at a time.
USB and Thunderbolt
Universal serial bus (USB) and Thunderbolt enable users to connect a device while the computer is running—you won’t have to reboot the system to install a new peripheral. With USB and Thunderbolt, just plug in the device and go! Because portables don’t have a desktop’s multiple internal expansion capabilities, USB and Thunderbolt are some of the more popular methods for attaching peripherals to laptops and other portables (see Figure 23.14). Keeping with the trend toward fewer and more standardized general-purpose ports, many modern laptop manufacturers design their devices to charge using USB-C rather than the older AC adapters or more proprietary solutions.
•Figure 23.14 Devices attached to USB on a portable PC
 Cross Check
Modern General-Purpose Ports
You explored USB and Thunderbolt back in Chapter 10. What kind of connectors do USB and Thunderbolt use? Do you recognize the differences between USB Type-A and USB Type-C? What are the cable length limitations? How many devices can each technology support?
Docking Stations
Docking stations offer legacy and modern single- and multifunction ports (see Figure 23.15). The traditional docking station uses a proprietary connection, though the high speeds of USB 3.x and Thunderbolt 3 and 4 have made universal docks more common. A docking station makes an excellent companion to small portables with fewer ports.

•Figure 23.15 Docking station
Port Replicators
A port replicator supplies one of the most critical aspects of docking stations, but in a smaller, more portable format: support for connectors that the laptop lacks. A modern USB Type-C port replicator, for example, will plug into a laptop’s USB-C port and offer an array of other port types, such as VGA, HDMI, USB Type-A (2, 3, 3.1), RJ45, and more. Port replicators work great with ultra-light, ultra-thin laptops to enhance the capabilities of the machine.
Smaller port replicators are also often referred to as dongles or USB-C dongles. Modern port replicators support something called pass-through charging, enabling the user to connect their charger to the port replicator. Be careful, because sometimes a port replicator won’t allow enough power through to the laptop, which can lead to slow charging, or even losing charge while plugged in.
USB Adapters
When you don’t need access to a number of ports at once, you can often find a USB adapter for whatever you need to connect. When it comes to drives or connectors that you need only occasionally, these adapters can enable you to use a much more portable device.
Two great examples of this are wired Ethernet and optical drives. I don’t know about you, but I haven’t spun up an optical disc in months, nor am I sure when I last opened my laptop within a few feet of a wired Ethernet connection. A USB to Ethernet (RJ45) dongle and a USB optical drive can provide these features when and where I need them, leaving me a much smaller laptop to carry the rest of the time.
Another good use for USB adapters is updating connectivity support for older devices. A USB to Wi-Fi dongle or a USB Bluetooth adapter can let me update an old laptop to 802.11ax or add Bluetooth to a laptop that didn’t come with it built in.
■ Managing and Maintaining Portable Computers
Most portables come from the factory fully assembled and configured. From a tech’s standpoint, your most common work on managing and maintaining portables involves taking care of the batteries and extending the battery life through proper power management, keeping the machine clean, and avoiding excessive heat.
Everything you normally do to maintain a computer applies to portable computers. You need to keep current on OS updates and use stable, recent drivers. Use appropriate tools to monitor the health of your storage drives and clean up unwanted files. That said, let’s look at issues specifically involving portables, with one caveat: because more compact or hybrid portables are often built like mobile devices, you may need to approach those devices by combining steps mentioned here with troubleshooting ideas from Chapter 25.
Batteries
Manufacturers over the years have used a few types of batteries for portable computers: Nickel-Cadmium (Ni-Cd), Nickel-Metal Hydride (Ni-MH), and Lithium-Ion (Li-Ion). Today, only Li-Ion is used because that battery chemistry provides the highest energy density for the weight and has few problems with external factors.
The Care and Feeding of Batteries
In general, keep in mind the following basics. First, always store batteries in a cool place. Although a freezer might seem like an excellent storage place, the moisture, extreme freezing cold, metal racks, and food make it a bad idea. Second, keep the battery charged, at least to 70–80 percent. Many modern laptops include optimized charging features that can prevent your battery from charging over a certain percentage while it’s plugged in, and in some cases, like with modern MacBooks, even learn your charging routine and adjust itself accordingly. Third, never drain a battery all the way down unless required to do so as part of a battery calibration (where you, in essence, reset the battery according to steps provided by the manufacturer). Rechargeable batteries have only a limited number of charge-discharge cycles before overall battery performance is reduced. Fourth, never handle a battery that has ruptured or broken; battery chemicals are very dangerous and flammable (check YouTube for videos of what happens when you puncture a Li-Ion battery). Finally, always recycle old batteries.
 Try This!
Recycling Old Portable Device Batteries
Got an old portable device battery lying around? Well, you need to get rid of it, and there are some pretty toxic chemicals in that battery, so you can’t just throw it in the trash. Sooner or later, you’ll probably need to deal with such a battery, so try this!
1. Do an online search to find the battery recycling center nearest to you. Electronics retailers are getting much better about accepting a wide array of e-waste, including batteries, though they may place quantity limits.
2. Sometimes, you can take old laptop batteries to an auto parts store that disposes of old car batteries—I know it sounds odd, but it’s true! See if you can find one in your area that will do this.
3. Many cities offer a hazardous materials disposal or recycling service. Check to see if and how your local government will help you dispose of your old batteries.
Power Management
Many different parts are included in the typical laptop, and each part uses power. The problem with early laptops was that every one of these parts used power continuously, whether or not the system needed the device at that time. For example, the hard drive continued to spin even when it was not being accessed, the CPU ran at full speed even when the system was doing light work, and the LCD panel continued to display even when the user walked away from the machine.
Over the years, a lot of work has gone into improving the battery life of portable devices. Beyond engineering better batteries and ever-more-efficient components, the system firmware and OS of most modern portables collaborate with the firmware of individual components to manage their power use. To reduce power use, the computer can power off unused components until they are needed, enter a low-power mode when the device isn’t in use, and throttle the performance of power-hungry components like the CPU to fit the current workload. This process of cooperation among the hardware, BIOS, and OS to reduce power use is known generically as power management.
Low-Power Modes
If you don’t know what’s going on under the hood, computers usually appear to be clearly off or on. In reality, most computers (both desktops and portables!) that appear to be off are using at least a little power, and may be in one of a few low-power modes. The CompTIA A+ 220-1102 exam focuses on configuring basic power options in the Windows Control Panel, but it’s good to have a handle on low-power modes in general.
When the computer is off, turning it on will boot the OS from scratch. You can think of there being two kinds of true off mode:
■ Mechanical off mode The system and all components, with the exception of the real-time clock (RTC), are off.
■ Soft power-off mode The system is mostly off except for components necessary for the keyboard, LAN, or USB devices to wake the system.
Computers that appear to be off may actually be in a sleep (also called standby or suspend) mode: waking them will resume any programs, processes, and windows that were open when they entered the low-power mode. There are a number of fine-grained sleep modes, but the highlights are
■ A device can wake quickly from normal sleep mode (sometimes called suspend to RAM) because it doesn’t power down the RAM, enabling the system to save its place. If the device loses power unexpectedly, it can lose whatever was in RAM.
■ Devices wake more slowly from a deeper sleep mode called hibernate (or suspend to disk) because they save everything in RAM to a hard drive or SSD (and restoring it all takes a moment) before powering down. On the up side, hibernation saves more power and won’t lose its place if the device loses power.
Configuring Power Options
You configure power options via the system setup utility or through the operating system. OS settings override CMOS settings. Implementations differ, but certain settings apply generally, like the ability to enable or disable power management; configure which devices can wake the system; configure what the power button does; and configure what the system should do when power is restored after an outage.
Operating systems tend to use friendly terms like Energy Options or Power Options, but you might run into some more technical terms in a system configuration utility. Many CMOS versions present settings to determine wake-up events, such as directing the system to monitor a modem or a NIC. You’ll see this feature as Wake on LAN, or something similar.
In Windows, power options can be found in the Settings | System | Power & sleep | in Windows 10/11 and the Control Panel applet Power Options. Windows offers power plans that enable better control over power use by customizing a Balanced, Power saver, or High performance power plan (see Figure 23.16).

•Figure 23.16 Windows 10 Balanced, Power saver, and High performance power plan option
You can customize a power plan for your laptop, for example, and configure it to turn off the display at a certain time interval while on battery versus plugged in, or configure it to put the computer to sleep (see Figure 23.17). To see the specific power plans, click Additional power settings or go directly to the Control Panel Power Options applet. There you can tweak a lot more, including choices like hibernation (see Figure 23.18).
•Figure 23.17 Customizing a laptop power plan in Windows 10
•Figure 23.18 Windows 10 hibernation settings in the Power Options applet
Manual Control over Power Use
Most portables give you several manual options for reducing battery use in certain circumstances. We’ve already discussed using the on/off switch or keyboard combinations for disabling the Wi-Fi antenna or shutting off Bluetooth, but many modern portables borrow a feature from smartphones and tablets for disabling most or all of their wireless components at once: airplane mode. Beyond its intended use, airplane mode is also a great way to disable power-sucking components quickly. On the flipside, some newer gaming laptops include something known as a MUX switch, which enables a user to disable the computer’s integrated graphics in favor of the dedicated graphics card, which increases performance, but decreases battery life significantly.
Try This!
Adjusting Your System’s Power Management
Go into the Power Options applet on a Windows computer and look at the various settings. What is the current power plan for the computer? Check to see if it is running a Balanced or High performance power plan. If it is, change the power plan to Power saver and click Change plan settings. Familiarize yourself with some of the advanced power settings (click the Change advanced power settings link).
Try changing the individual settings for each power scheme. For instance, set a new value for the Turn off the display setting—try making your display turn off after five minutes. Don’t worry; you aren’t going to hurt anything if you fiddle with these settings.
Note that Microsoft changed power settings for laptops in Windows 10 to be Balanced. You can still adjust advanced power settings and tweak everything.
Laptops with backlit keyboards or RGB lighting will have some way you can disable this feature when it’s not needed, usually with a keyboard combination. You can also reduce the output of the LCD backlight using a combination of FN and another key to eke out a few more precious minutes of computing time before you have to shut down. Figure 23.19 shows a close-up of the FN-activated keys for adjusting screen brightness.

•Figure 23.19 Keys for adjusting screen brightness
One of the best ways to conserve battery is to plan ahead for times when you’ll be unplugged. This can mean a lot of different things in practice, but they all boil down to thinking of ways to minimize the number of programs and hardware devices/radios you’ll need to use while your laptop is running on battery power. When I travel, for example, and know that I’m going to need a certain set of files stored on my file server at the office, I put those files on my laptop before I leave, while it’s still plugged into the AC. It’s tempting to throw the files on a thumb drive so I don’t have to break out my laptop at the office, or to let Dropbox do my syncing for me when I get to a Wi-Fi hotspot, but both USB and Wi-Fi use electricity.
Better than that, Windows enables me to designate the files and folders I need as offline files, storing a local, duplicate copy of the files and folders on my hard drive. When I connect my laptop to my office network, those offline files are automatically synced with the files and folders on the file server. Anything I changed on the laptop gets written to the server. Anything anyone changed in those folders on the server gets written to my laptop. If changes were made on both sides, a sync conflict pops up automatically, enabling me to resolve problems without fear of overwriting anything important.
To designate a folder and its contents as offline files, right-click the folder you want and select Always available offline from the context menu. The sync will occur and you’re done. When you want to open the files offline, go to the Control Panel and open the Sync Center applet (see Figure 23.20). Click the Manage offline files link to open the Offline Files dialog box (see Figure 23.21). Click the View your offline files button and you’re in.
•Figure 23.20 Sync Center applet

•Figure 23.21 Offline Files dialog box
Cleaning
Most portable computers take substantially more abuse than a corresponding desktop model. Constant handling, travel, airport food on the run, and so on can radically shorten the life of a portable if you don’t take action. One of the most important things you should do is clean the device regularly. Use an appropriate screen cleaner (not a glass cleaner!) to remove fingerprints and dust from the fragile LCD panel. (Refer to Chapter 17 for specifics.) Using a dedicated screen cleaner is important; otherwise, you run the risk of doing permanent damage to the display.
We’ll go into greater detail on environmental threats in Chapter 27, but if you’ve had the portable in a smoky or dusty environment where air quality alone can cause problems, try cleaning it with compressed air. Compressed air works great for blowing out dust and crumbs from the keyboard and for keeping any ports, slots, and sockets clear. Don’t use water on your keyboard! Even a little moisture inside the portable can toast a component.
Heat
To manage and maintain a healthy portable computer, you need to deal with heat issues. Every portable has a stack of electronic components crammed into a very small space. Unlike their desktop brethren, portables don’t have lots of freely moving air space that enables fans to cool everything down. Even with lots of low-power-consumption devices inside, portable computers crank out a good deal of heat. Excessive heat can cause system lockups and hardware failures, so you should handle the issue wisely.
The following steps have more traditional portables in mind; very compact portables are usually designed to handle heat more like mobile devices; in some cases, such as the newer MacBook Air, this is even accomplished without fans. Chapter 25 will approach heat issues with mobile device construction in mind. For more traditional portables, try this as a starter guide:
■ Use power management, even if you’re plugged into the AC outlet. This is especially important if you’re working in a warm (more than 80 degrees Fahrenheit) room.
■ Keep air space between the bottom of the laptop and the surface on which it rests. Putting a laptop on a soft surface, such as a pillow on your lap, creates a great heat-retention system—not a good thing! Always use a hard, flat surface.
■ Don’t use a keyboard protector for extended amounts of time.
■ Listen to your fan, assuming the laptop has one. If it’s often running very fast—you can tell by the whirring sound—examine your power management settings, environment, and running programs so you can change whatever is causing heat retention.
■ Speaking of fans, be alert to a fan that suddenly goes silent. Fans do fail on laptops, causing overheating and failure.
Protecting the Machine
Even midrange laptops can be pricey, and replacing them before you’re ready is always a pain. To protect your investment, you’ll want to adhere to certain best practices. You’ve already read tips in this chapter to deal with cleaning and heat, so let’s look at the “portable” part of portable computers.
Tripping
Pay attention to where you run the power cord when you plug in a laptop. One of the primary causes of laptop destruction is people tripping over the power cord and knocking the laptop off of a desk. This is especially true if you plug in at a public place such as a café or airport. Remember, the life you save could be your portable’s!
Storage
If you aren’t going to use your portable for a while, storing it safely will go a long way toward keeping it operable when you do power it up again. A quality case is worth the extra few dollars—preferably one with ample padding. Not only will this protect your system on a daily basis when transporting it from home to office, but it will keep dust and pet hair away as well. Also, protect from battery leakage, at least on devices with removable batteries, by removing the battery if you plan to store the device for an extended time. Regardless of whether the battery is removable or built in, it’s a good idea to store the battery partially charged and top it up occasionally to keep it from fully discharging.
Travel
If you travel with a laptop, guard against theft. If possible, use a case that doesn’t look like a computer case. A well-padded backpack makes a great travel bag for a laptop and appears less tempting to would-be thieves, though some brands and styles of these are still quite obvious. Smaller portables can often hide in less obvious bags. Don’t forget to pack any accessories you might need, like modular devices, power banks, and AC adapters. Most importantly—back up any important data before you leave!
Make sure to have at least a little battery power available. Heightened security at airports means you might have to power on your system to prove it’s really a computer and not a transport case for questionable materials. And never let your laptop out of your sight. If going through an x-ray machine, request a manual search. The x-ray won’t harm your computer like a metal detector would, but if the laptop gets through the line at security before you do, someone else might walk away with it. If flying, stow your laptop under the seat in front of you where you can keep an eye on it.
If you travel to a foreign country, be very careful about the electricity. North America uses ~115-V power outlets, but most of the world uses ~230-V outlets. Most portable computers have auto-switching power supplies, meaning they detect the voltage at the outlet and adjust accordingly (but most people just call it a charger). An auto-switching power supply will have an input voltage range printed on it somewhere (see Figure 23.22).

•Figure 23.22 Input and output voltages on laptop power brick
Double-check the charger to make sure its supported range covers voltages used in any country you plan to visit. If it doesn’t, you may need a full-blown electricity-converting device, either a step-down or step-up transformer. You should be able to find converters and transformers at electronics retailers, travel stores, and, of course, online.
Shipping
Much of the storage and travel advice can be applied to shipping. If possible, remove batteries and optical discs from their drives. Pack the portable well and disguise the container as best you can. Back up any data and verify the warranty coverage. Ship with a reputable carrier and always request a tracking number and, if possible, delivery signature. It’s also worth the extra couple of bucks to pay for the shipping insurance. And when the clerk asks what’s in the box, it’s safer to say “electronics” rather than “a new 17-inch laptop computer.”
Security
The fact is, if someone really wants to steal your laptop, they’ll find a way. While we cover securing devices against physical theft in Chapter 27, there are some things you can do to make yourself, and your portable devices, less desirable targets. As you’ve already learned, disguise is a good idea.
Another physical deterrent is a laptop lock. Not all laptops are able to use one, but they can be helpful if the option is available for your device. Similar to a steel bicycle cable, there is a loop on one end and a lock on the other. The idea is to loop the cable around a solid object, such as a bed frame, and secure the lock to the small security hole on the side of the laptop (see Figure 23.23). Again, if someone really wants to steal your computer, they’ll find a way. They’ll dismantle the bed frame if they’re desperate. The best protection is to be vigilant and not let the computer out of your sight.
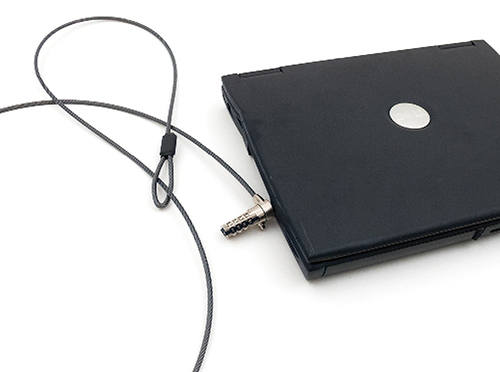
•Figure 23.23 Cable lock
An alternative to securing a laptop with a physical lock is to use a software tracking system that makes use of GPS. It won’t keep your device from being taken, but tracking software can use the many sensors and networking capabilities of modern devices to help recover them. While functionality differs by application, common features include seeing the location of the stolen computer, capturing images or audio with its sensors, and wiping sensitive files from the device. Because this functionality is more common in mobile devices, we’ll save the details for Chapter 25.
Theft isn’t the only security risk that laptop owners face; modern laptops account for the need to protect user privacy and data as well. Screen locks have been around for a long time, requiring a user to enter a PIN or password before being able to actually use the device. In recent years, these features have been enhanced using biometrics. Biometrics are measurements of physical characteristics that are documented and verified through the use of scanners. Biometrics can be used to match a physical characteristic of a user with a valid user account in order to authenticate the user. Common biometric security features found on laptops include fingerprint scanners located on the keyboard or facial recognition software that uses the device’s webcam. These are popular because they allow a user to quickly access their device without needing to enter a complex password every time they open the lid or come back from a lunch break.
■ Upgrading and Repairing Laptop Computers
A competent tech can upgrade and repair portable computers to a degree, though true laptop techs are specialists. Over the years, laptops have become more and more based on proprietary parts, to a point where some laptops can only really be repaired by the manufacturer or authorized third parties, and in some cases, upgrades are off the table altogether. Upgrading the basics usually means breaking out the trusty screwdriver and avoiding electrostatic discharge (ESD). Repairing portables successfully, on the other hand, requires research, patience, organization, special tools, and documentation. Plus, you need a ridiculously steady hand. This section provides an overview of the upgrade and repair process. Keep in mind that the growing number of form factors and the shrinking size of portable devices mean there are many exceptions, especially for very compact portables; these devices may be trickier to take apart, and components may be soldered on or use less-common interfaces.
Disassembly Process
Disassembling a portable PC is usually pretty easy, if it was designed to be upgraded or serviced by casual users. Putting it back together in working condition is the hard part! You need to follow a four-step process to succeed in disassembly/reassembly.
First, document and label every cable and screw location. Laptops don’t use standard connectors or screws. Often you’ll run into many tiny screws of varying threads. If you try to put a screw into the wrong hole, you could end up stripping the screw, stripping the hole, or getting the screw wedged into the wrong place.
Second, organize any parts you extract from the laptop. Seriously, put a big white piece of construction paper on your work surface, lay each extracted piece out in logical fashion, and clearly mark where each component connects and what it connects to as well. You may even want to use a smartphone camera to take pictures or a webcam to record your workspace in case something goes missing.
Third, refer to the manufacturer’s resources. I can’t stress this point enough. Unlike desktops, portables have no standardization of internal structure. Everything in the portable is designed according to the manufacturer’s best engineering efforts. Two portables from the same manufacturer might have a similar layout inside, but it’s far more likely that every model differs a lot.
Finally, you need to use the appropriate hand tools. A portable, especially on the inside, will have a remarkable variety of tiny screws that you can’t remove/reinsert without tiny-headed Phillips or Torx drivers. You’ll need tiny pry bars—metal and plastic—to open components. Figure 23.24 shows an entry-level toolkit for a laptop tech that you can order from iFixit (https://www.ifixit.com; more on this site in a moment). Their professional toolkit version has 70 tools, plus there’s an expansion kit! Like I said at the beginning of this section, portable techs are specialists.

•Figure 23.24 Bare-minimum laptop repair tools
Now that you have the official line on the disassembly process, let’s get one thing clear: a lot of manufacturers don’t provide access to their resources to just any tech, but only to authorized repair centers. So what do you do when faced with an unfamiliar laptop that a client brought in for repair?
You have essentially two options. First, you can find a dedicated laptop tech and refer your client to that person. If the problem is exceptionally complicated and the portable in question is mission critical, that’s often the best option. If you want to tackle the problem or it looks like something you should be able to do, then you go to third-party sources: YouTube and iFixit.
Every portable computer has a specific make and model. Open up a Web browser and go to YouTube. Type in precisely what you want to do, such as “Dell XPS 13 keyboard replacement,” and see what pops up (see Figure 23.25). You’ll most likely get results back, especially if the laptop in question is a couple of years old. People all over the world have to deal with broken devices, so you’re not alone.

•Figure 23.25 YouTube search result
Once you’ve found the appropriate video or something that’s close enough to enable the repair attempt, watch it. If it’s too difficult for your skill level or requires a set of expensive tools, then fall back to step one and go find a dedicated tech. Otherwise, figure out what tools and parts you need. Parts specific to a laptop (as in that Dell keyboard in the preceding example) will need to be purchased from the manufacturer. More generic parts, like hard drives, CPUs, and so on, can be purchased from Newegg (my favorite tech store) or some other online retailer.
For general tools, parts, and a lot of very detailed step-by-step instructions, I highly recommend iFixit. Billed as “Repair guides for everything, written by everyone,” iFixit is built by techs like you and me who conquer a problem, document the steps, and post the details (see Figure 23.26). This means the next tech along who runs into the same problem doesn’t have to reinvent the wheel. Just go to iFixit.com. The proceeds from parts and tools they sell, by the way, go toward supporting the site.
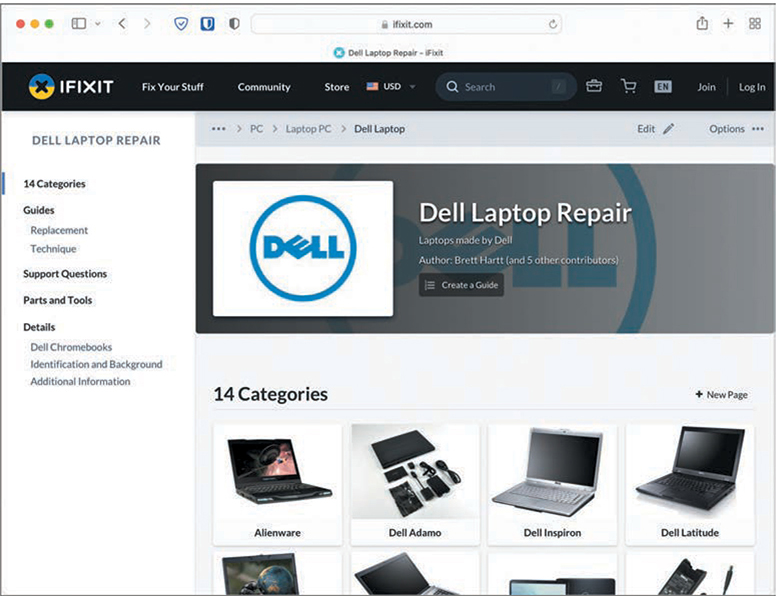
•Figure 23.26 Some of the Dell laptop repair walkthroughs at iFixit.com
Standard Upgrades
Every CompTIA A+ tech should know how to perform the two standard upgrades to portable computers: adding RAM and replacing a hard drive. Let’s go through the steps.
Upgrading RAM
Not every modern laptop has the option to upgrade RAM, but there are still plenty that do. As a result, one of the more common laptop upgrades you’ll be called on to do is to add more RAM. A quick Google search of the make and model that you’re working on will tell you whether or not the RAM is soldered or replaceable. If it’s replaceable, you’ll need to make sure you know what kind you need.
Cross Check
How Much RAM Is Enough?
The amount of RAM needed to run a computer—portable or otherwise—smoothly and stably depends on both the type of applications that it will run and the needs of the OS. When making a recommendation to a client about upgrading a laptop’s memory, you should ask the basic questions, such as what the client plans to do on the laptop. If the laptop will be used for e-mail, word processing, and Web surfing, a small amount of RAM, such as 8 GB, might be adequate. If the user travels, uses a high-res digital camera, and wants to use Photoshop to edit huge images, you’ll need to augment the RAM accordingly. Then add the needs of the OS to give a good recommendation. Turn to Chapter 11 and cross check your knowledge about specific OS RAM needs. What’s a good minimum for Windows 10? Does that differ from Windows 11?
How to Add or Replace RAM Upgrading the RAM in a laptop requires a couple of steps. Once you’ve determined that the specific device you’re working on can be upgraded, you need to get the correct RAM. Refer to the manufacturer’s Web site or to the manual (if any) that came with the laptop for the specific RAM needed. Once you know the type, you need to make sure you know the configuration of any existing RAM in the system. If you are planning to upgrade from 8 GB to 16 GB, you need to know if your portable already has one module at 8 GB or two modules at 4 GB.
Second, every portable offers a unique challenge to the tech who wants to upgrade the RAM, because there’s no standard location for RAM placement in portables. The RAM slots may not even be in the same spot. More often than not, you need to unscrew or pop open a panel on the underside of the portable or remove the entire back plate (see Figure 23.27). Then you press out on the restraining clips and the RAM stick pops up (see Figure 23.28). Gently remove the old stick of RAM and insert the new one by reversing the steps.

•Figure 23.27 Removing the back plate

•Figure 23.28 Releasing the RAM
Always remove all electrical power from the laptop before removing or inserting memory. Disconnect the AC cord from the wall outlet. Take out any removable batteries! Failure to disconnect from power can result in a fried laptop. In the case of systems with built-in batteries, consult the manufacturer’s resources to evaluate the safety of working on the system and any additional steps or precautions you should take.
Upgrading Mass Storage
You can replace a hard disk drive (HDD) or solid-state drive (SSD) in some laptops fairly easily, while others (like MacBooks) cannot be upgraded at all. Contemporary laptops with upgradeable storage make use of the small M.2 form factor in order to save space, although a fair number of systems, particularly older ones, will also use 2.5-inch SATA drives. Using smaller form-factor drives enables manufacturers to include a second slot for easy mass storage expansion.
mSATA and M.2 If you have a newer portable, chances are the computer uses one of the smaller SSD formats—mSATA or M.2. You read about them in detail back in Chapter 8, but glance back to refresh your memory if necessary.
Most manufacturers make it fairly easy to replace or upgrade an mSATA or M.2 drive. Remove the bottom plate or dedicated drive bay covering from the computer. Remove the tiny retaining screw and pop the old drive out. Put the new drive in its place, insert the retaining screw, and reattach the covering. You’re good to go, at least from the hardware side of things.
One of the best upgrades you can make on a laptop is to migrate from an HDD to an SSD. You may get less storage capacity for the money, but the trade-offs are worth it. Beyond improved reliability, the SSD will use a lot less electricity than an HDD, thus extending battery life. Additionally, any SSD is rip-roaringly faster than an HDD and performance across the board will be boosted. An upgrade from an HDD to an SSD can breathe new life into an otherwise sluggish older system.
The process of replacing a hard drive mirrors that of replacing RAM. You find the hard drive hatch—either along one edge or in a compartment on the underside of the computer—and release the screws. If the device doesn’t have a hatch, you may need to remove the bottom of the chassis (as previously shown in Figure 23.27). Remove the old drive and then slide the new drive into its place (see Figure 23.29). Reattach the hatch or cover and boot the computer. If you’re replacing your boot drive, grab a bootable USB flash drive and prepare to reinstall.

•Figure 23.29 Inserting a replacement drive
Hardware/Device Replacement
Once you get beyond upgrading RAM and replacing a hard drive on a portable, you take the plunge into the laptop-repair specialty. You can replace some components by lifting them out, detaching a ribbon cable, and then reversing the steps with the replacement part. Other parts require a full teardown of the laptop to the bare bones, which presents a much greater magnitude of difficulty. Because every portable differs, this section provides guidance, but not concrete steps, for replacement. Be aware, as mentioned earlier, that many systems are trending toward more integrated parts; make sure the part you’re replacing is actually replaceable in the specific system you’re working on.
Components
Replaceable components require more work than the RAM or drive upgrades, but replacing them generally falls into the category of “doable.” What I call components are the battery, keyboard, internal speaker(s), and expansion cards.
Battery If a battery’s performance falls below an acceptable level, you can replace it with a battery from the manufacturer or from an aftermarket vendor. Although this should be a simple swap replacement (and usually is, at least if the battery isn’t built in), you might encounter a situation where the real problem wasn’t the battery per se, but an inadequate or malfunctioning charging system. The new battery might not give you any better performance than the old one. Try it.
Keyboard Getting a keyboard off a laptop computer often requires little pry bars, but also look for screws, clips, and so on. Keyboards connect via a tiny, short, and very delicate cable, often held down by tape. Replacing one is tricky, but doable in many cases. Look up steps for detaching and reattaching keys on a specific device if possible, and otherwise find generic instructions for the clip type before proceeding.
Speaker Replacing the internal speaker or speakers on a laptop will most likely require you to open up the device. Most laptop speakers are inside the chassis, so if you want to replace them, you need to dismantle the portable to get to them. (See the upcoming “Integral Parts” section.)
Wireless and Expansion Cards Many portables have one or more true expansion slots for add-on cards. The more modular varieties will have a hatch on the bottom of the case that opens like the hatch that gives you access to the RAM slot(s). This enables you to change out an older wireless card (alternative names Wi-Fi card and WLAN card), for example, with one that supports current Wi-Fi card standards, thus greatly enhancing the Wi-Fi experience on this device. Similarly, you could change out a Bluetooth module for an upgraded version. Figure 23.30 shows a wide-open laptop with the expansion slot exposed for the insertion of a WLAN card.

•Figure 23.30 M.2 expansion slot on laptop with WLAN card
Just like when installing RAM in a portable, you must avoid ESD and remove all electricity before you take out or put in an expansion card. Failure to remove the battery and the AC adapter (or follow any extra steps and precautions in the manufacturer’s resources if the battery is built in) can and probably will result in a shorted-out laptop motherboard, and that just makes for a bad day.
The only other consideration with expansion cards applies specifically to wireless. Not only will you need to connect the card to the slot properly, but you must reattach the antenna connection and often a separate power cable. Pay attention when you remove the card as to the placement of these vital connections.
You’ll find one of two types of expansion slots in a portable: Mini-PCIe and M.2. The older ones (think 2013 and earlier) use Mini-PCIe and are uncommon to see today, while newer devices use M.2.
Display and Its Components A laptop screen presents unique challenges when faced with a replacement scenario. The display has the typical parts you’d expect in an LCD, such as the panel, backlight(s), and inverter (on older portables); plus, the display typically has other components along for the ride, such as the Wi-Fi antenna, a webcam, and a microphone. Finally, a touchscreen display offers even more of a challenge.
The process for replacing the screen (flat, touchscreen, digitizer), inverter, Wi-Fi antenna, webcam, or microphone follows the same steps. You pry the plastic frame off the display, most commonly using a spudger or other tool from your toolkit, then remove any exposed screws. The screen will lift out, and you’ll need to detach the internal parts. I can’t give you precise details, because every model differs, but the parts are usually secured with tiny screws or compression, or mild adhesive. Plus, you’ll need to gently disconnect data cables for each component. If you’re just replacing a defective webcam or microphone, you won’t need to disconnect other parts (most likely), but if you need to replace the screen or inverter, you’ll have to remove everything.
Take pictures with your phone. Keep track of which connectors go where. Don’t rush the process when dealing with so many tiny connectors and parts. Document the locations and types of screws. The extra work you do to record each step or layer will pay off with a properly repaired laptop. Trust me!
Integral Parts
Some hardware replacements require you to get serious with the laptop, opening it fully to the outside, removing many delicate parts, and even stripping it down to the bare chassis. I leave these repairs to the professional laptop repair folks, simply because they have the specific tools and expertise to do the job efficiently. To understand the process, I’ve outlined it here. This pertains to three components: DC jack, trackpad, and system board.
Portables generally open in two different ways, depending on the manufacturer. You either peel away layers from the top down, through the keyboard, or from the bottom up, through the base. Either direction requires careful attention to detail, part connectivity, and locations. You’ll need a system to keep track of the dozens of tiny screws.
Every one of the replacements here requires you to detach the screen from the main chassis of the portable. Aside from finding the connection points and removing the proper screws, you need to pay attention to the connection points for the data stream to the monitor and the antenna that’s in the frame of the display, as mentioned earlier.
Once you have the portable stripped down, you replace whichever component you’re in there to replace and then begin the process of building it back up into a coherent unit. Pay incredibly careful attention to getting data cables connected properly as you rebuild. I can’t imagine a worse tech experience than replacing a trackpad and rebuilding a laptop only to have missed a connection and having to do it all over again.
■ Troubleshooting Portable Computers
Many of the troubleshooting techniques you learned about for desktop systems can be applied to laptops. For example, take the proper precautions before and during disassembly. Use the proper hand tools, and document, label, and organize each plastic part and screw location for reassembly. Additionally, here are some laptop-specific procedures to try.
Power and Performance
Some of the most common portable device issues relate to how well they do (or don’t!) run—so let’s take a look at a few issues related to power, performance, and heat.
Laptop Won’t Power On
■ If a laptop won’t power up—a no power scenario—verify AC power by plugging another electronic device into the wall outlet. If the other device receives power, the outlet is good.
■ If the outlet is good, connect the laptop to the wall outlet and try to power on. If no LEDs light up, you may have a bad AC adapter. Swap it out with a known-good power adapter.
■ A faulty peripheral device might keep the laptop from powering up. Remove any peripherals such as USB or Thunderbolt devices.
Poor Performance
■ The most common reason for slow performance is that a running application or process is consuming high resources. All operating systems have a utility to check this—such as the Task Manager in Windows or Activity Monitor in macOS—and look into any problems it finds. The application or process may need to be closed or stopped, you may need to reboot, or the application may need an update.
■ Extreme performance issues may lead to a frozen system. If they don’t resolve on their own and you can’t interact with the device, you may need to perform a hard reboot (which may result in the loss of any unsaved work). Usually, holding down the power button for 10 seconds is sufficient, though you may need to check the manufacturer’s resources for the proper procedure. If the battery is removable, you may be able to reboot the device by pulling the battery out and replacing it.
Battery Issues
■ A swollen battery will probably go unnoticed at first, and the symptoms it creates may be hard to identify if you aren’t aware it can happen. The cause is usually over-charging, perhaps due to a failure in the circuits that should prevent it, but the early symptoms might be a laptop that doesn’t quite sit right on flat surfaces, a screen that doesn’t fit flush when closed, problems with input devices like the trackpad or keyboard, and trouble removing or inserting a removable battery. Eventually, the device’s case may be obviously deformed. While battery packs are designed to handle a little swelling, it increases the risk they’ll puncture—and a punctured battery can be dangerous. Don’t ignore these symptoms; open the case carefully to check the battery, and very carefully deliver it to an e-waste recycling or disposal site.
■ If you have a laptop with a battery that won’t charge up—a poor battery health problem—it could be one of three things: The device has a setting that limits how much charge the battery can hold to preserve its lifespan, the battery might be cooked, or the AC adapter isn’t doing its job, also known as improper charging. To troubleshoot, first go to the device’s battery settings and look to see if there is a charge-limiting setting. If there isn’t, you can try removing the battery and run the laptop on AC power only. If it works, you know the AC adapter is good. If it doesn’t work, you probably need to replace the adapter. Another option is to replace the battery with a known-good battery. If the new battery works, you’ve found the problem. Just replace the battery.
■ The reasons for very short battery life in a battery that charges properly are fairly benign. The battery has usually outlived its useful life and needs to be replaced, or some programs or hardware are drawing much more power than usual. Check wireless devices you usually keep disabled to make sure they aren’t on. Follow recommendations in the preceding “Poor Performance” section to address problem programs.
Overheating
■ Because overheating can be both a symptom and a cause of a variety of issues, you should be alert to any device that is running hotter than usual. Note which parts of the device are hot—this can give you important clues. If the device feels dangerously hot, err on the side of protecting the device from heat damage instead of trying to diagnose the cause. Power the device down and remove the battery if possible. Set it on a cool, hard surface, out of direct sunlight, with the hottest part of the device exposed to air if possible.
■ Likewise, look for possible signs a device is overheating—like inconsistent reboots, graphical glitches, system beeps—and rule out heat issues.
■ Listen for fans. While some portables don’t have any, complete silence may indicate a failed fan, and unusual noise may signal one on its way out. Before you open the device to check the fans, make sure that the device isn’t set to some type of silent mode. Many modern laptops include software that allows you to run the laptop quietly or silently when not doing resource-intensive tasks. If this setting is active, it may be the reason for the lack of fan noise.
■ Dust build-up in the laptop can lead to major overheating issues over time. If a computer is having overheating issues, it’s very possible that there is dust, pet hair, or residue from smoke gumming up the works. To fix this, you should first check the fan vents for obstructions, grab your ESD wrist strap, then open the laptop and disconnect the battery. Once this is done, use a can of compressed air to blow the dust out of the chassis using short bursts from different angles. Be careful, laptop fans can be fragile, so don’t be too aggressive when you clean them.
■ Know when to expect a hot device. Busy or charging devices can create a lot of heat; follow the steps mentioned in the preceding “Poor Performance” and “Battery Issues” sections for identifying components that shouldn’t be on, especially if they are hot to the touch, and finding runaway programs. If the device is charging, unplug it and see if the device cools. If you find nothing unexpected and the device is unusually hot, it may have an airflow problem.
■ If the entire device is hot, it may have simply been left in direct sunlight or a hot environment. Cool the device down and see if the trouble goes away.
Components
Various hardware components can encounter issues, including the display, wireless networking, audio, and input devices.
Display Problems
■ If the laptop is booting (you hear the beeps and the drives) but the screen doesn’t come on properly—a no display problem—first, make sure the display is turned on. Press the FN key and the key to activate the screen a few times until the laptop display comes on. If the device is a 2-in-1 with a removable screen, make sure it is properly attached and that it is receiving power.
■ If the laptop display is very dim—a dim display problem—it may be as simple as adjusting the brightness settings. Most laptops allow you to do this by using the FN key and the key to adjust the brightness. If this doesn’t work, it may also be due to some power saving setting. Check the power saving settings to see if the screen brightness is being limited there. If those options don’t fix the problem, you may be dealing with a failing backlight. This can be caused by failed inverters on older laptops.
■ If the screen won’t come on or is cracked, most laptops have a port for plugging in an external monitor, which you can use to log in to your laptop.
■ If you plug a laptop into an external monitor and that monitor does not display, remember that you have both a hardware and an OS component to making dual displays successful. There’s usually a combination of FN and another key to toggle among only portable, only external, and both displays. Plus, you have the Display area of Settings or the Display in the Control Panel to mirror or extend the desktop to a second monitor.
■ If you have a flickering display, you should check for software issues before you try to open the laptop chassis. Laptop displays can flicker because of bad device drivers or application issues just like desktop displays. Unlike desktop displays, laptops are more likely to be dropped or accidentally knocked off a table. This can loosen connectors inside the display and lead to flickering as well. If software isn’t the problem, loose connections just might be.
■ If the screen orientation on a Windows portable doesn’t change when the device is rotated, auto-rotation may be disabled. Likewise, if the orientation changes at the wrong time, you can lock rotation in Settings or via the Display in the Control Panel. If the rotation needs to remain locked, you can still change the orientation via Settings/Display, or possibly with FN key combinations.
Wireless Devices (Bluetooth, Wi-Fi, NFC, or GPS) Don’t Work or Work Intermittently
■ If the wireless doesn’t work at all, check along the front, rear, or side edges of the laptop for a physical switch that toggles the internal wireless adapter, Bluetooth adapter, or airplane mode on and off. Also check your notification area for an airplane icon.
■ If a tech has recently replaced a component that required removal of the laptop display, dead wireless could mean simply a disconnected antenna. Most portables have the antenna built into the display panel, so check that connection.
■ Try the special key combination for your laptop to toggle the wireless or Bluetooth adapter, or one for toggling airplane mode. You usually press the FN key in combination with another key.
■ You might simply be out of range or, if the wireless works intermittently, right at the edge of the range. Physically walk the laptop over to the wireless router or access point to ensure there are no out-of-range issues. You might also be experiencing congestion, too many wireless devices operating in the same frequency range.
■ With Bluetooth specifically, remember that the pairing process takes action or configuration on both devices to succeed. Turn on the Bluetooth device, actively seek it, and try again.
■ If only the GPS is not functioning, privacy options may be preventing applications from accessing your GPS location information. Check the Control Panel or the Privacy section of the Settings app to see whether the GPS device is enabled and if location services are enabled both system-wide and for the appropriate applications. Check System Preferences in macOS or a similar location in Linux for the same options.
■ While we won’t discuss Near Field Communication (NFC) in depth until Chapter 24, some portable computers may have NFC support; if NFC isn’t functioning, you may need to enable a setting to enable communication with nearby devices. In Windows, open the Proximity applet in the Control Panel (only present if you have NFC hardware) and make sure Proximity support is enabled.
Audio Problems
■ If audio isn’t working when it should be, check for a hardware mute or volume button or switch and verify through the notification area Volume icon that the audio output isn’t muted. Verify proper output device configuration through the operating system, and verify the application is using the right output device.
■ If no sound is coming from the device speakers, try plugging in a pair of headphones or some external speakers. If these work fine, there’s a chance the built-in speakers have been damaged. Depending on their location, it can be easy to get them wet.
■ If the device has had repairs or upgrades lately, make sure the speakers are properly connected.
■ If headphones work fine with the device, the speakers may need replacing. First, make sure the device has been rebooted, double-check the audio output device settings, try changing and resetting the default output device, and try disabling and re-enabling the appropriate device.
Input Problems
■ Before assuming an input problem is hardware related, confirm that the system is otherwise running smoothly. Input devices may appear not to work or work erratically if the system is freezing up. Refer to the earlier “Power and Performance” section for troubleshooting a frozen system.
■ If none of the keys work on your laptop, there’s a good chance you’ve unseated the keypad connector. These connectors are quite fragile and are prone to unseating from any physical stress on the laptop. Check the manufacturer’s disassembly procedures to locate and reseat the keypad.
■ If you’re getting numbers when you’re expecting to get letters, the number lock (NUM LOCK) function key is turned on. Turn it off. Pay attention to the NUM LOCK indicator lights, if any, on a portable if you experience these sorts of problems.
■ Laptop keyboards take far more abuse than the typical desktop keyboard, because of all those lunch meetings and café brainstorm sessions. Eating and drinking while over or around a keyboard just begs for problems. If you have a portable with sticking keys, look for the obvious debris in the keys. Use compressed air to clean them out. If you have serious goo and need to use a cleaning solution, disconnect the keyboard from the portable first. Make sure it’s fully dried out before you reconnect it or you’ll short it out.
■ A laptop keyboard key that doesn’t register presses or feels sticky may also have had its switch knocked out of place, especially if the key appears slightly raised or tilted. These switches can be delicate, so be careful if you want to avoid ordering replacements. Research what kind of switch your device’s keyboard uses, and be aware that a single keyboard may use a few different kinds. Look up steps for detaching and reattaching keys on that specific device if possible, and otherwise find generic instructions for the clip type before proceeding.
■ If the trackpad is having problems, a shot of compressed air does wonders for cleaning pet hair out of the trackpad sensors. You might get a cleaner shot if you remove the keyboard before using the compressed air. Remember to be gentle when lifting off the keyboard and make sure to follow the manufacturer’s instructions.
■ The trackpad driver might need to be reconfigured. Try the various options in the Control Panel | Mouse applet, or the equivalent location in System Preferences.
■ If the touchscreen is unresponsive or erratic, a good first step is to check the screen for dirt, grease, or liquids, which can make the sensors go haywire; wipe it down with a dry microfiber cloth.
■ Some touchscreens may appear to work improperly if they are registering an unintentional touch. Depending on the design of the device, it may be tempting to hold it in a way that leaves some part of your hand or arm too close to the edge of the screen; some devices will register this as a touch.
■ Your device may have touchscreen diagnostics available through hardware troubleshooting menus accessible through the BIOS. Refer to the manufacturer’s resources for how to access these diagnostics. If available, they are a quick way to identify whether you’re looking at a hardware or software/configuration issue. The Mouse applet in the Control Panel or Settings enables you to calibrate or reset your touch support. macOS has a Trackpad applet in System Preferences. Attempt to reset and recalibrate the display.
Chapter 23 Review
■ Chapter Summary
After reading this chapter and completing the exercises, you should understand the following about portable computing.
Describe the many types of portable computing devices available
■ All portable devices share certain features: video output using LCD screens, some kind of audio output, and DC battery power. There’s no industry standard for naming the vast majority of styles of portable computing devices.
■ The traditional portable computer form factor is the clamshell keyboard-on-the-bottom and LCD-screen-at-the-top design. The term laptop refers to this form factor. Gaming laptops are similarly loaded with high-performance components and flashy designs.
■ A Chromebook is a portable computer running Google’s Linux-based Chrome OS. Chromebooks focus on Web applications by making use of virtually unlimited data storage in the cloud and SaaS applications. Because they offload so much work, Chromebooks have a reputation for being cheap and light, but premium Chromebooks are increasingly common.
■ 2-in-1 form factors, inspired by mobile devices, merge the laptop and tablet experience. 2-in-1s are touchscreen computers somewhere along the spectrum from laptop-and-tablet to tablet-and-laptop. They are also sometimes referred to as hybrids or convertibles. Some 2-in-1s offer a rotating or removable screen that enables the user to turn the device into a tablet computer.
■ Portable computers come with a variety of input devices. Most have a fully functional keyboard and a device to control the mouse pointer. The basic QWERTY format is used, but manufacturers differ on key size and placement of the non-alphabet characters. Almost every portable keyboard uses a Function (FN) key to enable some keys to perform an extra duty.
■ By far the most common laptop pointing device found today is the trackpad—a flat, touch-sensitive pad just in front of the keyboard. To operate a trackpad, you simply glide your finger across its surface to move the pointer, and tap the surface once or twice to single- or double-click. You can perform additional functions with gestures if the trackpad has multitouch support.
■ Portable computers commonly include a webcam and microphone. The primary purpose is video chat, but microphones also enable the use of voice commands. Portables with the ability to see and hear what goes on around them present additional privacy and security risks.
Explain ways to expand portable computers
■ Every portable device comes with one or more single-function ports. The most common of all is the ubiquitous audio jack, and some have a microphone-in jack, though built-in microphones are increasingly common. Laptops invariably provide a video port such as HDMI (including Mini-HDMI and Micro-HDMI) or DisplayPort (including USB Type-C and Thunderbolt). Though rare, you may still find older or special-purpose portables with a VGA or DVI port.
■ Most laptops support a second monitor, giving you the option to duplicate your screen to the new monitor, or extend your desktop across both displays, letting you move windows between them. Usually a special Function (FN) key on the keyboard will cycle through the monitor configurations.
■ All portables offer some kind of network connectivity, such as 802.11 Wi-Fi to connect to the Internet. Wired Ethernet ports are common on full-sized laptops but are rare in smaller contemporary laptops and 2-in-1s. Bluetooth is common for connecting peripherals. Portables have some way to toggle Wi-Fi and Bluetooth off and on to conserve battery life.
■ Many portable devices also come equipped with a slot for a flash memory card, most commonly SD or microSD (though you may encounter other types on older devices). These enable fast file transfers and, on devices with limited internal storage, an essential boost to storage capacity.
■ Most portable devices have one or more general-purpose expansion ports that enable you to connect many devices such as mice, modems, printers, scanners, external optical drives, and more. USB and Thunderbolt are popular, widespread methods for attaching peripherals, though you may find older ports on ancient or specialized devices. All have easy-to-use connectors and can be hot-swapped.
■ Docking stations offer legacy and modern single- and multifunction ports, though the high speeds of USB 3.x and Thunderbolt 3 and 4 have made universal docks more common.
■ A port replicator (sometimes called a dongle) plugs into a USB or Thunderbolt port and offers a lot of other types of connectors, such as video and networking. You can also use a USB adapter to interface with whatever technology you need. These can enable you to add an RJ45 connection, Wi-Fi and Bluetooth radios, optical drives, and more. Many port replicators support pass-through charging, which enables a user to connect their charger to it and still charge their device.
Manage and maintain portable computers
■ Keep in mind that many portables take design cues from mobile devices; you may need to mix practices for these less-traditional portables with the practices for managing and maintaining mobile devices discussed in Chapter 25.
■ Today, portable computers use Lithium-Ion (Li-Ion) batteries because that battery chemistry provides the highest energy density for the weight and has few problems with external factors.
■ Batteries should be stored in a cool place and kept charged, at least to 70–80 percent. Never drain a battery all the way down unless required to do so as part of a battery calibration. Rechargeable batteries have only a limited number of charge-discharge cycles before overall battery performance is reduced. Because batteries contain dangerous chemicals, never handle one that has ruptured. Always recycle old batteries rather than disposing of them in the trash.
■ The process of cooperation among the hardware, the BIOS, and the OS to reduce power use is known generically as power management. Early laptops used power continuously, regardless of whether the system was using the device at the time. With power management features, today’s laptops can automatically throttle CPU speed, turn off unused devices, or put the system into low-power sleep/standby/suspend or hibernate modes, keeping application state ready to resume from RAM or a storage device.
■ Configure power options via the system setup utility or through the operating system. OS settings override CMOS settings.
■ Laptops with backlit keyboards will have some way you can disable this feature when it’s not needed, usually with a keyboard combination. You can also reduce the output of the LCD backlight using a combination of FN and another key to get a few more minutes of computing time before you have to shut down.
■ Use an appropriate screen cleaner (not glass cleaner) to clean the LCD screen. Use compressed air around the keyboard and trackpad. Never use water around the keyboard.
■ To combat the inevitable heat produced by a portable computer, always use power management, keep an air space between the bottom of the laptop and the surface on which it rests, don’t use a keyboard protector for an extended period of time, and be aware of your fan.
■ Store portable computers in quality cases when traveling. Well-padded backpacks not only keep a laptop protected but also make a system less appealing to would-be thieves. When traveling, don’t forget accessories such as AC power cords, additional batteries, or modular devices. Remove all discs from drives when shipping and make sure you have enough battery power to boot up for security personnel. If shipping your computer, go with a reputable carrier, keep your tracking number, and request a delivery signature. Use a laptop lock or a software tracking system to protect your laptop when traveling.
Upgrade and repair portable computers
■ Because very compact or 2-in-1 portables take design cues from mobile devices, the device may be hard or impossible to disassemble without specialized tools, and hardware that is standard and easily replaced or upgraded on a larger laptop may be soldered on. Be prepared to integrate these steps with mobile-device recommendations in Chapter 25.
■ You need to follow a four-step process to succeed in disassembly/reassembly. First, document and label every cable and screw location. Second, organize any parts you extract from the device. Third, refer to the manufacturer’s resources. Finally, use the appropriate hand tools. If you can’t get information directly from the manufacturer, try various online sites, such as YouTube or iFixit, for walkthroughs on fixing problems.
■ Every CompTIA A+ tech should know how to perform the two standard upgrades to portable computers: adding RAM and replacing a hard drive.
■ Most portables with upgradable or replaceable RAM use one of two types of RAM: 260-pin DDR4 or DDR5 SO-DIMMs. No standard exists for RAM placement in portables, and the slots may not even be in the same place. More often than not, you need to unscrew or pop open a panel on the underside of the portable and press out on the restraining clips to make the RAM stick pop up so you can remove and replace it. Always disconnect from all electrical sources (including batteries) before removing or inserting RAM.
■ SSDs in the M.2 drive format now rule in most laptops. It isn’t uncommon to find both M.2 and 2.5-inch drives used at the same time in larger systems.
■ Upgrading from an HDD to an SSD can bring remarkable gains in battery life and performance. If a user is reporting slow performance and you’ve already checked the RAM, it may be time to ditch the HDD in favor of a shiny new SSD.
■ Once you get beyond upgrading RAM and replacing a hard drive on a portable, you take the plunge into the device-repair specialty. You can replace some components by lifting them out, detaching a ribbon cable, and then reversing the steps with the replacement part. Other parts require a full teardown of the laptop to the bare bones, which presents a much greater level of difficulty.
■ Standard tech-level repairs you should be able to do are replacing the battery, keyboard, and optical drive (usually—some are tough to get out). Others are replacing the small speakers and Wi-Fi card.
■ You can also open the hatch on the bottom of the case that opens like the RAM hatch to expose other parts for replacement. The same hatch might hold one or two M.2 slots, for example, and give you access to the CPU.
■ Some hardware replacements require you to open a portable, remove many delicate parts, and strip it down to the bare chassis. Dedicated laptop techs do these jobs, but you should know the process.
■ Portables open in two different ways, depending on the manufacturer. You either peel away layers from the top down, through the keyboard, or from the bottom up, through the base. Either direction requires careful attention to detail, part connectivity, and locations. You’ll need a system to keep track of the dozens of tiny screws.
Troubleshoot portable computers
■ If your portable won’t power on, try a different wall outlet. If it still fails to power up, remove all peripheral devices and try again. If it still won’t power on, the AC adapter may be bad.
■ Performance may suffer if a program is frozen or too many programs are open. You can typically troubleshoot this with tools for analyzing system performance such as Task Manager in Windows or Activity Monitor in macOS; use them to identify and kill frozen, unnecessary, or resource-heavy programs and see if performance improves. Extreme or stubborn performance issues may require a hard reboot.
■ The most common battery issues are swelling, short life, or charging problems. Parts that don’t sit, close, open, or function like normal could be early symptoms of a swollen battery; swollen batteries are dangerous and should be promptly taken to an e-waste disposal site. A battery with short life is usually just old and in need of replacing, but check to make sure there aren’t performance issues causing increased power use. If the battery won’t charge, the AC adapter or battery needs replacing; if the battery is removable, you can identify a bad AC adapter by pulling the battery and trying to run the device with only the AC adapter.
■ Overheating can be a sign of poor airflow, high resource use, battery problems, or exposure to a hot environment, but it can also cause problems like damage to components or the battery. If the device feels dangerously hot, act fast to avoid damage; power down the device and move it to a cool environment. If there’s no obvious cause (such as the portable charging or doing heavy work), listen for fans, if the device has any, and check vents for blockages. If the device is charging, see if it cools when unplugged.
■ If the screen doesn’t come on properly, verify that the laptop is configured to use the built-in LCD screen by pressing the appropriate key to cycle through the internal and external monitors. If the screen is definitely broken, you may use an external monitor to access the laptop.
■ If wireless is not working, check for the physical switch on the side of the laptop that toggles power to the internal network card, Bluetooth adapter, GPS, or NFC. If your laptop doesn’t have a switch, check for a key combination or function key that toggles power; check if the device is in airplane mode. You also may be out of range. Physically walk the laptop closer to the wireless router or access point. If the only problem is GPS or NFC, check settings for location, privacy, and communication with nearby devices.
■ When audio isn’t working, check for any hardware audio controls and verify that audio isn’t muted in the notification area. If the device has recently been serviced, make sure the speakers are still connected. Try plugging in headphones or speakers to identify a problem with the device’s internal speaker. Before replacing speakers, try a reboot and double-check audio output device settings; try changing and resetting the default output device and disabling and re-enabling the output device itself.
■ If an input device isn’t responding, confirm the device isn’t frozen or having other performance problems. Reboot the device if necessary.
■ If the keypad or trackpad doesn’t work, try a shot of compressed air, reseat the physical internal connection, or reconfigure the driver settings through the Control Panel or System Preferences.
■ An unresponsive or erratic touchscreen may be dirty, wet, or registering unintentional touches. Wipe it down with a dry microfiber cloth and make sure you are holding it properly. If it is still erratic or unresponsive, check the manufacturer’s resources to see if there’s a hardware troubleshooting mode with a touchscreen diagnostic.
■ Key Terms
aspect ratio
biometrics
Chrome OS
docking station
Function (FN) key
gesture
hibernate
high-gloss
laptop
Lithium-Ion (Li-Ion)
M.2
matte
multitouch
near-field scanner
port replicator
power management
power plan
sleep
standby
swollen battery
suspend
touch pen
trackpad
■ Key Term Quiz
Use the Key Terms list to complete the sentences that follow. Not all terms will be used.
1. A typical clamshell-style portable computer with built-in LCD monitor, keyboard, and input device is most commonly called a __________________.
2. The _________________ enables laptop keyboards to do more than one function on a single key.
3. Many newer laptops feature __________________ screens offering richer color, higher contrast, and wider viewing angles.
4. Systems wake up more slowly from ___________ mode than from ___________ mode.
5. The __________________ is the comparison between display height and display width.
6. A(n) __________________ plugs into a single (often proprietary) port on the portable computer and offers legacy and modern single- and multifunction ports, as well as features like an optical drive or expansion card slots.
7. Today’s laptops use __________________ for batteries because that battery chemistry provides the highest energy density for the weight.
8. __________________ enable users to be more precise with their touchscreen interactions, hand write notes, draw, and keep the screen free of fingerprints.
9. A bulging laptop chassis is caused by a(n) __________________. Resolving this issue will involve a trip to your local electronics recycler.
10. Most laptops today have one or more __________________ slots for SSDs and internal expansion cards such as Wi-Fi NICs.
■ Multiple-Choice Quiz
1. Which of the following drive formats are found in modern laptops? (Select two.)
A. 1.8-inch
B. 2.5-inch
C. 3.5-inch
D. M.2
2. Which of the following modes writes information from RAM to the hard drive and then copies the data back to RAM when the computer is activated again?
A. Standby
B. Suspend
C. Sleep
D. Hibernate
3. Current portables typically use which of the following kinds of upgradeable RAM? (Select two.)
A. 204-pin DDR3 SO-DIMMs
B. 260-pin DDR4 SO-DIMMs
C. 262-pin DDR5 SO-DIMMs
D. 200-pin DDR2 SO-DIMMs
4. Where do you configure sleep modes in Windows?
A. The Power Options applet in the Control Panel
B. The Display in the Control Panel
C. The Power Management applet in the Control Panel
D. The Power and Devices applet in the Control Panel
5. Which of the following input devices will you most likely find on a portable?
A. TrackPoint
B. Trackpad
C. Trackball
D. Mouse
6. Which of the following is a common port used to connect modern laptops to an external monitor? (Select two.)
A. HDMI
B. DisplayPort
C. VGA
D. DVI
7. 2-in-1 describes what type of device?
A. Laptop that can become a tablet
B. Clamshell laptop computer
C. PDA
D. Desktop replacement
8. If wireless networking is not working, which should you check?
A. Check for a switch on the laptop that toggles power to the network adapter.
B. Make sure the Ethernet cable is plugged into the laptop.
C. Make sure the digitizer has been trained.
D. Make sure Power Management is enabled.
9. Erin has an older laptop with a charger that specifies an input voltage of 100–240V. What does this indicate?
A. The laptop has an auto-switching power supply.
B. The laptop has a fixed-input power supply.
C. The laptop has a step-down transforming power supply.
D. The laptop has a step-up transforming power supply.
10. Which of the following display types will you most commonly find on a portable device today?
A. CRT
B. LCD
C. OLED
D. Plasma
11. Jake has received two replacement memory sticks for his Dell laptop. What should he do first in the upgrade process?
A. Disconnect the AC cord and remove the battery.
B. Flip the laptop over and remove the RAM compartment cover.
C. Remove the memory sticks from their antistatic bags and set them on the antistatic mat next to the laptop.
D. Remove the memory sticks from the laptop.
12. Steve complains that his Windows laptop still isn’t snappy enough after doubling the amount of RAM. What might improve system performance?
A. Add more RAM.
B. Replace the power supply.
C. Replace the battery.
D. Replace the HDD with an SSD.
13. Jim likes his laptop but complains that his wireless seems slow compared to all the new laptops. On further inspection, you determine his laptop runs 802.11g. At first you suggest a new USB 802.11ac adapter, but Jim says he knows he’ll lose or break it in no time. Which of the remaining options could improve his network connection speed? (Select two.)
A. Replace the regular RAM with 802.11n RAM.
B. Replace the display with one with a better antenna.
C. Replace the Mini-PCIe 802.11g card with an 802.11ac card.
D. Get a new laptop.
14. Edgar successfully replaced the display on a laptop (a toddler had taken a ballpoint pen to it), but the customer called back almost immediately complaining that his wireless didn’t work. What could the problem be?
A. The problems are unrelated, so it could be anything.
B. Edgar inadvertently disconnected the antenna from the 802.11 card.
C. Edgar replaced the display with one without an internal antenna.
D. Edgar failed to reconnect the antenna in the new display.
15. Rafael gets a tech call from a user with a brand new laptop who is complaining that working on it was causing headaches. What could the problem be?
A. The laptop uses a plasma display.
B. The laptop uses an OLED display.
C. The laptop uses an LED display in power saving mode.
D. The laptop uses an LED display in full power mode.
■ Essay Quiz
1. You’ve been tasked to advise your group on current portable computer technology so they can purchase ten new laptops by the end of the quarter. In a short essay, weigh the pros and cons of getting Chromebooks versus 2-in-1s.
2. Your boss has a new portable computer and is planning to take it with him on a business trip to Paris. He’s not all that tech-savvy or much of a traveler, so write a memo that tells him what to do or avoid while traveling, especially overseas.
3. Norm wants to upgrade his laptop’s hard drive, CPU, and RAM. Because he’s upgraded all of these components on his desktop, he doesn’t think he’ll run into much trouble. What advice will you give him about selecting the components and upgrading the laptop?
Lab Projects
• Lab Project 23.1
This chapter mentioned that, although they are more expensive, portables typically provide less processing power and smaller hard drives, and in general are not as full-featured as desktop computers. Use the Internet to check sites such as www.lenovo.com, www.asus.com, www.dell.com, and www.hp.com to compare the best equipped, most powerful laptop you can find with the best equipped, most powerful desktop computer you can find. How do their features and prices compare? Now find a less expensive laptop and try to find a desktop computer that is as similar as possible in terms of capabilities, and compare their prices.
• Lab Project 23.2
Continuing from the previous lab, go to the www.dell.com website and compare one of the higher-end laptops with one of the more basic laptops. List the features that are of interest to you personally, starting with the most important and continuing down. Then use the site to begin building the perfect laptop for you. Compare your results with others’ results and discuss what’s important to you.