chapter 12
Working with Operating Systems
“Is it sufficient that you have learned to drive the car, or shall we look and see what is under the hood? Most people go through life without ever knowing.”
—DR. JUNE SINGER

In this chapter, you will learn how to
■ Explore Registry components
■ Explore and use Windows tools and settings
■ Understand the differences between Windows Administrative Tools and Processes, Applications, and Services
■ Identify common features and tools of macOS
Windows is powerful, easy to use, surprisingly idiot proof, backwardly compatible, and robust. A large part of Windows’ power is hidden—under the hood—in programs and processes that Microsoft doesn’t want normal users to see. For the record, I think hiding anything normal users don’t need is a smart idea. Technicians, on the other hand, need to not only understand these processes and programs but also know how to use, configure, and fix them when needed. This chapter doesn’t focus solely on Windows though! Here is a look at what this chapter will cover: the Registry, Windows 10 features and tools, using Windows 10 Control Panel utilities and settings, Windows 11 features that differ from Windows 10 features, and identifying common features and tools of macOS. Let’s dig in!
1102
■ Registry
The Registry is a critical database, core to every Windows system, that stores everything about a PC, including information on all the hardware, network information, user preferences, file types, passwords, desktop color…virtually everything you might find in Windows. Almost any form of configuration you do to a Windows system involves editing the Registry, and your system will not boot into Windows without a properly configured Registry. Every version of Windows stores the numerous Registry files (called hives) in the \%SystemRoot%System32config folder and each user account folder. Although you rarely have to access these files directly, every competent tech should know how to access the Registry, understand its basic components, and know how to manually edit the Registry. So, without further ado, let’s explore the Registry!
Accessing the Registry
When you use Windows’ Settings or Control Panel (or just about any other utility), you are editing the Registry; however, there are some situations where a tech might need to access the Registry directly.
You can access and open the Registry directly by using the go-to command in the Registry Editor (also known by its executable name, regedit) on your machine and compare what you see to the examples in this chapter. To open the Registry Editor, enter regedit in the Start | Search bar. You can also run regedit from the command line.
Registry Components
The Registry is organized in a tree structure similar to the folders on the file system. Once you open the Registry Editor in Windows, you will see five main subgroups, or root keys:
■ HKEY_CLASSES_ROOT
■ HKEY_CURRENT_USER
■ HKEY_LOCAL_MACHINE
■ HKEY_USERS
■ HKEY_CURRENT_CONFIG
Try opening one of these root keys by clicking the plus sign to its left; note that more subkeys are listed underneath. A subkey also can have other subkeys, or values. Values define aspects of the subkey. Figure 12.1 shows an example of a subkey with some values. Notice that the Registry Editor shows only keys—root keys and subkeys—on the left and values on the right. Each of the root keys has a specific function, so let’s take a look at them individually.

• Figure 12.1 Typical Registry root keys, subkeys, and values
HKEY_CLASSES_ROOT
Historically, the HKEY_CLASSES_ROOT root key defined the standard class objects used by Windows. A class object is a named group of functions that defines what you can do with the object it represents. Pretty much everything that has to do with files on the system is defined by a class object. The Registry, for example, uses two class objects to define the JPG image file. One object is located at HKEY_CLASSES_ROOT.jpg and the other object is located at HKEY_CURRENT_USERSoftwareClasses.jpg and covers user-specific associations for JPG files.
This root key combines class objects from SoftwareClasses under both HKEY_CURRENT_USER and HKEY_LOCAL_MACHINE to provide backward compatibility for older applications.
HKEY_CURRENT_USER and HKEY_USERS
Windows is designed to support more than one user on the same system, storing personalized information such as desktop colors, screensavers, and the contents of the desktop for every user that has an account on the system. HKEY_CURRENT_USER stores the current user settings, and HKEY_USERS stores all of the personalized information for each user. While you certainly can change items such as the screensaver here, the better way is to right-click on the desktop and select Personalize.
HKEY_LOCAL_MACHINE
The HKEY_LOCAL_MACHINE root key contains all the data for a system’s non-user-specific configurations. This encompasses every device and every program in your computer.
HKEY_CURRENT_CONFIG
If the values in HKEY_LOCAL_MACHINE have more than one option, such as two different monitors, this root key defines which one is currently being used. Because most people have only one type of monitor and similar equipment, this area is almost never touched.
![]()
Talkin’ Registry
When describing a Registry setting, we use a simple nomenclature. For example, I once moved my copy of World of Warcraft from my C: drive to my D: drive and had problems when the program started. I went online to https://www.blizzard.com (home of Blizzard Entertainment, the folks who make World of Warcraft) and contacted the support staff, who gave me instructions to access the Registry and make this change:
Go to HKLMSOFTWAREBlizzard EntertainmentWorld of Warcraft and change the GamePath object and the InstallPath object to reflect the new drive letter of your new WoW location.
To do so, I opened the Registry Editor. Using this nomenclature, I was able to find the location of these Registry settings. Figure 12.2 shows this location. Compare this image to the path described in the instructions from Blizzard. Note that HKEY_LOCAL_MACHINE is abbreviated as HKLM.
• Figure 12.2 Editing the Registry to move World of Warcraft to a new drive
To describe the location of a specific Registry value, like where the Blizzard tech told me to go, requires a little bit of repetition. To wit, in the previous example, World of Warcraft is a subkey to Blizzard Entertainment, which is in turn a subkey to the root key HKLM. The World of Warcraft subkey has four values. All keys have the (Default) value, so in this case the World of Warcraft subkey offers three functional values.
Values must have a defined type of data they store:
■ String value These are the most flexible type of value and are very common. You can put any form of data in these.
■ Binary value These values store nothing more than long strings of ones and zeros.
■ DWORD value These values are like Binary values but are limited to exactly 32 bits.
■ QWORD value These values are like Binary values but are limited to exactly 64 bits.
There are other types of values, but these four are used for most Registry entries.
Manual Registry Edits
The most common scenario where you need to access the Registry directly is when you’re directed to do so by a tech support Web site, a vendor’s patch, or a tech support technician. Be careful! When you do find yourself using the Registry Editor to access the Registry, you risk breaking things in Windows: applications might not start, utilities might not work, or worst of all, your computer might not boot. To prevent these problems, always make a backup of the Registry before you change anything. Once the backup is in a safe place (I like to use a thumb drive, personally), reboot the system to see if the changes you made had the desired result. If it worked, great. If not, you’ll need to restore the old Registry settings using your backup. Let’s watch this in action.
One of the more common manual Registry edits is to delete autostarting programs. I want to prevent a program installed by my Logitech GamePanel keyboard and mouse from autostarting. The most common place for making this change is here:
HKLMSOFTWAREMicrosoftWindowsCurrentVersionRun
Opening the Registry Editor and going to this subkey, you’ll see something like what’s shown in Figure 12.3.

• Figure 12.3 Mike’s Run subkey
Before I delete these keys, I’m going to save a copy of my Registry. The Registry Editor’s Export feature enables you to save either the full Registry or only a single root key or subkey (with all subkeys and values under it). Select Run from the left pane and then click File | Export. Save the subkey as a Registration file with the extension .reg. Be sure to put that file somewhere you’ll remember. Should you need to restore that key, use the File | Import command, or just right-click the icon and click Merge as shown in Figure 12.4.

• Figure 12.4 Merging keys from a backup file
Command-Line Registry Editing Tools
Windows includes a couple of command-line tools to edit the Registry (plus a lot more in PowerShell). The two that you might need on occasion are reg and regsvr32.

The reg command is a full Registry editing tool. You can view Registry keys and values, import and export some or all of a Registry, and even compare two different versions of a Registry. The tool is so powerful that it has multiple levels of help so you can tailor a command to accomplish very tight Registry edits. For example, typing reg /? brings up a list of 12 specific operations that you can search for help on, such as reg query /? and reg add /?.
The regsvr32 command, in contrast with reg, can modify the Registry in only one way, adding (or registering) dynamic link library (DLL) files as command components in the Registry. By default, if you run regsvr32 in a 64-bit version of Windows, the 64-bit version runs. This can cause problems if you’re trying to add a 32-bit DLL to the Registry. To accomplish the latter, run the regsvr32.exe file in the %SystemRoot%Syswow64 folder.
■ Your Basic Windows Toolset
Microsoft Windows comes with a dizzying number of built-in tools and utilities to do, well, everything you’ll ever want to do to a system. You’ve already started to see some of these tools—remember Disk Management from Chapter 8? Well, in this section you’re going to meet many more utilities, utilities so important that you’ll be revisiting them time and again throughout the rest of the book! In the next section, “Processes, Applications, and Service Tools,” you’ll be introduced to yet another set of tools which are a bit different from the ones we are about to discuss. The difference, you ask? Let’s see if you can figure it out after reading about both!
System Configuration
Techs use System Configuration (also known by its executable name, msconfig) to edit and troubleshoot operating system and program startup processes and services. System Configuration is an old tool but one we turn to again and again!
To start the System Configuration utility, go the Start | Search bar, enter msconfig, and click OK or press ENTER. The program runs after you provide the necessary credentials, depending on the User Account Control (UAC) setup.
The System Configuration utility offers a number of handy features, distributed across the following tabs:
■ General Select the type of startup you would like to use for the next boot (see Figure 12.5). You can perform a normal startup with all device drivers and services launching normally, a diagnostic startup with only basic devices and services, or a selective startup where you choose whether to load system services, load startup items, or use original boot configuration.

• Figure 12.5 Windows 10 System Configuration
■ Boot This tab contains advanced boot features. Here you can see every copy of Windows you have installed, set a default OS, or delete an OS from the boot menu. You can set up a safe boot, or adjust advanced options like the number of cores or amount of memory to use. Selecting Safe boot, by the way, will force Windows to start in Safe mode on every reboot until you deselect it. Safe mode loads minimal, generic, trusted drivers and is used for troubleshooting purposes.
■ Services This tab is similar to the Services tab in the Task Manager. You can enable or disable any or all services running on your PC.
■ Startup This tab lets you launch Task Manager to enable you to toggle on or off any startup programs (programs that load when you launch Windows). This is perhaps the most useful tab, especially if Windows is slow to load on your PC.
■ Tools This tab lists many of the tools and utilities available in Windows, including Event Viewer, Performance Monitor, Command Prompt, and so on. There’s nothing here that you can’t find elsewhere in Windows, but it’s a handy list all the same.
Windows Settings
Settings is the “one-stop-shop” utility for the vast majority of tools you’ll use to work on a Windows system (see Figure 12.6). Introduced back in 2012 with Windows 8, Settings is slowly replacing the Control Panel, the traditional place to configure Windows. This creates a bit of a problem for Windows users in that, as you’ll see later in this chapter, the Control Panel is still alive and well. In fact, the Control Panel is still critical for access to some utilities. This means that any given utility on your Windows system may only be accessible from Settings, only accessible from the Control Panel, or in some case accessible from both Settings and Control Panel. Sheesh! Let’s dive into some of the Settings categories that you are most likely to see on the CompTIA A+ 1102 exam.

• Figure 12.6 Windows Settings
Be careful with terminology here. Microsoft calls Settings an application (app) and it uses the term categories for the choices inside Settings, such as “System” or “Privacy.” Strange terms, but hey, it’s Microsoft, so we live with these things.
Time & Language
The Time & Language category is used to set the time and date, add languages to your PC, and adjust speech settings. Time & Language has four sections on the left: Date & Time, Region, Language, and Speech.
Date & Time In the Date & Time section, you’ll see the current date and time displayed at the top of the screen. Next, you’ll see Set time automatically and Set time zone automatically options; if you set both toggles to On, Windows will automatically set the date and time based on your device’s current location. If these toggles are set to Off, you can click Change to change the date, time, and time zone manually.
Region In the Region section, you can choose your country or region from a drop-down menu. Your region determines which apps you can use from the Windows Store (not all apps are available in all regions) and will also help app makers deliver localized content. Your region does not affect your Windows display language.
Language In the Language section, you can add languages and keyboards. To do this, click Add a language and choose the language you want to add. This will add that language’s keyboard to your PC. You can switch between keyboards by clicking the language taskbar button and pick the keyboard you want to use, or you can use the keyboard shortcut WINDOWS KEY-SPACEBAR to toggle between added keyboards.
Speech The last section in the Time & Language tab is the Speech section. Here, you can tweak some Cortana settings, such as picking what language you use to interact with your device. You can also choose the default voice for apps. This is where you can pick things such as a male or female voice and specific accents that match the country in which the computer is being used.
So that was a lot of detail, but the intent was to walk you through one section of Settings to help you understand what the workflow looks like. In the sections that follow we will talk about what other Settings do, but without the same level of detail. That said, you should open Settings and poke around to make sure you understand how everything works.
Update & Security
We use the Update & Security category for three main jobs. First, the Windows Update and Delivery Optimization sections enable you to configure how and when Windows and Store app updates are delivered. Second, the Windows Security section provides a button to launch the Windows Security app to configure anti-malware, firewalls, and other security functions. Third, the Backup section and the Recovery section provide options to make backups and to restore those backups, respectively.
Update & Security also gives you access to Windows Activation, Find my device, For developers (special Windows features that are intended only for developers), and the Windows Insider Program for those who like the most cutting-edge updates (Microsoft calls these preview builds). Also extremely handy are the Troubleshooter tools (for a quick diagnosis and automatic fix when things go wrong with Windows) and the Device Encryption tool, specifically Bitlocker, which helps protect your information.
Personalization
The Personalization category lets you change how Windows looks to suit your preferences. You can change the background on your desktop, colors, folder options, icons, and much more! If you have Windows, take some time to explore all of the items you can personalize. It’s all about you!
Apps
Windows is useless without the many applications we use to get work (or play) done. The Apps category lists all the apps installed on your system, enables you to uninstall any of the listed apps, and view and change what apps autostart when your system starts up. Some of the awesome apps offered include Microsoft Edge, Microsoft Office, Dropbox, OneDrive, Skype, and more.
Privacy
Virtually every tech company collects a certain amount of information about their users, such as what you do with their product, where you are using it, and what else you are doing at the time. They claim that they do this to diagnose common problems by bringing together information from thousands, if not millions, of users and that such information can also be used to customize your experience. Well, yes, some of that is accurate, but they also collect a heck of a lot of other data that they don’t do anything with but use it to put eerily accurate advertisements in front of you; a process known as monetization of data.
Think about apps that you may have installed on your phone. One of my favorite apps is a combination flashlight and magnifying glass. It’s great for reading menus in dark restaurants, but why do the app’s creators need to know my location and be able to access my microphone? They don’t, but we have grown so accustomed to giving up this type of data that we don’t think much about it. However, when we are tasked with creating secure systems, we have to consider potential negative outcomes.
The Privacy category enables you to limit the extent to which you’re targeted for advertising. It also has a list of permissions that apps may want (such as access to your camera or microphone), enabling you to control whether any app can have the permission or to control which apps do.
System
The System category is, in my opinion, a big pile of settings that Microsoft couldn’t find a better home for anywhere else. Lots of different settings are exposed in the System category. You can access Display options (e.g., fonts and layout) here. Moving from the visual to auditory you will find the Sound settings. Here you can select the audio input and output devices you want to use, troubleshoot them, customize volume levels, and access Bluetooth settings and connected devices.
In the Notifications & actions section, you can set the sounds you want to associate with different types of alerts, as well as where on your screen they appear. Notifications can be annoying, but they are important because they alert you to crucial incoming items. The next section of System, Focus assist, enables you to assign priority levels to different types of notifications, so you aren’t interrupted every time a spam message comes in. Power & sleep is an important section that is already well covered in Chapter 23. There are plenty of other options under Settings; you have to scroll down to see all of them. Luckily, CompTIA isn’t going to quiz you on every feature under System.
Devices
The Devices category enables you to make mundane adjustments to attached devices. From the main Settings window, open Devices and you will see several sections, including Bluetooth & other devices, Printers & scanners, Mouse, Touchpad, and so forth. (Please note that what you see may vary depending on what devices your administrator wants you to have access to.) To understand what is available, just click through the Devices list. For Bluetooth & other devices, you will see the Bluetooth On/Off toggle and, when set to On, a list of devices that are or may be connected. Printers & scanners lets you see the printers you have access to, add new ones, and print to Desktop, and it provides some troubleshooting services. Mouse lets you choose button and speed settings. A quick review of the other items will inform you of what you can do, but again, these are more mundane options that are provided to let you make quick adjustments or carry out simple tasks related to devices.
Network & Internet
If you need to do anything related to connecting your system to a network or the Internet, the Network & Internet category is the place to go. Here you get quick access to your connection status, adapter settings, network sharing options, as well as dial-up, VPN, and proxy settings. Many of the available options are covered in Chapters 18, 19, 20, and 21, so check out those chapters to see the Network & Internet category in action!
Gaming
If you have ever played a newer game on an older system, or even on a newer system that is underpowered, you know that the system can freeze up or, at the very least, drop frames. Either one of these events can suck all of the joy out of gameplay. The Gaming category is here to help prevent this from happening. Here you will find options specific to Xbox Game Bar, as well as the general Game Mode option. When you select Game Mode and toggle to the On position, your system will be optimized for more stable graphics performance while you’re playing a game. In addition, Game Mode prevents Windows Update from restarting Windows to install updates (but just while you’re running a game).
Accounts
Whether it’s a personal computer or a work computer, there may be more than one person using it, and each of those people may have differing roles and responsibilities. For example, on your personal computer you probably wouldn’t want your eight-year-old child to have the same levels of access that you do. In your job, you might share a workstation and not want someone else looking at your data or messing up tasks that you may have been working on for weeks. To meet needs like this, the Accounts category includes a wide range of options for configuring Windows accounts, privileges, and permissions which will be discussed next in Chapter 13.
Control Panel
Before Windows Settings there was the Control Panel. Like Windows Settings, the Control Panel is an application from which you can launch a number of different utilities. However, in the Control Panel each of these utilities is called an applet. For many years, the Control Panel was the place for users and administrators to configure Windows systems—but the role it plays has been steadily shrinking since the introduction of the Settings app in Windows 8. In fact, the CompTIA A+ 1102 objectives only mention the Control Panel in the context of Windows 10 (though it is still soldiering on in Windows 11, at least for now). Figure 12.7 shows the Control Panel in its default (Category) view.

• Figure 12.7 Control Panel default view
The Control Panel offers two ways to find the applets. At the top right of the panel, you will see a View by drop-down menu. Choose Category to view the main categories, which you can drill down into to find applets by function. Choose View by | Large icons or View by | Small icons to view the complete list of applets (Figure 12.8 shows Large icons view).
• Figure 12.8 Control Panel Large icons view
The CompTIA A+ 1102 exam objectives list 15 specific Control Panel applets you need to know for the exam. All 15 applets are described in this book, but many of them are discussed in other chapters that pertain to their specific usage. This chapter covers six applets that don’t fit well anywhere else, so let’s take a look at them and explore what they do.
System
The System applet opens Windows Settings in the About section of the System category, displaying information about the computer. This includes the version of Windows, processor speed, RAM, if it’s 32-bit or 64-bit, if pen or touch is enabled, computer name, workgroup, and if Windows is activated. This is one of the first places you go to view specifics on the system you are working with.

Sound
The Sound applet, as the name implies, has everything to do with sound settings. Here you can choose and configure sound output devices, sound input devices, and default Windows sounds. The Sound applet is one of the tools that exists in both Windows Settings and the Control Panel. Figure 12.9 compares the Sound Control Panel applet (left) to the Sound section of the System category in Windows Settings (right). At first glance they look very different, but if you open both tools and click through their options, you’ll see that they do basically the same job. Having said that, never assume that both Windows Settings and the Control Panel always have the same features.

• Figure 12.9 Sound Control Panel applet (left) compared to the Sound settings in Windows Settings (right)
Indexing Options
Indexing describes the way a computer gathers information about files to make it easier to find what you are looking for and stores the file information in a database-type format. This makes the search process much faster. Imagine having to open every folder and look through it to find what you need. Indexing solves this problem by creating a directory that you can reference and access files from. However, not every folder is indexed, as there are many folders that you will seldom, if ever, use. To speed up processing, these folders are excluded from the initial indexing. However, if there is something you want to index, because you use it frequently, the Indexing Options tool lets you select files and folders that you want indexed.
To index selected files or folders, click Indexing Options in the Control Panel. You will see a list of the folders that are indexed. As just noted, very few folders are actually indexed by default, with Figure 12.10 serving as an example of what you might expect to see.

• Figure 12.10 Indexing options in the Windows Control Panel
Ease of Access
Microsoft works hard to make Windows usable by folks with physical limitations, and Ease of Access Center in Control Panel is the place to go to adapt the OS to those needs. For those with sight impairment, you can launch Magnifier to enable them to enlarge part of the screen and launch Narrator to read the screen out loud. For those who need help with keyboard and mouse control, Ease of Access provides features such as On-Screen Keyboard, Sticky Keys (key combinations can be typed one key at a time), and Filter Keys (ignores double taps).
Administrative Tools
Administrative Tools is a special setting of File Explorer that enables you to open a specific set of applets—it’s like a super applet launcher! You’ve already seen some of these applets in earlier chapters—such as Disk Cleanup and Defragment back in Chapter 9. We’ll also cover a number of these applets in this and later chapters. For now just know that you can launch many applets from this one super applet (see Figure 12.11)!
• Figure 12.11 Administrative Tools
Don’t let the many applets in Administrative Tools intimidate you. Only a select few of these applets are on the exam, and we will talk about them in detail as appropriate, including in this chapter. What’s important here is that you recognize Administrative Tools and know that it’s located in the Control Panel.
 Tech Tip
Windows 11 renames Administrative Tools to Windows Tools. Still sitting in the Control Panel and with a few different applets, it does roughly the same job—a super applet that starts other applets!
File Explorer Options
File Explorer is your go-to tool for file manipulation in Windows. Here you can delete, copy, and move files. You can create folders and move or copy those folders as well. Equally, you can double-click on any file to launch it or run it. I have File Explorer open 50 percent of the time on my machine. Figure 12.12 shows the contents of the C: drive on my system.

• Figure 12.12 File Explorer
The File Explorer Options applet (see Figure 12.13) enables you to personalize what File Explorer shows you. Want File Explorer to open to Quick access rather than This PC? Set that here. Want to see the file extensions for every file? This applet is where you do that.

• Figure 12.13 File Explorer Options
Show Hidden Files A very popular setting in File Explorer Options is to show hidden and system files. By clicking the View tab, clicking the Show hidden files, folders, and drives radio button, and then unchecking the Hide protected operating system files (Recommended) checkbox, you’ll be able to see all files on your system. Compare Figure 12.14 to Figure 12.12 and you’ll see the difference.

• Figure 12.14 File Explorer with hidden and operating system files visible
Showing hidden files is an important function for File Explorer Options, but the CompTIA A+ 1102 exam objectives explicitly list three others, so let’s take a look at them.
Show or Hide Extensions Computer filenames have two parts, such as mydog.jpg. The first part of the name is the title that you or someone else gave the file. The second part is the type of file. In the mydog.jpg example, the file is a picture of my dog. We know this because of the descriptive title and because .jpg is a type of format that is used for images. This latter part of the name is known as the file extension. For some reason, though, Microsoft doesn’t think that users need to know the type of file they are looking at and therefore has hidden all of the extensions by default. If you want to see file extensions in File Explorer, go to the View tab and uncheck the Hide extensions for known file types checkbox.
View Options The previous sections discussed two of the most frequent options you will interact with in the View tab of File Explorer Options. However, as you’ve seen, there are many other options on the View tab. Take a few minutes to explore them. You will see options such as Always show icons, never thumbnails, Hide empty drives, Always show availability status, and so forth. These are all options that administrators commonly tinker with and ones you will likely learn on the job.
General Options File Explorer comes with many default settings. Most folks like the defaults, but for reasons ranging from privacy to personal preference, some users may want to change this interface. In File Explorer Options, click the General tab. The first option you see, Open File Explorer to, enables you to specify if you want to open File Explorer to Quick access or This PC. The Privacy section, at the bottom of the General tab, allows you to specify whether you want to show recently used files and frequently used folders in Quick access. Both options are checked by default, but you can uncheck either or both.
The other two sections in the General tab deal far more with personal preference. The first, Browse folders, allows you to specify whether you want folders to open in the same window or a new window. The second, Click items as follows, allows you to adjust how click behaviors work: either point at an item to select it and click once to open it, or click once to select an item and click twice to open it.
■ Processes, Applications, and Services Tools
Recall from Chapter 3 that CPUs run threads—bits of programs that are fed into the CPU. Let’s take a moment and develop this concept. A program is machine code, manifesting as a file, that the CPU can read from RAM. When the program is sitting on your hard drive, nothing is happening. When you click on the file, a copy of the program is loaded from the hard drive onto RAM. At this point the program is running and is called a process. As the CPU runs the program, it grabs a few lines of code from RAM and processes them.
Dealing with processes in their many forms is a big part of understanding what’s happening “under the hood.” Windows is a multitasking operating system, running lots of processes simultaneously. Many of these processes appear in a window (or full screen) when you open them and end when you close that window. These processes are called applications.
There’s an entire class of processes that, due to the nature of their job, don’t require a window of any form. These processes run invisibly in the background, providing a large number of necessary support roles. Collectively, these are called services.
A big part of troubleshooting a Windows system is dealing with processes and services. We start them up and turn them off. We need to configure which applications autostart when the computer boots up. We need to make sure that we don’t overload our system with too many processes and services. Perhaps we need to schedule a program to run at a certain time. For these scenarios and so many more, Windows comes with many utilities to help us tweak our processes, applications, and services. Let’s take a look at these tools now.
Task Manager
Microsoft offers the Windows Task Manager as the one-stop-shop for anything you need to do with applications, processes, and services. The Task Manager is an old utility that dates back to some of the earliest versions of Windows, but it has been updated with almost every version of Windows. By default, the Task Manager starts in a simplified mode that makes it easy for new users to kill problem apps, if needed (see Figure 12.15).
• Figure 12.15 Default Task Manager
The quickest way to open the Task Manager is to press CTRL-SHIFT-ESC. There are many other ways to open the Task Manager, including a few that you might see on the CompTIA A+ 1102 exam: go to Start | Search, type taskmgr, and press ENTER; or press CTRL-ALT-DELETE and select Task Manager.
For some users, the simplified mode is all they’ll ever need—but the real power of the Task Manager is in its detailed mode, which you can access by clicking the More details button. Once you have switched into detailed mode you can see that the Task Manager has several tabs. Every one of these tabs is incredibly useful and deserves a separate discussion, so let’s look at each in turn, starting with the Processes tab.
Processes Tab
If you really want to tap the power of the Task Manager, there’s no better place to start than the Processes tab (see Figure 12.16). Since everything is a process, and the Processes tab shows you every running process, this is the one place that enables you to see and control every process running on your computer.

• Figure 12.16 Lots of Firefox processes!
Most processes also provide a description to help you understand what the process is doing, although you’ll probably need to scroll right to see this information.
All processes have certain common features that you should recognize:
■ A process is named after its executable file, which usually ends in .exe but can also end with other extensions.
■ A single process may spawn many instances of the same process, as shown in Figure 12.16.
■ All processes have a username to identify who started the process. A process started by Windows has the username System.
■ All processes have a process identifier (PID). To identify a process, you use the PID, not the process name. You can see all PIDs in the Details tab.
 Try This!
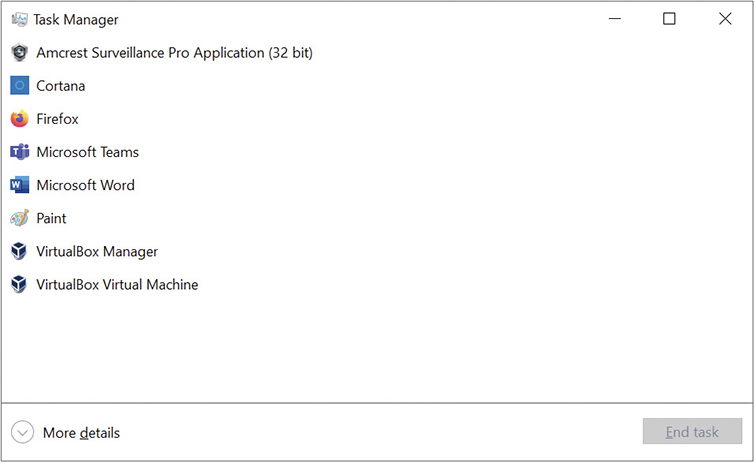
Closing Applications
Launch Notepad and then start up the Task Manager. On the Processes tab in the Task Manager, right-click the Notepad application and select Go to details. It takes you to the process in the Details pane. Right-click and select End task to close the application.
Performance Tab
The Performance tab is a great resource to get an overview of resource usage on your system. On this one page you get a graphical view of how much your system is taxing your CPU, RAM (see Figure 12.17), storage, and network connections and even how hard your GPU is working. When you run into scenarios where your system or the Internet seems to run too slowly or stop, this is a great first place to check.

• Figure 12.17 I’m using about half my RAM according to the Task Manager.
App History Tab
The App history tab tracks how much CPU time and network bandwidth all your applications have used since the last time you reset tracking. I don’t find App history useful, and it seems CompTIA agrees—it isn’t listed as a Task Manager tab in A+ 1102 exam objective 1.3.
Startup Tab
Too many programs automatically starting up when you start Windows? The Startup tab shows you all the autostarting programs. You can disable autostarting programs (see Figure 12.18) to see how the system runs without them, but you cannot permanently remove them from autostarting—a bit frustrating, Microsoft!

• Figure 12.18 Disabling an autostarting program
Microsoft has a weird relationship with autostarting programs. Windows has been around since the 1980s, and over the years Microsoft has come up with many ways to autostart both programs and services. This means there is no single utility to answer the question “What’s autostarting on my system?” To find this answer, download Microsoft’s free Autoruns utility at https://docs.microsoft.com/en-us/sysinternals/downloads/autoruns.
Tech Tip
Microsoft’s Sysinternals offers many more great tools in addition to Autoruns. Want to lose six hours of your life filled with nerdy joy? Go to https://docs.microsoft.com/en-us/sysinternals/ and start playing with the hundreds of powerful tools invented by Microsoft’s CTO of the Azure product team, Mark Russinovich. Mark’s been writing Windows utilities for over 25 years, and all of us techs love him.
Users Tab
Windows is designed to support multiple users. Twenty or thirty years ago it was common for a single computer to have, for example, one user from 8 a.m. to 4 p.m. and another user from 4 p.m. to midnight. We tend to forget this as we live in a world where everyone has their own computer(s). Yet with networking and the Internet, it’s possible for one person to log on at the computer (locally) while others log on remotely. The Users tab shows the applications running on a per-user basis (see Figure 12.19). You can also right-click on a username and sign them out.

• Figure 12.19 Users tab
The Users tab is the place to go if you want to see who’s logged in and which programs each logged-in user is running. But if you want to see a list of everything that’s running along with which user is running it, the Details tab is where you want to go.
Details Tab
The main Processes tab is a great overview of your running processes, but to see the PID and User name columns, switch to the Details tab, as shown in Figure 12.20. The Details tab also enables you to pull a neat trick for dealing with stubborn, hard-to-kill programs with more than one process; right-click on a process and select End process tree to kill the process and child processes it launched.

• Figure 12.20 Details tab
Shockingly, the Details tab isn’t listed along with the other Task Manager tabs in CompTIA A+ 1102 objective 1.3. I think this is a huge error on CompTIA’s part. The Details tab, even though not on the exam, has many features such as usernames and PIDs. Usernames and PIDs are on the exam, so let’s just use the Details tab as a tool to understand the CompTIA A+ objectives even better.
Services Tab
We’ve spent a lot of time talking about how the Task Manager allows us to manipulate one genre of processes known as applications, so it’s easy to forget there’s an entire other genre of processes that are not applications: services. Services are the soul of your Windows system. Services don’t show up on your screen but they do the hundreds of background tasks critical to making Windows run.
Services need to be started either manually, by another process, or autostarted. You’ll run into scenarios where a service becomes erratic and needs to be stopped. Sometimes too many services load up and slow down your system. This is where the Service tab comes into play (see Figure 12.21).

• Figure 12.21 Services tab
The Services tab allows you to start, stop, or restart any service. You cannot, however, use the Services tab to set up a service to autostart or even just pause a service for a moment. This is a job for a different utility. Take a look at the bottom of the Services tab. See the option called Open Services? Click this to open the ancient but still useful Services utility. At first glance the Services utility looks pretty much like Task Manager’s Services tab, but it actually does much more. Check out Figure 12.22 to see some of the settings that you can configure for a service by right-clicking its name in the Services utility and choosing Properties.

• Figure 12.22 Services utility showing properties
Resource Monitor
The Task Manager should always be your first choice for quick checks on system usage, but there are times where you might need more detail and more control. In these cases, it’s time to use Resource Monitor. Think of Resource Monitor (resmon) as a super Task Manager with all the same features, plus many more (see Figure 12.23) You can access Resource Monitor from the Performance tab in the Task Manager, from the Control Panel under Administrative Tools, or just by typing resource monitor or resmon in the Start | Search bar.

• Figure 12.23 Resource Monitor
Resource Monitor starts on the Overview tab. This is handy, and the graphs on the right are pretty, but the work is done in the four other tabs: CPU, Memory, Disk, and Network.
Resource Monitor organizes everything by PID (process ID) number. Using PIDs can facilitate diagnosis of problems, because tracking a four-digit number is much easier than remembering a text string.
Beyond that, each tab brings subtle but interesting features you don’t see in the Task Manager:
■ CPU Enables you to start or suspend any process without killing it
■ Memory Breaks down memory into specific types
■ Disk Breaks down disk activity by PID
■ Network Shows network activity by PID, open connections, and much more
Resource Monitor enables you to close running applications and all associated programs with the End process and End process tree context menu options. It makes sense to put the options here, so you can look specifically at programs jamming CPU usage, for example, or network utilization.
In general, if you want a quick overview of what’s happening with your system’s processes, use the Task Manager. When you need to get down to the details of what process is using what resource and then close a buggy process, go to Resource Monitor.
Microsoft Management Console
Microsoft has always had a challenge with the organization of its many built-in utilities. Tools like the Control Panel and Windows Settings are examples of Microsoft’s ongoing desire to organize utilities into what I personally see as “tools to launch tools.” Back in 2000, Microsoft launched another such tool called Microsoft Management Console (MMC). Microsoft describes MMC as a framework used to support and launch special programs called snap-ins. On your system, MMC is an executable file called mmc.exe. A snap-in is a file with the file extension .msc. Not all Windows Administrative Tools are available as snap-ins, which CompTIA lists as “Additional tools” in 1102 objective 1.3.
Over 25 different snap-ins are preinstalled in a typical Windows system. In fact, you’ve already encountered some snap-ins in previous chapters! Remember Device Manager (devmgmt.msc) in Chapters 2 and 5? Disk Management (diskmgmt.msc), covered in Chapter 8? Those are both MMC snap-ins. Group Policy Editor (gpedit.msc), covered in Chapter 11, is another MMC snap-in. We will see more MMC snap-ins in later chapters in the context of their related topics. For example, Local Users and Groups (lusrmgr.msc) is covered in Chapter 13, and Task Scheduler (taskschd.msc) is covered in Chapter 14. This section describes three snap-ins that fit best in this chapter. But before we go through these three, let’s first explore how to use MMC.
To open MMC, type mmc into the Start | Search bar and (after confirming the UAC prompt) press ENTER. This brings up an empty console, that is, MMC is a tool that enables you to create individual consoles as shown in Figure 12.24.
• Figure 12.24 Blank MMC
An empty MMC console is useless without loading one or more snap-ins. Choose File | Add/Remove snap-in to see a list of available snap-ins. To add a snap-in, click its name in the Available snap-ins list on the left and click the Add button to add it to the Selected snap-ins list on the right (see Figure 12.25). Keep clicking and adding until you have the snap-ins you want for this console and then click OK to finish.

• Figure 12.25 Loading snap-ins
You don’t have to run MMC to start a snap-in. If you know the filename of the snap-in you want to run, just type the filename in the Start | Search bar, press ENTER, and that snap-in starts without your needing to first open MMC. Of course, the trick is to know the names of these snap-ins. CompTIA wants you to know the names of eight specific snap-ins. Table 12.1 lists these snap-ins and their corresponding filenames.
Table 12.1 MMC Snap-Ins and Filenames

Now that you know how to run MMC and snap-ins, I’ll give you a tour of the three snap-ins listed in Table 12.1 that are not covered in other chapters.
Performance Monitor (perfmon.msc)
The Task Manager and Resource Monitor are great at identifying current problems, but what about problems that happen when you’re not around to see them? What about problems that happen over time? For example, what if your system is always running at a CPU utilization of 60 percent—is that good or bad? Windows comes with tools to log resource usage so you can track metrics such as CPU and RAM usage over time. In Windows, a good tech turns to Performance Monitor as the primary tool for tracking system performance over time.
You can find Performance Monitor in the Administrative Tools applet in the Control Panel. You can also open the tool by going to Start | Search, typing perfmon.msc, and pressing ENTER. Performance Monitor opens to a screen that displays some text about Performance Monitor and a System Summary. Clicking the Performance Monitor item on the left shows the default tracker (see Figure 12.26). Note at the bottom of the screen that Performance Monitor is tracking the % Processor Time counter.

• Figure 12.26 Default Performance Monitor
If you want very detailed, specific tracking, then you might still find a good reason to use this tool. That requires an understanding of objects and counters.
Objects and Counters Two tool types define the usefulness of Performance Monitor: object and counter. An object is a system component that is given a set of characteristics and can be managed by the operating system as a single entity. A counter tracks specific information about an object. The processor object counter %Processor Time shown in Figure 12.26, for example, tracks the percentage of elapsed time the processor uses to execute a non-idle thread. Many counters can be associated with an object.
Working with the Tools Performance Monitor gathers real-time data on objects, such as memory, physical disk, processor, and network, and displays this data as a graph (line graph), histogram (bar graph), or simple report. When you first open it, Performance Monitor shows data in graph form. The data displayed is from the set of counters listed below the chart. If you want to add counters, click the Add button (the one that looks like a plus sign). Select one of the many different objects you can monitor. Once you’ve chosen an object, the Add Counters dialog box includes a helpful feature: you can select a counter and click the Show description checkbox to learn about the counter, as shown in Figure 12.27.

• Figure 12.27 Add Counters dialog box
The big question here is “Which counters should I add?” Well, to understand fully which counters to use in which situation takes a lifetime of learning, but you can narrow down your options by considering what you want to look at. For instance, in a scenario where the Internet is running slower than normal, you may want to consider a counter that tracks the network bandwidth. If you’re worried you are running low on RAM, use a counter that shows total memory use. In the end, when a CompTIA A+ 1102 exam question asks you which counters to use in a particular scenario, a little common sense is all you need. In the real world where things are more complex, you can always turn to online recommendations or use a premade data collector set that ships with Windows.
Data Collector Sets Data Collector Sets are groups of counters you can use to make reports. You can make your own Data Collector Sets (User Defined), or you can just grab one of the predefined system sets. Once you start a Data Collector Set, you can use the Reports option to see the results (see Figure 12.28). Data Collector Sets not only help you choose counter objects to track but also enable you to schedule when you want them to run. Pretty cool, right?

• Figure 12.28 Sample report
Event Viewer (eventvwr.msc)
Event Viewer is Windows’ default tattletale program, spilling the beans about thousands of interesting happenings (Windows calls them events) that your system monitors and logs. Your system monitors many different logs by default, and you can add more logs or change what they see if you’d like. Event Viewer is the tool you use to read and understand these logs. Be patient with Event Viewer! It is akin to learning chess. You can get the basics of Event Viewer quickly, but it takes a lifetime to master.
You can open Event Viewer from Control Panel | Administrative Tools or by typing eventvwr.msc and pressing ENTER. You can also just start typing Event Viewer in the Start | Search bar and press ENTER when it pops up in the results. The default interface isn’t too interesting. Get into the good part of Event Viewer by expanding the Windows Logs option on the left to see something like Figure 12.29.

• Figure 12.29 Event Viewer showing Windows Logs
Tech Tip
A log file is a record of events. Windows logs are binary files. You must read them through tools like Event Viewer.
Windows Logs There are four important Windows Logs: Application, Security, Setup, and System. Collectively and by default these four logs are all that most techs need to diagnose what’s happening on a system. Make sure you know what type of events each of these four logs stores:
■ Application Records anything that has to do with applications or programs outside of the Windows system files themselves
■ Security Records security events such as failed logons
■ Setup Tracks setup and update events for your Windows system
■ System Tracks anything having to do with your Windows operating system
Your system may have more logs than just these four. That’s fine. For the exam and for real life, stick with the big four.
Clicking System should list quite a few events. Even the tamest Windows machine generates lots of events, and that’s OK. By default, the top (the most recent) event is selected and the bottom of Event Viewer shows details about that event (see Figure 12.30).
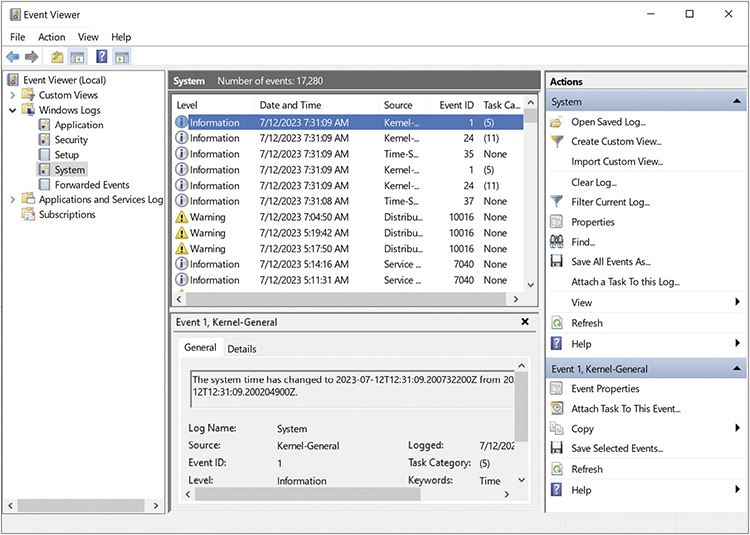
• Figure 12.30 Individual event in Event Viewer
Event Levels Not all events are created equal. Some are extremely serious, requiring some form of action or at least your notification, while others are just letting you know something took place. Windows defines five different event levels:
■ Verbose Extra information that is probably only useful when debugging an application.
■ Information Something happened that went well, such as a successful backup.
■ Warning An event that isn’t an error but may warn about one, like low disk space.
■ Error Something went wrong, such as a file not loading.
■ Critical Something a little more serious happened, like the system unexpectedly powering off instead of shutting down cleanly.
The first time you investigate individual events, you’re going to be intimidated. No worries, as most Windows events aren’t very easy to understand. In most cases you just search for the error online and you’ll find the explanation. Also remember that error details might give you a clue as to the problem.
Custom Views Going through the default logs poses a problem: a single log can include tens or even hundreds of thousands of events. Plus, who wants to go through every log when there is a single, filtered place to see all or at least some of them? That place is Custom Views in the Event Viewer navigation pane.
Event Viewer comes with a premade Custom View called Administrative Events that does a good job of tracking warning and error events across your logs. You can (and probably should) make your own custom views based on your own needs by clicking New View. Figure 12.31 shows the results of a custom view called Critical Only that only shows critical errors for the System and Application log.
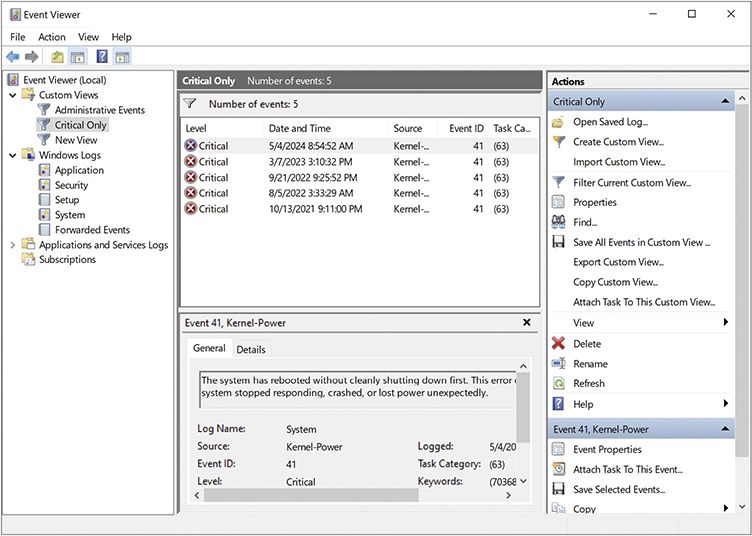
• Figure 12.31 Event Viewer showing only Critical events
Certificate Manager (certmgr.msc)
A certificate is, in essence, a digital key that enables your programs to encrypt data that may only be read by a corresponding key on the receiver’s side. Certificates are the cornerstone of pretty much every encrypted communication done between devices on the Internet. Your system is full of certificates, and the Certificate Manager gives you access to all of them.
Honestly, there’s not much reason to go into the Certificate Manager unless you’re instructed to. I’ll save the big discussion of certificates for Chapter 27, so for now let’s just make sure you know how to start Certificates Manager. Like the other snap-ins discussed here, you can access Certificate Manager from Control Panel | Administrative Tools, or by typing either certmgr.msc or Certificate Manager in the Start | Search bar and pressing ENTER. All will lead you to the default screen, as shown in Figure 12.32.

• Figure 12.32 Default Certificate Manager screen
So, returning to the question at the beginning of “Your Basic Windows Toolset” section on the difference between those tools and the ones we just discussed, what is the difference? Your Basic Windows Toolset includes a number of Microsoft Management Console snap-ins found in the Windows folder (e.g., Task Scheduler, Event Viewer). Your Processes, Applications, and Services tools either run in the background, execute programs using one or more threads, or are executable by the user when logged in. Now, let’s switch gears and tackle a different animal—macOS preferences and features.
■ macOS Preferences and Features
Where the rubber meets the road, Windows and macOS are both just operating systems. Since users need many of the same things from any operating system they use, Windows and macOS are actually pretty similar. They both have places to go to configure the OS, set up file synchronization, search the device, and more. Let’s look at a few things you’ll need to understand for configuring and working with macOS.
System Preferences
As you may have noticed in the sections on the Windows Settings app and the Control Panel, the location of different settings in a modern Windows system is a bit chaotic and sometimes downright frustrating. If you find this as annoying as I do, you’ll understand one small reason why macOS has many dedicated users.
In macOS, most settings are neatly collected under the System Preferences category, which works like a more consistent version of the Control Panel. Just like the Control Panel, System Preferences (shown in Figure 12.33) collects settings in dozens of preference panes. It also includes a handy-dandy search box (shown in Figure 12.34) in case you aren’t sure where an option lives.

• Figure 12.33 System Preferences

• Figure 12.34 Finding an option in System Preferences
You shouldn’t need to know all the preference panes for the exam—the CompTIA A+ 1102 exam objectives only call out seven: Displays, Network, Printers, Scanners, Privacy, Accessibility, and Time Machine. Let’s take a look at each.
Displays
Much like the display settings in Windows, this is the place to go to confi-gure things like your display’s resolution, brightness, and color and configure how multiple displays are arranged. The settings here differ from device to device based on their capabilities.
For example, the main reason to come here is to arrange multiple displays. Figure 12.35 shows how the Display preference pane puts this option front-and-center when you have a second display connected and otherwise opens to settings for the lone display. The display-specific preferences enable you to configure things like the resolution, color profile, refresh rate, and rotation—but the precise options will depend on the display’s features.
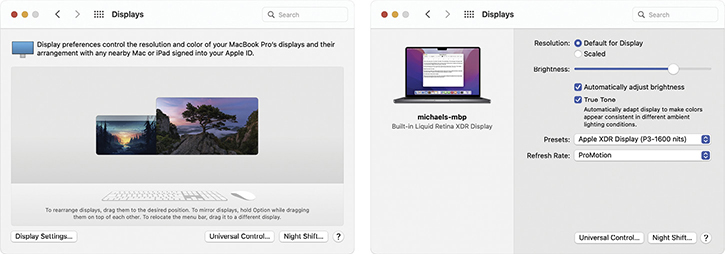
• Figure 12.35 Display preferences with multiple displays (left) and a single display (right)
Network
Since we haven’t discussed networking in much detail yet (we’ll get there in Chapters 18 through 21), I’ll keep this pretty light for now. The most common network operation that your average user needs is just to connect to or disconnect from a wireless network or turn Wi-Fi off altogether—and you can accomplish both of these via the Wi-Fi status menu on the right side of the menu bar (see Figure 12.36).

• Figure 12.36 Selecting a wireless network in macOS
The Network preferences pane (see Figure 12.37) is where to look if you need to fiddle with a whole slate of network settings that we haven’t had a chance to talk about yet: setting up rare network types, configuring preferred Wi-Fi networks, TCP/IP settings, DNS settings, and configuring many more advanced options. Don’t worry about what these are for now—just remember where to find them and keep an eye out for these topics in the network chapters.

• Figure 12.37 Network preference pane
Printers & Scanners
The CompTIA A+ 1102 objectives list separate preference panes called Printers and Scanners—but in reality there is a single preference pane called Printers & Scanners (shown in Figure 12.38) for configuring printers, document/photo scanners, and combination all-in-one printer/scanner devices. We’ll take a closer look at these devices in Chapter 26, so for now you just need to know that Printers & Scanners is where you’d go to add or remove a printer or scanner, check on supply levels, and check up on a document that seems to be stuck in the print queue.

• Figure 12.38 Printers & Scanners preference pane
Privacy
The CompTIA A+ 1102 objectives mention the Privacy preferences, though you won’t find them at the top level of System Preferences. To find the Privacy preferences shown in Figure 12.39, open the Security & Privacy preferences pane and then select the Privacy tab. There are a few different things to notice here.

• Figure 12.39 Privacy preferences in the Security & Privacy pane
First, note the lock icon in the lower-left corner. Just like in Windows, some preferences require administrator privileges to change. On these panes, you’ll have to click this lock icon and then authenticate with your fingerprint or password before making changes.
Whether you unlock to make changes or not, the list on the left side of the Privacy preferences tab shows you a list of the special privacy permissions available, and the list on the right side shows which apps and processes have requested or been granted the permission. Figure 12.39 shows that I’ve selected the Screen Recording permission and that I have granted this permission to the Chrome browser and Microsoft Teams. If you unlock to make changes, you can toggle the permission for a given process.
Accessibility
The Accessibility preferences pane enables users to configure macOS to better support any needs they have with respect to vision, hearing, and motor control. This is where you can go to enable voice control, turn on captions, enlarge parts of the screen, cause macOS to narrate menus for you, and more.
Time Machine
We’ll take a closer look at Time Machine, a tool for backing up (and restoring) files and folders on your Mac, in Chapter 14. For now, it’s enough to know that the Time Machine preferences pane enables you to turn on backups, specify where to store them, control which files are backed up, and configure whether Time Machine should take new backups if your device is running on battery power.
However, more and more macOS and Linux administrators turn to antivirus/anti-malware for these systems. There’s plenty of third-party options for Mac and Linux antivirus, both free and for pay, that do a fine job of keeping malware at bay. Check out our complete antivirus/anti-malware discussion in Chapter 27 for more details!
Apple ID
An Apple ID is, more or less, Apple’s version of a Microsoft account. It’s a global account that you register with Apple that enables you to synchronize data and preferences among multiple devices (through Apple’s iCloud service). The main difference is that you can log in to a Windows system with a Microsoft account, while an Apple ID is just associated with your local account after you log in.
The CompTIA A+ 1102 exam objectives don’t focus on Apple ID as part of System Preferences—but the Apple ID preference pane is the place to go to log in, log out, update account data, configure which kinds of data are synchronized via iCloud (shown in Figure 12.40), see which devices are associated with your Apple ID, and locate a device if Find My Mac is enabled.
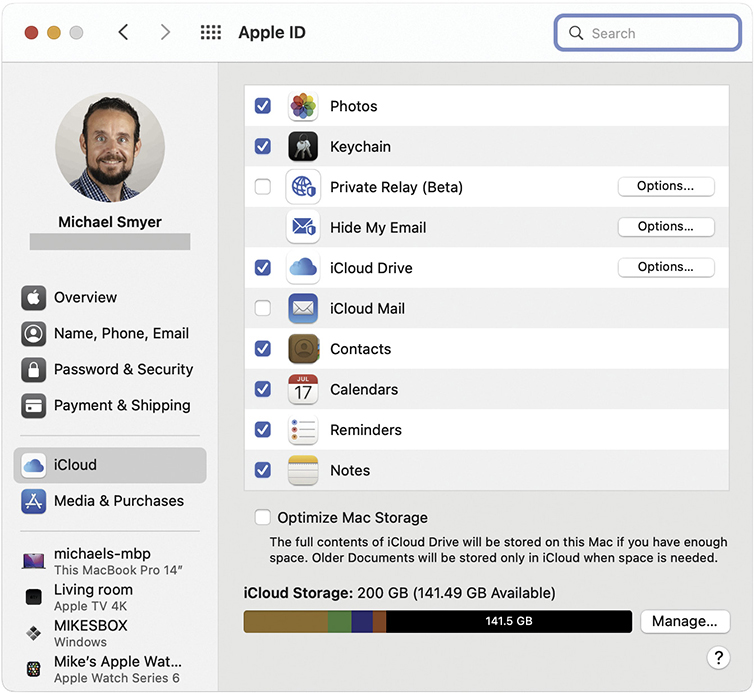
• Figure 12.40 iCloud synchronization options in the Apple ID preferences pane
AirDrop
Your series editor is a Windows guy, but Apple sure does a great job creating some very nifty utilities that really just don’t happen in the Windows world. AirDrop is one example of that kind of nifty. Got a file you want to share with another Apple product nearby? Select the file and choose Share | AirDrop. You will see every AirDrop-enabled device in your nearby space. Just drag the file to the systems you wish—nifty!
Watch for scenarios where AirDrop doesn’t work. First, make sure the other device is AirDrop capable. Second, make sure that both your device and the other device are discoverable (Go | AirDrop in Finder). Last, make sure each system’s firewall has “Block All Incoming Connections” disabled.
Spotlight
Spotlight has long been the global system search tool on macOS—it can find files, preferences, Web pages, contacts, and events, and can even serve as a calculator. The Spotlight search experience has been so good for so long that Windows (via Start | Search) and most Linux distros all include a similar global search tool these days. To access Spotlight, just press COMMAND-SPACE and then start typing your query.
Keychain
On macOS, Keychain (which you can investigate via the Keychain Access app) is responsible for managing sensitive passwords and certificates. We’ll talk a little more about certificates in Chapters 21 and 27, so for now let’s focus on passwords.
Keychain remembers many kinds of common passwords (like your aunt’s Wi-Fi password) automatically. Keychain will supply the password automatically when you join the network. If you need to see it later, you can pop open Keychain Access, find the password item, toggle Show password, and then provide your own user-account password (or fingerprint scan) to reveal the prerecorded password (as shown in Figure 12.41).
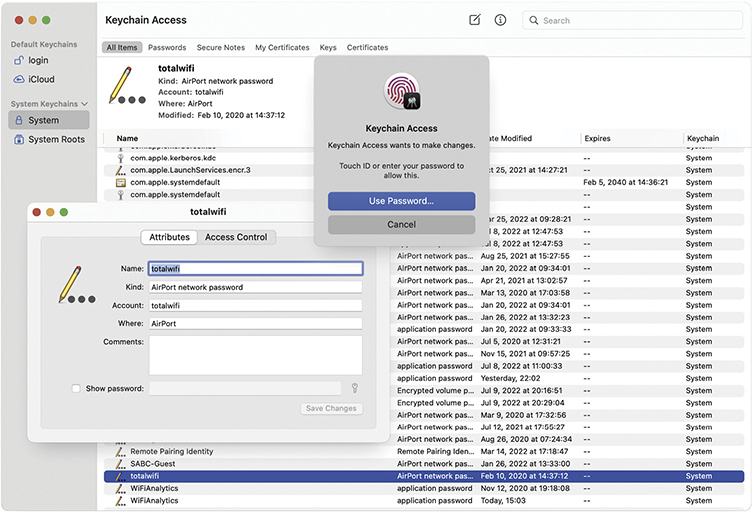
• Figure 12.41 Revealing a Wi-Fi password in Keychain Access
FileVault
In the early 2000s, Apple first introduced its FileVault storage encryption feature. FileVault makes it easy to encrypt a storage device so that some snoop can’t plug it in to another system and read your files without having to log in. FileVault has become a little less important in recent years—all of the internal storage devices on modern Macs are encrypted by default—but I still think it’s a pretty cool idea.
The main difference between the default encryption and FileVault is that macOS automatically unlocks the default encryption when you turn on the device, while a storage volume encrypted by FileVault is only unlocked once you log in to your account. If you lose or give a device away without FileVault enabled, it will be much harder for some snoop to recover your files.
Chapter 12 Review
■ Chapter Summary
After reading this chapter and completing the exercises, you should understand the following about Windows and macOS features and settings.
Explore Registry components
■ The Registry is a critical database, part of every installed Windows system, that stores everything about a PC, including information on all the hardware, network information, user preferences, file types, passwords, desktop color . . . virtually everything you might find in Windows. Registry files (hives) are stored in the \%SystemRoot%System32config folder.
■ To edit the Registry, use regedit, also known as the Registry Editor.
■ The Registry is organized in a tree structure similar to the folders on a PC. The five root keys of the Registry are HKEY_CLASSES_ROOT, HKEY_CURRENT_USER, HKEY_LOCAL_MACHINE, HKEY_USERS, and HKEY_CURRENT_CONFIG.
■ Root keys are divided into subkeys, which are divided into values. In the Registry Editor, keys are listed on the left and values are listed on the right.
■ The Registry Editor’s Export feature enables you to save either the full Registry or only a single root key or subkey (with all subkeys and values under it).
Explore and use Windows tools and settings
■ System Configuration (also known as msconfig) enables you to edit and troubleshoot how Windows and the services and programs it contains start up.
■ The Settings app is a one-stop-shop for most of the tools you need to configure a Windows system. Settings is slowly replacing the Control Panel, though there are still tools that you can access only through the Control Panel.
■ Time & Language settings enable you to change the time and date, add languages to your PC, and adjust speech settings. Update & Security settings deal mainly with how and when Windows updates are delivered. Personalization settings let you change how Windows looks. Apps settings enable you to uninstall applications, enable optional Windows features, set default applications, and configure autostarting applications. Privacy settings enable you to disable targeted advertising features of Windows and control what apps can access things like the webcam, microphone, or even your contacts. System settings is a big pile of settings without a better home—settings related to fonts and layout, audio input and output devices, notifications, and power use. Devices settings enable you to manage connected peripherals. Network & Internet settings enable you to check your device’s connection status and change advanced networking settings. Gaming settings are where you can enable Game Mode to pause distracting notifications and allocate the maximum amount of system resources to the game. Accounts settings enable you to configure Windows accounts, privileges, and permissions.
■ While it is slowly being replaced by Settings, the Control Panel still houses legacy configuration utilities and tools called applets.
■ The Control Panel System applet links to the About section of the Settings app, which displays information about the computer. The Sound applet enables you to configure audio input and output devices and change the noises Windows makes. The Indexing Options applet gives you control over which files and folders are indexed for easier searching. The Ease of Access applet enables you to configure the OS to compensate for sight and hearing impairments. The Administrative Tools applet contains a whole slate of helpful tools. The File Explorer Options applet gives you fine-grained control over which files and folders show up in File Explorer, how they look, and how File Explorer itself works.
■ In Windows, programs are executable files waiting on a mass storage device. When you start a program, Windows loads it into RAM as a process. The CPU reads the process, and the process tells the CPU which chunks of code to run.
■ Processes that appear in a window when you open them are called applications, while processes that run in the background without a window are called services—and a big part of troubleshooting Windows systems is using various tools to deal with processes and services.
■ The Windows Task Manager is the one-stop-shop for anything to do with applications, processes, and services. To open the Task Manager, either press CTRL-SHIFT-ESC or press CTRL-ALT-DELETE and select Task Manager. Alternatively, go to Start | Search, type taskmgr, and press ENTER.
■ Since everything is a process, the Process tab is a great place to start with the Task Manager. You may have to click the More details button to see it. Processes are named after their executable files, may go on to spawn more instances of the same process, are associated with the user account that started them, and have a process identifier (PID) to uniquely identify them.
■ The Performance tab of the Task Manager gives you a good overview of resource use on your system. It includes a graph of how taxed your CPU, RAM, storage, network connection, and GPU are. The App history tab tracks how much CPU time and network bandwidth your applications have used since you last reset the tracking. The Startup tab shows you autostarting applications and enables you to disable them. The Users tab shows applications running on a per-user basis. The Details tab provides helpful information such as the user and PID in a single view. The Services tab enables you to start, stop, or restart a service. It also links to the old Services utility (which can do much more with services).
■ Most of the time, techs will use the Task Manager in the More details view, but keep in mind that your users may be looking at the Fewer details view. There’s a button to toggle between the views.
■ Think of Resource Monitor as a super Task Manager. It starts on the Overview tab with pretty graphs, but most of the work is done on the CPU, Memory, Disk, and Network tabs. The CPU tab enables you to start or suspend a process without killing it. The Memory tab breaks down memory into specific types. The Disk tab breaks down activity PID. The Network tab shows network activity by PID, open connections, and more.
■ Microsoft Management Console (MMC) can launch special programs called snap-ins (which have the .msc extension. Snap-ins covered in subsequent chapters include Local Users and Groups and Task Scheduler.
■ MMC starts blank, and you load the snap-ins you want to make it useful.
■ The Performance Monitor (perfmon.msc) snap-in makes it easier to investigate performance issues that play out over long periods of time or when you aren’t around to see them. Performance Monitor works with objects and counters. For example, the Processor object has counters to track what percentage of processor time is used. Many counters can be associated with one object. There are also groups of counters—Data Collector Sets—that you can use to make reports (you can use predefined system sets or make your own).
■ The Event Viewer (eventvwr.msc) snap-in is Windows’ default tattletale, spilling the beans about the events your system monitors and logs. It has four important Windows logs: Application, Security, Setup, and System. The Application log records events related to applications and programs. The Security log records events like failed logons. The Setup log tracks Windows setup and update events. The System log tracks events related to Windows itself. Events can have different levels for informational events, warnings, and errors. The Security log also has Audit Success and Audit Failure levels. You can also create a custom view to filter for specific events.
■ The Certificate Manager (certmgr.msc) snap-in enables you to manage all of the many certificates on your system.
■ Your Basic Windows Toolset includes a number of Microsoft Management Console snap-ins found in the Windows folder (e.g., Task Scheduler, Event Viewer). Your Processes, Applications, and Services tools either run in the background, execute programs using one or more threads, or are executable by the user when logged in.
Identify common features and tools of macOS
■ In macOS, most settings are neatly collected under the System Preferences app, which works like a more consistent version of the Control Panel. It collects settings in dozens of preference panes and includes a handy search box if you aren’t sure where to find an option.
■ The Displays pane enables you to arrange multiple displays and tune display-specific settings such as resolution, color profile, refresh rate, rotation, and so on. The Network pane enables you to control preferred Wi-Fi networks, TCP/IP settings, DNS settings, and other advanced options. The Printers & Scanners pane enables you to add or remove printers and scanners, check their status, and check up on something that seems to be stuck in the print queue. The Privacy pane gives you control over which apps and programs have different permissions (such as the ability to record your screen). The Accessibility pane enables users to configure the OS to support any vision, hearing, or motor control needs they have. The Time Machine pane enables you to turn on backups, specify where to store them, control what gets backed up, and configure whether backups should take place on battery power.
■ An Apple ID is roughly Apple’s version of a Microsoft account. It’s a global account registered with Apple that enables data and preference synchronization. The main difference is that you can’t log in to macOS with the Apple ID—you just separately associate the Apple ID with your account after logging in.
■ Apple’s AirDrop feature allows you to instantly share items from your Apple device, such as documents, photos, notes, Web sites, playlists, etc., with another Apple device product nearby. Select the file and choose Share | AirDrop. You will see every AirDrop-enabled device in your nearby space. Just drag the file to the systems you wish.
■ Spotlight, the global system search on macOS, can find files, preferences, Web pages, contacts, and events and even serve as a calculator. It’s similar to the Start | Search tool on Windows. To access Spotlight, just press COMMAND-SPACE and then start typing your query.
■ Keychain manages sensitive passwords and certificates for macOS. It remembers many kinds of common passwords (like Wi-Fi passwords) and supplies them automatically as needed. If you need to see the password later, find the item in Keychain Access, toggle Show password, and authenticate.
■ FileVault is the macOS storage encryption feature. It enables you to encrypt your storage device, making it harder for snoops to remove the storage device and read your files. You can enable FileVault from the FileVault tab in the Security & Privacy preferences pane.
■ Key Terms
applet
Certificate (certmgr.msc)
Control Panel
counter
Data Collector Sets
Details tab
Event Viewer
file extension
FileVault
Keychain
Microsoft Management Console (MMC)
object
Performance Monitor (perfmon.msc)
Performance tab
Personalization
process
Processes tab
reg
Registry
Registry Editor (regedit)
regsvr32
Resource Monitor (resmon)
root keys
service
Services tab
Settings
Spotlight
Startup tab
System Configuration (msconfig)
System Preferences
Task Manager (taskmgr)
Time & Language
Users tab
■ Key Term Quiz
Use the Key Terms list to complete the sentences that follow. Not all terms will be used.
1. The __________________ in the Task Manager shows applications that will run on boot.
2. __________________ is the global system search tool on macOS.
3. The __________________ in the Task Manager displays overall CPU and memory usage.
4. Performance Monitor requires a(n) __________________ and a(n) __________________ to create logs about resource usage.
5. When you open the Registry Editor, you will see the five __________________ on the left side of the window.
6. You can right-click on a username in the __________________ of the Task Manager to disconnect the user.
7. The Ease of Access Center is a(n) __________________ found in the __________________.
8. The __________________ tracks everything about your computer, from file types to user preferences.
9. In macOS, _________________ is a utility used to customize the macOS interface and is available on the Apple menu.
10. __________________ is like an advanced version of the Task Manager.
■ Multiple-Choice Quiz
1. Which of the following is a difference between an Apple ID and a Microsoft account?
A. An Apple ID is required to use macOS, while a Microsoft account is optional to use Windows.
B. Setting up an Apple ID requires an iPhone, but anyone can set up a Microsoft account.
C. An Apple ID is based on your phone number, while a Microsoft account is based on your e-mail address.
D. An Apple ID cannot directly log in to macOS, while a Microsoft account can log in to Windows.
2. Which of the following root keys contains the data for a system’s non-user-specific configurations?
A. HKEY_LOCAL_MACHINE
B. HKEY_USERS
C. HKEY_CURRENT_USER
D. HKEY_CLASSES_ROOT
3. Which option in Performance Monitor enables you to gather performance data over time to assess problems?
A. Objects
B. Counters
C. Data Collector Sets
D. Performance Monitor doesn’t have this option.
4. Which of the following Task Manager tabs enable you to see which user initiated a process? (Select two.)
A. App history
B. Details
C. Processes
D. Users
5. Which of the following are organized inside the Registry’s root keys? (Select two.)
A. Subkeys
B. Subfolders
C. Values
D. Objects
6. How can you open the System Preferences app in Windows?
A. Right-click on Start and select System Preferences.
B. Start typing sys in Start | Search and select System Preferences when it appears.
C. Press CTRL-ALT-ESC.
D. None of the above.
7. What does the Startup tab in the Task Manager enable you to do?
A. Control the Windows boot mode and options
B. Start or restart Windows services
C. Control which programs start when Windows loads
D. Control which Windows services start when Windows loads
8. Which of the following is a Control Panel applet that now links to the About section of the System category in the Settings app?
A. Administrative Tools
B. System Information
C. System
D. System Configuration
9. Mark needs to edit the Registry on Mary’s Windows 10 box. Which tool enables manual editing of the Registry from a command prompt?
A. reg
B. regedit
C. Registry Editor
D. Task Manager
10. Which Task Manager tab enables you to close a program and its child processes?
A. Services
B. Performance
C. Processes
D. Details
11. How do you open the Registry Editor from the Start | Search box or the command prompt?
A. regedit
B. regsvr32
C. regeditor
D. bcdedit
12. Which category in Windows’ Settings app enables you to change the appearance of Windows?
A. Personalization
B. Display
C. System
D. Appearance
13. Which of the following key combinations opens the Task Manager?
A. CTRL-ALT-SHIFT
B. SHIFT-F5
C. CTRL-SHIFT-ESC
D. WINDOWS KEY-PAUSE/BREAK
14. Which file extension is associated with MMC snap-ins?
A. .msp
B. .msi
C. .msc
D. .mmc
15. With what is every application and service in Windows associated?
A. An object
B. A counter
C. A component
D. A process
■ Essay Quiz
1. Your coworker Mike just discovered the Task Manager. He’s been wreaking havoc on his applications, starting and stopping services, and killing processes left and right. You notice his behavior and decide to clue him in on how processes really work. Explain the differences and connections between applications, processes, and services.
2. Your security-conscious boss wants your help disabling the Windows feature that runs Start | Search queries through Microsoft’s Bing search engine. She thinks the best way for you to do this is in the Registry. Before you begin your work, explain the importance of the Registry’s contents and the risks of making changes.
Lab Projects
• Lab Project 12.1
The Task Manager is a powerful utility. Open it and take a look around. Click each of the tabs and explore its contents. On each tab, right-click the various elements to see what options are in the context menu. This is also a great time to try ending a task or killing a process.
• Lab Project 12.2
Try tracking your CPU and RAM usage over time. Open the Performance Monitor in Windows and set up some objects and counters to monitor the information. How does this tool differ from the Task Manager’s Performance tab?