
This section is for developers interested in extending the JRockit Mission Control Management Console with custom tabs. It assumes some familiarity with the Eclipse platform and terminology, such as extension point and form page.
There is an extension point available for the console that can be used to implement custom tabs. This extension point was, for instance, used when creating the JConsole plug-in tab available from the JRockit Mission Control experimental update site. See the previous chapter for more information on the experimental update site.
The easiest way to get started building your own JRockit Mission Control Console plug-in is to use the PDE wizard available from the experimental update site. First make sure that Eclipse for RCP/Plug-in Developers (Eclipse 3.5/Ganymede or later versions) is installed. Next install the JRockit Mission Control Plug-in into Eclipse. Finally install the PDE Integration Plug-in from the experimental update site.
Note
PDE is short for Plug-in Development Environment, which is a set of tools built into Eclipse to help create, develop, test, debug, build, and deploy Eclipse plug-ins. The PDE Integration Plug-in from the experimental update site provides specialized wizards and templates that make it easier to write plug-ins for JRockit Mission Control.
The available console PDE wizards can be used to generate the boilerplate code needed to contribute custom tabs to the JRockit Mission Control Console. They also serve as examples on how custom tabs can be implemented.
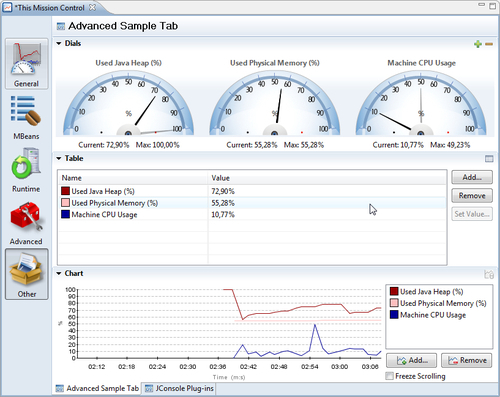
There are two different wizards for creating JRockit Mission Control tabs available in the PDE plug-in—simple and advanced. The simple wizard will generate an example tab that shows a label with the CPU load. The advanced wizard will use various components built into the JRockit Mission Control console to show three selected attributes in various different ways.
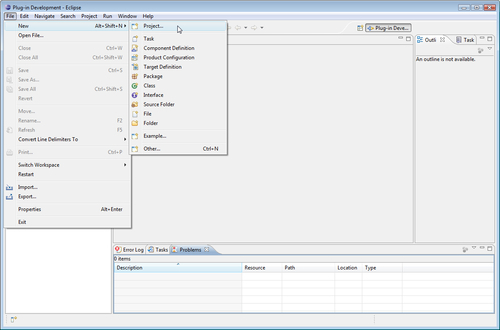
This section walks you through how to create a new tab project:
- Select File | New | Project...
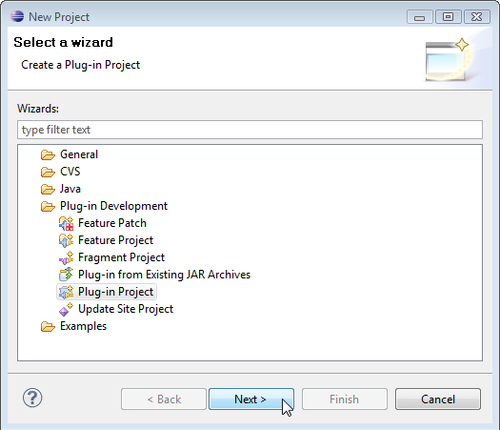
- In the New Project dialog box, select Plug-in Project and click on Next.
- Name your project. It is common practice to name the plug-in project after the main package of your plug-in, for example
com.example.mc.console.myplugin. - Ensure that the correct target platform is selected (Eclipse 3.4 for JRockit Mission Control 3.1 and Eclipse 3.5 for JRockit Mission Control 4.0).
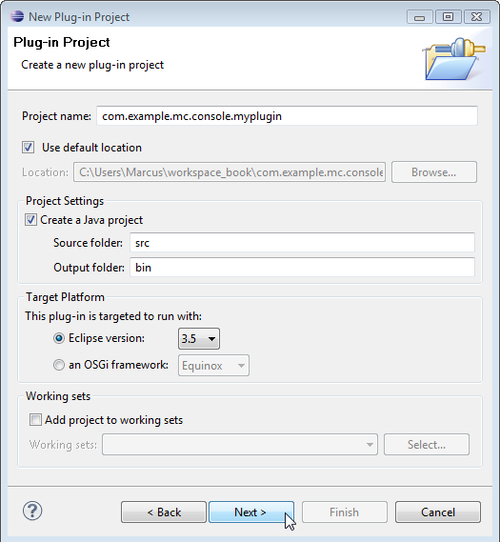
- Click on Next and optionally change plug-in property details. When satisfied, click on Next again.
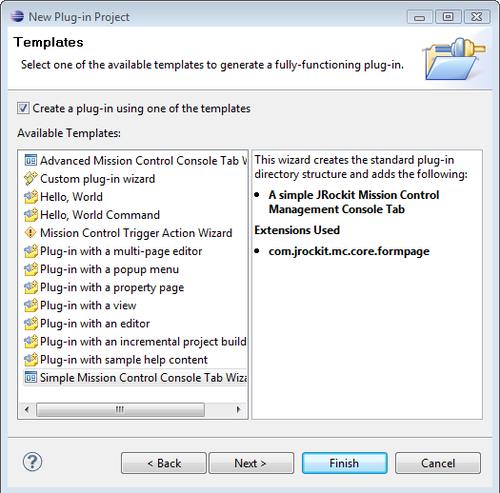
- If the PDE plug-in is correctly installed, you should now be presented with numerous templates, two of which should be the advanced and simple console tab ones. Select either the advanced or the simple one and then click on Next.
- Change the details to match your plug-in and then click on Finish.

The end result should be a plug-in project with all the necessary code for an additional tab in the JRockit Mission Control Console. To try out your new tab, simply go to Run | Run Configurations... In the Run Configurations Dialog, right click on Eclipse Application and select New. This will create a new run configuration for launching Eclipse. By default, it should be using the Eclipse in which you are developing as a target platform and include all the plug-ins in your workspace. As your Eclipse includes the JRockit Mission Control plug-in, everything should be fine. Select the new configuration and press the Run button in the lower right corner.
A new Eclipse should be launched with your brand new plug-in deployed. Open up the Mission Control perspective the way you normally would and start the console. Your tab will show up under the Other tab group.
If the advanced wizard was used, a class containing the code for creating a tab looking much like the standard Overview tab should have been created. It displays three different attributes in various different ways.
Setting up the tab is done programmatically and the code for it is rather simple. The extension point only requires us to subclass org.eclipse.ui.forms.editor.FormPage. So, there are really no dependencies on JRockit or JRockit Mission Control specific classes for the extension point itself. The editor input from the form page can be adapted to an IMBeanService, which is a communication helper service for the console available in the com.jrockit.mc.rjmx.core package.
private IMBeanService getMBeanService() {
return (IMBeanService) getEditorInput().getAdapter(IMBeanService.class);
}
This allows access to the JRockit Mission Control specific MBean layer residing in the com.jrockit.mc.rjmx* plug-ins. RJMX provides, among other things, access to the subscription engine and the proxy layer in JRockit Mission Control.
The proxy layer can be used to access JRockit specific attributes and operations in a version neutral way with respect to the API. Use getMBeanService().getProxyNames() for the attributes and getMBeanService().getProxyOperations() for the operations.
For example, the location of the attribute for the CPU load is different in JRockit versions R26.4 , R27.x, and R28.x. To get the location of the CPU load, regardless of JRockit version, the proxy layer can be used like this:
getMBeanService().getProxyNames(). getAttributeDescriptor(IProxyNames.Key.OS_CPU_LOAD);
This will return an attribute descriptor containing the MBean ObjectName and attribute name needed to locate the attribute. Most of RJMX makes use of attribute descriptors that are objects encapsulating the MBean ObjectName and the attribute name.
This is how we create an attribute descriptor directly pointing to the CPU load where it is located in R28 versions of JRockit:
new AttributeDescriptor( "oracle.jrockit.management:type=Runtime","CPULoad");
To invoke a garbage collection, regardless of JRockit version, the proxy layer can be used in the following way:
getMBeanService().getProxyOperations().gc();
As can be seen from the advanced template code, adding a table for a collection of attributes is very easy.
builder.setProperty( AttributeVisualizerBuilder.TITLE, "Chart");
builder.setProperty( AttributeVisualizerBuilder.TITLE_AXIS_Y, "%");
builder.setProperty( AttributeVisualizerBuilder.TITLE_AXIS_X, "Time");
addAttributesToVisualizer(builder.createChart());
The simple template is actually a little bit more complex than it seems, as it uses the different services directly and does not rely on the standard Mission Control GUI components. The resulting GUI is, however, much simpler. The tab generated from the simple template provides a good example for how to use the RJMX subscription service. The subscription service allows subscribing to the values of one or more attributes using the same subscription mechanism as the rest of the console. Adding a subscription to the CPU load is done by using the SubscriptionService.
getMBeanService().getAttributeSubscriptionService()
.addAttributeValueListener(getMBeanService().getProxyNames(). getAttributeDescriptor(IProxyNames.Key.OS_CPU_LOAD),
new LabelUpdater(valueLabel));
The LabelUpdater is a simple implementation of the IAttributeValueListener interface defined in the com.jrockit.mc.rjmx.subscription package. Each time a new value is retrieved, the valueChanged method is called with an event containing the value. Note that there are no guarantees as to which thread is delivering the event. In the current implementation, it will either be the subscription thread (most events) or the JMX subsystem (notification based events). It will very likely never be the GUI thread, which means that any updates to the GUI will need to be posted to the GUI thread, as done by using DisplayToolkit.safeAsyncExec in the LabelUpdater example code:
public static class LabelUpdater
implements IAttributeValueListener {
private final Label label;
public LabelUpdater(Label label) {
this.label = label;
}
public void valueChanged(final AttributeValueEvent event) {
DisplayToolkit.safeAsyncExec(label, new Runnable(){
public void run() {
Double latestValue = (Double) event.getValue();
label.setText("CPU Load is: "
+ (latestValue.doubleValue() * 100) + "%");
}
});
}
}
Creating an extension for a trigger action is done in the same way. Simply select the Mission Control Trigger Action Wizard template from the plug-in project wizard in step 6.