
Chapter 1
Understanding Electronic Instruments and MIDI
IN THIS CHAPTER
![]() Understanding Musical Instrument Digital Interface (MIDI)
Understanding Musical Instrument Digital Interface (MIDI)
![]() Getting to know synthesizers, drum machines, and other electronic instruments
Getting to know synthesizers, drum machines, and other electronic instruments
![]() Synchronizing MIDI devices
Synchronizing MIDI devices
![]() Exploring sequencing
Exploring sequencing
My first job in a recording studio was in 1985. I can still remember the first time I walked into that studio. The owner was sitting, arms crossed, in front of the mixing console (called a console in those days because the mixer was an actual piece of furniture that took up nearly the whole room). He looked at me and hit a key on the Macintosh computer sitting next to him. Then all of a sudden, a synthesizer started playing, then another, and yet another. “This is cool,” I thought. But then I heard my nemesis — the drum machine.
Drum machines made me lose my recording gigs as a drummer and drove me to expand my career to that of a recording engineer as well. However, I eventually came to love that drum machine and the many others to follow (sigh). In fact, over the years, I became so captivated by the whole MIDI/drum machine thing that I assembled a whole series of electronic drum sets using drum machines and samplers — all controlled through MIDI.
In this chapter, you find out how MIDI enables synthesizers and computers to communicate with one another — a revolutionary thing for the musician. You get your hands dirty in the world of sequencing — recording MIDI performance information so you can play your performance automatically. You also peruse a variety of MIDI-capable instruments and explore the ins and outs of controlling your MIDI gear.
 Like audio recording, MIDI can be a deep subject. You can go nuts trying to understand every little nuance of MIDI. (I know some guys who are not quite the same after plunging headfirst into this stuff.) The reality is that to use MIDI effectively, you don’t need to know every little thing about it. In this chapter, I focus on what you need to know to get started.
Meeting MIDI
MIDI is a protocol (a set of agreed-upon standards) for musical instruments to communicate with one another through a cabled connection and a common digital language. This arrangement allows each one to understand the other, regardless of manufacturer or instrument. All that’s required is an instrument equipped with MIDI ports (jacks).
MIDI data is different from an audio recording because it contains no sound as such; rather, it’s limited to performance information. This includes information about various performance characteristics, which (for keyboards, at least) includes the following:
- Note-on and note-off: What note is played and when
- Velocity: How hard someone presses a key
- After-touch: Whether the key pressure changes after the initial press
- Vibrato and pitch bend: Whether the pitch changes while a key is pressed
This information allows the MIDI musician potentially to create a performance that is as rich in texture as those of the world’s finest players.
Digital messages sent from one device to another across a cable (called the MIDI cable, of course) create MIDI data. The cable connects to MIDI ports on each device, and the messages are sent in the form of binary digits. Each instrument can understand and respond to these messages.
Perusing MIDI ports
The three types of MIDI ports are In, Out, and Thru.
- In: The In port receives incoming messages.
- Out: This port sends those messages.
- Thru: This port sends the messages that one device receives directly to the In port of another instrument. You use the Thru port when you create a daisychain, which means you connect more than two devices.
Figure 1-1 shows a daisy chain setup.

FIGURE 1-1: MIDI devices can be chained via the In, Out, and Thru ports on each instrument.
MIDI signals travel in only one direction. Data flows from the Out port of one device to an In port of another device — but not the other way around. Likewise, data going through the Thru port originates from the first device in the chain — not the device whose Thru port is being used. The particular way that data flows is what gives you flexibility in how you can connect different devices together. Here are some examples:
- Example 1: In Figure 1-1, three synthesizers are connected in a daisychain lineup. A cable connects device A’s Out port to device B’s In port. Another cable connects device B’s Thru port to device C’s In port. In this scenario, device A controls devices B and C. Devices B and C can’t control any other device, because neither device B nor device C has a connection from its Out port.
- Example 2: Suppose you connect device B to device C by using device B’s Out port instead of its Thru port. In this case, device A sends messages to device B but not to device C. Device B controls device C. Device C has no control over either A or B because neither one is connected to device C’s Out port.
- Example 3: Now take a look at Figure 1-2. In this figure, two devices have MIDI cables running from the Out port of each to the In port of the other — which allows communication to go both ways. (The MIDI interface in this figure is necessary for making MIDI connections in a computer.) For example, a master synthesizer and a computer sequencer are frequently connected this way so you can send performance information from the synthesizer to the sequencer (when you’re recording your part) and from the sequencer back to the synthesizer (when you want to play the part back again).

FIGURE 1-2: Connecting two devices with cords going both ways allows two-way communication.
A connection to a MIDI device’s In port or through a device’s Thru port doesn’t allow the device to control another device. A MIDI device can control another device only if the cable is connected from its Out port to the other device’s In port.
Understanding MIDI channels
Okay, so you have a daisychain of MIDI instruments all hooked together, and you want to control them from your master keyboard or sequencer program. Now you want the drum machine to play the drum part and a sound module to play the string part. This is where MIDI channels come in handy.
MIDI channels allow you to designate which messages go to a particular machine. You can program each machine to receive messages on one or more of the 16 MIDI channels. For instance, you can set your drum machine to receive messages on Channel 10 (the default channel for drum sounds) and set the sound module with the string sounds to receive data on Channel 1. (You set the MIDI channels on your digital instrument by going into the System Parameters menu. Check your owner’s manual for specific procedures.) After you assign your channels, your master keyboard sends the performance information for both MIDI signals — the drum machine and the sound module playing the string sounds — across one MIDI cable. Each receiving device responds only to the messages directed to the MIDI channel that it’s assigned to receive.
In this scenario, the sound module with the string sounds receives all the data from the master keyboard, responds to the messages on Channel 1, and simultaneously sends the data from the master keyboard onto the drum machine (via the sound module’s Thru port). The drum machine receives the same messages from the master keyboard as the sound module but responds only to those sent for Channel 10.
Having 16 MIDI channels allows you to have up to 16 separate instruments playing different parts at the same time. You may use 16 different devices or 16 different parts from the same device if you have a multitimbral sound generator. (See the “Synthesizers” section later in this chapter for more on such sound generators.)
 You’d think that each MIDI channel would be sent along its own wire in the MIDI cable. That’s actually not the case. Inside the MIDI cable are three wires — two for data transmission, and one to serve as a shield. MIDI messages are sent across the two wires via a channel code, which tells the receiving device to what channel it should send the data following the code. Such a MIDI channel message, also called a channel voice message, precedes each performance command.
Appreciating MIDI messages
In order for MIDI instruments to communicate with one another, they need to have a vocabulary in common. This is where MIDI messages come in. MIDI messages contain an array of commands, including performance data, control changes, system-common messages, and system-exclusive messages (more about this shortly).
Not all MIDI devices recognize all MIDI commands. For example, a sound module generally can’t send performance-data messages (such as after-touch) because a sound module doesn’t have triggering mechanisms that produce those commands.
 Check your instrument’s manual for a MIDI Implementation Chart. All MIDI instruments come with this chart. In it, you can find a list of all the MIDI commands that the device can send or receive. The chart also includes information on polyphony (how many notes the instrument can play at once and multitimbrality (how many different sounds the instrument can produce at the same time).
Performance data
Included in performance data are note-on and note-off messages, as well as specifications for velocity, after-touch, vibrato, and pitch bend.
MIDI performance-data messages each have 128 different values. For example, each note that you play on the keyboard has a number associated with it. Middle C is 60, for instance. Likewise, velocity is recorded and sent as a number between 0 and 127, 0 being the softest volume (no sound) and 127 the loudest that you can play.
Control-change messages
Control-change messages are a type of performance-data message. These messages contain data about expression, including modulation, volume, and pan.
System-common messages
System-common messages contain data about which channel the performance data is sent to and what sound in the sound library to play. System-common messages also include information about timing data, master volume, and effects settings.
System-exclusive messages
System-exclusive messages contain information that is exclusive to the system or device. These messages can include data transfers of new sound patches, among other things.
To use MIDI effectively, you don’t need to know all (or even many) of the MIDI messages that a device can recognize. If you hook up your gear and play, your MIDI devices generate and respond to the messages for you.
Managing modes
Your synthesizer, drum machine, or other MIDI module has four operating modes, appropriately called Mode 1, Mode 2, Mode 3, and Mode 4. These modes dictate how your instrument responds to the MIDI messages it receives.
Mode 1: Omni On/Poly
In Omni On/Poly mode, your instrument responds to all the MIDI messages coming across the wires (well, except for the MIDI channel data). This means that your synthesizer (or whatever) tries to play the parts of all the instruments hooked up to your MIDI controller. In this mode, your device also plays polyphonically (more than one note at a time).
Some older MIDI devices default to Omni On/Poly mode (Mode 1) when you turn them on. In such a case, you have to reset your instrument if it’s one of several in your MIDI setup. If you don’t, the instrument responds to any MIDI message sent from the controller, not just the ones directed toward it.
Mode 2: Omni On/Mono
Omni On/Mono allows your device to receive messages from all MIDI channels but lets it play only one note at time (monophonically). This mode is rarely, if ever, used.
Mode 3: Omni Off/Poly
In the Omni Off/Poly mode, your device can play polyphonically but responds only to MIDI signals on the channels that it’s set to. This is the mode you use most often when you’re sequencing — recording or playing back MIDI data. (Book 4, Chapter 3 covers this process in Pro Tools in greater detail.)
Mode 4: Omni Off/Mono
In the Omni Off/Mono mode, your instrument responds only to the messages sent on the MIDI channel that it’s set to and ignores the rest. Rather than play polyphonically, like in Mode 3, your instrument plays only one note at a time. This can be advantageous if you’re playing a MIDI controller from an instrument that can play only one note at a time, such as a flute or saxophone.
General MIDI
If you end up composing music for other people to play on their MIDI instruments — or if you want to use music from another composer — General MIDI is invaluable to you. General MIDI (GM) is a protocol that enables a MIDI instrument to provide a series of sounds and messages consistent with other MIDI instruments. With General MIDI, you can take a Standard MIDI File (SMF) of a song created on one sequencer program, transfer the file to another program, and use that other program to play the exact performance — sounds, timing, program changes, everything.
GM instruments contain numerous sound patches that the MIDI community has standardized. Not all these sounds are exactly the same as far as sound quality goes, but their sound type and location (acoustic grand piano on Patch #1, for instance) are the same on all GM-compatible machines.
Not all MIDI-capable instruments follow the GM standards. If this feature is important to you, be sure you find out before you buy whether the instrument that interests you is GM compatible.
GM standards dictate not only the particular sounds that a synthesizer has, but also which drum sounds are located on which keys, how many notes of polyphony the instrument has, and how many different channels the instrument can receive and send instructions on. The two levels of GM compatibility are Level 1 and Level 2.
GM Level 1 compatibility
Level 1 protocols were developed in 1991 and consist of a minimum of 128 instrument patches, 24 notes of polyphony, receiving and sending capability for all 16 MIDI channels, 16-part multitimbrality, and a host of controller and performance messages.
GM Level 2 compatibility
Level 2 was implemented in 1999 and includes more sounds, polyphony, and features. A GM Level 2-compatible device has 32 notes of polyphony, 16-channel support, up to 16 simultaneous instrument sound patches, and a host of additional sounds (384, to be exact), including 2 channels of simultaneous percussion sounds. Also added to the GM2 standard are reverb and chorus effects.
Getting Started with MIDI
Enough with the technical aspects of MIDI — you want to know how to start using this great technology, right?
To get started, you first need to know just what you have to buy to do some MIDI-ing yourself. Well, I’m sorry to inform you that you can’t do any of this cool MIDI stuff with your vintage Stratocaster guitar or your acoustic drum set (unless you do some fancy rigging to your gear — see the sidebar, “MIDI control this …”). What you do need is
- A sound generator: This device, which enables you to hear the music, can be a synthesizer, drum machine, sound module, or sampler.
- A MIDI controller: This device controls the MIDI instruments in your studio. You’ll most likely use the MIDI functions in Pro Tools for this purpose. This may also be your keyboard, electronic drum pads, or other MIDI instruments (such as the Roland GK3).
- A sequencer: This device records and plays the MIDI performances that are programmed into it. The sequencer allows you to program your part into the synthesizer and have it play back automatically (much like the old-time player piano). Again, you’ll most likely use Pro Tools software for this, but you can use a sequencer in your keyboard if you prefer.
- A MIDI interface: The MIDI interface is used to enable your computer to send and receive MIDI data. Many audio interfaces also include MIDI ports. You also find MIDI devices that include USB ports for MIDI connectivity.
I know this sounds like a lot of stuff, but most of this gear performs more than one function in the MIDI studio. For example, nearly all synthesizers come with drum sounds, and some synthesizers even include a sequencer. In this case, this one synthesizer can do the job of sound generator, drum machine, MIDI controller, and sequencer all in one.
In the following sections, I discuss the different types of sound generators. You may indeed find one piece of equipment that does everything you want. If that’s not your situation, read on as I separate all the features that different equipment has. That way, you can understand the function of each feature and then decide how to configure your studio.
Sound generators
The sound generator is the core of the MIDI studio. This is what produces the sounds that you hear. Without it, you may as well skip the rest of the stuff because (of course) you won’t hear any of your work.
Sound generators can come in many different shapes and sizes: a fully functional keyboard synthesizer, an independent drum machine, a standalone sound module, samplers, software synthesizers (soft-synths), and a computer sound card. Each of these devices has its strengths and weaknesses. (Read on for the details.)
In the following sections, I discuss the different types of sound generators. Although you may find one piece of equipment that does everything you want, in this section, I separate all the features that different equipment may have to help you understand the function of each feature and decide how to configure your studio.
Synthesizers
A synthesizer, like the one shown in Figure 1-3, consists of not only sounds but also a keyboard on which you can play these sounds. Synthesizers come in a variety of sizes and configurations. For example, some keyboards come with 61 keys (5 octaves), and others provide as many as 88 keys (the number on an acoustic piano keyboard).
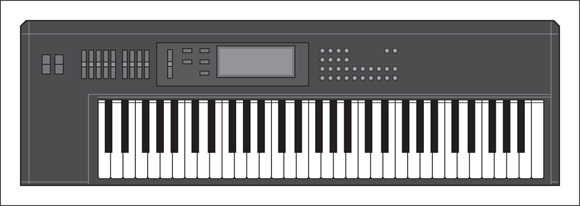
FIGURE 1-3: A typical synthesizer contains a keyboard and a variety of sounds.
If you’re in the market for a synthesizer, you need to consider several things:
Polyphony:Polyphony is the number of notes that sound at one time. Most decent synthesizers nowadays have at least 16 notes of polyphony although models that can produce 32 notes at once are not uncommon.
 Each manufacturer treats polyphony differently, and the GM standards allow some variations on the effective use of this parameter. For instance, a synth patch may use more than one digital sound to create the actual sound you hear. The synth patch that you love so much may, in fact, consist of four different sounds layered atop one another. In such a case, you just reduced your polyphony by three-fourths, just by using that one patch. If your synthesizer has 16-note polyphony, it’s now down to 4-note polyphony because each of those 4 notes has four “sounds” associated with it. If you use this patch, you can play only 4 notes (a simple chord) at a time, not the 16 that you thought you had to work with.
Your best bet is to buy a synthesizer (or sound module) with the highest polyphony you can get, especially if you want to layer one sound on top of another or do multitimbral parts with your synth.
Multitimbrality: Most decent keyboards allow you to play more than one sound patch at a time. This is multitimbrality, which basically allows you to have your keyboard divided into several groups of sounds. For example, a multitimbral synth can divide a song’s chords, melody, bass part, and drum set sounds into different groups of sounds — and then play all those groups at once.
If you do any sequencing (recording or playing back MIDI data), a multitimbral synthesizer is a must-have. Otherwise, you would need a separate synthesizer for each type of sound that you want to play. Fortunately, with the GM standards, compatible synthesizers made in the last 15 years have the ability to play 16 sounds at once.- Keyboard feel: Some keyboards have weighted keys and feel like real pianos, and other keyboards have a somewhat spongy action. If you’re a trained piano player, a spongy keyboard may feel uncomfortable to you. On the other hand, if you have no training in piano and don’t need weighted keys, you don’t have to pay the extra money for that feature.
- Sound quality: This is a subjective thing. Choose the synthesizer that has the sounds you think you’ll use. I know this seems kind of obvious, but buy the synthesizer whose sounds you like even if this means waiting and saving the money before you can buy. If you buy a synthesizer that was a good deal but don’t love the sounds, you’ve wasted your money because you’ll just end up buying the more expensive one later.
- Built-in sequencer: Many keyboards contain a built-in sequencer, which allows you to program and play back your performance. Units like these are usually called keyboard workstations or MIDI workstations because they contain everything you need to create a song. If you’re considering one of these complete workstations, take a good, hard look at the sequencer and the user interface — make sure that you like the way those work for you. Each manufacturer treats the process of sequencing a little differently; you can probably find one that fits your style of working.
Drum machines
A drum machine contains the sounds of the drum set and other more exotic drums, as well as a sequencer to allow you to program rhythms. Figure 1-4 shows a typical drum machine.
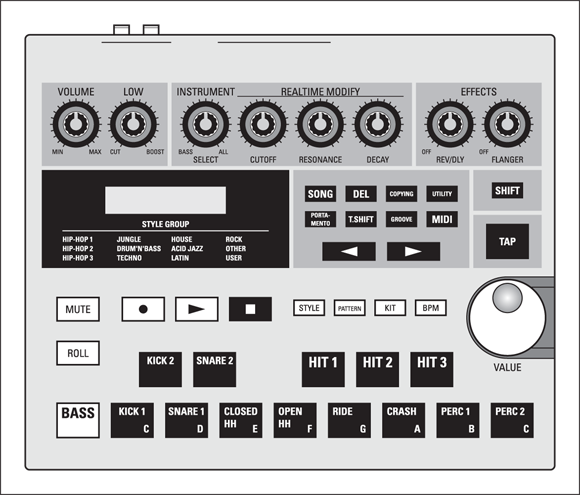
FIGURE 1-4: A drum machine has drum sounds and a sequencer to program rhythms.
Most drum machines contain hundreds of drum sounds, numerous preset rhythm patches, and the ability to program dozens of songs. All standalone drum machines have pads on which you can play the part. The more advanced drum machines can give your rhythms a more human feel. Effects, such as reverb and delay, are also fairly common on the more advanced drum machines.
Sound modules
A sound module is basically a stripped-down version of a synthesizer or drum machine. Sound modules don’t contain triggering devices (such as the keys for the keyboard, pickups for the guitar, or pads for the drum machine). What they do contain are a variety of sounds (often hundreds) that a master controller or sequencer can trigger. The advantage to sound modules is they take up little space and cost considerably less than their fully endowed counterparts (the synthesizers and drum machines, that is).
If you already have a master keyboard, you may find adding sound modules to be a cost- and space-effective way to add more sounds to your system.
Samplers
A sampler is a sound module that contains short audio samples of real instruments. Most samplers come with sound libraries containing hundreds of different types of sounds, from acoustic pianos to snare drums to sound effects. These sounds are often much more realistic than those that come in some synthesizers.
The real purpose of a sampler is to allow you to record your own sounds. For example, in the 1980s, it was cool to make a drum set from unusual percussive sounds. A snare drum can be the sound of a flushing toilet (don’t laugh, I actually did this) or breaking glass. Tom-toms can be grunts set to certain pitches. You’d be amazed at the strange stuff that people have turned into music — all with the help of a sampler.
Another common use of a sampler is recording short sections of already recorded songs. This can be a melodic or rhythmic phrase, a vocal cue, or a single drum or synthesizer sound. Sampling other songs is common in electronic music, rap, and hip-hop (be careful of copyright issues before doing this, however). If you’re into electronic music or hip-hop, you may find a sampler a necessary addition to your studio.
Soft-synths
Because you’re using Pro Tools, your DAW (Digital Audio Workstation) software enables you to produce great sounds by using soft-synth plug-ins. Soft-synths are basically software equivalents of standalone synthesizers, sound modules, or samplers. As you can see in Figure 1-5, a soft-synth’s GUI (its graphical user interface, the smiley face that the software shows the world) is often designed to look just like a piece of regular hardware, complete with “buttons” and “knobs.”

FIGURE 1-5: Computer-based DAW users can choose soft-synths to create synthesizer sounds.
Of course, soft-synths have their advantages and disadvantages:
- Advantage: Soft-synths cost less than standalone units because no hardware is involved.
- Disadvantages: Unlike regular synthesizers, soft-synths use up processor power. This can slow down your computer system and prevent you from recording as many audio tracks or applying as many effect patches as you’d like. Another downside (depending on whom you talk to) is that soft-synth programs may not sound quite as good as an external synthesizer.
Countless soft-synth plug-ins are available for Pro Tools. All AAX instrument plug-ins will work with Pro Tools. You can find hundreds with an Internet search, including a ton that are inexpensive or even free.
Sound cards
Most sound cards that you can put in your computer (or that come with a computer) have General MIDI sounds in them. Depending on the quality of your sound card, it may sound decent or border on unbearable.
To find out whether the GM sounds in your computer’s sound card are any good, go ahead and play a MIDI file on your computer. First, do a search on the Internet for MIDI files (just type MIDI into your favorite search engine). Some sites require you to pay to download a song — especially for popular or familiar tunes — but you can find many sites that allow you to choose a song to listen to without downloading or paying a fee. Click a song, and it’ll start playing automatically. You’ll immediately know whether you like the sound of your sound card.
If you bought a new sound card for your computer to record audio with, you’ll generally find that the sounds are pretty good. And (happily) with your audio program, you also have access to soft-synth patches.
MIDI controllers
A MIDI controller is essentially what its name describes: a device that can control another MIDI device. MIDI controllers come in many different formats. In fact, a MIDI controller can be anything from a synthesizer to a drum machine, or from a computer to a xylophone.
When MIDI first came out, your controller choice was limited to a keyboard, but now you can choose other options — keyboards, wind controllers (for saxophones or other wind instruments), guitars, or drums. So even if you don’t play piano, you can find a controller that resembles an instrument you know how to play. Look around, and you may find one (or more) MIDI controllers that allow you to create music your way.
Sequencers
Although you can get standalone sequencers and sequencers integrated into a synthesizer, you probably want to just use the sequencer in Pro Tools for this. The reasons for this are many, but the overriding factor is that you can have your MIDI and audio tracks in one place, and Pro Tools offers you more powerful editing capabilities than a sequencer that’s contained in a box and that uses a tiny LCD screen.
MIDI interfaces
The MIDI interface allows you to send and receive MIDI information from a computer. Many audio interfaces have a MIDI port. If you end up doing a lot of MIDI sequencing, though, and use more than one sound module or external controller — or if you have an audio interface without MIDI ports — you need a separate MIDI interface, such as the one shown in Figure 1-6.

FIGURE 1-6: A MIDI interface is necessary if you want to connect your instrument to a computer.
MIDI interfaces come in a staggering variety of configurations, so you have several things to consider when you buy a MIDI interface. Use the following questions to help you to determine your needs:
- What type of computer do you own? MIDI interfaces are configured to connect to a serial, parallel, or USB port. You determine which one to use by the type of port(s) you have in your computer. For example, new Macs have only a USB port although you can add a serial port if you remove the internal modem. A PC has either a parallel port or a USB port (sometimes both). PCs also have a joystick port, which accepts a special MIDI joystick cable; no MIDI interface is needed.
- How many instruments do you intend to connect? MIDI interfaces come with a variety of input and output configurations. There are models with two In and two Out, four In and four Out, and even eight In and eight Out. There are also “thru” boxes that have one or more inputs and several outputs. If you have only one or two instruments, you can get by with a smaller interface. In this case, a 2 x 2 interface — two In and two Out — would work great. If you have many instruments that you want to connect, you need a larger box.