
Chapter 1
Audio Editing Basics
IN THIS CHAPTER
![]() Getting to know hard-drive editing
Getting to know hard-drive editing
![]() Working with audio clips
Working with audio clips
![]() Using edit modes
Using edit modes
![]() Editing playlists
Editing playlists
Hard drive recording — in general, and with Pro Tools specifically — makes editing audio fast and easy. In days of old, if you wanted to remove a bad note or shoddy drum hit, you had to break out a razor blade and some sticky tape, prepare the offending segment of magnetic tape for surgery, hold your breath, and apply a steady hand. Any changes to the recorded tracks got you into a messy, inexact, time-consuming process that many engineers weren’t very good at. Even the steadiest hands can’t come close to the accuracy and variety now available (to even the clumsiest of the bunch) through the editing functions of the new digital gear.
This chapter gets you started on the process of editing audio in Pro Tools. First, you get to know the basic ways that Pro Tools does editing — in particular, the role of audio clips (representations of your audio files in the Edit window). This chapter then guides you through finding and viewing clips so making edits is quick and easy. You also discover the joys of using playlists to work with these clips. And as if all that wasn’t enough, this chapter also explains the four different edit modes available in Pro Tools.
Understanding Pro Tools Editing
Editing in Pro Tools on your computer is similar to working with any hard drive recorder — and often, it’s much easier. Two things about editing in Pro Tools make it fast, easy, and (from the viewpoint of your creative work) safe:
- Unless you specify otherwise, it’s nondestructive: That is, you can always undo your edit if you don’t like it.
- You can perform most editing functions in Pro Tools while your session is playing back.
I detail both of these features in the following sections.
Nondestructive editing
Nondestructive editing does not change your original audio files when you edit an audio clip. Most editing functions in Pro Tools — clearing, cutting, pasting, separating, and trimming your audio clips, for example — are nondestructive. (All these operations are explained in Chapter 3 of this mini-book.)
 Not all Pro Tool editing procedures are nondestructive. A few are destructive: Using them will permanently alter your source audio file. Whenever I describe one of these procedures, I’ll warn you (look for a Warning icon) that after you perform the function, your source file will be changed.
Editing during playback
Most editing functions can be carried out while the session is playing. This feature makes editing much faster and easier because you can instantly hear (and see) what your changes have done. Some of these edits include
- Capturing, separating, and trimming clips
- Nudging, placing, rearranging, or spotting clips
- Creating fades or crossfades in and between clips (version 6.0 and later)
- Auditioning playlists
- Editing automation data
- Inserting RealTime plug-ins (version 6.0 and later)
- Processing audio using AudioSuite plug-ins
You can find out more about these functions throughout this chapter and the next three chapters (Chapters 2–4 in this mini-book).
Getting to Know Clip Types
When you record a track, a new audio clip is created in the track’s playlist (the track displays you see next to the Track Controls section in the Edit window). This clip corresponds to an audio file of that performance, which resides on your hard drive. When you perform edits to your recorded performances, you do so by making changes to these clips.
Both edited and unedited clips appear on the Audio Clips list, the handy list you find to the right of the track playlist. (If the Audio Clips list isn’t visible, click the double arrow at the far bottom-right of the Edit window to open it.) Several clip types show up in the list, indicating the entire audio file or a portion of it. These include
- Whole-File:Whole-file audio clips represent entire audio files recorded to your hard drive. Displayed in bold letters in the Audio Clips list, they’re created when you do one of four things:
- First record an audio track.
- Import an audio file from outside the session.
- Consolidate existing clips.
- Nondestructively process audio by using an AudioSuite plug-in.
- User-Defined:User-defined clips are created when you do one of three things:
- Rename an existing clip.
- Capture, record, consolidate, or separate audio clips.
- Trim a whole-file clip.
- Auto-Created: These clips are created automatically when you edit a clip or punch-record over one. The more takes you record of your tracks — and the more edits you do — the more these clips add up. To keep your Audio Clips list from becoming cluttered, you can hide your Auto-Created clips easily, or you can convert them into full-fledged User-Defined clips by renaming them.
- Offline: These clips can’t be linked to an audio file on your hard drive, usually because Pro Tools can’t find the original file. In the Audio Clips list, the names of these clips are displayed in dimmed italics; in the track’s playlist, they show up in blue italics. You can generally edit these clips just as you would any other clip except that you can’t process them by using AudioSuite plug-ins.
- Multichannel: These audio clips are associated with stereo or surround files. If you click the triangle to the left of the clip name, you can see the included channels listed. These individual channels can be dragged onto separate tracks, if you choose.
- Clip Groups: You can group clips together and have them appear onscreen as a single clip in the Audio Clips list. These clips can exist on single or multiple tracks. Clicking the icon expands the group so you can see and move clips within the group.
- Warped Clips:Warped clips are those that have had Real Time Elastic Audio functions enabled. These clip types are identified by the Warp Indicator icon. Elastic Audio is a processing function where you can stretch or contract an audio file to fit the tempo of your session, among other cool things.
Viewing Clips
You can customize how you view audio clips a number of ways in Pro Tools: Select the track view, change the track height, assign name and time locations, or zoom in and out. These options get a closer look in the following sections.
Selecting the track view
By default, audio tracks in the Edit window are set to Waveform view. This view shows a visual representation of the sound produced by the audio file associated with a particular clip. Pro Tools also gives you the option of ditching the Waveform view and going with something different. You switch between different views with the help of the Track View menu, as shown in Figure 1-1, which you access by clicking and holding the Track View display in the Track Controls section of the Edit window.

FIGURE 1-1: Select a view of a clip in a track from the Track View menu.
Your options are as follows:
- Block:Block view shows a blank box for each audio clip. This view makes screen redraws much quicker, which is useful during mixing when all the editing is done and you don’t need to see the waveform.
- Playlists:Playlists view expands the track to show any additional playlists for that track. These appear below the selected playlist for the track.
- Analysis:Analysis view shows you the event markers for Elastic Audio–enabled tracks. In this view, you can manually edit (add, move, or delete) the marker locations. This is useful for clips that don’t contain easily identified transients that can serve as event marker locations.
- Warp:Warp view also contains the event markers for your Elastic Audio–enabled tracks and lets you edit these events. This is the best place to work if you want to adjust the timing of a performance.
Waveform:Waveform view is the default — a graphical representation of the audio file, much like what you’d see if you ran a sound through an oscilloscope. This is the best view to be in when you’re editing clips because you can easily find the start of a note. After a while, you’ll probably be almost able to hear the track in your head just by looking at the waveform.
 Besides being able to see waveforms in their normal way — with both positive and negative values — you can choose the Draw Waveforms Rectified option, which displays the waveform as a summed value of the positive and negative level. This can be useful when you want to create volume automation to increase or reduce specific notes (such as, respectively, a weak or very loud drum hit). To get that rectified look, select the Draw Waveforms Rectified check box on the Display tab of the Preferences dialog box. (You know the drill: Choose Setup ⇒ Preferences from the main menu to get to the Preferences dialog box.)
- Volume: This view shows the volume level of the track. The volume level is displayed as a line superimposed over the waveform. In this view, the clip’s name is hidden.
- Mute: This view shows whether the track is muted. When a track is muted, the line shows at the bottom of the view; when the track is unmuted, the line shows at the top. If a track uses automatic muting, a vertical line shows where the mute is turned on or off. This view also shows the waveform in the background.
- Pan:Pan view shows the apparent position of the track’s output from left to right (pan) in the stereo sound. When the track is panned in the center, the line is centered in the view. Far-left panning shows up at the top; far-right is on the bottom. Settings in between these two extremes correspond to the pan value. In this view, you can also see a waveform display in the background.
You can toggle between Waveform and Volume views by highlighting the track and pressing Control+– (minus/dash; Mac) or Windows+– (minus/dash; PC).
Adjusting the track height
Pro Tools lets you adjust your track heights. You can either choose from various track heights (Micro, Mini, Small, Medium, Large, Jumbo, Extreme, and Fit to Window), or you can simply click and drag the lower boundary of your track with your mouse to the height that you want. These choices allow you to make tracks you’re not editing small, while the tracks you want to edit can be made big enough so that you can really get in close to a waveform when you edit. You choose your various track heights from the Track Height drop-down menu, which you can access from
- The Track Height Selector button in the Track Controls section of the Edit window: Click and hold with the mouse pointer over the button (it’s a down-facing arrow immediately to the left of the track name) to make the Track Height drop-down menu appear, as shown in Figure 1-2. Choose the size you want.
- The far-right edge of the Track Controls section: Choose the track height you want by clicking and holding with the mouse pointer over the little ruler at the far side of the Track Controls section (as in Figure 1-3) and selecting an option from the Track Height drop-down menu that appears.
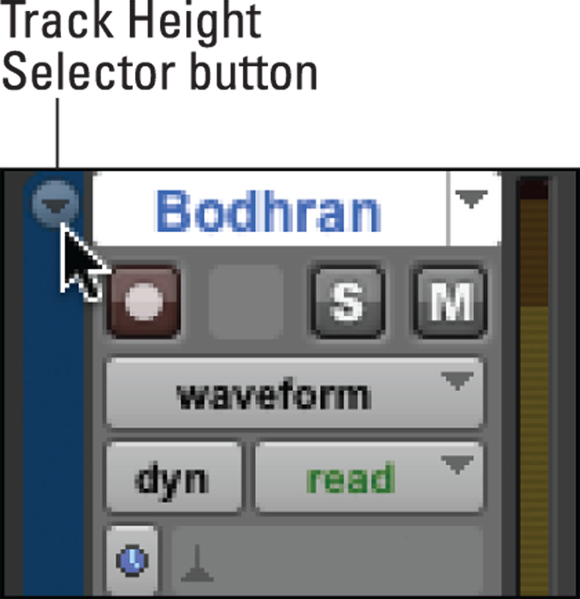
FIGURE 1-2: Open the Track Height menu by clicking and holding the Track Height Selector button.

FIGURE 1-3: Open the Track Height menu by clicking the far-right edge of the Track Controls section.
For stereo tracks, you can choose an expanded view that allows you to view each channel separately. If you edit the channels individually and they end up being different lengths, these stereo tracks become two mono tracks instead.
Assigning clip-name and time-location displays
Every audio clip has a clip name and time stamp attached to it. You can choose whether this information shows up on the clip displays in your tracks.
Displaying clip names
You can choose to show or hide the name of the clips in the track displays by choosing View ⇒ Clip ⇒ Name, as shown in Figure 1-4. (Choose View ⇒ Clip ⇒ Name again to uncheck the option.)

FIGURE 1-4: Show the name in the Tracks Clip display.
Choosing clip time stamps
You can choose any of several time stamp views by choosing View ⇒ Clip, and then selecting a time stamp view: Current Time, Original Time Stamp (as shown Figure 1-5), User Time Stamp, or No Time.

FIGURE 1-5: Choose time stamp views from the Clip option under the View menu.
Your options include
- Current Time: This choice shows the start and end times of each clip.
- Original Time Stamp: This option shows the time when the clip was created.
- User Time Stamp: This option displays a time stamp that you can define. By default, it shows the original time, but you can change it in the Time Stamp option under the Audio Clips list drop-down menu, which you can open by clicking the Audio Clips title bar at the top of the Audio Clips list. Selecting the Time Stamp option opens the User Time Stamp dialog box where you can enter the value you want, as shown in Figure 1-6.
- No Time: This option hides the time stamp.

FIGURE 1-6: The User Time Stamp dialog box.
Zooming in and out
You can zoom in and out of all tracks by using the Zoom buttons at the top of the Edit window (see Figure 1-7), or you can zoom in and out of a single track by using the Zoom tool (see upcoming Figure 1-8). You can also zoom in on the ruler and toggle the zoom back and forth between unzoomed and zoomed. Being able to zoom way into a clip lets you make precise edits to the waveform.

FIGURE 1-7: Use Zoom buttons to zoom in and out of tracks.

FIGURE 1-8: Click and drag with the Zoom tool to zoom in horizontally.
Zooming in on all tracks with the Zoom buttons
The Zoom buttons section of the Edit window has buttons that allow you to zoom in and out both horizontally and vertically, as well as buttons for creating zoom presets for levels that you use frequently. The following list gives you the details on each feature:
- Horizontal Zoom: The outer two Zoom buttons control how wide of a portion of the timeline — and of all audio and MIDI tracks and clips — that you can see onscreen. Clicking the left button gives you a narrower view; clicking the right button gives you a wider view.
Vertical Zoom: To zoom in vertically on audio (left Vertical Zoom button) or MIDI (right Vertical Zoom button) tracks, click the top or bottom part of the button with the waveform icon (at the left of the window). Clicking the top of the button increases the height of the display in the track’s view; clicking the bottom decreases the height.
Increasing the vertical zoom might make the waveform too big to fit in the track display. If this is the case, you can increase the track’s height as described in the “Adjusting the track height” section, earlier in this chapter.Zoom Presets: At the bottom of the Zoom buttons section are five presets that work like the presets on a car radio. To assign a setting to a Preset button, just get the Zoom setting you want — kind of like tuning a car radio to the station you want — and then ⌘ -click (Mac) or Ctrl-click (PC) the Preset button. Then repeat the steps for the other four preset buttons.
You can select a preset by
- Clicking the numbered Preset button you want in the Zoom buttons section of the Edit window
- Pressing the number of the Preset button you want on your keyboard while pressing Control (Mac) or Windows (PC)
 With Command Keyboard Focus (Commands Focus) enabled, pressing the number of the Preset number you want on the number pad of your keyboard Enable Command Keyboard Focus by clicking the Command Keyboard Focus button, as shown here in the margin.
Zooming in on a single track with the Zoom tool
Use the Zoom tool to select a specific spot in a track to zoom in and out of. The Zoom tool has two modes: Normal and Single Zoom.
- Normal Zoom mode: You can zoom in and out horizontally and vertically on the waveform when using this mode.
 Zoom horizontally: First click the Zoom tool button, as shown here in the margin, to select the Zoom tool. Then click and drag a section to select it, as shown in Figure 1-8. Pro Tools zooms to that section. To zoom in farther, click and drag again.
Zoom vertically and horizontally: Press ⌘ (Mac) or Ctrl (PC) and then click and drag the section, as shown in Figure 1-9. Pro Tools zooms in. Repeat to zoom in farther.
To zoom out again, press the Option (Mac) or Alt (PC) key while you click the zoomed area. Each click moves you out a little bit.
Single Zoom mode: If you’re in Single Zoom mode when you finish zooming in on a spot, Pro Tools switches you back to the tool you were using. For example, if you want to scrub a section of a track and need to zoom in to get a more accurate start point, you can use the Single Zoom mode of the Zoom tool to zoom in. After you’re zoomed in, you return automatically to the Scrub tool.
You can select Single Zoom mode by
- Clicking and holding the Zoom tool button (as shown here in the margin) and selecting the Single Zoom option
Clicking the Zoom tool button and pressing F5 on your keyboard to toggle back and forth between Zoom tool modes
 No matter which method you choose to select Single Zoom mode, after you’re in this mode, the Zoom tool button changes its face to look like what you see here in the margin.

FIGURE 1-9: Moving in vertically and horizontally.
Zooming in on the ruler
If you have a spot in your session (the start of the chorus, for example) that you want to zoom into, you can use the ruler bar (where the location of your session is displayed) to select your zoom location. This is done by ⌘ +Control-clicking (Mac) or Ctrl+Alt-clicking (PC) over a section of the ruler to zoom in one level. You can also drag over a section of the ruler while holding ⌘ and Control (Mac) or Ctrl and Alt (PC).
Zooming with the Zoom Toggle command
The Zoom Toggle command takes a selection, increases the track’s height to Large, and fills the window. This command makes zooming quick: just one keystroke. This is a great function to use when you edit parts and need to get in really close to make an accurate edit, and then move out further to find the next spot to edit. To use the Zoom Toggle command, follow these steps:
 Choose the Selector tool by clicking it at the top of the Edit window.
- With the Selector tool, select a portion of one or more tracks.
Press Control+E (Mac) or Windows+E (PC).
The track height changes to the Large setting (see the “Adjusting the track height” section, earlier in the chapter) and the selection fills the space.
- Repeat Step 3 to return to the previous view.
If you want to change the default height for the Toggle Zoom to something other than Large, use the Zoom Toggle Track Height drop-down menu. (It’s on the Editing tab of the Preferences dialog box, as shown in Figure 1-10.) Choose Setup ⇒ Preferences from the main menu to call up the Preferences dialog box, from which you can select any of the possible Track Height options.
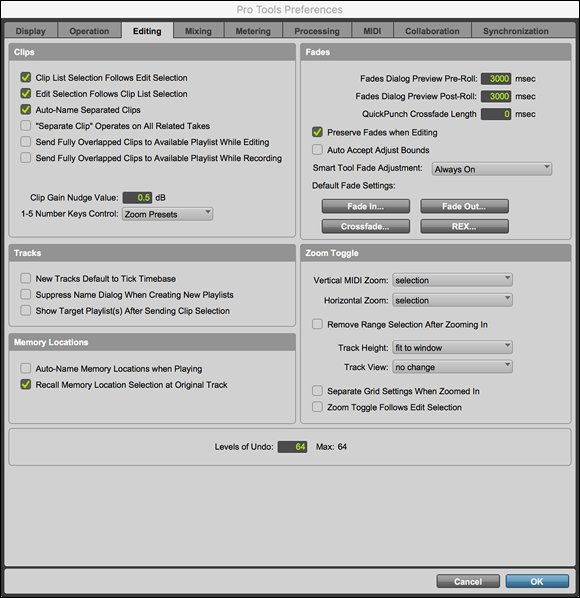
FIGURE 1-10: Setting the default height for Toggle Zoom.
Understanding Edit Modes
Pro Tools offers four basic edit modes; the mode you use depends on the task you want to perform. You get a chance to dig pretty deep into these edit modes in the next chapter, but here’s a basic overview of each of them. Figure 1-11 shows all four edit mode buttons — Shuffle, Spot, Slip, and Grid — all nicely lined up on the toolbar — and coming right up is a list that gives you a taste of what each mode can do for you.
- Shuffle:Shuffle mode allows you to move a clip around in an audio track, automatically placing it at the end of the nearest clip. This is a handy way to move clips around if you want to experiment with alternate arrangements of a song. For example, you can move the second bar of a four-bar phrase to the last bar by grabbing it and sliding it over to the end. The third bar moves to replace the second, and the second bar snaps right to the end of the fourth. Presto! New arrangement!
Spot: In Spot mode, you can designate the exact timeline placement of a clip you want to move. Click to engage Spot mode, and then click a clip (which brings up the Spot dialog box, as shown in Figure 1-12). Enter the place you want to move the clip to in the appropriate field and then click OK.
If you want to move the clip back to its original place, you can click the arrow to the right of the Original Time Stamp field in the Spot dialog box.- Slip: Use Slip mode to move clips anywhere you want within the playlist. You can have clips overlap or leave space between them, for instance. To move a clip using Slip mode, click and hold over the clip and then drag it where you want.
- Grid: Moving a clip using Grid mode snaps the clip to the predefined time grid. Grid mode is useful if you want to quickly move a drum part over a beat, for example. Starting with version 6.0, Grid mode gives you two different options: Absolute and Relative. To choose one of these modes, click and hold the Grid button and then choose the one you want. Here’s what they offer you:
Absolute Grid mode: When using Absolute Grid mode, if you move a clip that doesn’t begin where the grid resides — on the & of 1 when the grid is set to 1/4 notes, for example — the clip will snap to the resolution of the grid.
 This isn’t a good mode to use if you have a clip that starts on the & of 1 (1/8 note after the downbeat) with a 1/4-note grid and you want the clip to fit in the measure the same way after moving it. Your start point will move to a downbeat and all the rest of your notes will be off by an eighth note.
Relative Grid mode: In Relative Grid mode, you move clips by the unit of the grid (1/4 notes, for example). So, in the example of a clip starting on the & of 1 with a grid resolution of 1/4 notes, the clip will move over by the grid value (1/4 notes), leaving the start time of the clip on the & of the beat.
Relative Grid mode is useful for moving a drum hit over and having it fit within the grid, even if its start point doesn’t originally match the grid itself.
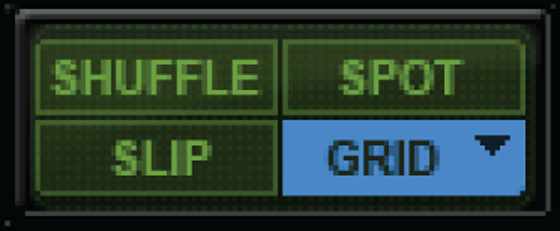
FIGURE 1-11: Pro Tools offers four edit modes: Shuffle, Spot, Slip, and Grid.

FIGURE 1-12: Use the Spot dialog box to choose where to place a clip.
Setting grid resolution
Setting grid resolution is an outrageously handy tool for precision-tweaking the rhythms of your track. If you decide to go the Grid mode route, you can set the resolution of the grid that you work in by following these steps:
Click and hold on the Grid Value window, located under the Edit tools in the main Edit window, as shown in Figure 1-13.
The Grid Resolution menu appears, offering you choices for the resolution of your grid — 1/2 notes, 1/4 notes, 1/16 notes, whatever.
Drag to the resolution you want.
Within this menu, you can also choose the time scale you want the grid in as well as whether you want the grid to follow the main time scale.

FIGURE 1-13: Click and hold on the Grid Value window to open the Grid Resolution menu.
Displaying grid lines
Again, if you want to work in Grid mode, you might find the grid lines in the Edit window helpful. You can get them to appear onscreen by using one of two methods:
- Click the Grid button (see Figure 1-14).
- With Grid Edit mode enabled, click the Timeline Ruler (Bars:Beats) button to toggle the grid on and off, as shown in Figure 1-15.

FIGURE 1-14: Turn on the Grid view here.

FIGURE 1-15: Click the Timeline Ruler button to toggle the grid on and off in Grid Edit mode.
Working (Okay, Playing) with Playlists
The Edit playlists within your tracks consist of various arrangements of the clips within a track. Each track can have one or more clips that you can arrange in any order that you want using the edit modes listed in the previous section. Edit playlists allow you to experiment with different arrangements of clips within a track — and you can still change them at will by switching to another playlist. This is handy if you want to try different arrangements of songs and easily compare them without having to create copies of entire sessions (as you would with some other programs).
You access your Edit playlists by clicking the Playlist selector in the Track section of the Edit window, as shown in Figure 1-16. From the menu called up by the Playlist selector, as shown in all its glory in Figure 1-17, you can choose from the various playlists as well as create, duplicate, or delete them.

FIGURE 1-16: Find the Playlist selector in the Track Controls section of the Edit window.

FIGURE 1-17: Use the Playlist drop-down menu to manage playlists for each track.
Creating a new playlist
When you record or import audio into a track, you automatically create an empty playlist. With this new playlist, you can import audio clips, drag those clips in, or copy and paste them from other tracks. You can create additional playlists by opening the Playlist drop-down menu; just click the Playlist selector next to the track’s name in the Track Controls section of the Edit window and choose New. (See Figure 1-17.)
Duplicating a playlist
Being able to duplicate a playlist makes creating different arrangements of a track or making edits to the clips in a playlist easy. Instead of creating a new blank playlist, you start from one you already created. To duplicate a playlist, click and hold with the mouse pointer over the Playlist selector and then choose Duplicate. You get the option of naming the new playlist or going with the default.
Deleting a playlist
Playlists take up no space on your hard drive, so you don’t need to delete them to free up space. Still, if you want to delete a playlist from a session, follow these steps.
You can’t undo this operation.
- Make sure that the playlist you want to delete isn’t the active one in the track.
- Open the track’s playlist menu by clicking the Playlist selector (the arrows located next to the track’s name in the Track Controls section of the Edit window).
Choose Delete Unused.
A dialog box opens, listing all playlists in the track (except the currently assigned playlist).
Select the playlist that you want to delete from the list.
To delete more than one, press and hold the Shift key while you select the playlists.Click OK.
The selected playlist is deleted.
Renaming playlists
To rename the current playlist in a track, double-click the name of the track where the playlist resides and then type in a new name.
Assigning a playlist to a different track
You can assign an unused playlist to a different track than the one it was recorded to by choosing Other Playlists from the Playlist selector.
Choosing playlists
You can choose the playlist that appears in a track by clicking the Playlist selector (the arrows located next to the track’s name in the Track Controls section of the Edit window) and dragging to the playlist you want. The name of the playlist then shows up as the track’s name.
Using the Audio Clips List
All the audio clips in your session are displayed in the Audio Clips list, located on the right side of your Edit or Mix window, as shown in Figure 1-18. From this list you can
- Drag a clip into a track.
- Drag to rearrange clips in the list.
- Audition any clip by Option-clicking (Mac) or Alt-clicking (PC) a clip in the list.

FIGURE 1-18: The Audio Clips list shows all the clips in a session.
After you start recording, importing, and editing clips in your session, you can start accumulating clips in this list very quickly. Fortunately, Pro Tools helps you keep track of them by displaying clip types differently. The “distinguishing marks” are as follows:
- Whole File clips are in bold.
- Auto-Defined and User-Defined clips are in regular text.
- Offline clips are in italics.
- Stereo clips contain two mono clips that can be expanded by clicking the triangle to the left of the clip name.
Selecting clips
Here’s how to select single or multiple clips from the Audio Clips list:
- To select a single clip: Click a single clip. It becomes highlighted. Then select the Clip List Selection Follows Track Selection check box on the Editing tab of the Preferences dialog box (the dialog box you get by choosing Setup ⇒ Preferences from the main menu). Voilà! The track containing this clip becomes highlighted to show it’s selected.
- To select a range of contiguous clips: You have two choices:
- With the cursor on the left of the Audio Clips list (a marquee will appear), click and drag across the clips you want to select.
- Shift-click to the left of the first and last clip names for a group of clips. All the clips in between these two are selected.
- To select multiple clips that aren’t next to one another: Your method depends on your platform:
- Mac: With the cursor located over the name of the clip, ⌘ -click each clip.
- PC: Shift-click over the name of each clip.
Using the Audio Clips list drop-down menu
Audio clips can also be managed from the drop-down menu located at the top of the Audio Clips list, as shown in Figure 1-19. (The Audio Clips list is located at the right side of the Edit window. If it isn’t visible, click the double arrow at the bottom-right corner of the Edit window to open it.) Open this menu by clicking and holding the Audio Clips title at the top of the Audio Clips list. Many of the functions in this menu are covered in this section.

FIGURE 1-19: Use the Audio Clips drop-down menu to manage your audio clips.
Sorting clips
After you start editing in earnest, the clips in the Audio Clips list start adding up. The only way to keep track of them is by being able to sort them. Pro Tools offers you several ways to sort, including by name, time stamp (when it was recorded), length, and a host of other parameters. To sort clips from the Audio Clips drop-down menu, choose Sort By from the menu and then choose one of the many options pictured in Figure 1-20.

FIGURE 1-20: Sorting clips in many ways from the Audio Clips drop-down menu.
Finding clips
You can find clips in the list by choosing Find from the Audio Clips drop-down menu. When you do, a dialog box appears, as shown in Figure 1-21, where you can enter part of a word or a whole word for the clip you want to find.

FIGURE 1-21: Type a word or part of a word of the clip you want to find.
Displaying clip information
Besides displaying just the clip’s name — the default for the Audio Clips list — you can have Pro Tools display some additional information about the clip in the playlist section of the track:
- The complete path of the clip’s location: Choose the Show option from the Audio Clips list drop-down menu; then from this list, choose Full Path. Open this menu by clicking and holding the Audio Clips title at the top of the Audio Clips list located on the right side of the Edit window. (If this list isn’t visible, click the double arrow at the bottom-right corner of the Edit window.)
- The name of the file where the audio clip is located: Choose Show from the Audio Clips list drop-down menu; then from that list, choose File Name.
- The name of the hard drive where the file is located: To see this information, choose Show from the Audio Clips list drop-down menu; then, from that list, choose Disk Name.
Managing Undos
Here’s the realm where digital editing saves you vast quantities of time, hassle, and frustration: Pro Tools lets you undo operations that you perform in your sessions. This gives you vast flexibility and offers at least some safety net when you start messing around with your songs.
Setting levels of Undo
Pro Tools offers up to 64 levels of Undo. You don’t have to use them all, though. In fact, if you have minimal memory on your computer, performing edit operations in Pro Tools will quickly fill it up and really slow things down. Or, if your memory is really low, you might not be able to perform an edit at all because all your previous edits are stored in RAM, right up to the number you specify in your preferences.
Luckily, Pro Tools offers you the ability to choose the maximum levels of Undo that your session will have. You can set these levels on your session by doing the following:
Choose Setup ⇒ Preferences from the main menu.
The Preferences dialog box duly appears.
- Click the Editing tab.
- Type in the number of Undos you want in your session in the Levels of Undo field at the bottom of the window, as shown in Figure 1-22.
- Click OK.

FIGURE 1-22: Choose the levels of Undo in your session.
Performing Undos
Performing Undos in Pro Tools is just like any other program: Choose Edit ⇒ Undo from the main menu. The Undo option also includes the name of the operation that you’re undoing, as shown in Figure 1-23. This is helpful when you want to perform multiple Undos because you have to move back progressively through each operation that you performed. Keeping track of 32 operations can be tricky.

FIGURE 1-23: When you’re undoing an operation, the menu shows you what you’re undoing.
You can redo an Undo — but only the last one — by choosing Edit ⇒ Redo from the main menu.
Knowing when you can no longer Undo
Some operations result in clearing your Undo lineup. Whenever you perform the following operations, your previous operations can no longer be undone:
- Importing track or session data.
- Selecting Select Unused Clips or Select Unused Clips Except Whole Files from the Audio Clips list drop-down menu.
- Deleting a track or clearing a clip from the Audio Clips list drop-down menu.
Pro Tools won’t warn you before you perform these operations. But hey, sometimes we human beings actually do know what we’re doing.