
Chapter 2
Configuring Your Computer
IN THIS CHAPTER
![]() Choosing hardware
Choosing hardware
![]() Setting up a Mac
Setting up a Mac
![]() Configuring a PC
Configuring a PC
Pro Tools works well on both Macs and PCs, so no matter which type of computer you prefer, you can make good music without much hassle. However, you need to do a few things to your computer — and certain hardware requirements you need to observe — to run Pro Tools successfully.
This chapter gets you up to speed on these areas. I walk you through setting up and configuring your system and installing the software. As an added attraction, I include some advice on how to keep the bugs at bay. (You know, those nasty computer hiccups that can keep you from capturing your best guitar solo — or, worse yet, losing it after the fact.)
Using Pro Tools on a Mac
Getting up and going on a Mac is easy. After you have a computer with the right specs (which I cover in this section), it takes you less than 15 minutes to be ready to plug in your hardware (covered in Chapter 3 of this mini-book) and start recording (audio is covered in Book 3 and MIDI is covered in Book 4). This section takes you step by step, turning your Mac into a lean, mean, audio-recording machine.
Understanding Mac system requirements
One of the great things about Macintosh computers is that there aren’t a lot of variables. Almost any Mac can record audio with Pro Tools. (Well, as long as it meets the basic system requirements. See the following Remember icon.) Here are a few things, however, that you need to know to record well. These are covered in this section.
 The best way to ensure that the computer and audio interface that you own or are considering buying will work with Pro Tools is to go to the compatibility page on the Avid website at
 http://avid.force.com/pkb/articles/en_US/Compatibility/en436391. Choose the hardware and operating system (OS) you use (or intend to use) to see whether it will work with Pro Tools.
 Because the people at Avid can’t test all possible hardware options, you may also want to check out the Avid User Conference (DUC) for any topics covering hardware issues. That web page is
 http://duc.avid.com. Look for the section dedicated to Pro Tools for Macs.
Knowing which Mac to buy
You need a Mac with an Intel Core i5 or i7 processor to run Pro Tools. This encompasses most Macs made in the last several years, including iMac, Mac Pro, Mac Mini, MacBook, MacBook Pro, and MacBook Air.
The speed of your processor and the number of cores you have will dictate the overall power of your system. I was reasonably happy using an early-2015 MacBook Pro with two cores until I switched to a late-2017 iMac Pro with eight cores. For basic work and fewer than 24 tracks of audio, the MacBook worked fine, but for higher track counts, the iMac made life easier, especially when mixing and bouncing.
If you’re a singer-songwriter recording tracks one at a time, you can get by with a more basic Mac (or a laptop), but if you record bands live, you’ll be happier with a more suped-up Mac.
Opting for a Mac operating system
You need at least Mac OS X version 10.6 to run Pro Tools 2018 software. You definitely want to check out the Avid compatibility page (http://avid.force.com/pkb/articles/en_US/Compatibility/en436391) to see whether any issues are noted for the Mac OS you have.
I try to stay one version behind with all my software, especially the OS. I’ve learned the hard way to wait until the bugs are worked out before upgrading. One nice thing about Avid is that it constantly checks and approves the newest hardware and OS versions so you don’t need to do it yourself.
Recognizing your RAM needs
Pro Tools requires at least 16GB of RAM for basic operation, though 32GB of RAM is recommended, so I say go for broke here. Get as much RAM as you can afford or as your computer can handle. And don’t buy the cheap stuff — get high-quality RAM. It’s worth checking out www.crucial.com or www.ramjet.com to find the best RAM for your system.
This is where the MacBook (all varieties) have limitations because you can’t add RAM, and even the amount of RAM you can configure when you buy your computer is limited.
Getting a handle on hard drives
As I described in Book 1, Chapter 2, Pro Tools (and any other audio-recording software for that matter) likes to have more than one hard drive. In fact, I’ll go as far as to say that Pro Tools needs more than one hard drive to run properly. My advice? Get multiple drives: one drive for all your system files and software; one for all your audio data; and one for your software instruments, sample libraries, and MIDI files. Here’s a look at how to organize them:
System drive: For your system drive, you can use the stock drive that came with your computer. If you have a choice, though, I recommend getting one with a spindle speed of 7,200 rpm or a solid state drive (SSD). You’ll be much happier, as will Pro Tools. And get a big one — hard drive, that is (at least 500GB).
 Even if you have other programs on your computer (such as finance or word-processing software), you don’t need to partition your drive. In fact, doing so may slow down your system.
Data and sample library drives: You can go with an SSD or a hard disk drive (HDD). If you go with an HDD, make sure that you have a drive with the following (or better) specs:
- Spindle speed: Also called rotational speed, this is the rate at which the hard drive spins. For the most part, a 7,200-rpm drive works well for recording and playing back audio.
- Seek time: This is the amount of time that it takes the drive to find the data that’s stored on it. You want an average seek time under 10 milliseconds (ms). Get as low as you can. (I prefer a seek time of 8 to 9 ms.)
- Buffer size: Often called a cache buffer, buffers are memory units that store data while it’s being transferred. You want a buffer size of at least 2MB, but get one as big as you can. I recommend a drive with an 8MB buffer.
A drive with these specs in a good size (2TB or so) will run you about $100, so you have no reason not to spring for the second drive.
I share my favorite drives in Book 1, Chapter 2 if you’re looking for specific recommendations.
Dealing with other software on your system
Not too long ago, installing any other software on the computer that you intended to record audio into was asking for trouble. This isn’t a problem so much anymore, but you still need to be careful not to stress your system by putting too much junk on your computer. (Games come to mind.)
As an experiment, I had Pro Tools running while I had both my email and Internet browser programs open and downloading files, as well as Photoshop and Microsoft Word running (talk about multitasking!) — and Pro Tools still ran fine. I wouldn’t try to record or mix seriously with all this stuff going, but I was able to work without my system crashing.
With that said, if you’re really serious about having a bulletproof system, try to keep any extra software (such as games, finance, publishing, graphics, and so on) off your audio computer. At the very least, keep all other applications closed while you work in Pro Tools.
Setting system settings
Before you install Pro Tools software, check to make sure that you have the latest version of OS X. (Also check the Avid compatibility web page at http://avid.force.com/pkb/articles/en_US/Compatibility/en436391 to make sure this version is supported.) Then follow these steps to prepare your system for the software installation (these steps refer to version 10.13.3):
Log on to your computer by using an administration account.
Your OS X documentation will spell out this procedure for you.
- Choose
 ⇒ System Preferences from the main menu, as shown in Figure 2-1.
 Under the Hardware Options, click the Energy Saver icon.
A new window opens.
On the Computer Sleep option, move the slider to Never, as shown in Figure 2-2.
This keeps your computer from shutting down because you haven’t touched any keys if you’re recording a long song and you (very sensibly) don’t touch any keys while recording.
Leave the Put the Hard Disk to Sleep When Possible option unchecked.
This keeps your computer from going to sleep during long sessions.
- Go back to the main Systems Preferences page by clicking the Show All button in the upper-left corner of the window.
- Choose the Apps option.
When the new window opens, deselect the Automatically Check for Updates, as shown in Figure 2-3.
This keeps your system from dedicating resources to look for and download software updates when you’re working.
- Close the window by clicking the red button in the upper-left corner of the window.

FIGURE 2-1: Find Systems Preferences under the Apple () menu.
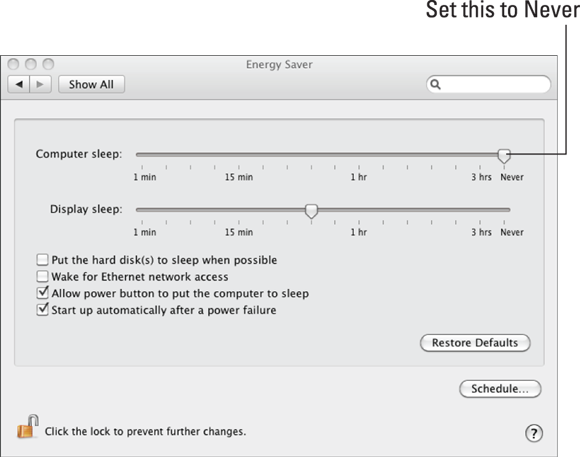
FIGURE 2-2: Turn off the Sleep function for the computer in the Energy Saver window.

FIGURE 2-3: Deselect the Automatically Check for Updates option from the App Store window.
Installing the program
After you complete the system setup requirements in the previous section, you can install Pro Tools software by following these steps:
- Navigate to the download section of Avid’s website to download the files and click the download icon. Pro Tools will download (it may take a while), and an installer will open.
In the new window that appears, double-click the Install Pro Tools icon.
The OS X Administration window appears, asking you to enter your password.
Enter your OS X Administration password and then click OK.
The Pro Tools installer opens.
Select the Startup hard drive as the destination drive.
The installation path is set.
Click Install.
Pro Tools installs on your computer. This may take a few minutes, so sit back and contemplate the fun you’re going to have after it finishes installing itself.
- Restart your computer.
Wait to open the program until after you’ve attached your hardware. The complete details for this procedure are located in Chapter 3 of this mini-book.
Using Pro Tools on a PC
Getting set up with a PC is a little more complicated than it is with a Mac simply because you have a lot more hardware variables to deal with. As long as you keep the basic system requirements in mind, you can set yourself up with a very powerful system, often for less money than you’d shell out for a comparable Mac-based system. In this section, I cover some basic things to keep in mind when you’re either purchasing or configuring a PC system for use with Pro Tools.
Understanding PC system requirements
Although the system requirements for PCs are similar to the basic ones for Macs, you do have to deal with a ton more variables. Of these variables, central processing units (CPUs), motherboards, and graphics cards are probably the most confusing to people starting out. These components — as well as the more basic stuff, such as hard drives and RAM — are covered in this section so you can get up and running on a PC in no time.
Again, the best source for the latest hardware compatibility information can be found online at the Avid website at
http://avid.force.com/pkb/articles/en_US/Compatibility/en353265
or on the Avid User’s Conference (DUC) web page at
Picking a central processing unit (CPU)
A CPU is a small chip that’s responsible for processing all the data in your computer. It’s essentially the computer’s brain. The two major CPU manufacturers in the PC world are Intel and AMD. In the past, Avid supported both, but at this point Avid only recommends computers with an Intel i5, i7, or Xeon processor.
Because Pro Tools is a host-based system, it relies on the processing power of your computer’s CPU instead of hardware-processing cards (as the more elaborate Pro Tools | Ultimate systems do). The number of plug-ins and amount of mix automation you can use in a session is directly related to how powerful (read: fast) your system is, so don’t skimp on CPU speed. The good news is that the current higher-end processors can perform as well as, if not better than, the super-expensive Pro Tools | Ultimate systems.
Choosing a motherboard
A motherboard is the main circuit board in your computer, holding the CPU, memory, and other peripheral cards. You have many choices for a motherboard. I have had good results over the years with Asus brand motherboards, but other brands can also work well.
When you select a motherboard for use with Pro Tools, your main concern is that it
- Supports the CPU you plan on using
- Has a compatible chipset
You also have to make sure you have the necessary ports to connect your audio interface. Most likely, you’ll be able to get by with USB-3, but depending on your gear, you may also need a PCI slot or Thunderbolt 3 (USB-C).
Be sure to check out the Avid compatibility site before you buy a motherboard.
Grabbing a graphics card
Avid supports graphics card by the three most popular graphics processing unit (GPU) manufacturers: AMD/ATI, Intel, and Nvidia. Though Pro Tools doesn’t make the same demands on your graphics card that modern game software does, you’d do best to stick with these. The main thing to keep in mind with your graphics card is to be up to date with your drivers. Check with your GPU manufacturer to install the latest drivers.
Loading up on RAM
As far as RAM goes, Avid suggests using a minimum of 16GB, but recommend having at least 32GB for best performance. As I mention in earlier chapters, get a lot more RAM — at least double the minimum amount. The other important thing to remember when buying RAM for your PC is that you get the proper type of RAM for your motherboard.
Don’t buy cheap RAM because it can cause problems with your system. High-quality RAM is not much more expensive than the cheap stuff, so spend the extra few bucks. You’ll thank me when your system doesn’t freeze on you. As I mention in the earlier Mac section, I recommend checking out www.crucial.com to find the best RAM for your system.
Selecting hard drives
Hard drive requirements for a PC system are essentially the same as those for Macs. Check out the “Getting a handle on hard drives” section earlier in this chapter for the lowdown on buying hard drives for your system.
Opting for a Windows operating system
Windows 8.1 or 10 is required for Pro Tools 2018 and all the compatible Avid hardware. This includes the Mbox and Eleven Rack. At the risk of belaboring a point, check the Avid compatibility page to see what OSes are approved for your hardware and software version.
Preparing to install Pro Tools software
Before you can actually install your Pro Tools software, you need to get your system configured for it. This section describes the procedures and helps you make sure that your system will run trouble-free (at least as much as can be expected).
Looking at Windows settings
Although it’s true for the most part that you can run Pro Tools just fine on a standard Windows 8.1 or 10 configuration, a few system adjustments will free up system resources, allowing more of your computer system’s power available for use by Pro Tools. This is important because Pro Tools is a native DAW (Digital Audio Workstation) — one that relies solely on the host computer’s processing power with no additional DSP (Digital Signal Processing) cards for support. And some of these adjustments — such as enabling DMA (Direct Memory Access) for all your IDE hard drives — are crucial for running Pro Tools successfully. The sections that follow lay out the basic system settings that I recommend.
This procedure disables the active desktop in Windows, which frees some valuable system resources.
Choosing Control Panel settings
Windows is remarkably stable, but for those rare times when it (or a program running under Windows) crashes, it generates an error report and asks whether you want to send the report to Microsoft. This feature, called Error Reporting, takes system resources to run. Because I’m sure that you’d rather have those resources working hard to keep Pro Tools running smoothly, I recommend that you disable Error Reporting. Here’s the drill:
- Click Start and click Control Panel.
- Click the Action Center icon.
- Click the down arrow next to the Maintenance section.
- Click the Settings link under the Check for Solutions to Problem Reports option.
- Select the Never Check For Solutions option.
- Click OK.
Standby power should be set to Always On for your Pro Tools system. To do this, follow these steps:
- Click Start and click Control Panel.
- Click the Power Options icon.
- On the Select a Power Plan screen, choose the High Performance option under the Preferred Plans section (see Figure 2-4).
- Click the window to save the setting automatically.

FIGURE 2-4: Make sure to choose High Performance from the Preferred Plans section.
You also want to make sure that your screen doesn’t go to sleep and crash your session. These steps show you how to do this:
- Click Start and click Control Panel.
- Click the Personalization icon on the screen that appears, and then click Screen Saver in the lower-right corner.
- Choose None from the Screen Saver drop-down menu.
- Click Apply and then click OK.
- Click the Control Panel Home link in the upper-left corner of the screen.
- Click the System icon.
Click the Advanced System Settings link in the upper-left corner of the screen.
The System Properties dialog box appears.
Click the Advanced tab (if it isn’t already selected) and then click the Settings button in the Performance section.
The Performance Options dialog box appears.
- Click the Visual Effects tab (if it isn’t already selected).
Select the Custom option.
Make sure that none of the options listed in the dialog box are selected with a check mark (as you can see in Figure 2-5). If any are, simply click those pesky check marks so they disappear.
- Click OK.

FIGURE 2-5: Uncheck (clear) all the visual-effects options.
Your System Sounds need to be disabled to prevent potential problems with Pro Tools. To do this, follow these steps:
- Click Start and click Control Panel.
- Click the Sound icon.
- Click the Sounds tab.
- From the Sound Scheme drop-down menu, choose No Sounds (see Figure 2-6).
- Click Apply and then click OK.
- Close the Control Panel.

FIGURE 2-6: Choose No Sounds on the Sounds tab.
Congratulations! You just configured your system settings.
Disabling virus protection
Virus protection is an important thing to have on any computer that connects to the Internet, but virus protection can also adversely affect Pro Tools performance. Ideally, your Pro Tools host computer would be dedicated to just running Pro Tools. However, many of you will be using an “all-purpose” computer that you will use for many tasks, such as surfing the Web for business, pleasure, and/or for helping with your children’s homework.
In that case, you should turn off your virus protection and disconnect from the Internet whenever you run Pro Tools. Check with the documentation that came with your virus-protection software for the best way to do this. (And don’t forget to re-enable virus protection before you log on to the Internet again.)
I hate to repeat myself, but I will: If you’re really serious about having a bulletproof system, try to keep any extra software (such as games, finance, publishing, graphics, and so on) off your audio computer. At the very least, keep all other applications closed while you work in Pro Tools.
After you make all these system adjustments listed earlier, you need to reboot your computer.
Connecting your hardware
After you have your system fine-tuned (as described in the previous sections), you can now connect your hardware. Shut down your computer and refer to Chapter 3 of this mini-book for the specifics on connecting your Avid hardware. Each piece of hardware has its own installation procedure; I cover each one, step by step, in that chapter. After you have the hardware connected, turn on your computer. Then, after the Windows desktop appears, turn on the power to your Avid hardware. (If you’re using a product that doesn’t have a power switch, you can ignore this step.)
On Windows PCs, wait to install the program until after you attach your hardware — and, if needed, power it on. The complete details for this procedure are located in Chapter 3 of this mini-book.
Installing the program
After you complete the Windows system-setup adjustments listed in the previous sections, you can install Pro Tools software by following these steps:
Connect your audio interface to your computer.
Depending on your device, this can be a USB or Thunderbolt port or PCI slot.
Start Windows.
The Windows desktop appears.
Turn on your audio interface if it has a power switch.
If you’re using a bus-powered device — such as the Mbox 2 interfaces — it’ll already be powered on when you plug it in.Navigate to the download section of Avid’s website to download the files and click the download icon.
Pro Tools will download (it may take a while), and an installer will open.
- Open the Pro Tools Installer folder.
- Click Setup.
- After the Installer appears, click Next to continue.
- Accept the Default paths for installation (they’re fine, and it’s less hassle) and then click Next.
- Wait for the installation to complete.
- Restart your computer.
Avid has included additional drivers that aren’t needed for use with Pro Tools, but are included in case you’re using third-party programs and want your Avid hardware to interface with them. Frankly, I don’t recommend installing these drivers unless you absolutely have to. Remember, it’s best to keep a lean, mean DAW machine, and that means staying away from any unnecessary drivers and programs. If you have to install these drivers for use with a third-party audio program (such as Sonar or Cubase), refer to their manuals and the Avid documentation that came with your hardware for instructions.
Keeping Bugs at Bay: Good Habits to Get Into
One thing is certain with computers: Hiccups will happen. Just when you think everything is performing perfectly, something crashes your system. Because these things are inevitable, I recommend that you work on developing some good habits to keep these minor problems from becoming disasters. In this section, I list a bunch of things that can help give you as stress-free an experience recording on your computer as possible.
Back up your data often
There’s an old saying about computer data — If it doesn’t exist in at LEAST two places, then it DOESN’T EXIST! Your hard drive can be considered one such “location.” There are several ways people usually back up their data:
- Get a second hard drive and back up to it every day. You can also use an automated backup program, such as Retrospect, to do this for you.
- Put your data on DVD +/-R discs or a USB thumb drive. Again, do this daily.
- Use a Cloud-storage solution such as Dropbox or Amazon Cloud Drive. This only works if your audio computer has an Internet connection, but with some services you can also mirror your system drive so if it does go down you can get back up and running quickly (see the next section for more on backing up your system drive).
Regardless of the method you choose, the important thing is to back up your data. Hard drives have become remarkably reliable, but as with anything else, failures can and do happen. If your hard drive should fail (or if you accidentally delete something that you shouldn’t have), you’ll be very happy you made copies of all your Pro Tools sessions to another storage device — and (if you didn’t make copies) very sad to see your hard work disappear forever right before your eyes.
Back up your system drive
Because installing your OS, software applications, plug-ins, and so forth can take a considerable amount of time, I prefer to back up this information as well as my audio and session data. Some great programs are available that allow you to create an image of your system drive onto another hard drive or to removable media (such as DVD-Rs). In the event of a hard drive crash or other problem, you can restore your drive (or a new drive) to exactly the way you had it before the crash occurred. The best part is that this takes a lot less time than reinstalling everything from scratch.
To do this, get a separate hard drive, preferably a big one) and choose the following:
- For Mac, use Apple’s Time Machine.
- For PC, use Windows Backup and Restore.
These programs will automatically backup your system drive, allowing you to go back to previous versions if you ever need to. If you get a large enough hard drive, you can choose to back up not only your system drive but another drive with your audio data as well. This makes everything easier in case something bad happens to your computer.
A few minutes spent backing up your system drive and your Pro Tools sessions now can save you hours of work reloading all your programs later — and can also save you from losing that session you spent so many hours perfecting. Get into the habit of backing up your data regularly.