86
CHAPTER PIECING TECHNIQUES
Piece Square-in-Square Units
A square-in-square unit (sometimes called diamond-in-a-square) is a center square set on point with
triangles surrounding it. Sewing the triangles onto a square is tricky, but the methods shown here will
help you be successful. Choose the one that works best for you.
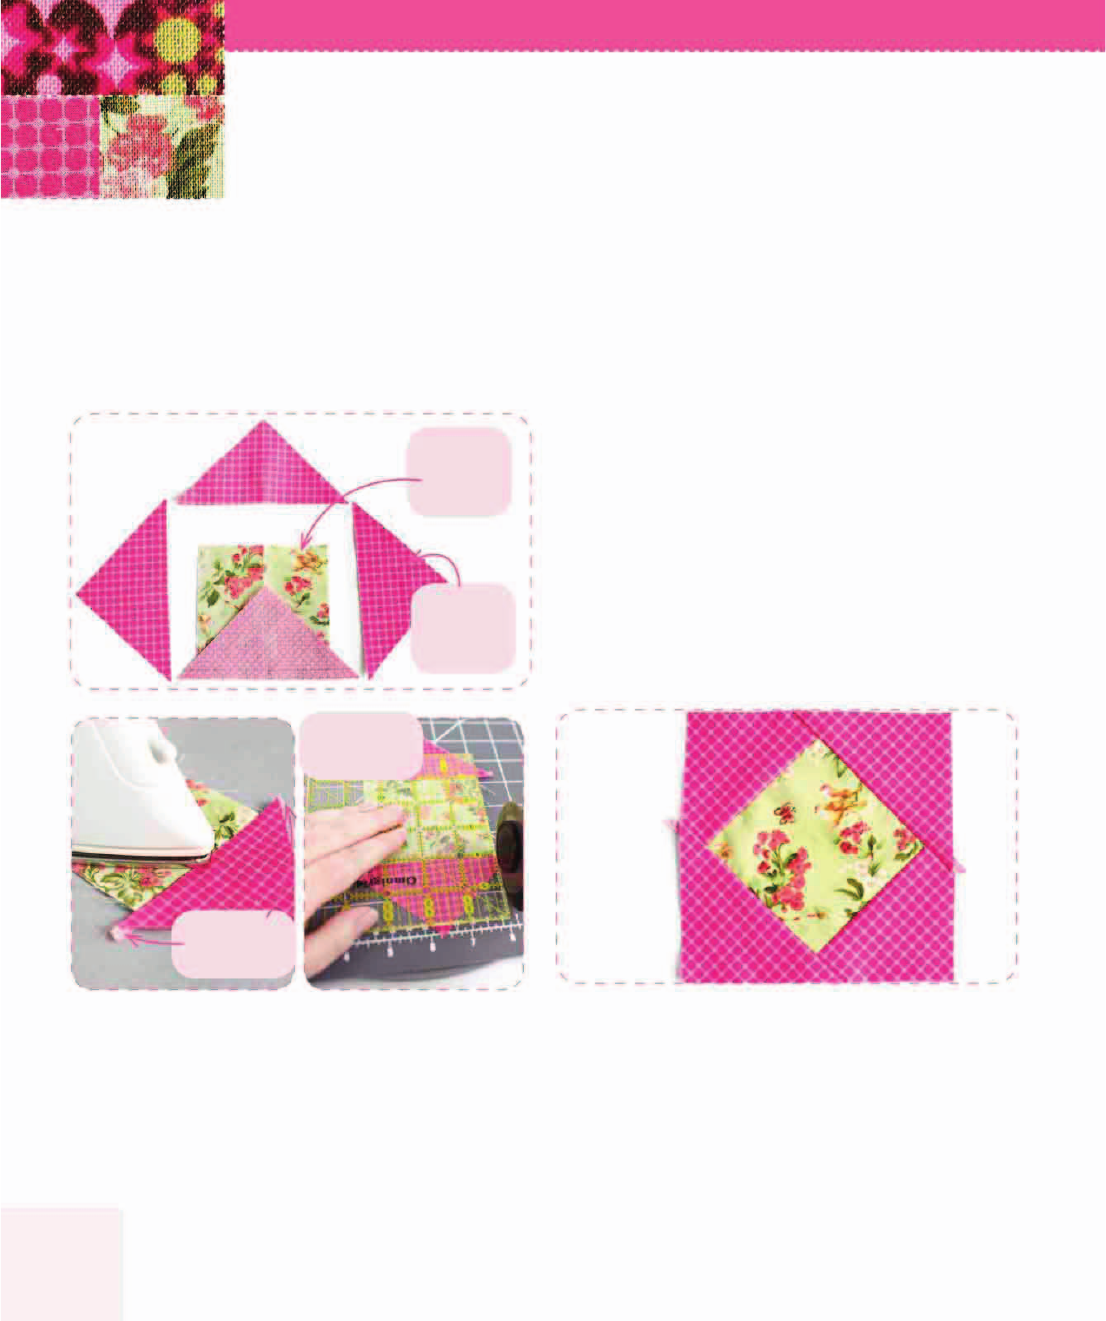
Sew triangles to opposite sides of the square and press.
Align the first triangle with its cut edge along one side of the
center square, right sides together. Use the folds in the center
square and the triangle to help you center the triangle. Two
“dog ears” will stick out on either side of the triangle. Sew the
triangle to the square, and press away from the square. Then
repeat this process to add the other triangle. Trim the dog ears.
2
1
Cut the center square and triangle squares.
Take the finished size of your block, divide by 2, multiply by
1.414, add
1
⁄
2
inch (1.2 cm), and cut a center square that size.
To make a 5-inch (12.7 cm) finished unit, cut a 4-inch (10.2
cm) center square. Cut two triangle squares half the size of
the finished block plus 1 inch. Cut the triangle squares in half
diagonally, and then mark the
1
⁄
4
-inch (.6 cm) seam allow-
ance on the cut edge of the triangle. Fold the center square
and the triangles in half to mark the midpoints.
Method 1: Makes One Square-in-Square Unit
Sew the remaining triangles to opposite sides of the
square and press.
Fold the center square in half in the other direction to mark
the midpoints. Fold the triangles in half, too. Align a triangle
along each edge, sew, and press. Trim the block to size. The
points of the center square should measure exactly
1
⁄
4
inch
(.6 cm) to the edge of the finished unit.
3
Center
square
Triangle
squares
Dog ears
Trim the
dog ears

87
PIECE SQUAREINSQUARE UNITS
Cut the base square and corner squares.
Cut the base square the finished size you want, plus
1
⁄
2
inch
(1.2 cm). For a 3-inch (7.6 cm) finished square-in-square unit,
cut the center square 3
1
⁄
2
inches (8.8 cm). Cut the corner
squares half the finished size plus
1
⁄
2
inch (1.2 cm). In this
example, cut the corner squares 2 inches (5.1 cm). Mark the
corner squares diagonally. This will be the sewing line.
1
Stitch and flip a corner square.
Place a corner square in a corner of the base square, right
sides together, and stitch on the diagonal line. Flip the cor-
ner square over the diagonal and press to the corner. Then
trim the excess corner square underneath, leaving a
1
⁄
4
-inch
(.6 cm) seam. Do not trim the base square.
2
If you make square-in-square units
using a dierent method than
prescribed in your quilt pattern,
make adjustments to the fabric yard-
age and cutting directions as needed.
Method 2: Makes One Square-in-Square Unit
Sew on the rest of the corners and press.
Place the next corner square on the base square and sew on
the line. Press to the corner and trim. Use the stitch-and-flip
method to add the remaining corner squares. Measure and
trim the unit as needed. The points of the center square
should measure exactly
1
⁄
4
inch (.6 cm) to the edge of the
finished unit. To trim, measure out
1
⁄
4
inch (.6 cm) from two
sides and trim both sides, and then rotate the block and trim
the last two sides.
3
Corner
squares
Base
square
Unflipped
corner square
Trimmed
excess
..................Content has been hidden....................
You can't read the all page of ebook, please click here login for view all page.