
134
CHAPTER APPLIQUÉ
FINISHED BLOCK SIZE
5-inch (12.7 cm) hourglass units
MATERIALS LIST
FINISHED SIZE
30×25 inches (76.2×63.5 cm)
“Funky Flowers” appliqué patterns
Lightweight fusible interfacing:
2
⁄
3
yard (61 cm)
Stabilizer: 25×25 inches (63.5×63.5 cm)
Black-on-white geometric fabric:
3
⁄
4
yard (68.5 cm)
(appliqué background)
White-on-black geometric fabric #1:
1
⁄
4
yard (22.9 cm)
(appliqué, blocks)
White-on-black geometric fabric #2:
1
⁄
4
yard (22.9 cm)
(appliqué, blocks)
White-on-black geometric fabric #3:
1
⁄
4
yard (22.9 cm)
(appliqué, blocks)
Practice your new appliqué skills by making this
funky flower wall hanging. This wall hanging com-
bines turned-edge fusible appliqué with hour-
glass blocks to create a distinctive look.
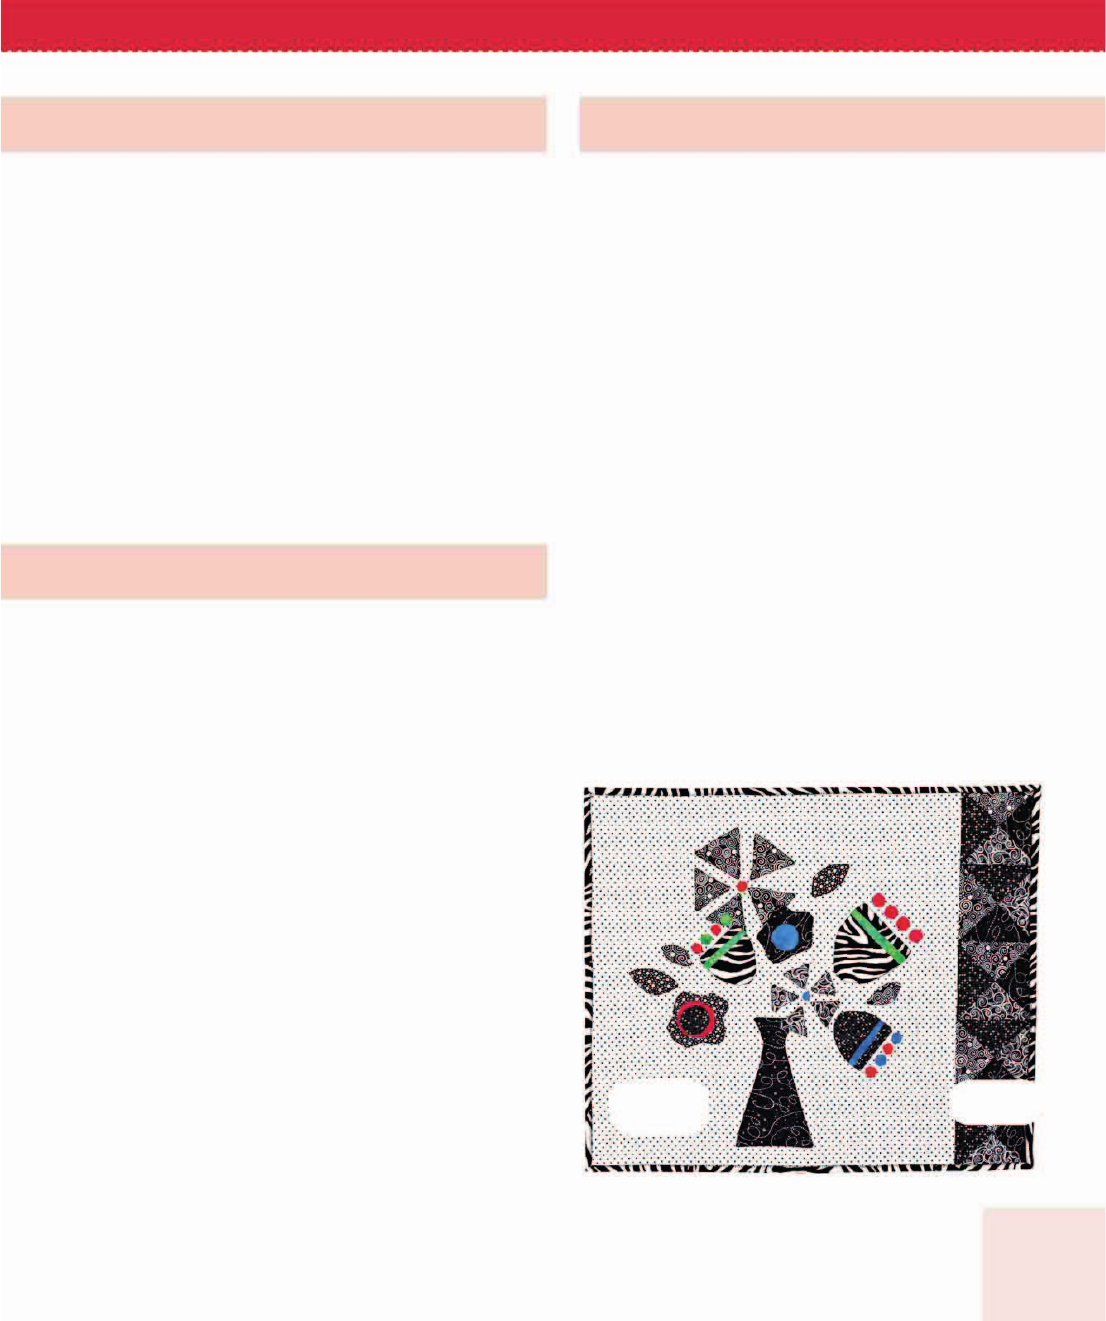
“Funky Flowers” Wall Hanging
PRACTICE PROJECT
135
PRACTICE PROJECT “FUNKY FLOWERS” WALL HANGING
White-on-black geometric fabric #4:
1
⁄
4
yard (22.9 cm)
(appliqué, blocks)
White-on-black geometric fabric #5:
1
⁄
4
yard (22.9 cm)
(appliqué, binding)
White-on-black geometric fabric #6:
Scrap, 5×7 inches (12.7×17.8 cm) (appliqué)
Rose batik: Scrap, 5×5 inches (12.7×12.7 cm) (appliqué)
Orange batik: Scrap, 3×1 inches (7.6×2.5 cm) (appliqué)
Blue batik: Scrap, 5×4 inches (12.7×10.2 cm) (appliqué)
Lime green batik: Scrap, 5×3 inches (12.7×7.6 cm) (appliqué)
Backing: 1 yard (91.5 cm)
Batting: 36×31 inches (91.4×78.7 cm)
MATERIALS LIST CONTINUED
CUTTING DIRECTIONS
Black-on-white geometric:
1 square (A) 27×27 inches (68.6×68.6 cm)
(appliqué background)
White-on-black geometric #1:
1 pattern L (vase)
1 pattern J (flower)
2 squares (B) 6
1
⁄
2
×6
1
⁄
2
inches (16.5×16.5 cm)
(blocks)
White-on-black geometric #2:
1 pattern M (flower)
1 pattern I (flower center)
2 squares (B) 6
1
⁄
2
×6
1
⁄
2
inches (16.5×16.5 cm)
(blocks)
White-on-black geometric #3:
1 pattern S, T, U, V, W (flower)
2 squares (B) 6
1
⁄
2
×6
1
⁄
2
inches (16.5×16.5 cm)
(blocks)
White-on-black geometric #4:
1 pattern A, B, C, D, E (flower)
1 patterns Y, Y1 (leaf)
2 squares (B) 6
1
⁄
2
×6
1
⁄
2
inches (16.5×16.5 cm)
(blocks)
White-on-black geometric #5:
1 pattern M, O (flower)
3 strips, 2 or 2
1
⁄
4
inches (5 or 5.7 cm) wide as you
prefer (binding)
White-on-black geometric #6:
1 pattern G (flower)
2 patterns X (leaf)
Rose batik:
2 patterns F (flower)
4 patterns Q (flower)
1 pattern H (flower)
Orange batik:
3 patterns F (flower)
Blue batik:
1 pattern K, N, R (flower)
2 patterns F (flower)
Lime batik:
1 pattern N, P (flower)
2 patterns F (flower)
Backing:
1 rectangle 36×31 inches (91.4×78.7 cm)
CUTTING DIRECTIONS CONTINUED
Quilt Assembly Diagram
Block Z
Unit 2

136
CHAPTER APPLIQUÉ
Block Z—Appliqué Layout Diagram
3. After preparing all appliqué shapes, lay them out on
the background square A as shown in the Appliqué
Layout Diagram and fuse the shapes in place.
4. Pin or fuse stabilizer behind appliqué. Stitch around
each shape with thread that matches the appliqué.
Use a straight stitch, loose zigzag, or blanket stitch
as you prefer. The sample quilt was stitched using a
loose zigzag.
12
4
3
A
B
E
X
Q
P
O
Y
M
F
N
L
X
I
G
H
M
N
F
Y
F
C
K
J
S
T
U
V
WR
Appliquéing the Quilt Center
You will appliqué the vase of flowers using the turned-
edge fusible appliqué method.
1. Fold appliqué background A square in half both
ways to find the center.
2. Trace appliqué shapes onto the non-fusible side of
lightweight fusible interfacing. Cut out each shape,
leaving a rough
1
⁄
4
-inch (.6 cm) seam allowance.
Place a shape, fusible side down, on the right side of
appliqué fabric, pin, and sew on the drawn line. Cut
a slit in the interfacing and turn shape right side out.
Finger press edges.
Making the Hourglass Units
Although you only need five hourglass units for this
project, this method makes eight. The extra units may
be pieced into the backing or used to make a label on
the back of the quilt.
1. Using Method 1 for piecing hourglass units, make
eight hourglass units. Use one white-on-black geo-
metric #1 B square and one white-on-black geomet-
ric #3 B square to make two half-square triangles
(HSTs). Press to the dark. Repeat to make four HSTs
using white-on-black geometric #1 and #3.
2. Use one geometric #2 B square and one geometric
#4 B square to make two HSTs. Repeat to make four
HSTs using geometric #2 and #4.
3. Place one geometric #1/#3 HST on top of one
geometric #2/#4 HST, butting the seams against
each other. Mark the diagonal and sewing lines, and
sew, creating two hourglass blocks (Unit 1). Repeat
with the remaining half-square triangles to create
eight hourglass units. Trim these hourglass units to
5
1
⁄
2
inches (14 cm) square. Press seams open.
Unit 1 (Make 8)

137
PRACTICE PROJECT “FUNKY FLOWERS” WALL HANGING
5. Press appliqué from the back and trim background to
25
1
⁄
2
×25
1
⁄
2
inches (63.5×63.5 cm).
Adding the Hourglass Units
1. Arrange five hourglass units in a column. Use an
arrangement that pleases you. Here, the hourglass
units are rotated so that the almost black triangles
touch the almost white triangles.
Unit 2 (Make 1)
2. Sew hourglass units to make Unit 2. Press the seams
open. Unit 2 should measure 5
1
⁄
2
×25
1
⁄
2
inches
(14×64.8 cm).
3. Sew Unit 2 to the appliqué square as shown in the
Quilt Assembly diagram. Press to the appliqué
square. The quilt should measure 30
1
⁄
2
×25
1
⁄
2
inches
(77.5×64.8 cm).
Quilting and Finishing
1. Remove selvages from backing fabric before basting
the quilt. Prepare the quilt for quilting and quilt as
desired. The sample quilt was quilted with a mixture
of geometric shapes and curved lines that follow the
appliqué flowers. The hourglass units were quilted in
an orange peel pattern using half-circles.
2. Square up the quilted quilt and bind it. Add a label
and a sleeve for hanging.
If bold fabrics don’t appeal to you, try
Asian fabrics instead, which lend an
air of sophistication to this appliqué
wall hanging.

..................Content has been hidden....................
You can't read the all page of ebook, please click here login for view all page.