
214
CHAPTER GALLERY OF PROJECTS
FINISHED BLOCK SIZE
32 inches (81.3 cm)
MATERIALS LIST
FINISHED SIZE
40×40 inches (101.6×101.6 cm)
“Elephants on Parade” ear patterns (A, A1)
4 buttons, 1 inch (2.5 cm)
Light lime:
1
⁄
2
yard (45.7 cm) (block, Border #1)
Light teal:
1
⁄
2
yard (45.7 cm) (block, Border #1)
Light salmon:
1
⁄
2
yard (45.7 cm) (block, Border #1)
Light magenta:
1
⁄
2
yard (45.7 cm) (block, Border #1)
Bright lime:
3
⁄
8
yard (34.3 cm) (appliqué)
3
⁄
8
yard (34.3 cm) (binding)
Bright teal:
3
⁄
8
yard (34.3 cm) (appliqué)
Bright salmon:
3
⁄
8
yard (34.3 cm) (appliqué)
Bright magenta:
3
⁄
8
yard (34.3 cm) (appliqué)
Backing: 1
2
⁄
3
yards (152.4 cm)
Batting: Crib size, at least 46×46 inches (116.9×116.9
cm)
4 14×14-inch scraps (for elephant ears)
This playful crib quilt features big, dimensional
elephant ears that a baby can flip back and forth.
The light prints provide a restful and modern
look, while bolder, coordinating graphic prints
add something bright and interesting for baby to
look at.
“Elephants on Parade”
Crib Quilt

215
PROJECT “ELEPHANTS ON PARADE” CRIB QUILT
CUTTING DIRECTIONS
Light lime:
1 strip 4
1
⁄
2
×42 inches (11.5×106.7 cm) (Border #1)
1 rectangle (A) 4
1
⁄
2
×14
1
⁄
2
inches (11.5×36.8 cm)
1 rectangle (B) 8
1
⁄
2
×14
1
⁄
2
inches (21.6×36.8 cm)
1 rectangle (C) 6
1
⁄
2
×12
1
⁄
2
inches
(41.9×31.8 cm)
1 square (D) 4
1
⁄
2
×4
1
⁄
2
inches (11.5×11.5 cm)
2 squares (E) 2
1
⁄
2
×2
1
⁄
2
inches (6.4×6.4 cm)
1 rectangle (F) 2
1
⁄
2
×6
1
⁄
2
inches (6.4×16.5 cm)
1 square (G) 6
1
⁄
2
×6
1
⁄
2
inches (16.5×16.5 cm)
Light teal:
1 strip 4
1
⁄
2
×42 inches (11.5×106.7 cm) (Border #1)
1 rectangle (A) 4
1
⁄
2
×14
1
⁄
2
inches (11.5×36.8 cm)
1 rectangle (B) 8
1
⁄
2
×14
1
⁄
2
inches (21.6×36.8 cm)
1 rectangle (C) 6
1
⁄
2
×12
1
⁄
2
inches (41.9×31.8 cm)
1 square (D) 4
1
⁄
2
×4
1
⁄
2
inches (11.5×11.5 cm)
2 squares (E) 2
1
⁄
2
×2
1
⁄
2
inches (6.4×6.4 cm)
1 rectangle (F) 2
1
⁄
2
×6
1
⁄
2
inches (6.4×16.5 cm)
1 square (G) 6
1
⁄
2
×6
1
⁄
2
inches
(16.5×16.5 cm)
Light salmon:
1 strip 4
1
⁄
2
×42 inches (11.5×106.7 cm) (Border #1)
1 rectangle (A) 4
1
⁄
2
×14
1
⁄
2
inches (11.5×36.8 cm)
1 rectangle (B) 8
1
⁄
2
×14
1
⁄
2
inches (21.6×36.8 cm)
1 rectangle (C) 6
1
⁄
2
×12
1
⁄
2
inches (41.9×31.8 cm)
1 square (D) 4
1
⁄
2
×4
1
⁄
2
inches (11.5×11.5 cm)
2 squares (E) 2
1
⁄
2
×2
1
⁄
2
inches (6.4×6.4 cm)
1 rectangle (F) 2
1
⁄
2
×6
1
⁄
2
inches (6.4×16.5 cm)
1 square (G) 6
1
⁄
2
×6
1
⁄
2
inches (16.5×16.5 cm)
Light magenta:
1 strip 4
1
⁄
2
×42 inches (11.5×106.7 cm) (Border #1)
1 rectangle (A) 4
1
⁄
2
×14
1
⁄
2
inches (11.5×36.8 cm)
1 rectangle (B) 8
1
⁄
2
×14
1
⁄
2
inches (21.6×36.8 cm)
1 rectangle (C) 6
1
⁄
2
×12
1
⁄
2
inches (41.9×31.8 cm)
1 square (D) 4
1
⁄
2
×4
1
⁄
2
inches (11.5×11.5 cm)
2 squares (E) 2
1
⁄
2
×2
1
⁄
2
inches (6.4×6.4 cm)
1 rectangle (F) 2
1
⁄
2
×6
1
⁄
2
inches (6.4×16.5 cm)
1 square (G) 6
1
⁄
2
×6
1
⁄
2
inches (16.5×16.5 cm)
Bright lime:
5 strips, 2×42 or 2
1
⁄
4
×42 inches (5.1×106.7 or
5.7×106.7cm) as you prefer (binding)
1 pattern A1 (ear)
Bright teal:
1 pattern A (ear)
1 pattern A1 (ear)
Bright salmon:
1 pattern A (ear)
1 pattern A1 (ear)
Bright magenta:
1 pattern A (ear)
1 pattern A1 (ear)
Backing:
1 rectangle 46×42 inches (116.8×106.7 cm)
2 strips 5×42 inches (12.7×106.7 cm)
Note: Cut border strips before cutting anything else. Trim the border
strips to the right size after the quilt center is sewn. For help cutting
the light fabrics, refer to the Cutting Diagram.
E
G
D
C
B
E
F
BORDER 1
A
216
CHAPTER GALLERY OF PROJECTS
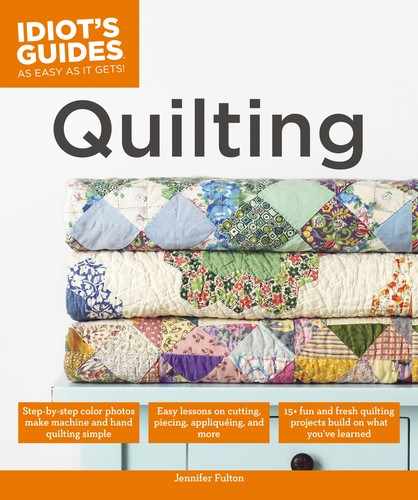
Unit 1 (Make 1)
1. Lay out 1 E square of each color in a four patch.
Using Method 1 for piecing four-patch units, sew the
four squares together to create Unit 1. Unit 1 should
measure 4
1
⁄
2
inches (11.5 cm) square. Press to the
dark as you construct the four patch, and then press
open or fan out the center seam.
Unit 3 (Make 4)
4. Draw a diagonal line on the back of the G squares.
Place the magenta G square on the right end of
the teal C rectangle, right sides together. Sew on
the diagonal line, flip the G square back, and press
to make Unit 3. Trim the excess triangle fabric
underneath the G triangle without trimming the C
rectangle. Unit 3 should measure 6
1
⁄
2
×12
1
⁄
2
inches
(16.5×31.8 cm).
5. Repeat Step 4 to create 3 more Unit 3s in dierent
colors, as shown in the Quilt Assembly Diagram.
Assembling the Units
E
E
EE
Unit 2 (Make 4)
2. Draw a diagonal line on the back of the four other
E squares. Place the teal E square on the right end
of a magenta F rectangle, right sides together. Sew
on the diagonal line, flip the E square back, and
press to make Unit 2. Trim the excess triangle fabric
underneath the E triangle without trimming the F
rectangle. Unit 2 should measure 2
1
⁄
2
×6
1
⁄
2
inches
(6.5×16.5 cm).
3. Repeat Step 2 to create 3 more Unit 2s in dierent
colors, as shown in the Quilt Assembly Diagram.
Unit 4 (Make 4)
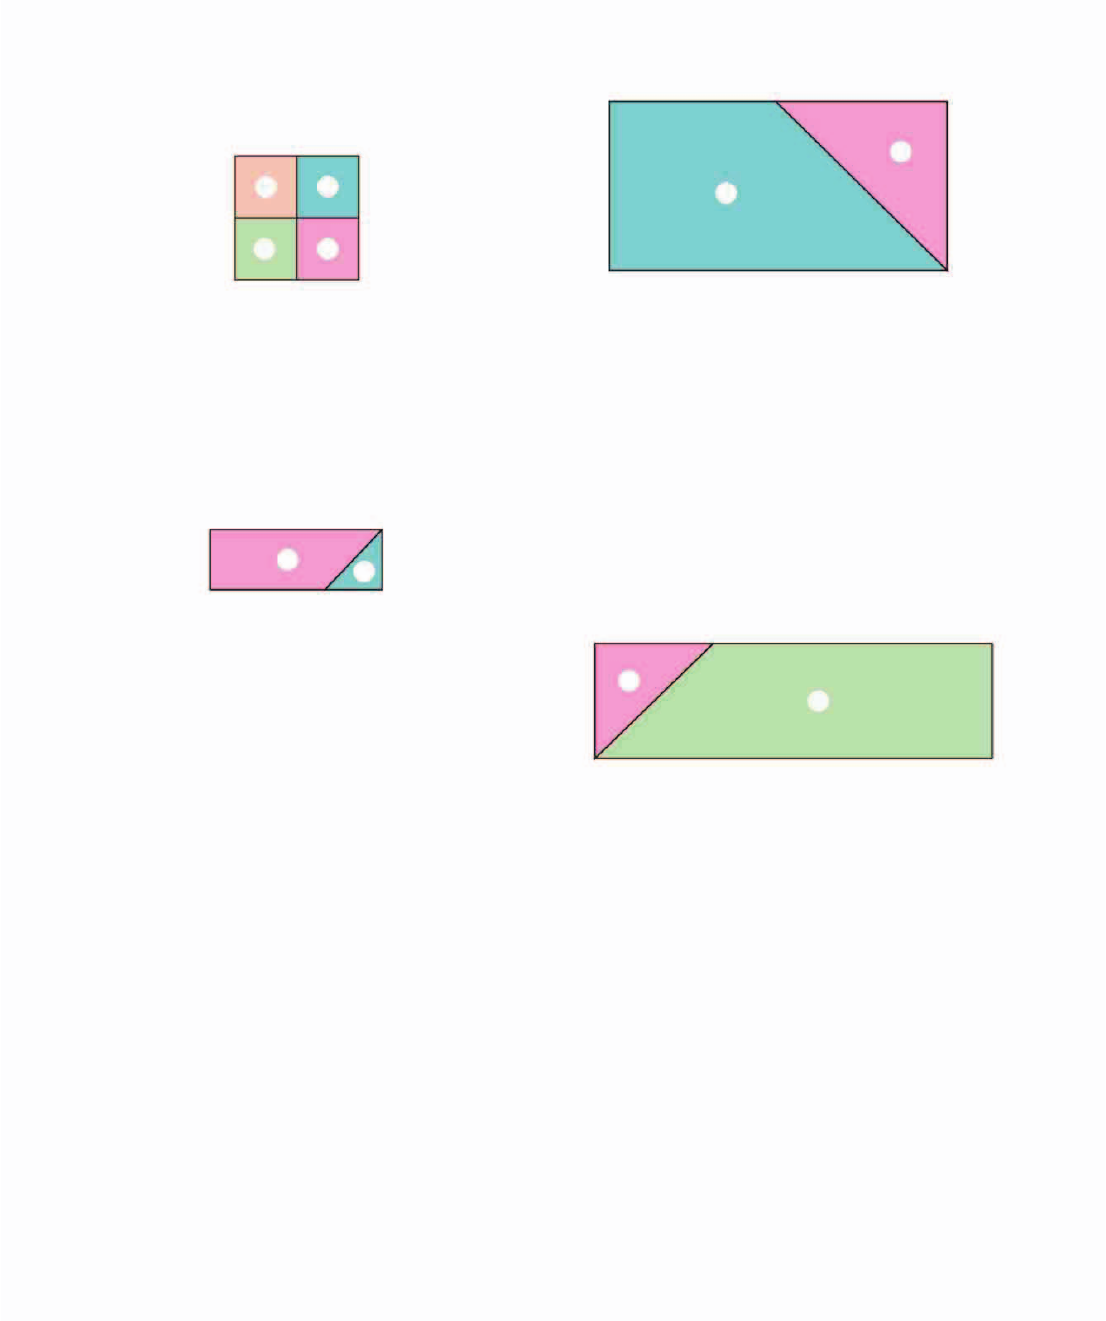
6. Draw a diagonal line on the back of the D squares.
Place the magenta D square on the left end of the
lime A rectangle, right sides together. Sew on the
diagonal line, flip the D square back, and press to
make Unit 4. Trim the excess triangle fabric under-
neath the triangle without trimming the A rectangle.
Unit 4 should measure 4
1
⁄
2
×14
1
⁄
2
inches (11.5×36.8
cm).
E
F
G
C
A
D
217
PROJECT “ELEPHANTS ON PARADE” CRIB QUILT
7. Repeat Step 6 to create 3 more Unit 4s in dierent
colors. Sew a lime D square on a salmon A rectan-
gle, a salmon D square on a teal A rectangle, and a
teal D square on a magenta A rectangle to create
the Unit 4s.
Assembling the Quilt Block
Unit 5 (Make 4)
8. Sew the magenta-lime Unit 4 to the lime B rectan-
gle. Press to the B rectangle. Sew the magenta-lime
Unit 3 to the left end of this newly completed unit
to create Unit 5. Unit 5 should measure 12
1
⁄
2
×20
1
⁄
2
inches (31.8×50.1 cm).
9. Repeat Step 8 to make 3 more Unit 5s in dierent
colors, as shown in the Quilt Assembly Diagram.
Block Z (Make 1)
1. This quilt has only one block, Block Z. Join units to
create Block Z. Lay out the block first, being careful
to place each unit in the right place based on color.
2. Start by sewing the Unit 2s to the four-patch Unit 1.
Sew the first Unit 2 onto Unit 1 using a partial seam,
and then add each Unit 2 in turn, returning to the
first Unit 2 and sewing to complete the seam. Press
to Unit 2.
3. Sew the Unit 5s to the central unit. Sew the first
Unit 5 onto the central unit using a partial seam,
and then add each Unit 5 in turn, returning to the
first Unit 5 and sewing to complete the seam. Press
to Unit 5.
4. Block Z should measure 32
1
⁄
2
×32
1
⁄
2
inches
(82.5×82.5 cm).
UNIT 3
UNIT 4
B
UNIT 3
UNIT 5
UNIT 3
UNIT 5
UNIT 3
UNIT 5
UNIT 3
UNIT 5
UNIT 2
UNIT 2
UNIT1
UNIT 2
UNIT 2

218
CHAPTER GALLERY OF PROJECTS
Assembling the Elephant Ears
1. To make floppy ears, trace ear patterns A and A1
onto the back of each ear fabric and cut out. Trace
four ear A1 patterns onto quilt batting and cut out.
If you prefer nonfloppy ears, you can appliqué them to the quilt instead. For hand
appliqué, use the ear pattern A1 (nonreversed), so you can trace it onto the front of
the fabric. For machine appliqué, use the ear pattern A (reversed). Remove the
1
⁄
4
-inch
seam allowance marked on the pattern if applicable to the appliqué method you are
using.
2. Place an A ear on top of a similarly colored A1
ear, right sides together. Place quilt batting on top.
Sew shapes together, beginning and ending where
marked and leaving the tab opening unsewn. Back-
stitch at the beginning and end of the seam. Clip
curves and turn the shape right side out. Press all
along the sewn edge. Repeat to sew the other ears.
3. Turn under the tabbed edges of one ear, leaving
roughly a
1
⁄
2
-inch (.6 cm) tab. Sew close to the
edge to close the opening. Be sure to backstitch
at the beginning and end of the seam. Repeat for
other ears.
4. Quilt the ears with a simple pattern, such as diago-
nal lines, or with a unique pattern for each ear.
Adding the Borders
Quilt Assembly Diagram
1. Using the Quilt Assembly Diagram, arrange bor-
ders on the proper sides, based on color.
2. Measure down the quilt center and cut the side
Border #1 strips that length. Sew these strips to the
sides of the quilt center. Press toward the strips.
3. Measure across the quilt center and cut the top
and bottom Border #1 strips that length. Sew these
strips to the top and bottom of the quilt center.
Press toward the strips. The quilt should measure
40
1
⁄
2
×40
1
⁄
2
inches (102.9×102.9 cm).
Block Z
4
1
⁄
2
×40
1
⁄
2
inches (11.5×102.9 cm)
4
1
⁄
2
×40
1
⁄
2
inches (11.5×102.9 cm)
4
1
⁄
2
×32
1
⁄
2
inches (11.5×82.5 cm)
4
1
⁄
2
×32
1
⁄
2
inches (11.5×82.5 cm)
TAB
BEGIN
HERE
END
HERE
STITCHING
LINE
..................Content has been hidden....................
You can't read the all page of ebook, please click here login for view all page.