
220
CHAPTER GALLERY OF PROJECTS
FINISHED BLOCK SIZE
8
1
⁄
2
inches (21.6 cm)
MATERIALS LIST
FINISHED SIZE
60×72 inches (152.4×182.9 cm)
1 batik Jelly Roll, or 2
7
⁄
8
yards (2.6 m) from a variety
of batiks (blocks, setting triangles, Border #2)
1 batik Charm pack plus
5
⁄
8
yard (57.2 cm) from a
variety of batiks (blocks, setting triangles)
If not using a charm pack, then 1
1
⁄
4
total yards (1.2 m)
from a variety of batiks
Dark batik:
7
⁄
8
yard (80 cm) (Border #1 and #3)
1
⁄
2
yard (45.7 cm) (binding)
Backing: 3
7
⁄
8
yards (3.5 m)
Batting: At least 66×78 inches
Only the toughest organisms can survive life in a
tide pool because of the strong currents and sun
exposure. Making a quilt is sometimes tough as
well, because of all the choices you need to make.
This quilt has a secret to help you survive your
quilting tide pool: it’s made from precuts that not
only save you time in construction, but guarantee
you success when selecting fabrics because the
precut fabrics are designed to go together.
“Life in the Tide Pool”
Lap Quilt
221
PROJECT “LIFE IN THE TIDE POOL” LAP QUILT
CUTTING DIRECTIONS
From one Jelly Roll or a variety of batiks:
64 rectangles (A) 2
1
⁄
2
×9 inches (6.4×22.8 cm) (blocks)
64 rectangles (B) 2
1
⁄
2
×5 inches (6.4×12.7 cm) (blocks)
14 rectangles (E) 2
1
⁄
2
×7
1
⁄
2
inches (6.4×19 cm) (setting
triangles)
14 rectangles (F) 2
1
⁄
2
×9
1
⁄
2
inches (6.4×24.2 cm)
(setting triangles)
4 rectangles (H) 2
1
⁄
2
×9
1
⁄
2
inches (6.4×24.8 cm)
(setting triangles)
60 rectangles (I) 2
1
⁄
2
×4
1
⁄
2
inches (6.4×11.5 cm)
(Border #2)
To use the Jelly Roll, cut as follows:
1. From all 40 strips, cut 1 A rectangle and 1 B rectan-
gle.
2. Select 24 of the 40 strips, and cut 1 more A rectan-
gle and 1 B rectangle from each for a total of 64 A
rectangles and 64 B rectangles.
Cut 2 I rectangles from each of the 24 strips for a
total of 48 I rectangles. Set the 24 strips aside.
3. Select 12 of the 16 remaining strips, and cut 1 I
rectangle from each. You should now have 60 I
rectangles.
4. Select two strips from the set of 16 strips, and cut 2
H rectangles from each for a total of 4 H rectan-
gles.
5. From the remaining 14 strips, cut 1 E rectangle and
1 F rectangle for a total of 14 E and 14 F rectangles.
From one Charm Pack:
32 squares (C) 5×5 inches (12.7×12.7 cm) (blocks)
From a variety of batiks:
4 squares (D) 7
5
⁄
8
×7
5
⁄
8
inches (19.4×19.4 cm), cut
diagonally in both directions (setting triangles) (put two
triangles aside for use in another project)
2 squares (G) 4
1
⁄
8
×4
1
⁄
8
inches (10.5×10.5 cm), cut
diagonally once (setting triangles)
Dark batik:
Note: Cut border strips before cutting anything else. Trim the border
strips to the right size after the quilt center is sewn.
6 strips, 2
1
⁄
2
×42 inches (6.4×106.7 cm) (Border #1)
8 strips, 2
1
⁄
2
×42 inches (6.4×106.7 cm) (Border #3)
7 strips, 2×42 inches (5.1×106.7 cm) or 2
1
⁄
4
×42 inches
(6.4×106.7 cm) as you prefer (binding)
Backing:
2 strips at least 66×42 inches (167.6×106.7 cm)
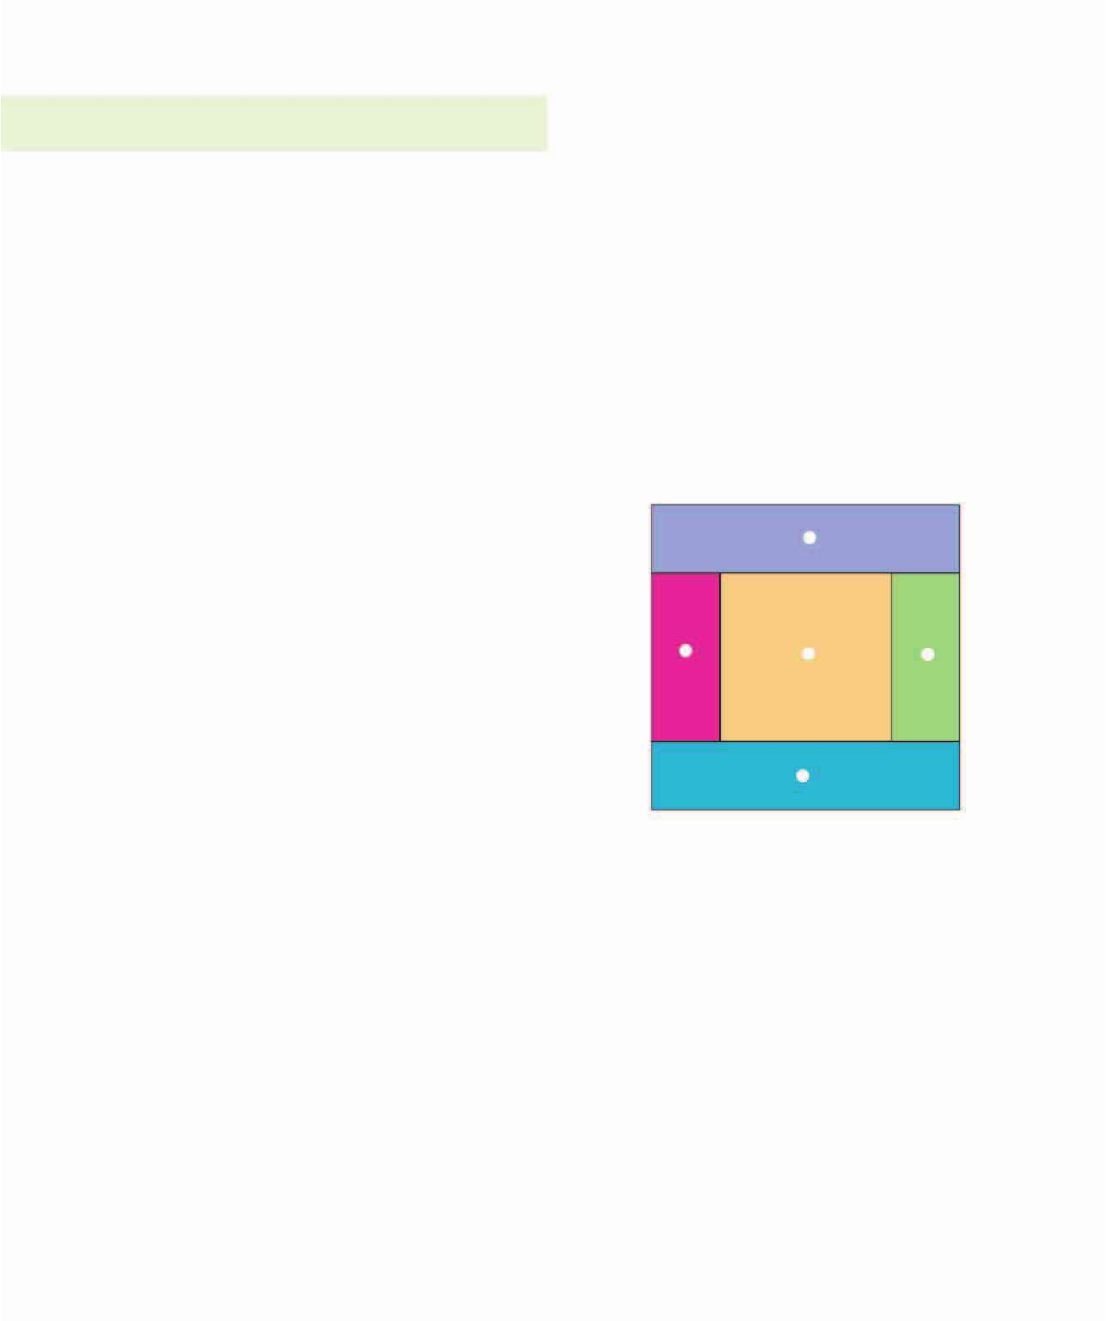
Assembling the Quilt Blocks
Block Z (Make 32)
1. Sew 1 B rectangle to either side of 1 C square. Press
to the B rectangles. Sew 1 A rectangle to the top
and bottom of this unit to make Block Z. Make 32
Block Zs. Press half the blocks to the A rectangles,
and the other half to the C square. This will help
you in assembling your rows. Block Z should mea-
sure 9×9 inches (22.8×22.8 cm).
A
A
B
B
C

222
CHAPTER GALLERY OF PROJECTS
Side Setting Triangle Y (Make 14)
2. For the pieced side setting triangles, you will partial-
ly piece a block, and then trim it. Sew 1 D triangle
to 1 E rectangle. Use a slightly shorter stitch length
and backstitch at the beginning and end of the
seam. Be careful not to stretch the bias edge of the
triangle when adding the E rectangle. Press to the E
rectangle. Sew the F rectangle to this unit to make
side setting Triangle Y, pressing to the F rectangle.
Again, be careful of the bias edge on the triangle.
Make 14 Triangle Ys.
3. Align a ruler to the edge of D triangle and trim.
Trim all 14 Triangle Ys.
Triangle X. Use a slightly shorter stitch length and
backstitch at the beginning and end of the seam.
Be careful not to stretch the bias edge of the trian-
gle. Press to the H rectangle. Make 4 Triangle Xs.
5. Align a ruler to the edge of G triangle and trim.
Trim all 4 Triangle Xs.
Assembling the Quilt Center
Quilt Assembly Diagram
F
E
D
F
E
D
TRIM
TRIM
TRIM
TRIM
G
H
G
H
Corner Setting Triangle X (Make 4)
4. For the pieced corner setting triangles, you will
partially piece a block, and then trim it. Fold a G
triangle in half to find its center. Fold the H rect-
angle in half as well. Matching these centers, sew 1
G triangle to 1 H rectangle to make corner setting
Block
Z
Triangle X
Triangle
Y
2
1
⁄
2
inches×60
1
⁄
2
inches (6.4×153.7 cm)
2
1
⁄
2
inches×64
1
⁄
2
inches (6.4×163.8 cm)
2
1
⁄
2
inches×68
1
⁄
2
inches (6.4×174 cm)
2
1
⁄
2
inches×60
1
⁄
2
inches (6.4×153.7 cm)
2
1
⁄
2
inches×56
1
⁄
2
inches (6.4×143.5 cm)
2
1
⁄
2
inches×52
1
⁄
2
inches (6.4×133.4 cm)

223
PROJECT “LIFE IN THE TIDE POOL” LAP QUILT
1. Using the Quilt Assembly Diagram, arrange Block
Zs in diagonal rows on your design wall. To make
assembly easier, you might want to place Block
Zs pressed to the A rectangles next to Block Zs
pressed to the C squares. Add Triangle Xs and
Triangle Ys where shown in the Quilt Assembly
Diagram.
2. Start by sewing the blocks together to make each
diagonal row. Add the side and/or corner setting
triangles after joining the blocks in each row; press
toward the setting triangles. Press the blocks in odd
rows to the left and blocks in even rows to the right,
to help when assembling rows together.
3. Sew the rows together. Press row seams in one
direction. The quilt center should measure
48
1
⁄
2
×60
1
⁄
2
inches (123.2×153.6 cm).
Adding the Borders
1. Cut two of the 2
1
⁄
2
×42-inch (6.4×106.7 cm) Border
#1 strips in half. Sew each half to the remaining
four 2
1
⁄
2
×42-inch (6.4×106.7 cm) Border #1 strips
to create four 2
1
⁄
2
×63-inch (6.4×160 cm) Border #1
strips.
2. Measure down the quilt center and cut two Border
#1 strips that length. Sew these strips to the sides
of the quilt center. If you sew one strip from the top
of the quilt down and the other from the bottom of
the quilt up, you will avoid placing the border seam
in the side borders in the same position on each
side. Press toward Border #1.
3. Measure across the quilt center and cut the other
two Border #1 strips that length. Sew these strips
to the top and bottom of the quilt center, once
again switching directions from which you sew the
borders to stagger where the border seams are
located. Press toward Border #1. The quilt should
measure 52
1
⁄
2
×64
1
⁄
2
inches (133.4×163.8 cm).
4. Lay out 16 I rectangles of various colors in a pleas-
ing arrangement, and sew them together to create
one side Border #2. Repeat to create a second
side Border #2. Press seams in the same direction,
and then measure the borders. Measure down the
center of the quilt. If your pieced borders do not
equal this measurement, make adjustments to a few
seams in the middle of each pieced border so that
the two measurements are the same. Sew the side
borders to the quilt center. Press toward Border #1.
5. Sew 14 I rectangles together to create a top Border
#2 2
1
⁄
2
×56
1
⁄
2
inches (6.4×143.5 cm). Repeat to cre-
ate the bottom Border #2. Press seams in the same
direction. Measure the borders and the width of the
quilt, and make adjustments to the middle seams of
the borders as needed. Sew the borders to the top
and bottom of the quilt center. Press toward Border
#1. The quilt should measure 56
1
⁄
2
×64
1
⁄
2
inches
(143.5×163.8 cm).
6. Sew two of the 2
1
⁄
2
×42-inch (6.4×106.7 cm) Border
#3 strips together. Repeat to create four 2
1
⁄
2
×83
1
⁄
2
-
inch (6.4×212.2 cm) Border #3 strips.
7. Measure down the quilt center and cut two Border
#3 strips that length. Sew these strips to the sides of
the quilt center. Sew the strips in opposite direc-
tions so the seam is not in the same position on
each side. Press toward Border #3.
8. Measure across the quilt center and cut the other
2 Border #3 strips that length. Sew these strips to
the top and bottom of the quilt center, once again
switching directions to stagger where the seams are
located. Press toward Border #3. The quilt should
measure 60
1
⁄
2
×72
1
⁄
2
inches (153.6×184.2 cm).

224
CHAPTER GALLERY OF PROJECTS
Quilting and Finishing
1. Make sure you remove selvages from
the backing. Piece the backing by sewing
the two 66×42-inch (167.7×106.7 cm)
strips together with a
1
⁄
2
-inch (1.2 cm)
seam allowance, creating a 66×83-inch
(167.7×210.8 cm) rectangle. Backstitch at
the beginning and ending of the seam.
Press the seam open.
2. Quilt as desired. The sample quilt was
quilted with curvy feathers in the squares
and wavy lines that run diagonally down
the strips.
3. Square up the quilted quilt and bind it.
Add a label.
Bright fabrics with lots of white make this summer table runner sizzle. It uses
four blocks, solid setting triangles, a skinny 1-inch (2.5 cm) inner border, and
a wider 2
1
⁄
2
-inch (6.4 cm) outer border that’s perfect for showcasing beautiful
quilting.
..................Content has been hidden....................
You can't read the all page of ebook, please click here login for view all page.