232
CHAPTER GALLERY OF PROJECTS
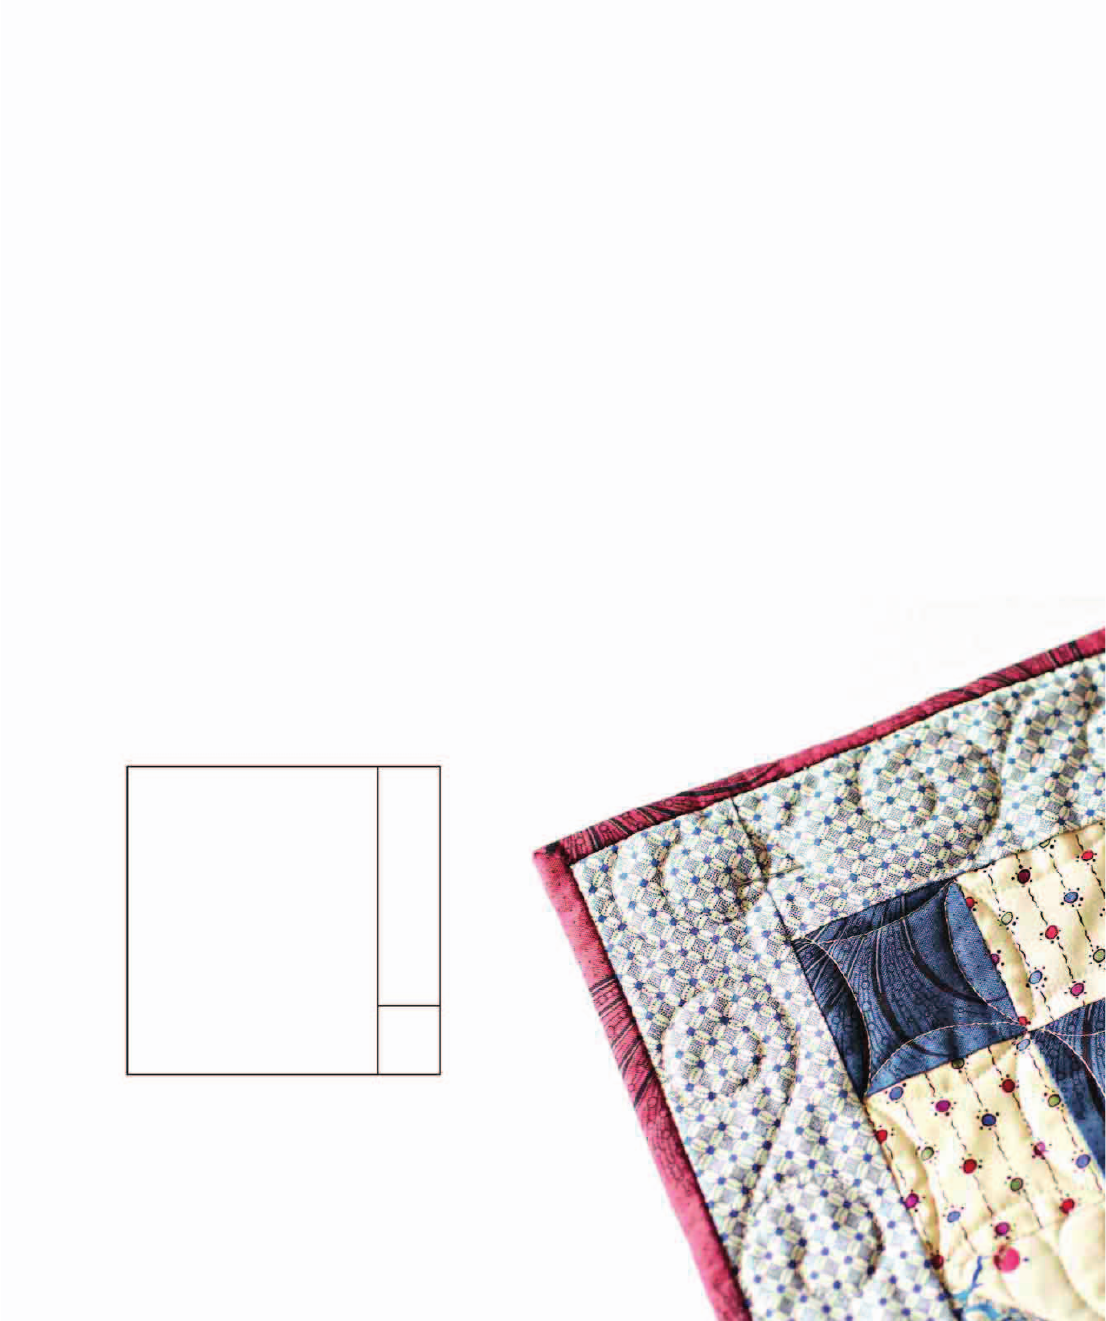
BLOCK SIZE
8 inches (20.3 cm)
MATERIALS LIST
FINISHED SIZE
42×42 inches (106.7×106.7 cm)
“Star-Crossed” foundation paper patterns
Foundation paper: 16 sheets
Cream stripe:
3
⁄
8
yard (34.3 cm) (blocks)
Cream with berries: 1 yard (91.4 cm) (blocks, sash-
ing)
Navy blue ribbons:
3
⁄
8
yard (34.3 cm) (blocks)
Light blue feathers:
3
⁄
8
yard (34.3 cm) (sashing,
cornerstones)
Dark red plumes:
5
⁄
8
yard (57.2 cm) (blocks, sashing,
binding)
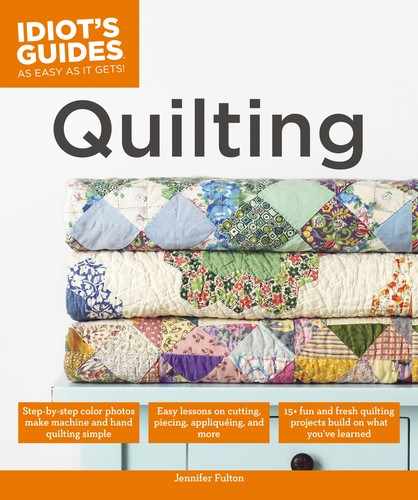
Some of the most moving and memorable love sto-
ries involve star-crossed lovers. Their love seems
doomed, yet we can’t help hoping that they can
somehow find a happy ending. Inspired by such
love stories, this wall hanging combines pieced
blocks with foundation-pieced sashing to create a
secondary star-crossed pattern. The blocks come
together quickly using strip sets.
“Star-Crossed” Wall Hanging

233
PROJECT “STARCROSSED” WALL HANGING
CUTTING DIRECTIONS
Cream stripe:
4 strips, 2
1
⁄
2
×42 inches (6.4×106.7 cm) (strip sets for
blocks)
Cream with berries:
16 squares (A) 5×5 inches (12.7×12.7 cm) (blocks)
16 rectangles (A1) 3×6
1
⁄
2
inches (7×15.9 cm) (sashing
foundations)
8 rectangles 2
1
⁄
2
×8
1
⁄
2
inches (6.4×21.6 cm) (sashing)
Navy blue ribbons:
16 squares (A) 5×5 inches (12.7×12.7 cm) (blocks)
Light blue feathers:
16 rectangles (A2) 3×3
3
⁄
4
inches (7.6×9.5 cm)
(sashing foundations)
4 squares 2
1
⁄
2
×2
1
⁄
2
inches (6.4×6.4 cm)
(cornerstones)
Dark red plumes:
5 strips, 2×42 to 2
1
⁄
4
×42 inches (5.1×106.7 or 5.7×106.7
cm) as you prefer (binding)
2 strips, 2
1
⁄
2
×42 inches (6.4×106.2 cm) (strip sets for
blocks)
8 rectangles (A3) 3×4
1
⁄
2
inches (7.6×11.5 cm) (sash-
ing foundations)
Dark blue plumes:
2 strips, 2
1
⁄
2
×42 inches (6.4×106.7 cm) (strip sets for
blocks)
8 rectangles (A3) 3×4
1
⁄
2
inches (7.6×11.5 cm) (sash-
ing foundations)
Blue check:
5 strips 2
1
⁄
2
×42 inches (6.4×106.7 cm) (Border #1)
5 squares 2
1
⁄
2
×2
1
⁄
2
inches (6.4×6.4 cm) (corner-
stones)
Backing:
1 rectangle 48×42 inches (157.5×106.7 cm)
1 rectangle 7×42 inches (17.8×106.7 cm)
1 square 7×7 inches (17.8×17.8 cm)
Note: Cut border strips before cutting anything else. Trim the border
strips to the right size after the quilt center is sewn.
MATERIALS LIST CONTINUED
Dark blue plumes:
3
⁄
8
yard (34.3 cm) (blocks, sashing)
Blue check:
1
⁄
2
yard (34.3 cm) (Border #1, cornerstones)
Backing: 1
3
⁄
4
yards (160 cm)
Batting: Crib size, at least 48×48 inches (121.9×121.9 cm)
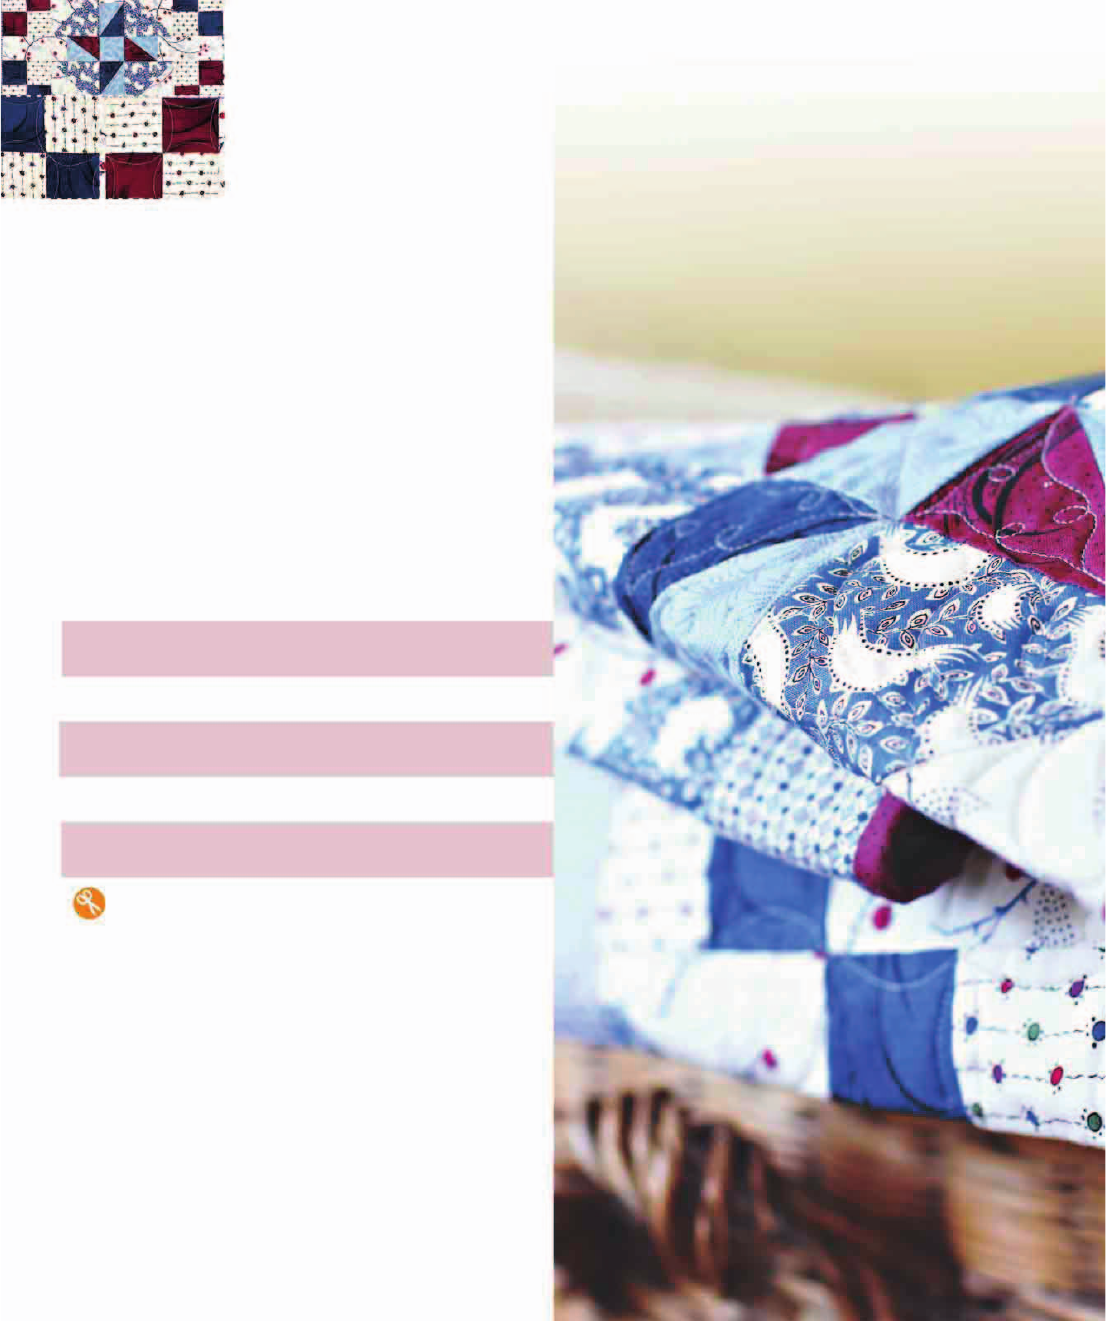
Making the Block Units
1. Using Method 2 for piecing four-patch units, make
16 dark red and cream stripe four-patches. Use one
cream stripe strip and one dark red strip to create
one strip set. Press to the dark red. Repeat to create
a second strip set.
234
CHAPTER GALLERY OF PROJECTS
Assembling the Quilt Blocks
Unit 1 (Make 16)
2. Subcut the strip sets every 2
1
⁄
2
inches (6.4 cm) to
create 32 two-square units. Sew two of these units
together to create a four-patch (Unit 1). Press the
center seam open or fan it to reduce bulk. Make
16 Unit 1s. Unit 1 should measure 4
1
⁄
2
×4
1
⁄
2
inches
(11.5×11.5 cm).
Unit 1A (Make 16)
3. Repeat Steps 1 and 2 to create 16 dark blue and
cream stripe four-patches (Unit 1As). Unit 1A
should measure 4
1
⁄
2
×4
1
⁄
2
inches (11.5×11.5 cm).
4. Using Method 1 for piecing half-square triangles
(HSTs), make 32 HSTs. Use one navy blue A
square and one cream A square to make two HSTs.
Press to the dark. Measure and trim each HST to
4
1
⁄
2
×4
1
⁄
2
inches (11.5×11.5 cm).
Block Z (Make 8)
1. Join Unit 1s and HSTs to create Block Z. Assemble
each row, paying particular attention to the arrange-
ment of the dark red squares in the four-patches
and the navy blue triangle in the HST. Pin the HST
carefully to avoid cropping its point. Sew the two
rows together and press seam open. Make 8 Block
Zs. Block Z should measure 8
1
⁄
2
inches (21.6 cm)
square.
Unit 1
Unit 1
Block Y (Make 8)
2. Join Unit 1As and HSTs to create Block Y. As-
semble each row, paying particular attention to
the arrangement of the dark blue squares in the
four-patches and the navy blue triangle in the HST.
Unit 1A
Unit 1A
235
PROJECT “STARCROSSED” WALL HANGING
Pin the HST carefully to avoid cropping its point.
Sew the two rows together and press seam open.
Make 8 Block Ys. Block Y should measure 8
1
⁄
2
inches (21.6 cm) square.
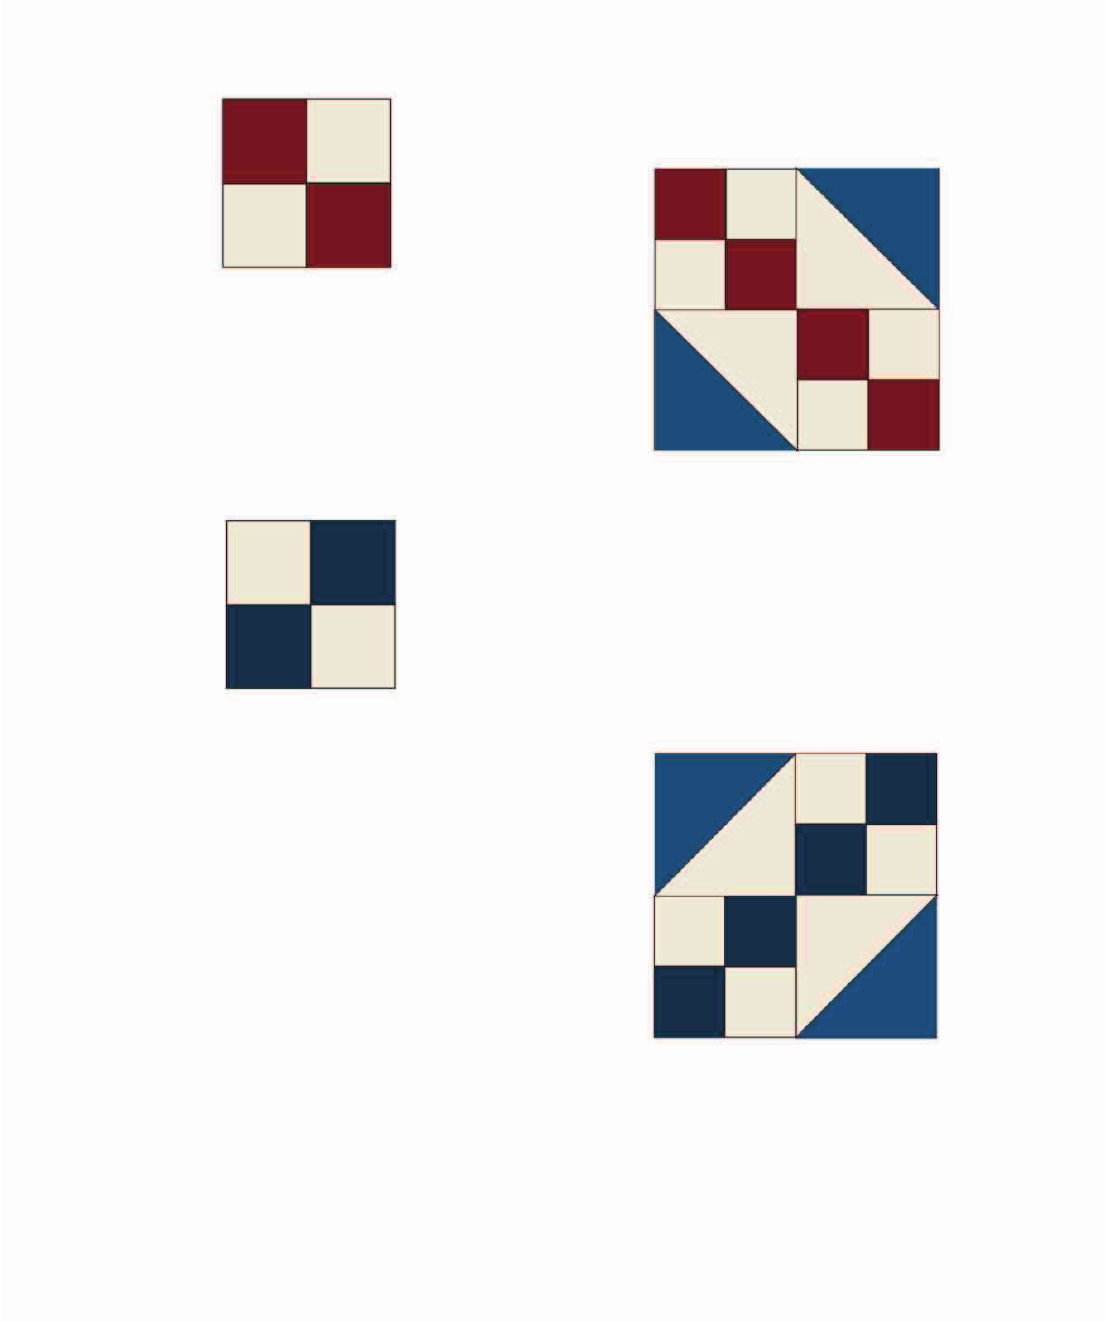
Assembling the Sashing
1. Prepare foundations by copying the Star-Crossed
pattern onto foundation paper. Make 16 founda-
tions.
Assembling the Quilt Center
Unit 2 (Make 8)
2. Piece a foundation for the sashing, to create Unit 2.
Place the cream with berries fabric in the A1 spot,
light blue in the A2 spot, and dark blue in the A3
spot. Repeat to make 8 Unit 2s.
Quilt Assembly Diagram
1. Using the Quilt Assembly Diagram, join Block Zs,
Block Ys, Unit 2s, Unit 2As, and cornerstones to
form the quilt center.
2. Sew the appropriate sashing (foundation pieced or
plain) to the right side of every block in columns 1,
2, and 3. When adding foundation-pieced sashing,
pay particular attention to the orientation of the
dark red or dark blue triangle. Press to the sashing.
3. Sew the appropriate sashing (foundation pieced
or plain) to the bottom of every block in rows 1, 2,
and 3. Again, pay attention to the orientation of
the triangles in the pieced sashing. Before you sew
on the sashing, add a cornerstone to the right side
of the sashing. Press to the sashing to aid in row
assembly later. Then sew the appropriate sashing to
the bottom of the blocks.
Unit 2A (Make 8)
3. Piece another foundation for the sashing, placing
the cream with berries fabric in the A1 spot, light
blue in the A2 spot, and dark red in the A3 spot to
create Unit 2A. Repeat to make 8 Unit 2As.
4. Trim all foundations, leaving a
1
⁄
4
-inch (.6 cm) seam
allowance on all sides. Unit 2s and Unit 2As should
measure 2
1
⁄
2
×8
1
⁄
2
inches (6.4×21.6 cm).
Block Z
Block Y
Unit 2
Unit 2A
Cornerstone
38
1
⁄
2
×2
1
⁄
2
inches (97.8×6.4 cm)
42
1
⁄
2
×2
1
⁄
2
inches (108×6.4 cm)
A1
A2
A3
A1
A2
A3
236
CHAPTER GALLERY OF PROJECTS
4. Lay out all blocks, and then sew together in rows.
Pin at every intersection. Press to the sashing. Sew
rows together. Press row seams in the same direc-
tion. The quilt center should measure 38
1
⁄
2
×38
1
⁄
2
inches (97.8×97.8 cm).
Adding the Borders
1. Measure down the quilt center and cut the side
borders that length. Sew these strips to the sides of
the quilt center. Press toward the strips.
2. Cut one of the remaining Border #1 strips in half,
and sew each half to the top and bottom Border
#1 strips. Measure across the quilt center and cut
the top and bottom borders that length. Sew these
strips to the top and bottom of the quilt center and
press toward the strips. The quilt should measure
42
1
⁄
2
×42
1
⁄
2
inches (108×108 cm).
Quilting and Finishing
The size of this quilt requires a pieced backing.
42 inches (106.7 cm)
7 inches
(17.8 cm)
7 inches
(17.8 cm)
42 inches (106.7 cm)
48 inches (121.9 cm)
1. After removing the selvages from backing fabric,
piece the back as shown in the Pieced Back Dia-
gram. Start by sewing the 7×42-inch (17.8×106.7 cm)
rectangle to the 7-inch (17.8 cm) square along the
7-inch (17.8 cm) edge using a
1
⁄
2
-inch (1.2 cm) seam
allowance. Lock your stitches at the beginning and
end of the seam by backstitching. Press the seam to
one side.
2. Sew the just-stitched 7×48-inch (17.8×121.9 cm)
rectangle to the 42×48-inch (106.7×121.9 cm) rect-
angle you cut earlier, again with a
1
⁄
2
-inch (1.2 cm)
seam allowance. Lock your stitches at the beginning
and end of the seam by backstitching. Press the
seam to one side.
3. Prepare the quilt for quilting and quilt as desired.
The sample quilt was quilted with feathers and soft
curves in the blocks, and swirls in the sashing and
borders.
4. Square up the quilted quilt and bind it. Add a label
and a sleeve for hanging.
Pieced Back Diagram
Diagram shows cut sizes
..................Content has been hidden....................
You can't read the all page of ebook, please click here login for view all page.