
156
CHAPTER ASSEMBLING A QUILT TOP
FINISHED BLOCK SIZE
14 inches (35.5 cm)
MATERIALS LIST
FINISHED SIZE
67
1
⁄
2
×87
1
⁄
4
inches (171.5×221.6 cm)
Cherry red batik: 1
1
⁄
4
yards (1.14 m) (blocks)
Dark red batik: 3
1
⁄
2
yards (3.2 m) (blocks, setting
triangles, Border #2)
White: 1
2
⁄
3
yards (2 m) (blocks)
Red-and-white diagonal stripe: 1
5
⁄
8
yards (1.49 m)
(blocks, Border #1, straight binding)
Backing: 4
7
⁄
8
yards (4.5 m)
Batting: Twin or Full size, at least 74×94 inches
(188×238.8 cm)
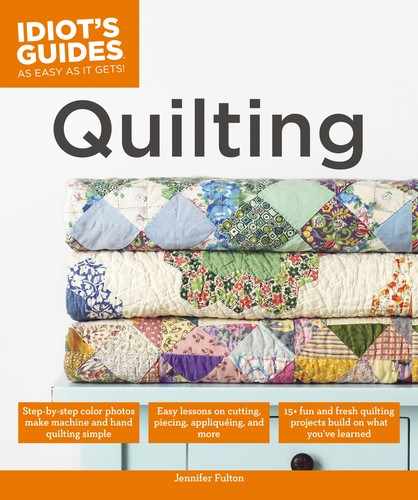
Once your quilt blocks are pieced, you can ar-
range them in a variety of settings. This quilt uses
an on-point (diagonal) setting, which requires
setting triangles to make the sides of the quilt
straight. The quilt is quick to make because you
construct the blocks using strip sets. If you use
the red and white fabrics as shown, prewash to
prevent the colors from bleeding.
“Peppermint Twist” Twin Quilt
PRACTICE PROJECT
157
PRACTICE PROJECT “PEPPERMINT TWIST” TWIN QUILT
CUTTING DIRECTIONS
Cherry red batik:
12 strips 3
1
⁄
2
×42 inches (8.9×106.7 cm)
(strip sets)
12 squares (A) 2
1
⁄
2
×2
1
⁄
2
inches (6.3×6.3 cm) (blocks)
Dark red batik: (See “Cutting the Fabric”)
6 strips 3
1
⁄
2
×42 inches (8.9×106.7 cm)
(strip sets)
4 strips 3
1
⁄
2
×105 inches (8.9×266.7 cm)
(Border #2)
3 squares 21
1
⁄
8
inches (53.7 cm) (side setting
triangles)
2 squares 10
7
⁄
8
inches (27.6 cm) (corner setting
triangles)
6 squares (A) 2
1
⁄
2
×2
1
⁄
2
inches (6.3×6.3 cm) (blocks)
White:
18 strips 1
1
⁄
4
×42 inches (3.1×106.7 cm) (strip sets)
18 strips 2×42 inches (5.1×106.7 cm) (strip sets)
Red-and-white diagnoal stripe:
18 strips 1
1
⁄
4
×42 inches (3.1×106.7 cm) (strip sets)
8 strips 1×42 inches (2.5×106.7 cm) (Border #1)
8 strips, 2×42 or 2
1
⁄
2
×42 inches (5.1×106.7 or
6.4×106.7 cm) as you prefer (binding)
Note: If you can’t find a diagonal striped fabric, cut bias binding
from a 30-inch (76.2 cm) square of regular striped fabric to create the
same look.
Backing:
2 strips 74×42 inches (188×106.7 cm)
1 strip 12×42 inches (30.5×106.7 cm)
1 rectangle 12×3 inches (30.5×81.3 cm)
Note: Cut border strips before cutting anything else. Trim the border
strips to the right size aer the quilt center is sewn.
Cutting the Fabric
In order to get the required pieces from your dark red
batik fabric, follow these instructions.
1. Cut six 3
1
⁄
2
×42-inch (8.9×106.7 cm) strips.
3
1
⁄
2
3
1
⁄
2
3
1
⁄
2
3
1
⁄
2
3
1
⁄
2
3
1
⁄
2
selvage

158
CHAPTER ASSEMBLING A QUILT TOP
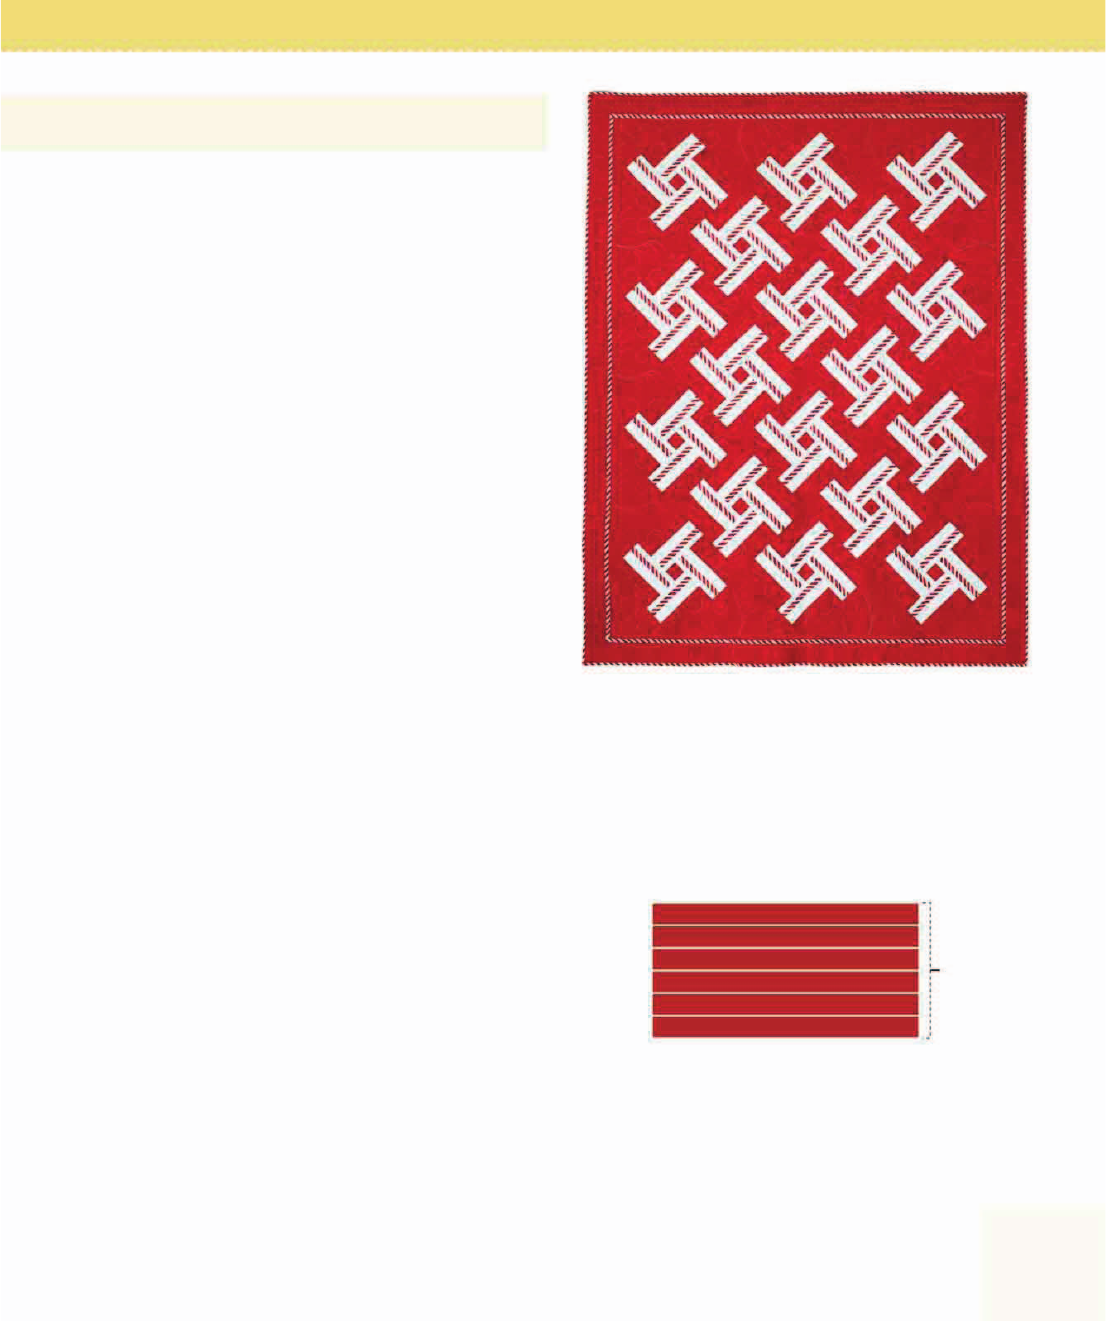
Unit 1 (Make 48)
3. Piece the strip sets for the dark red blocks by sewing
one dark red 3
1
⁄
2
-inch (8.9 cm) strip to one white
2-inch (5.1 cm) strip, and press to the dark. Sew one
1
1
⁄
4
-inch (3.2 cm) red-and-white striped strip to one
white 1
1
⁄
4
-inch (3.2 cm) strip, and press to the dark.
Assembling the Block Units
1. Piece the strip sets for the cherry red blocks by
sewing one cherry red 3
1
⁄
2
-inch (8.9 cm) strip to one
white 2-inch strip (5.1 cm), and press to the dark.
Sew one 1
1
⁄
4
-inch (3.2 cm) red-and-white striped
strip to one white 1
1
⁄
4
-inch (3.2 cm) strip, and press
to the dark. Sew the two sets together, placing the
striped strip between the two white strips, and press
to the dark. The strip set should measure 6
1
⁄
2
inches
(16.5 cm) wide. Repeat to make twelve cherry red
strip sets.
2. Subcut each strip set into four 6
1
⁄
2
×8
1
⁄
2
-inch
(16.5×21.6 cm) rectangles (Unit 1) for a total of 48
Unit 1s.
selvage
selvage
Four 3
1
⁄
2
˝ (8.9 cm) border strips
Three 21
1
⁄
8
˝ (53.6 cm)
squares cut both ways
diagonally
Two 10
7
⁄
8
˝ (27.6 cm) squares
cut diagonally
Six 2
1
⁄
2
˝ (6.4 cm)
squares
2. Refold fabric with selvages on the sides. Cut four
3
1
⁄
2
×105-inch (8.9 × 266.7 cm) border strips from the
lengthwise grain.
3. Cut three 21
1
⁄
8
-inch (53.7 cm) squares. Cut each
square diagonally in both directions. Set aside two
of these triangles for another project.
4. Cut two 10
7
⁄
8
-inch (27.6 cm) squares cut once
diagonally, for corner setting triangles.
5. Cut six 2
1
⁄
2
-inch (6.3 cm) squares.
159
PRACTICE PROJECT “PEPPERMINT TWIST” TWIN QUILT
Assembling the Quilt Blocks
1. Using partial seams, join Unit 1s and cherry red A
squares to create Block Z. Press to the red center
square. Make 12 Block Zs. Blocks should measure
14
1
⁄
2
×14
1
⁄
2
inches (36.9×36.9 cm) square.
Block Y (Make 6)
Assembling the Quilt Center
Sew the two sets together, placing the striped strip
between the two white strips, and press to the dark.
The strip set should measure 6
1
⁄
2
inches (16.5 cm)
wide. Repeat to make six dark red strip sets.
4. Subcut each strip set into four 6
1
⁄
2
×8
1
⁄
2
-inch
(16.5×21.6 cm) rectangles (Unit 2) for a total of 24
Unit 2s.
Unit 2 (Make 24)
Block Z (Make 12)
2. Using partial seams, join Unit 2s and dark red A
squares to create Block Y. Press to the red center
square. Make 6 Block Ys. Blocks should measure
14
1
⁄
2
×14
1
⁄
2
inches (36.9×36.9 cm) square.
A
A
Block Y
Block Z
Side
setting
triangle
Corner setting triangle
Unit 2
Unit 2
Unit 2
Unit 2
Unit 1
Unit 1
Unit 1
Unit 1
Quilt Assembly Diagram
160
CHAPTER ASSEMBLING A QUILT TOP
Quilting and Finishing
Pieced Back Diagram
Diagram shows cut sizes.
1. Make sure you’ve removed the selvages from
the backing, and then sew the two 74×42-inch
(188×106.7 cm) strips together along the 74-inch
side with a wide
1
⁄
2
-inch (1.3 cm) seam. Sew the
12×42-inch (30.5×106.7 cm) strip and the 12×33-inch
(30.5×83.8 cm) strip together along the 12-inch
(30.5 cm) side with a wide seam. Backstitch at the
beginning and end of all seams. Sew this strip to the
other two strips to create a quilt back that’s roughly
74×94 inches (188×238.8 cm). Press seams open.
2. Quilt as desired. The sample quilt was quilted with
swirling feathers radiating from the center of each
block.
3. Square up the quilted quilt and bind it. Add a label.
74 inches (188 cm)
42 inches
(106.7 cm)
42 inches
(106.7 cm)
12 inches
(30.5 cm)
33 inches
(
83.8 cm
)
42 inches
(
106.7 cm
)
1. Using the Quilt Assembly Diagram, arrange blocks
in diagonal rows on your design wall. Pay attention
to the placement of Block Zs and Block Ys. Add
corner and setting triangles as shown.
2. Start by sewing the blocks together to make each
diagonal row. Press toward the Block Ys. Add the
side and/or corner setting triangles after joining the
blocks in each row; press toward the setting trian-
gles. The quilt center should measure 59
1
⁄
2
×79
1
⁄
4
inches (151.1×201.3 cm).
3. Sew the rows together. Press seams in one
direction.
Adding the Borders
1. Sew two 1×42-inch (2.5×106.7 cm) red-and-white
striped Border #1 strips together to create a 1×83
1
⁄
2
-
inch (2.5×212.1 cm) strip. Repeat to create four
Border #1 strips.
2. Measure down the quilt center and cut two Border
#1 strips that length. Sew these strips to the sides of
the quilt center. Press toward the strips.
3. Measure across the quilt center and cut the other
two Border #1 strips that length. Sew these strips
to the top and bottom of the quilt center. Press to-
ward the strips. The quilt should measure 61
1
⁄
2
×81
1
⁄
4
inches (156.2×206.4 cm).
4. Measure down the quilt center and cut two dark
red Border #2 strips that length. Sew these strips to
the sides of the quilt center. Press toward the dark.
5. Measure across the quilt center and cut the other
two Border #2 strips that length. Sew these strips to
the top and bottom of the quilt center and press to-
ward the dark. The quilt should measure 67
1
⁄
2
×87
1
⁄
4
inches (171.5×221.6 cm).
..................Content has been hidden....................
You can't read the all page of ebook, please click here login for view all page.