

130
CHAPTER APPLIQUÉ
Turned-Edge Fusible
Machine Appliqué
Turned-edge fusible machine appliqué uses
lightweight fusible interfacing to help create
the turned edge. Turning the edges of your
appliqué prevents them from unraveling when
washed, making it a good technique for all types
of projects. Using a fusible simplifies the process
of placing appliqué pieces, but you still need to
stitch down the edges of the appliqué.
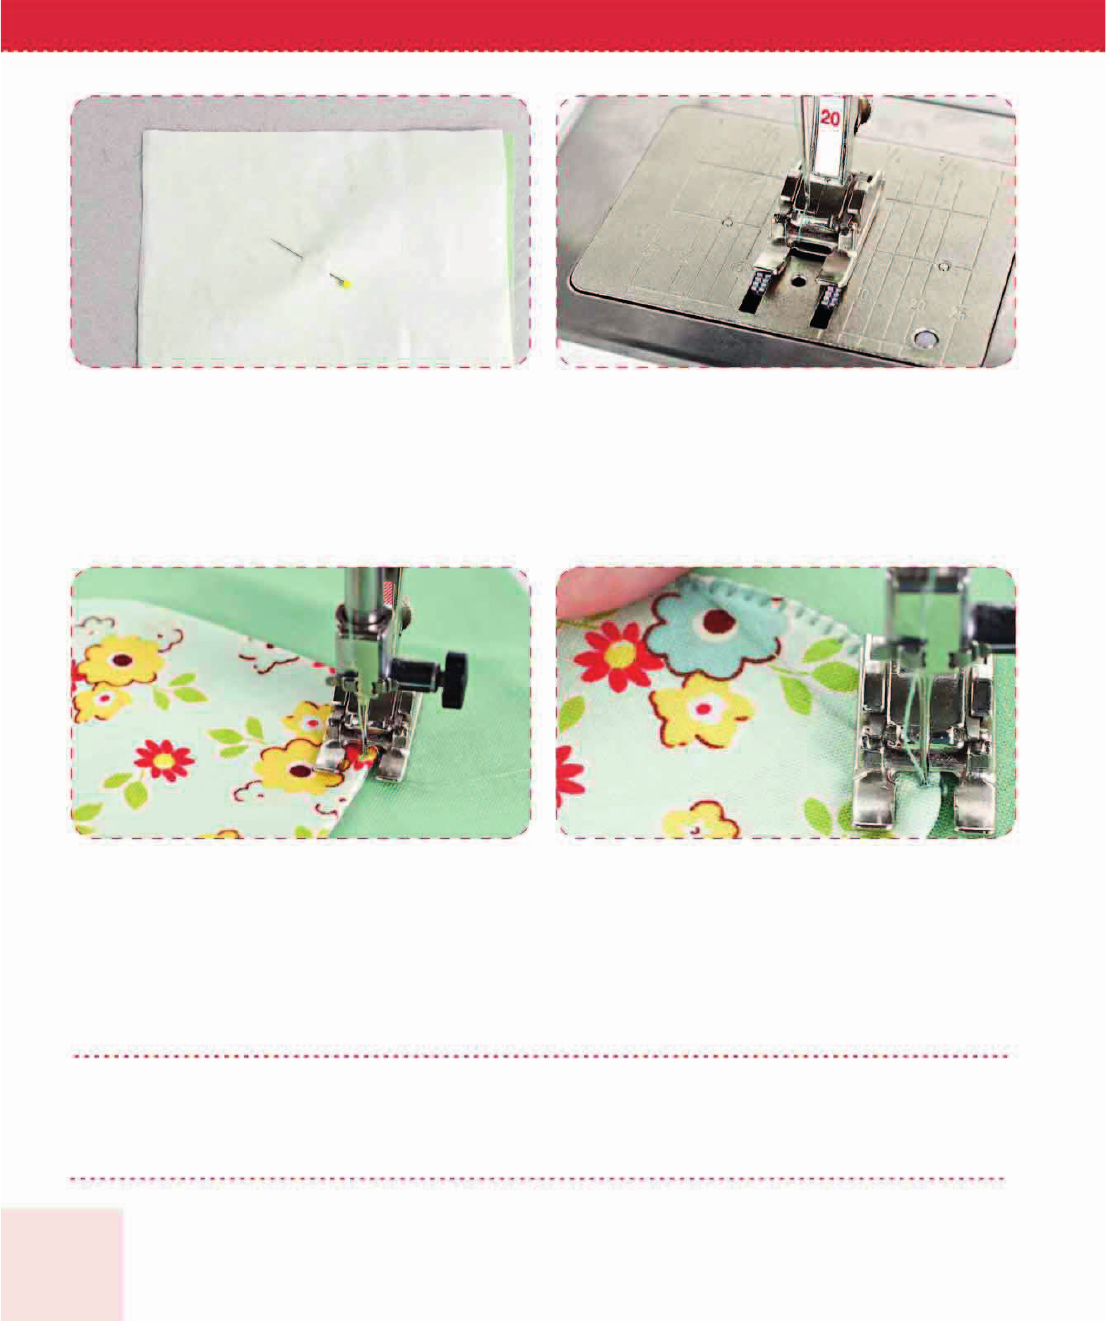
Pin fusible interfacing to fabric and cut it out.
Place the interfacing on fabric, with the shiny, fusible side
against the right side of fabric. Pin the interfacing in place,
but do not iron. Using fabric scissors, cut out the interfacing
and the fabric roughly, leaving a wide margin outside the
drawn line.
21
Trace the appliqué shape.
Trace the shape onto the non-shiny (non-fusible) side of
lightweight fusible interfacing. The shape should be the
reverse of the finished shape as it will appear on your quilt.
Using your paper scissors, roughly cut out the fusible inter-
facing.
If you want to press your finished appliqué piece, iron it from the back, on a
towel, to prevent crushing the appliqué.

131
TURNEDEDGE FUSIBLE MACHINE APPLIQUÉ
Cut out the appliqué shape.
Cut the shape out precisely using small, sharp appliqué
scissors. Leave a scant
1
⁄
4
-inch (.6 cm) seam allowance. Clip
inner curves, trim the tip o outer points, and clip straight in
to any inner points.
Turn appliqué shape right side out.
Pull the interfacing away from the fabric and cut a slit in the
center of the interfacing. Use the slit to turn the shape right
side out. Poke out points and curved edges using a knitting
needle or similar tool. Finger press the edges, but do not
iron. Repeat Steps 1 to 5 to prepare all appliqué pieces in
your pattern.
4
5
Sew the interfacing to the appliqué shape.
Use a slightly shorter stitch length and regular 50 weight
cotton thread to sew on the drawn line all the way around
the shape.
3
Fuse appliqué pieces in place.
Cut a background square slightly larger than needed.
Fuse the appliqué pieces to the background, following the
manufacturer’s directions. Cover the appliqué with a pressing
sheet to protect your iron.
6
132
CHAPTER APPLIQUÉ
Prepare your machine to appliqué with a blanket stitch.
Insert an Appliqué/Sharps 80/12 needle. Thread your ma-
chine with 50 or 60 weight cotton thread that matches your
appliqué; use the same thread in the bobbin. Prepare your
machine with a zig-zag stitch plate and open-toe foot.
Lock the first stitches.
Pull up the bobbin thread, select a straight stitch, reduce its
stitch length, and take a few locking stitches. Change to a
blanket stitch, and adjust its width and length to about
2–2.5 mm.
8
9
Pin or fuse stabilizer to the back of the appliqué.
To prevent the appliqué from puckering when you stitch,
back it with cut-away, tear-away, or wash-away stabilizer,
following the manufacturer’s directions.
7
Appliqué the shape with a blanket stitch.
Align the stitch so that the straight part runs along the
outer edge of the appliqué, on the background, while the
perpendicular “nibbles” land on the appliqué itself. Using an
open-toe foot will help you see the edge clearly.
10
Instead of a blanket stitch, you can also use a straight stitch, zigzag stitch,
blind hem, or other decorative stitch to sew the appliqué to the background.

133
TURNEDEDGE FUSIBLE MACHINE APPLIQUÉ
On inside curves, pivot when the needle is on the right.
Try not to pivot too much on curves in order to avoid
creating a “V” with the “nibble” part of the stitch. To do that,
keep the “nibble” part of the stitch (the left part of the stitch)
perpendicular to the appliqué edge as much as possible.
Adjust the stitch length at sharp points to place the
nibble on the point.
You can hold back a bit to lengthen a stitch or even back up
slightly in order to have the nibble part of the stitch hit the
point exactly. Pivot only when the needle is on the right, in
the background.
12
13
On outside curves, pivot during a straight stitch.
Pivot when the needle is down in the background during
a straight stitch; not when it is on the left taking a “nibble.”
After pivoting the fabric, make sure that the appliqué is
positioned so that the stitch to the left is perpendicular to
the applique edge.
11
Lock the last stitches.
As you near where you started, make sure you have clipped
your starting threads. Stop at a point with the needle on the
right, in the background fabric. Change to a straight stitch
with a reduced stitch length. Take a few short stitches at the
edge of the appliqué to lock your stitching. Remove the
stabilizer from behind the appliqué, following the manufac-
turer’s directions. Trim the background to the size indicated
on your pattern.
14
..................Content has been hidden....................
You can't read the all page of ebook, please click here login for view all page.