The Opportunity Sales Stages configured in a Salesforce organization are important for pipeline and performance measurement. The stages should be clearly described and communicated to the sales team and across the business. In this a recipe we will describe the stages in Salesforce and make these descriptions available on the home page.
Carry out the following steps to add sales stages descriptions:

Carry out the following steps to create an Apex class to show Opportunity Sales Stages descriptions on the home page:
- Navigate to the home page components setup page by going to Your Name | Setup | Develop | Apex Classes.
- Click on New.
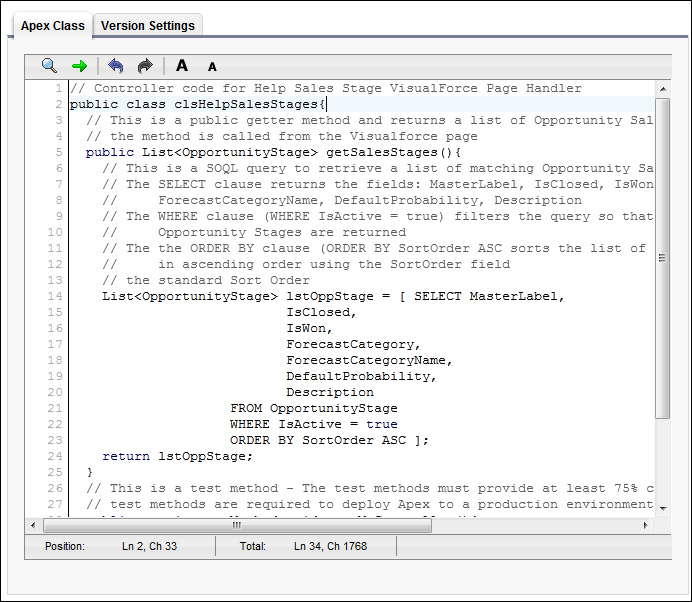
- Paste the following code (as shown in the following screenshot):
// Controller code for Help Sales Stage VisualForce Page Handler public class clsHelpSalesStages{ // This is a public getter method and returns a list of Opportunity Sales Stages // the method is called from the Visualforce page public List<OpportunityStage> getSalesStages(){ // This is a SOQL query to retrieve a list of matching Opportunity Sales Stages // The SELECT clause returns the fields: MasterLabel, IsClosed, IsWon, ForecastCategory, // ForecastCategoryName, DefaultProbability, Description // The WHERE clause (WHERE IsActive = true) filters the query so that only Active // Opportunity Stages are returned // The the ORDER BY clause (ORDER BY SortOrder ASC sorts the list of Opportunity Stages // in ascending order using the SortOrder field // the standard Sort Order List<OpportunityStage> lstOppStage = [ SELECT MasterLabel, IsClosed, IsWon, ForecastCategory, ForecastCategoryName, DefaultProbability, Description FROM OpportunityStage WHERE IsActive = true ORDER BY SortOrder ASC ]; return lstOppStage; } // This is a test method - The test methods must provide at least 75% code coverage // test methods are required to deploy Apex to a production environment public static testMethod void testMyController(){ clsHelpSalesStages objOppStage = new clsHelpSalesStages(); List<OpportunityStage> lstOppStageTest = objOppStage .getSalesStages(); // This is an assertion to ensure that Opportunity Sales Stages are returned. System.assert( lstOppStageTest.size() > 0 ); } } - Click on Save.
Carry out the following steps to create a Visualforce page to show Opportunity Sales Stages descriptions on the home page:
- Navigate to the home page components setup page by going to Your Name | Setup | Develop | Pages.
- Click on New.
- Enter
vfpHelpSalesStagesin the Label field. - Accept the default vfpHelpSalesStages in the Name field.
- Paste the following code (as shown in the following screenshot):
<apex:page controller="clsHelpSalesStages" tabStyle="Opportunity" showHeader="false" sidebar="false">
<apex:form >
<apex:sectionHeader title="Sales Stages Description. Date: {!NOW()}"/>
<apex:pageBlock title="">
<apex:pageMessages ></apex:pageMessages>
<apex:pageBlockTable value="{!SalesStages}" var="s" rendered="{!NOT(ISNULL(SalesStages))}">
<apex:column >
<apex:facet name="header">Name</apex:facet>
<div style="background-color:{!CASE(s.ForecastCategoryName,'Closed','maroon','Omitted','#FFA07A','Commit','green','Funnel','blue','gray')};
color:{!CASE(s.ForecastCategoryName,'Omitted','black','white')}">
{!s.MasterLabel}
</div>
</apex:column>
<apex:column value="{!s.DefaultProbability}"></apex:column>
<apex:column value="{!s.Description}"></apex:column>
<apex:column value="{!s.ForecastCategoryName}"></apex:column>
</apex:pageBlockTable>
</apex:pageBlock>
</apex:form>
</apex:page>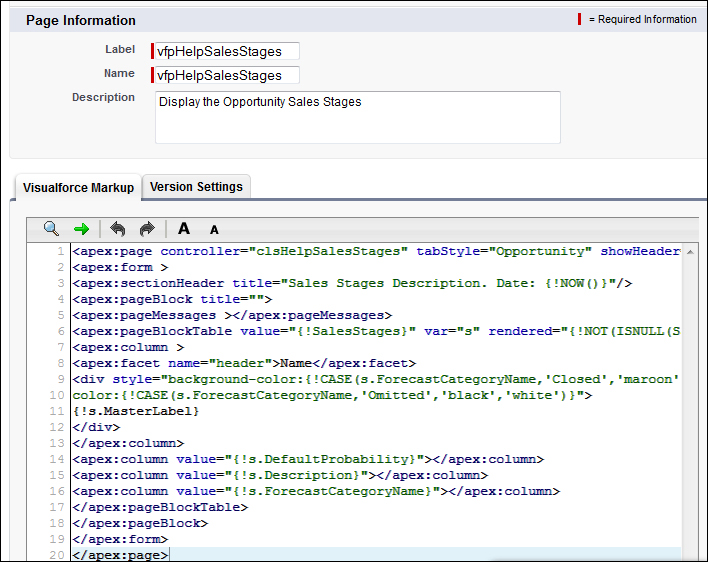
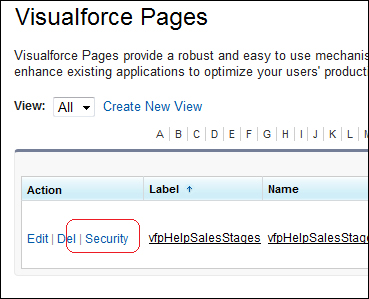
- Now set security for the required profiles in your organization (this is required for every user profile that you wish to view the sales stage descriptions).
- Navigate to the home page components setup page by going to Your Name | Setup | Customize | Home | Home Page Components.
- Click on New.
- Click on Next (on the Understanding Custom Components splash screen if shown). The Next button is found on the Understanding Custom Components splash screen (this page is only shown if the Don't show this page again checkbox has not previously been checked), as in the following screenshot:
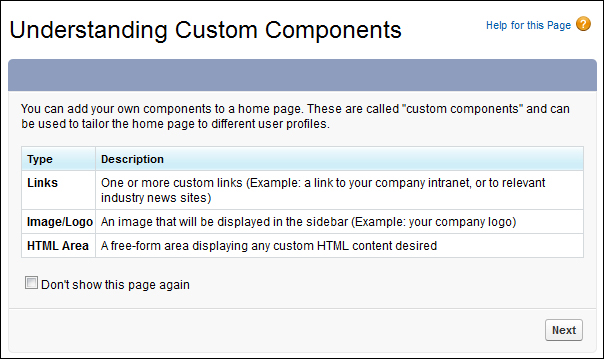
Here, we are presented with the Step 1. New Custom Components page.
- Enter the name of the custom component in the Name field. Enter the text
Opportunity Sales Stages. - Select the HTML Area option from the Type options list.
- Click on Next.
- Ensure that the option Wide (Right) Column is selected within the Component Position option list.
- Check the Show HTML checkbox.
- Paste the following code:
<iframe style="width: 100%; height: 400px;" src="/apex/vfpHelpSalesStages" frameBorder="0"></iframe>
- Click on Save.
- Navigate to the home page components going to Your Name | Setup | Customize | Home | Home Page Layouts.
- Determine which home page layout to place the component on and click on Edit. Here we are editing the home page layout named DE Default.
We are presented with the Step 1. Select the components to show page.
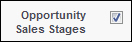
- Check the Opportunity Sales Stages checkbox in the Select Wide Components to Show section, as shown in the following screenshot:
- Click on Next.
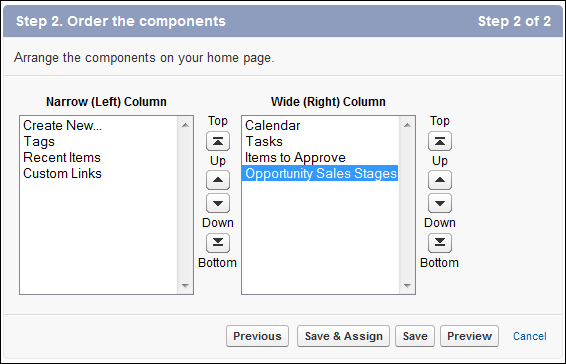
- Move the Opportunity Sales Stages to the top position in the Wide (Right) Column using the Arrange the component on your home page. section, as shown in the following screenshot:
- Click on Save.

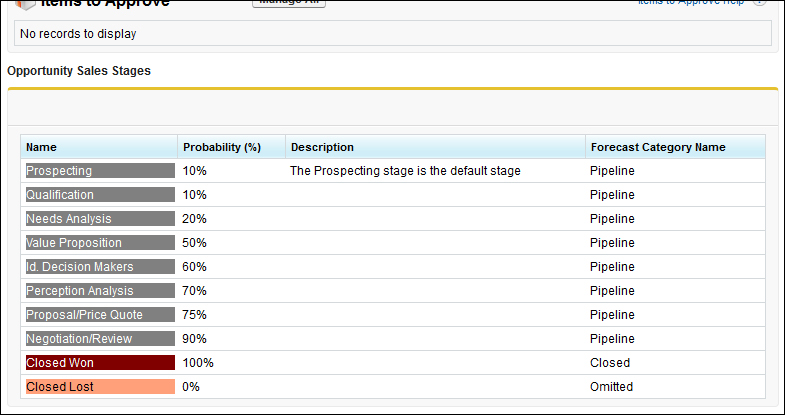
By adding the description for the sales stages, the Visualforce and Apex reads the data directly from within Salesforce and so, regardless of whether the sales stage descriptions change or even the sales stages themselves change in the future, the content is always up-to-date.
Users can then see the description, that you would have set, for each of the opportunity stages in the organization on the Visualforce page without having to create dummy opportunities and look at the available stage names.
Salesforce does not natively support the embedding of Visualforce pages into the home page, hence the need to create this HTML custom component. Within this component we are using the <iframe> HTML tag we are able to insert the rendered output of a specified Visualforce page.
You can see how this appears on the home page in the following screenshot: