
Many users of Salesforce also have Microsoft Outlook as their e-mail application and in order to link Outlook data with Salesforce, salesforce.com has developed Salesforce for Outlook.
Salesforce for Outlook is an external application that installs onto the same computer as the Outlook application and it can be used to keep contact, event, and task records synced between Salesforce and Outlook.
A Salesforce for Outlook configuration comprises the settings and parameters that determine which data users can sync between Outlook and Salesforce CRM.
Salesforce for Outlook configuration also allows you to set up configurations that allow users to edit some of their own settings.
Within the Salesforce for Outlook configuration, you can define which items are allowed to sync, which direction the data flows between Outlook and Salesforce, and what happens when data conflicts arise.
You can create multiple configurations to cater for the needs of various types of users. For example, a sales team might want to sync contacts, tasks, and events, while a senior manager might only be concerned with syncing events.
Carry out the following steps to set up Salesforce for Outlook configurations within Salesforce CRM:
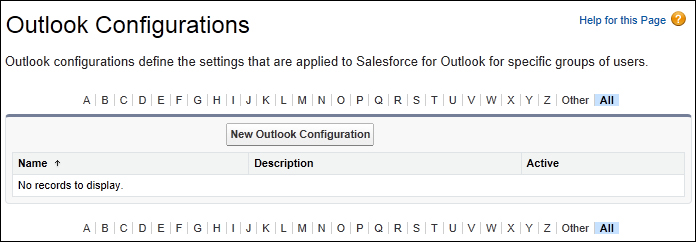
- Navigate to the new Outlook Configuration page by going to Your Name | Setup | Desktop Administration | Outlook Configurations. This page is shown in the following screenshot:
- Click on New Outlook Configuration.
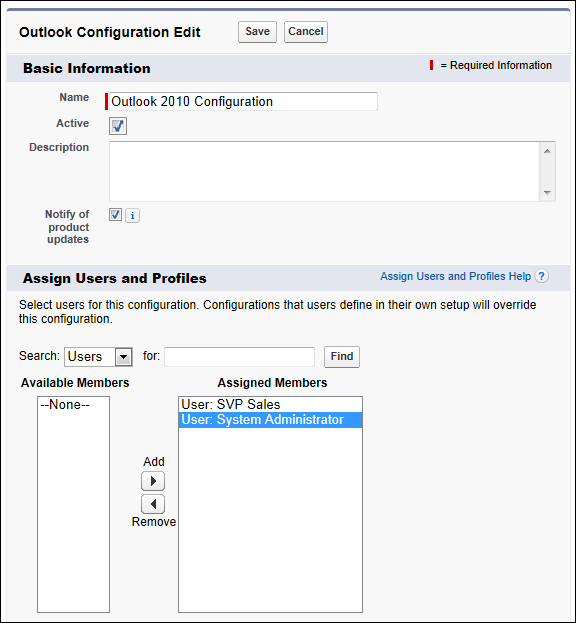
- Enter the name of the Outlook configuration in the Name field. For this recipe, type the text
Outlook 2010 Configuration. - Check the Active checkbox.
- Optionally, enter a description in the Description textbox.
- Leave the checkbox Notify of product updates checked. When an updated version of Salesforce for Outlook is available, users will see a system tray notification, which they can then click on to download the latest version. Users are alerted every 14 days until they either download the new version or hide system tray alerts.
Note
After you define basic information for a Salesforce for Outlook configuration, you select the Salesforce for Outlook users that the configuration's settings will apply to. Complete the following details in the Assign Users and Profiles section as shown in the upcoming screenshot.
If you assign a user who is already assigned to a different configuration, that user is removed from the other configuration and assigned to this one. If an assigned user is also part of a profile assigned to another active configuration, the configuration that lists the user directly is used.
- Select the users or profiles for this configuration:
Note
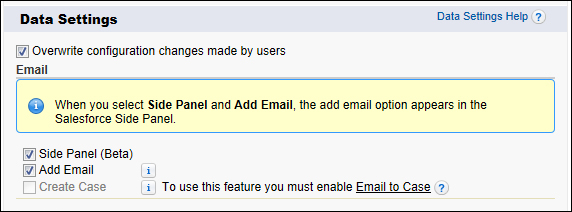
Data settings control the sync behavior and e-mail functionality of Salesforce for Outlook. You can define the following settings using the fields in the Data Settings section in a Salesforce for Outlook configuration. Complete the following details in the Data Settings section as shown in the upcoming screenshot.
- Check the Overwrite configuration changes made by users checkbox.
- Check the Side Panel (Beta) checkbox to display the Salesforce side panel in Microsoft Outlook.
- Check the Add Email checkbox. This adds the Add Emails and Send and Add buttons to Outlook, and lets your users add up to 10 e-mails simultaneously to Salesforce.
Note
Before activating the Add Email setting, you must first have enabled the Email to Salesforce feature. Email to Salesforce allows you to assign e-mails to leads, contacts, opportunities, and other records in Salesforce when e-mailing from Outlook. This is done by entering your Email to Salesforce address in the BCC field or any recipient field.
Salesforce then receives a copy of the e-mail and, depending on your configuration, adds it either to the Activity History related list of the matching records or to the My Unresolved Items page, where you can manually assign it.
- Optionally, set the Create Case checkbox depending on your setup and requirements as shown in the following screenshot:
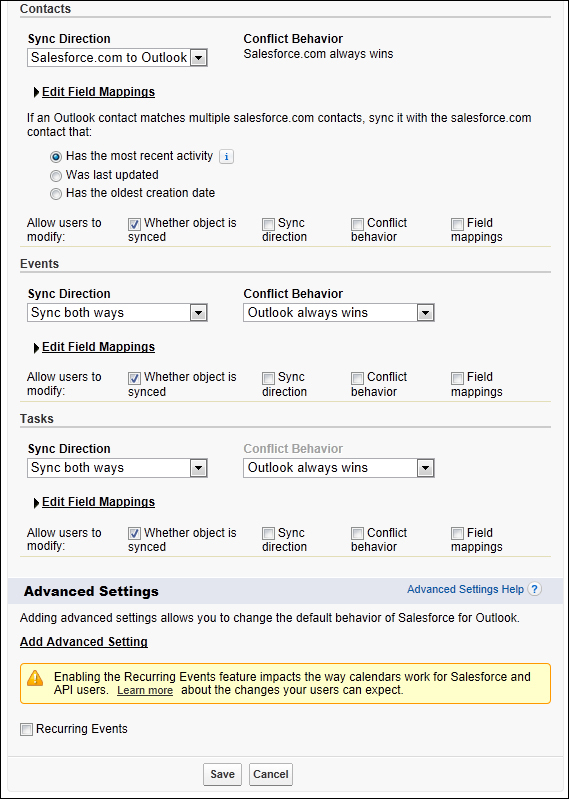
- In the Contacts subsection, set the Sync Direction option as Salesforce.com to Outlook.
- Here, the Conflict Behavior option defaults to Salesforce.com always wins.
- In the Contacts subsection, leave Edit Field Mappings unchanged.
Note
The Edit Field Mappings link allows you select fields mapping between Salesforce contacts and Outlook contacts. Clicking on the link presents the mapped fields which automatically has all standard fields mapped between Salesforce and Outlook. If you have any custom fields to sync, you can add them here.
- In the Contacts subsection, set the If an Outlook contact matches multiple salesforce.com contacts, sync it with the salesforce.com contact that: pick list option to Has the most recent activity.
- In the Contacts subsection, check only the Whether object is synced checkbox present in the Allow users to modify: section.
Note
Salesforce.com should be set up as the system of record when syncing contacts with Outlook due to the issue of record ownership in the Salesforce CRM application. Here we may have one user who owns a particular contact record and another user who may also have this contact record in their Outlook. By setting the sync direction as Salesforce.com to Outlook, we can avoid duplicate contact records being added to Salesforce.
- In the Events subsection, set the Sync Direction option as Sync both ways.
- In the Events subsection, set Conflict Behavior to Outlook always wins.
- In the Events subsection, leave Edit Field Mappings unchanged.
Note
The Edit Field Mappings link allows you to select fields mapping between Salesforce events and the Outlook calendar. Clicking on the link presents the mapped fields which automatically has all standard fields mapped between Salesforce and Outlook. If you have any custom fields to sync, you can add them here.
- In the Events subsection, check only the Whether object is synced checkbox present in the Allow users to modify: section.
- In the Tasks subsection, set the Sync Direction option as Sync both ways.
- In the Tasks subsection, set Conflict Behavior to Outlook always wins.
- In the Tasks subsection, leave Edit Field Mappings unchanged.
Note
The Edit Field Mappings link allows you to select fields mapping between Salesforce tasks and Outlook tasks. Clicking on the link presents the mapped fields which automatically has all standard fields mapped between Salesforce and Outlook. If you have any custom fields to sync, you can add them here.
- In the Tasks subsection, check only the Whether object is synced checkbox present in the Allow users to modify: section.
- In the Advanced Settings section, you can leave the HTTPTimeout, MaxLogFileSize, and MaxRetries settings as default:
- Click on Save.
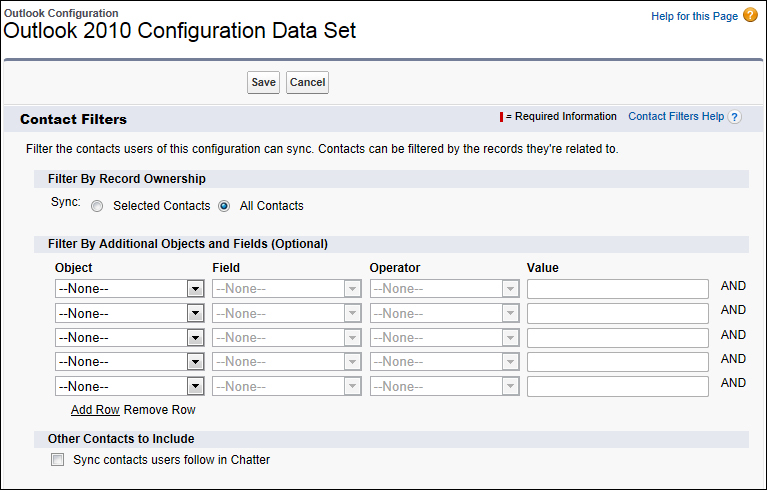
- In the Contact Filters section, set the option for Filter By Record Ownership to All Contacts.
- In the Contact Filters section, leave the pick list selections for the Filter By Additional Objects and Fields (Optional) as default.
- In the Contact Filters section, optionally set the Other Contacts to Include subsection checkbox for the Sync contacts users follow in Chatter (as shown in the following screenshot):
- In the Event Filters section, leave the Filter By End Date option as LAST 30 DAYS.
- In the Task Filters section, leave the Filter By Due Date option as LAST 30 DAYS as shown in the following screenshot:
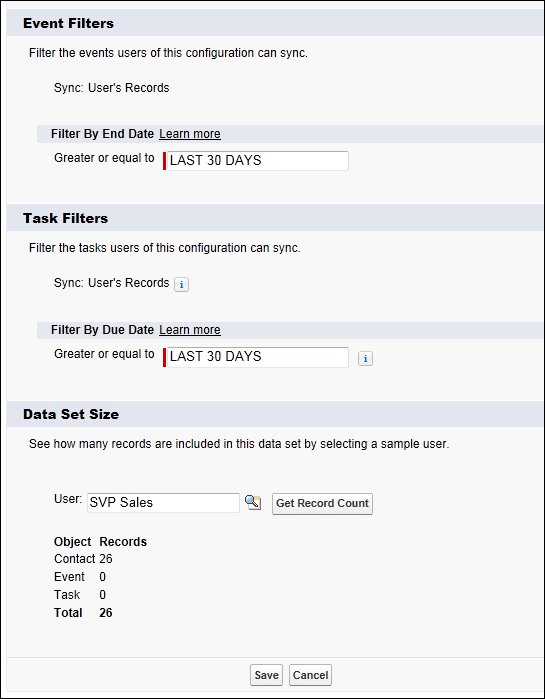
- You can use the Get Record Count button to check how many records will sync for a sample Salesforce for Outlook user based on the configuration's filters. If the numbers are too high or low, you can adjust the filters and check the size again. The maximum record count is 5000 per object.
- Click on Save.