Salesforce CRM provides related lists on the standard pages which are added vertically to the lower section of the page below the detail section.
As more and more related lists are added for an object, the sections of related list data can make the page stretch vertically and make it a challenge for users to scroll down to the page to locate the required information as shown in the following screenshot:
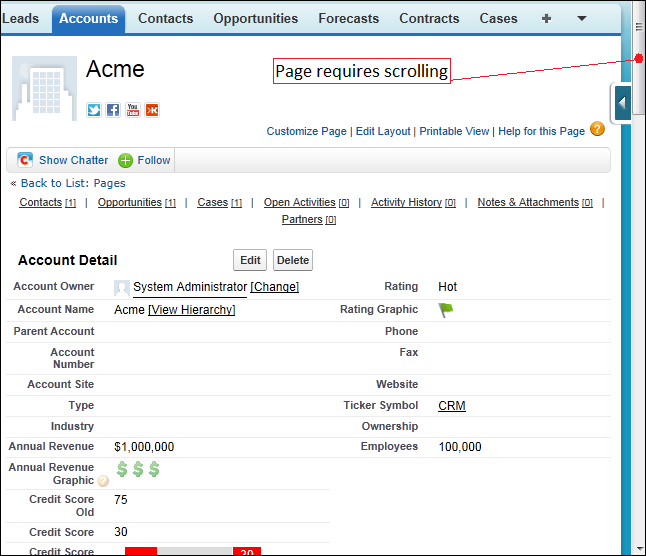
To counter this, Salesforce provides hover links at the top of the page that allow the users to navigate via hyperlinks directly to the required related list selection further down the page. This is very useful when users are aware and dexterous enough to use its capabilities; however, some users experience navigating pages that have many related lists.
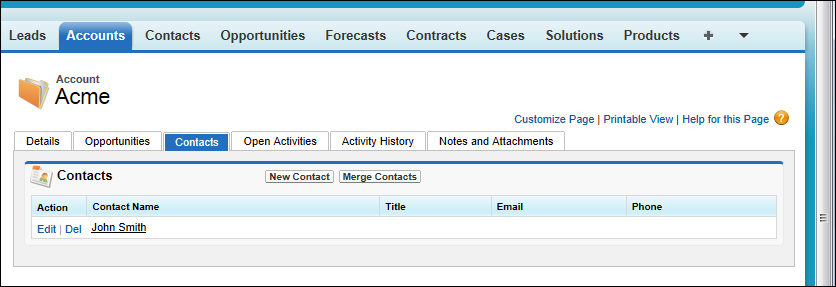
In this recipe, we will look at how you can show a Visualforce page to override the standard Account view and present the related list as separate tabs instead of having them rendered at the bottom of the page.
Carry out the following steps to create a Visualforce page:
- Navigate to the Visualforce Pages setup screen by going to Your Name | Setup | Develop | Pages.
- Click on New.
- Enter
AccountViewOverridein the Label field. - Accept the default AccountViewOverride in the Name field.
- Paste the following code in the formula edit box (as shown in the screenshot further below):
<apex:page standardController="Account" showHeader="true" tabStyle="Account">
  <style>.activeTab {background-color: #236FBD; color:white; background-image:none}.inactiveTab { background-color: white; color:black; background-image:none}
  </style>
   <apex:tabPanel switchType="client" selectedTab="tabdetails" id="AccountTabPanel" tabClass="activeTab" inactiveTabClass="inactiveTab">
      <apex:tab label="Details" name="AccDetails" id="tabdetails">
    <apex:detail relatedList="false" relatedListHover="false" title="true" inlineEdit="false"/>
      </apex:tab>
    <apex:tab label="Available Opportunities" name="Available Opportunities" id="tabAvOpp">
        <apex:relatedList subject="{!account}" list="AvailableOpportunities__r" />
    </apex:tab>
    <apex:tab label="Contacts" name="Contacts" id="tabContact">
        <apex:relatedList subject="{!account}" list="contacts" />
    </apex:tab>
      <apex:tab label="Open Activities" name="OpenActivities" id="tabOpenAct">
         <apex:relatedList subject="{!account}" list="OpenActivities" />
      </apex:tab>
      <apex:tab label="Activity History" name="ActivityHistory" id="tabActHist" >
         <apex:relatedList subject="{!account}" list="ActivityHistories" pageSize="15" />
      </apex:tab>
      <apex:tab label="Notes and Attachments" name="NotesAndAttachments" id="tabNews">
         <apex:relatedList subject="{!account}" list="NotesAndAttachments" />
      </apex:tab>
   </apex:tabPanel>
</apex:page>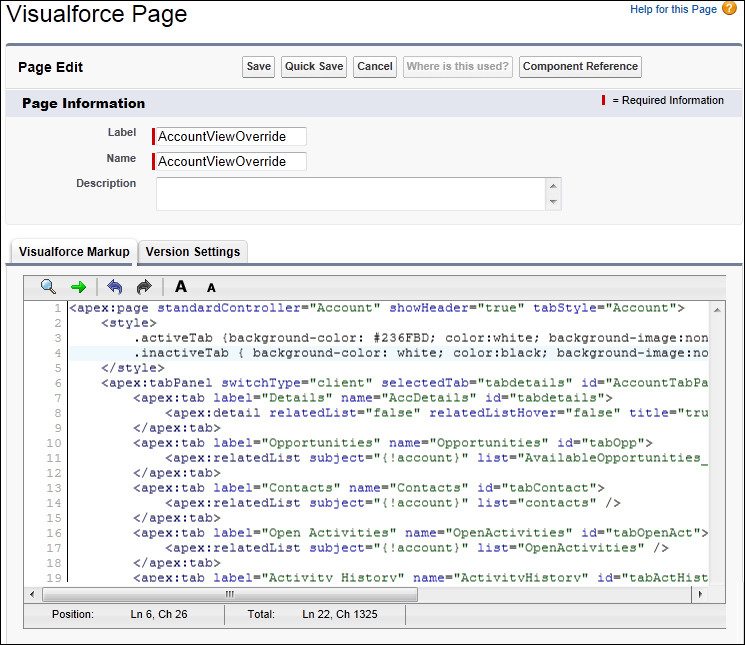
- Now set the Security for the required profiles in your organization by going to Your Name | Setup | Develop | Pages.
- Locate the row for the Visualforce Page AccountViewOverride and click on the Security link as shown in the following screenshot:

- Now, override the standard Account View by going to Your Name | Setup | Customize | Accounts | Buttons and Links.
- On the Accounts Buttons and Links page locate the Accounts View row and click on Edit.
- Click on the Override With option and select Visualforce Page.
- Select the AccountViewOverride Visualforce page as shown in the following screenshot:
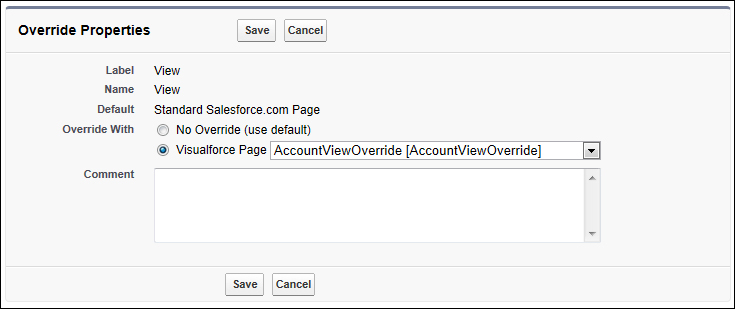
- Click on Save.