Walls are one of the most common things built from LEGO bricks. They may be walls for a fire station, a hospital, or a police department. They could also be the walls of a medieval castle or maybe even an alien base on some far-off planet. In the Overlapping section earlier in this chapter, you saw how to build a strong wall by itself. Now let’s move on to learn how to connect two or more walls together.
In several of the earlier illustrations (Figures Figure 2-7, Figure 2-8, and Figure 2-9), you saw simple walls built with the overlap technique. However, a lone wall isn’t much good if you intend to create a realistic-looking building. The inhabitants of your LEGO world will certainly enjoy their buildings more if you provide them with rooms, doorways, and other basic structures—especially ones that won’t fall down.
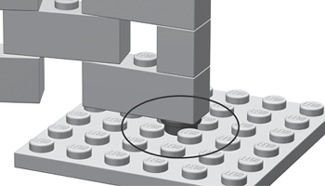
But don’t expect to connect two preexisting walls to each other to make a strong pair. It is much better to build them at the same time and have them draw on each other’s strength. Walls should be joined to each other from the very first course of bricks. Figure 2-12 shows the first layer of two walls that will be connected.
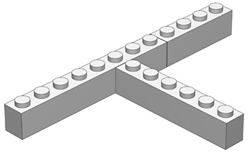
The next course of bricks begins to lock the first layer in place by overlapping, as shown in Figure 2-13. The dark 1x4 brick ties one wall to another, locking the 1x6 to the 1x8.
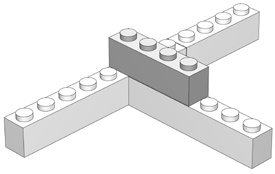
Figure 2-13. The highlighted brick is the cornerstone of the overlap. It connects the two walls beginning with the second course.
This technique is the key to building solid models. As Figure 2-14 shows, as you add the remainder of the second course, the other bricks (in this particular example) aren’t quite as important as the one highlighted in Figure 2-13. They are part of the walls, but not part of what is holding the two walls together.
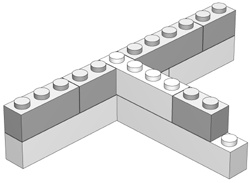
Finally, in Figure 2-15, you can see that the overlapping technique continues to be used to connect the two walls to each other but is also used within each individual wall. This ensures the structure is sound.
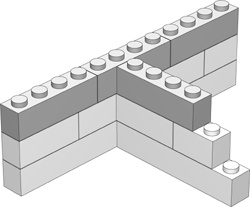
After just a few layers, you should find that your two walls are firmly supporting each other. Try pushing on either wall, and you will soon see that they can’t be easily shifted. The overlap pattern has given you strong walls, and by connecting them together, you have made them even more stable.
Of course, you don’t always want perfectly straight and perfectly interlocked walls. Sometimes you want to create a model that’s a little more organic, or at the very least, less than square.
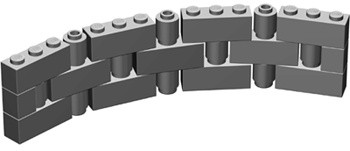
How can you use straight bricks to form a curved wall? One fun technique is to dig up as many 1x3 bricks as you can find and link them together, as shown in Figure 2-16.

Figure 2-16. 1x3 bricks joined in this fashion make it possible to create curved or even completely circular walls.
This method allows you to curve a wall as much as you want, even to the point of creating a complete circle. You may find yourself using this idea to make a pen for barnyard animals, the body of a rocket, a fence around a house, and so on.
To create a different look, try adding 1x1 cylinder bricks to the openings between the 1x3 bricks. As you can see in Figure 2-17, this makes the wall appear more solid. You won’t be able to curve it as much as the example in Figure 2-16, but it’s still a great technique that will add new shapes to your models.
By playing around with the length of your wall and the curve of the bricks, you may find that you can even link the ends of the wall into existing square structures (see Figure 2-18). For example, you may be able to take two castle walls and create a rounded corner that connects them. Or, you can try to make a guard tower from the 1x3 technique and set it on a castle made from regular walls that meet at 90 degrees. By placing 1x1 round plates at various points under the 1x3’s, you should be able to find combinations that allow you to connect your round wall to the other parts of your model.