
In the world of official LEGO sets, Technic models can sometimes rank among the largest and most complex designs. Some may be made up of 300 to 1,000 or more pieces. Some may have very few standard system parts in them, relying instead on large numbers of Technic bricks, beams, pins, and other parts I’ve talked about in this chapter. Your own Technic models need not be nearly this complex. You are, of course, free to incorporate as many or as few Technic pieces as you feel you need.
For the purposes of this book, in order to keep things a bit simpler, I’ve decided to present a Technic model that falls on the small side of the range. To illustrate how just a few Technic pieces can add interest and functions to an otherwise simple model, I designed the little helicopter you see in Figure 9-24.

At first glance, you might look at Figure 9-24 and wonder, “What makes this a Technic model?” That’s a question worth asking, so let’s take a closer look.
Right off the bat, a couple of things are obvious, and one thing might not be so obvious. If you look at the helicopter, it’s easy to see that the landing gear and tail rotor are both made completely from what we’ve already identified as Technic pieces in this chapter. The landing gear (as seen in Figure 9-24) is made up of coupler elements and axles, attached to keyhole bricks that make up part of the helicopter’s body.
Although the tail section may seem a bit oversized for the rest of the model, it is not without reason. Hidden behind the two 1x2 Technic bricks are two bevel gears. You can see them in Figure 9-25, which is taken from the rear of the model.

Figure 9-25. Two bevel gears meet at a right angle. This transfers motion from one axle to the other. Note the half-width bushing on the right, holding the axle in place.
You can see that the first of the two gears is mounted on the same axle as the tail rotor pieces (also made from Technic elements). That gear, in turn, mates with a second identical piece that attaches to the drive shaft that runs the length of the helicopter’s tail. The shaft itself is much more visible in Figure 9-26.
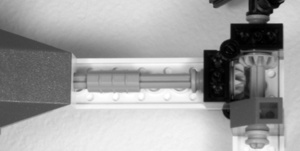
Figure 9-26. This shot might be disorienting at first. You’re looking at the underside of the tail; the main body of the copter is at the left. This shows how the motion is transferred from the tail through to the main rotor.
The shaft then continues into the body of the copter where it ends in yet another bevel gear. This time the gear transfers its motion to a similar piece mounted vertically on the shaft connected to the main propellers. You can see both the gear inside the body and the one that drives the propellers in Figure 9-27.
Figure 9-27. You can think of the rotor, including its bevel gear, as a subassembly, and you can build it separately from the model so it can be added last.
When fully assembled, the two bevel gears (inside the body of the helicopter) mate perfectly. If you’ve been following along, you’ll know how the whole thing comes together. The small tail rotor acts like a handle that you can crank. The motion you put into the tail rotor is transferred along the main drive shaft into the helicopter body and then passed along again to the main rotor.
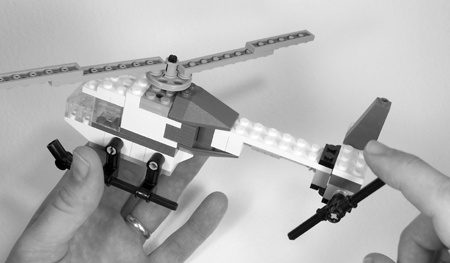
Figure 9-28. The still image shown here doesn’t show the action that occurs when the tail rotor is moved. When you build your own, you’ll see that.
The result, as demonstrated in Figure 9-28, is that by turning the tail, you cause the larger propellers to rotate. Any movement of the small tail rotor causes the larger blades to spin, and it is this special function that earns this little model the Technic moniker. This is a simple, yet effective, demonstration of a model that, without Technic pieces, would be far less interesting.
Note
Complete instructions for the helicopter example are included on the website that accompanies this book. Go to www.apotome.com/instructions.html to download full color steps to build your own version of this little model.