
For millions of people around the world LEGO bricks have always had a common meaning: creativity. Regardless of age, we all seem to recognize the sound the bricks make as we rummage through a bucket full of them or a pile on the floor.
Whenever you look at that pile of LEGO pieces, you are looking at something remarkable and yet at the same time remarkably simple. You are looking at the different parts of a system. A system is not only a collection of different bits and pieces but also the ways in which they connect with each other to become a larger object or series of objects. In this chapter, I discuss the LEGO system and what makes it so amazing. I then show you a number of the pieces that make up the system and how they relate to each other. Finally, you’ll take a look at how geometry and color come into play as you’re building with LEGO pieces.
The LEGO system is made up of an enormous number of different pieces, sometimes known as elements. Every piece in that pile is an element. Every element (with only a few exceptions) can connect to any other element in an almost infinite number of ways. A handful of pieces can be combined to form a wall; a few more added on create a roof and then a complete house, then maybe a car and a driveway to park it in. Tomorrow those same elements can be taken apart and recombined to create a deep space cruiser, a sculpture of a calico cat, or even a fortress with a group of medieval knights.
Take another look at that pile of LEGO pieces on the floor (or imagine a pile) and you’ll notice that not all of them are perfectly rectangular. Some have sloping sides, some are cylindrical or cone shaped, and some are much thinner than others. You’ve got to have a way to identify different features of bricks or you’ll have a tough time learning how to build with them. This section describes the various key attributes of LEGO bricks and puts them into useful categories.
As you read about the different types of LEGO pieces, you’ll undoubtedly find many that are familiar to you and that already exist within your own collection. At the same time, you are likely to come across others that you haven’t seen before and that you may not yet own. Of course, that’s part of the overall enjoyment of LEGO as a hobby. As you buy new sets or find used pieces at yard sales or thrift shops, you discover new parts that in turn open up new building options.
Throughout this book, I often refer to the size and shape of various LEGO pieces, but before I do, I need to provide you with a foundation for these references. Let’s begin with the basic 1x1 brick, as shown in Figure 1-1.
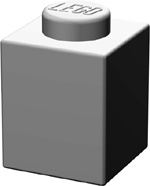
When I speak of the LEGO system, I consider the 1x1 (pronounced “one by one”) brick to be the standard upon which I base all other measurements. This, in turn, makes it easy to describe the size and shape of other bricks. For example, if you put two 1x1 bricks next to each other, you see that they are the exact same size as the next largest standardsized brick. They make a 1x2 brick, as shown in Figure 1-2.
In addition, if a piece is the same height as a 1x1, I say it is “one brick high.” A brick that is the same height as a 1x1 brick but is twice as long is called a 1x2 brick.

It’s common to put the shorter dimension (the width) ahead of the longer one (the length). Similarly, the element shown in Figure 1-3 is a 2x4 brick (the equivalent of two 1x1’s wide and four 1x1’s long). I’ll use these measurement standards throughout this book to describe the various LEGO pieces.
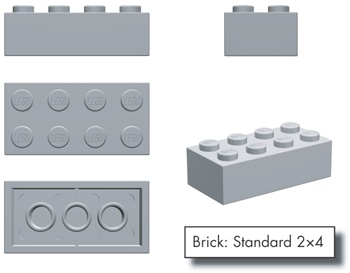
Figure 1-3. Anatomy of a 2x4 brick. When you see it from all sides, you get a sense of its general size and shape.
Another important standard that you will find in this book is the use of the capital letter N as a substitute for a brick’s length. For example, I might talk about a bunch of 1xN (pronounced “one by en”) bricks that I used to make the outer wall of a building. In this case, the capital N represents a number of possible brick lengths, such as 1x2, 1x4, 1x8, and so on. Rather than list all of the assorted sizes, it is sometimes easier to replace the last number with an N and allow the description to apply to a range of brick sizes.
The stud is a part of almost every LEGO piece, and you use it to measure the length or width of any given piece. The stud (shown circled in Figure 1-4) helps define the look of a LEGO element and it is integral to how the entire system functions.
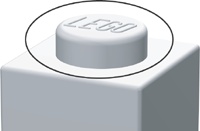
Figure 1-4. The stud gives every element half of what it needs to connect to almost any other element.
The 1x1 brick shown in Figure 1-4 has exactly one stud. In fact, 1x1 refers to the fact that our base brick is one stud wide and one stud long. Similarly, the element shown in Figure 1-3 is two studs wide and four studs long.
The tube is the other half of the mechanism that helps bricks stick together. Tubes capture the studs so that you can join LEGO elements and know that they won’t fall apart. You can see the tubes by simply looking beneath most LEGO pieces, such as those shown in Figure 1-5.
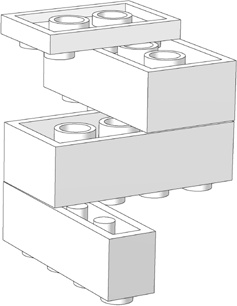
Figure 1-5. The underside of LEGO elements reveals the other half of the secret that locks bricks together.
Figure 1-5 uses a simple upside-down sculpture to demonstrate the way in which the tubes work with the studs. Different types of elements have variations on the tube design. In Figure 1-5, you can see that the thinnest piece (at the top of the illustration) has shortened tubes, whereas the 2x4 bricks beneath it have longer tubes inside of them. The 1x4 brick (at the bottom of the sculpture) has thin posts rather than hollow tubes. Despite the contrast in their sizes, they all serve the same purpose: the tubes wedge together against the studs of the piece below to hold the bricks together.
Although it is tempting to refer to all LEGO pieces as bricks, it is more accurate to use this term only when talking about certain elements. The label brick is generally given to a type of LEGO part that is the same height as a standard 1x1 element, like the ones shown in Figure 1-6. A brick should have straight sides and a rectangular shape when you view it from the side.
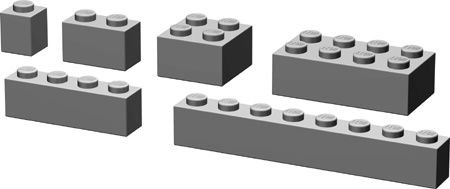
A LEGO brick is not unlike a real brick that you might find making up the outside walls of a house, an apartment building, or a school. In some respects, the plastic versions are used much as you would use their clay or concrete counterparts. You can use them to create the walls of buildings, but you can also use them to create vehicles, cities, moats, airplanes, and so on.
You will use 1x1 bricks in a variety of ways: they may find their way into mini-land style figures (featured in Chapter 4), mosaics (detailed in Chapter 8), small-scale animals, or just about any model where small detail work is required. In some ways, this is an extremely flexible brick that is sometimes overlooked.
Among other things, 1x2 and 1x3 bricks are handy for creating columns for either true structural support or just for ornamental purposes. I’ll explore this technique in-depth in Chapter 2.
In many ways, the longer bricks in the 1xN category represent the backbone of the detail-building portion of the LEGO system. They have an enormous number of uses—far too many to fully represent here. One of the first uses that comes to mind is that they may function as the standard walls for virtually any small building. They provide a reasonable to-scale rendition of the thickness that you would find in real world walls.
Now let’s move on to the wider pieces. It’s hard to imagine the LEGO system having found as much long-term success without the association it has come to have with the 2x4 brick. For many builders who recall time spent rummaging through a pile of pieces, the 2x4 represents a standard image of a LEGO brick. This piece in particular finds its way into many models; both official sets and original creations by every class of builder.
On their own, these pieces may seem clunky and old-fashioned; they aren’t particularly sleek or smooth and don’t seem to offer much beyond their rectangular shapes. But for many projects, they represent the core material onto which other elements can be added. They are the true bricks of the LEGO system in every respect.
At first glance, the common plate (shown in Figure 1-7) may not seem as useful as its big brother, the brick. After all, it takes three plates stacked on top of each other to equal the height of any regular-sized brick. However, that is exactly what makes the plate such an effective building tool. Because it’s only one-third as high as a full-sized brick, you can use a plate to add subtle detailing, internal bracing, or realistic scaling to almost any model.
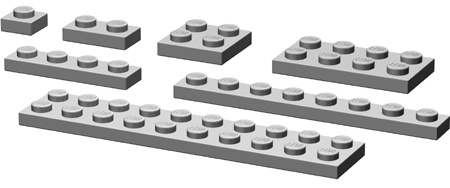
As noted earlier, the underrated plate is often the little piece that could. Plates can be among the most useful of elements and are found in many of the same length and width combinations as bricks—1x1, 1x4, 2x2, 2x4, and so on.
Plates of the 1x1 variety can find their way into almost any model, from the smallest automobile, to artistic mosaics (see Chapter 8 for more on mosaics), right up to helping flesh out the largest of sculptures (like those in Chapter 7). Similarly, you can find 1x2 and 1x3 plates in a range of applications and, thankfully, they are available in an equally large number of colors.
Longer 1xN plates have a huge number of uses; you can use them for projects ranging from building helicopter blades for small-sized rescue machines to creating long colorful stripes on the sides of a locomotive. Another area in which they shine is in helping tie together several columns of bricks or other plates that have been stacked vertically to create a visually interesting pattern. (We’ll look more at construction techniques in the next chapter.)
Although the 2xN bricks represent the foundation of the brick class, the 2x2, 2x3, and 2x4 plates are the working class elements that allow you to accomplish a lot with a minimum amount of material. Throughout this book, I will hit on the idea of using a piece that is only as big as it needs to be. Shorter 2xN plates will pop up again and again as we drive toward that goal.
Beneath many a large-scale model are longer 2xN plates that hold even larger 4xN or 6xN plates together. Often 2xN plates allow some areas to remain open or exposed, which in turn allows you to add more detail or structure to the model.
When you dig through your LEGO pieces, you’ll usually come across what look like ramps for very tiny cars. These are slopes, so named because one or more sides slant from top to bottom (see examples in Figure 1-8). Slopes always create an angled surface between the studs at the top of the element and the point at which that element meets the piece beneath it. Slopes come in a variety of angles from 25 to 75 degrees (with 33- and 45-degree angles being the most common).
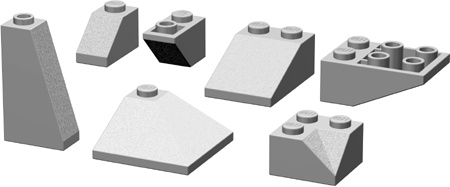
Although slopes are sometimes called roof bricks, they can do a lot more than simply cap off LEGO houses. They can add character to almost any model by helping to soften the harsh square edges that otherwise result from using only standard bricks. They can give beveled wings to an airplane, create a reasonable facsimile of an evergreen tree, or be used to put the roof on just about any kind of building.
In addition to their standard form, many slopes are manufactured in an inverted variety where the slant is found on the underside of the brick. An inverted slope is what you might see if you put a regular slope on a mirrored surface (see Figure 1-9). Of course, you can put your LEGO elements on a mirror; just don’t expect them to realize how gorgeous they are.

Within the LEGO system, certain elements defy easy classification. A few examples are shown in Figure 1-10. These pieces are either entirely unique or are just different enough from other elements so that they require a category of their own. Many times these pieces are unique because of their shape or perhaps because of the way in which their studs are oriented.
Although standard bricks and plates are inherently useful, the pieces in this category have some type of extra functionality. They are useful in many ordinary but also many specialized situations.

Other classification systems (typically those used on the Internet to catalog, track, or sell elements) tend to sort specialized pieces into existing standardized categories whether the fit is good or not. What happens as a result is that it becomes a challenge to try to find some of these pieces. For example, the well-known offset plate (shown on the left in Figure 1-10) is often described as a plate with a single stud in the center. Other resources label it as a modified plate or a jumper plate. However, it could just as easily be called a tile with a stud in the center, because its surface is more tile-like than it is plate-like. Without a specialized category, it is not the easiest part to classify.
One subcategory of specialized pieces will be wheels. Although it’s certainly possible to use them for other things, they are most often used for one obvious and specialized purpose. See the Brickopedia for a few samples of these elements.
Originally developed in the 1970s, the Technic portion of the LEGO system was first released in sets known as Technical Sets. They promised to add realism and complexity to regular LEGO bricks, and the models certainly reflected that. The key to adding realism was, in fact, that the new pieces (gears, bricks with holes, axles, and so on, as shown in Figure 1-11) were very much compatible with elements already in existence. In other words, if you wanted to buy or build with the new sets, you didn’t have to start building your LEGO collection again from scratch. You could buy a little blue go-kart with the working steering and the one cylinder motor, and you could use your own blue bricks to add details to it that didn’t come in the factory-made kit.
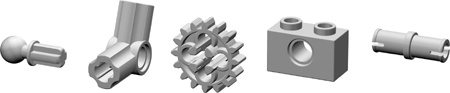
Figure 1-11. Technic parts cover a large range of strange shapes and serve to enable more realistic and functional models made from LEGO elements.
In theory, you could build almost an entire model using nothing but Technic elements, but by adding in some of your regular system parts, you can enhance that model and produce a more finished result.
To classify Technic pieces, you need to add additional subcategories to what is, in essence, already a subcategory. In order to keep things as simple as possible, the number of divisions has been kept to a minimum, and the descriptors have been similarly kept lean. Since Technic gets its own chapter later on (Chapter 9), I’ll leave any examination of this category for that part of the book.
At first glance, you might think that arch pieces (like the ones in Figure 1-12) are too specialized to be of much use for more than architectural detailing. And although they serve their primary purpose without compromise, they can also add character and shape to models of all types, not just buildings.
Arch bricks are useful for creating arches, especially on the exterior of buildings, but they can appear over many things. For instance, you can have an arch over a doorway or above windows. You will also find arches repeated to create visually exciting geometric patterns along the top edges of buildings, or you may find them used on otherwise plain walls to create sections sometimes filled with other colors or patterns.

Figure 1-12. Among the most graceful of LEGO elements are the arches. They come in several sizes and styles.
Using an arch as an arch is a no-brainer. Using arches of varying sizes and shapes is a little more difficult. In many cases, it’s best to draw your inspiration directly from the building you are attempting to copy, or at least a similar type of structure if you’re building a piece of architecture that has never before existed. Picking out how arches are used on buildings is not unlike working one of those brainteaser puzzles where you have to figure out how many triangles are really drawn among the dozens of intersecting lines on the page.
Standard tiles are easy to spot (see Figure 1-13); they’re like a plate without studs. Cylindrical tiles are similarly easy to figure out because they look like tiny smooth manhole covers.

Panels, on the other hand, come in a wider variety of shapes and sizes (see Figure 1-14). In some sense, panels are like tiles with other tiles attached at right angles to form a thin vertical wall or two. Panels may or may not have studs.

Cylinder elements have a cylindrical shape, like a coffee can or a drum (see Figure 1-15). Cones, on the other hand, are sort of like upside-down ice cream cones. Although only a few elements fall into the standard cylinder or cone categories, what they lack in number they make up for in uniqueness.

Figure 1-15. Cylinders come in standard vertical-walled varieties and also sloped versions known as cones.
From tree trunks, to light posts, to the nozzles on the ends of water cannons, you’ll find a varied set of uses for cylinders and cones.
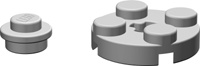
Cylinder plates, as their name suggests are just shorter versions of their full brick-height cousins. The tiny 1x1 cylinder plate (sometimes known as a pip) and the useful 2x2 plate (both shown in Figure 1-16) are the only two elements that make up this subcategory, making it among the smallest you’ll see.
It’s not hard to confuse large standard bricks with small baseplates. So where do large bricks end and baseplates begin? For purposes of this text, assume a baseplate is an element with a waffled underside to which no other bricks can be attached. These baseplates are, in fact, thinner than even a standard plate, as shown in Figure 1-17. They may be plain (having only regular studs on top) or may have designs (such as roadways) printed on them.

Figure 1-17. A 1x1 plate is used to show the difference in thickness between it and a waffled baseplate.
Baseplates give you a foundation upon which to build a model, whether it’s a building, a machine, a sculpture, or just about anything that requires a platform to steady it or allow it to be transported or displayed.
Standard bricks, plates, and slopes are obviously useful for creating a basic model. Sometimes though, you need to add a bit of character to your creations. Decorative elements can perform that task for you by allowing you to add windows, doors, trees, and so on. As you can see in Figure 1-18, they take many forms.
