
Bracing is the art of reinforcing your models, typically on the inside, to make them stronger and more stable. It can be as simple as adding a few long bricks to strengthen otherwise unsteady structures, or as involved as building columns and beams within a larger model to allow it to be handled, transported somewhere, or even just stand up without falling down.
In Figure 2-19, you see some simple walls. They could be the outsides of an office building, the sides of a grandfather clock, or maybe the beginnings of a tall but slender air traffic control tower. You also see some other bricks (marked A and B) that seem to connect the other walls. This reinforcement, made up of a central column and two horizontal beams, is bracing that is used to make the model stronger.
The amount of bracing required varies from model to model—from none for smaller models to lots for large buildings and towers. Bracing your model properly can give it a very solid structure that is particularly useful for transporting it (to a public display or to a friend’s house) or even just playing with it.
Why not just fill in the area inside the building completely and make it solid? Although this might work for some smaller models, it makes larger ones heavier than they need to be, and it most definitely uses more bricks than you probably need. Why hide your bricks needlessly? Use what you need for support and no more. You can use the bricks you save by building efficiently to build other parts or other models.
Bracing is really functional construction and does not necessarily have to look pretty. The great thing about this technique is that you can use just about any bricks at your disposal to beef up a model from behind or underneath. After all, no one is going to see the bricks, so it doesn’t matter what color they are or whether they are even the same color.
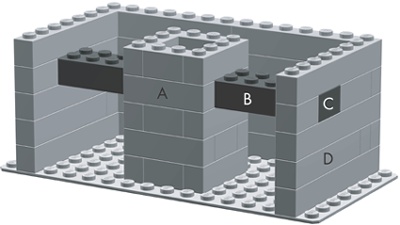
Figure 2-19. A peek behind the scenes shows how columns and beams come together to form bracing for this representative building.
In Figure 2-19, the column (labeled A) stands away from the walls of the building. The beam on the right (labeled B) extends from the column to the outside wall (labeled D). The dark square (labeled C) in the wall is really the end of beam B. It is built into the wall and creates a strong link between column A and wall D.
To better understand bracing, you need to learn a bit more about columns and beams.
You saw one form of columns in Figure 2-5. Normally, though, you wouldn’t expect to see columns lined up next to each other as in that example. Rather, you would find them as the corners of buildings, the structures on either sides of doorways, or as supports for wide floors or ceilings.
One reason that the columns in Figure 2-5 were able to tumble was that there was nothing holding them together. That’s where beams come into play. Beams are the horizontal equivalents of columns, and they work hand-in-hand with them to form strong structures.
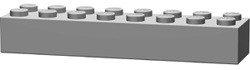
A beam can be as simple as a single brick (such as the one shown in Figure 2-20) you use to connect two parts of a structure that would not otherwise touch each other. Or, a beam can be a much larger and much more complicated substructure. A substructure is a portion of a model that you build separately and then join to the main model. An example could be something used for support, like the composite beam shown in Figure 2-21, or it could be something more visible, like the ladder on a fire truck.
You can make composite beams (see Figure 2-21) from a mixture of bricks and plates or just several layers of bricks. You can build them very long, yet they still remain strong.
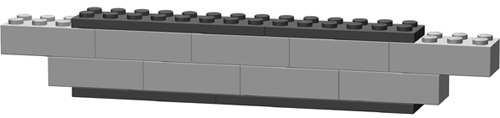
Notice (in Figure 2-21) that overlapping plates (with each other or with full-height bricks) is just as critical as it is when you are building with bricks alone.
Given how important they are, building strong beams is obviously a big concern. Let me first show you how not to do it.
Set up a few bricks to resemble Figure 2-22.

To conduct this experiment, simply push down with your finger on the brick shown in Figure 2-22. You’ll find that with very little effort, the bricks you set up between the two columns quickly break apart and fall down. You have just seen a structure fail, which is typically something that you’d rather avoid in most of your models.
Now try setting up a similar set of bricks but in a slightly different pattern, as shown in Figure 2-23. Carefully note the positions of the bricks and where they overlap. Now when you push down from above, you should find it nearly impossible to cause the beam to fail. It should become quickly apparent why it is so important to overlap bricks.
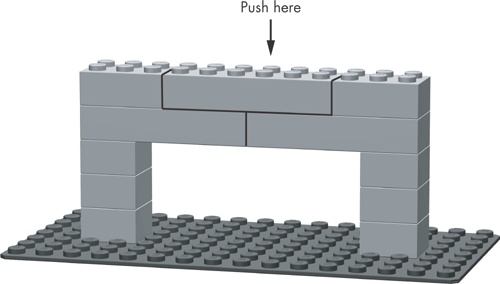
Figure 2-23. This example uses a simple overlap pattern to ensure the beam won’t buckle under pressure.
You could use the beam in Figure 2-23 to connect the outer walls of a large building or you might even find it over top of the large opening on the front of a LEGO aircraft hangar.
Columns are the other half of what you use to brace larger or unstable models. Typically you’ll use one or more columns to support beams that connect to the sides of your model. Columns can take many different forms, as seen in Figures Figure 2-24 through Figure 2-27.
In Figure 2-24 you see nothing more than 2x2 bricks stacked on top of each other. A simple column like this one might suit some of your projects quite well. It’s important that you never make anything more complicated than it needs to be. Just be sure the post doesn’t get too high, because this type of column lacks the strength of the other examples.
In addition to the 2x2 bricks in Figure 2-24, it is also possible to make a simple post from 2x3’s, 2x4’s, or just about any other sized brick.
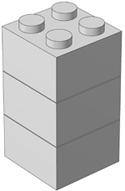

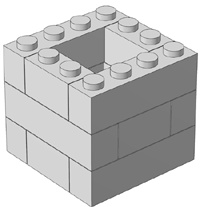
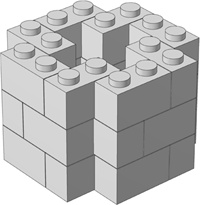
Figure 2-25 is a much more sturdy column, though one that obviously consumes more bricks. Unlike the 2x2 version, this 2x4 column can withstand a certain amount of pressure from any side without crumbling. It’s also about as simple to build as anything you could ask for. This is an excellent choice when you are creating a number of columns quickly (perhaps even to use as temporary support).
The column shown in Figure 2-26 is about as strong as the one in Figure 2-25, but it offers some weight (and brick) savings over the previous example. Because the core of this column is hollow, you get much of the horizontal stability of the 2x4 version but at only 75 percent of its weight. This may be important if you are building a model that you want to transport.
One drawback to this column is that you must check it regularly to ensure that its core remains square. Do so by making a 2x2 column of six or more pieces and, as you build, inserting it into the core from time to time.
What do you do with all those leftover 1x2’s? Make them into a column. The column shown in Figure 2-27 can be varied in both size and shape. The specific arrangement shown here is just one possible pattern based on the principle of creating composite walls out of mostly smaller (1x3 or less) bricks. You can change the pattern slightly and the column can grow in diameter based on your model’s needs.
Like the chimney pattern, you must use some arrangement of bricks (built into the shape of the core) to constantly align the keyhole column. Because of its many components, this column has a particularly strong tendency to warp and twist as it rises. However, if you can keep it reasonably straight, it is not only a very functional substructure, but an attractive one as well.
An interesting new pattern comes about when you mix the regular compound post column with the chimney pattern, as shown in Figure 2-28.
By using this hybrid column, you immediately resolve one of the major problems with the hollow-core version: by adding a layer or two of 2x4 bricks (as shown in Figure 2-29) every few layers, you help keep the 1x2 and 1x4 bricks aligned.
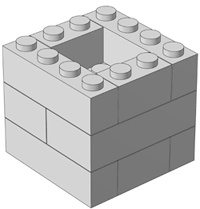
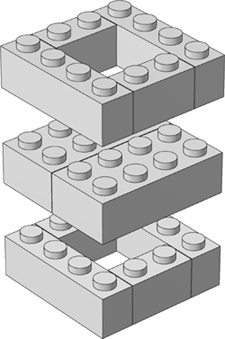
Figure 2-29. An “exploded” view of the hybrid column design showing the orientation of the different layers.
Given the actual inventories of bricks that most builders have, this version may be more realistic to build. It’s unlikely that you will build a large-scale model entirely of 2x4 bricks or entirely of 1x2 and 1x4 bricks. In most situations, you are much more likely to mix and match all sizes of bricks as you need them. Therefore, when it comes to having bricks left over for your columns (bricks that you don’t need in the main model) you will probably have a good mix of the three sizes.
Remember that your models may not always be so large that they need internal bracing. But don’t discard some of the construction patterns you’ve learned while looking at columns and beams. In Chapter 3, you will see just how useful a simple post–style column can be when you go to create a small building. And you can use beams, apart from linking columns together, to support floors within a building or give you something solid onto which you can add a roof. Keeping the different patterns in mind gives you the essential tools you need to be a successful LEGO builder.