
The word “fun” is often associated with the LEGO hobby. To take the fun even further, you can combine your LEGO elements with games you already know (by re-creating them in LEGO pieces) or you can create games that are completely original.
A number of traditional games are played on a checkerboard-styled playing surface. This board typically has 8 squares along each side, for a total of 64 squares.
Interestingly, the LEGO company makes a waffle-type baseplate that is 32 studs along each side. When you divide 32 by 8, you’ll quickly realize that this large LEGO baseplate can be broken up into squares that are four studs long on each side.
As you can see in Figure 11-7, it only takes a few 2x2 tiles to make up each square on the game board.
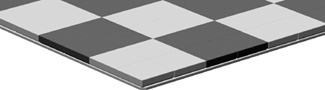
If you don’t have quite as many tiles as you need to completely cover a 32x32 baseplate, you can use two different colors of standard plates. It won’t look as smooth, but it should be just as useful for playing games.
Once you’ve made a board like this, you can use it to play games like checkers or chess. As you can imagine, to play a game of checkers on a LEGO game board, all you really need are simple playing pieces. In fact, they can be as simple as 2x2 bricks in two different colors.
To enjoy a game of chess, however, you might consider creating your own custom set of chessmen. You’ve probably seen different chess sets, some with traditional style pieces and others that have pieces that reflect a theme of some sort. Using LEGO elements, it’s possible to create whatever style chess pieces you prefer. Figure 11-8 shows a simple traditional pawn. It uses mostly common parts, so building eight of them shouldn’t tax your collection too much.
And whereas the rook, shown on the right in Figure 11-9, is fairly traditional, it also is a good start to a medieval-themed set of chess pieces. The bishop shown on the left in Figure 11-9 is fairly plain, but it does have the pointed top that is commonly associated with this piece. These are just some examples to get you started. Creating your own themed chess set can be a fun exercise.


In Chapter 10, you tackled the challenge of designing your own LEGO set. For another interesting activity, you might try using LEGO pieces to create your own original game, complete with rules on how to play.
As an example, I’m going to present a game that I originally designed to be played on wooden tiles using glass bead markers. The game is called Connect-Across, and the basic rules follow momentarily. As you’ll see, it works just as well when you make it from LEGO pieces.
To get ready to play, you simply need to make 30 tiles or squares similar to those in Figure 11-10.

Figure 11-10. These are two examples of how you can create the tiles. Pick either style or work on one of your own. You’ll need 30 identical tiles to play the game.
It’s not important which style you use, so long as all the tiles are the same size. Additionally, they don’t all need to be the same color; they can be any combination of bricks and/or plates that you have in your collection.
You also need two sets of playing pieces. Each set should consist of 15 identical markers, for a total of 30. You can pick from one of the styles shown in Figure 11-11 or come up with something similar on your own. The only thing to keep in mind is that the two sets of pieces should look different from each other.

For example, for the first set, you could use 15 upside-down wheels (with or without the rubber tires) like the one shown on the far left of Figure 11-11. Then, for the second set of pieces, you could make 15 copies of the marker shown on the far right of Figure 11-11.
Once you’ve built the pieces you need ( just described), you’re ready to play your first game. Here are the complete instructions to get you started.
Connect-Across is a game that combines the basic goal of tic-tac-toe with the light strategy involved in checkers. You and your opponent build the board together as the game progresses, while at the same time, you try to get four of your own pieces aligned in a row.
Decide who is going to use which set of markers. You may wish to build one set using light-colored elements and the other using darker elements. Have each player set his or her 15 markers near them on the table.
Set aside four of the square tiles.
Give each player about one-half of the remaining tiles. The tiles are all the same, and it doesn’t really matter which ones you get or if you get exactly half of them.
Decide who is going to go first. You can do this with the flip of a coin or by any other means.
The player who is selected to go second actually completes the setup part of the game. They do this by taking the four tiles set aside earlier and arranging them in the center of the table (see Figure 11-12 for an example). These tiles may be set out in any pattern, as long as each tile is touching the side or corner of one of the others. In other words, you can’t have any tiles floating free, away from the remainder of the group.
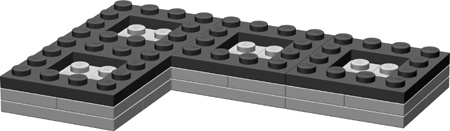
Figure 11-12. Here is only one example of an opening pattern. The tiles can be in any arrangement, as long as they are all touching.
You may wish to use one of the large 48x48 waffled baseplates on which to set your tiles. This keeps them from shifting around too much. However, it’s not at all necessary—the game should play just as well on any level surface.
It’s important to understand that there are really only three basic rules for playing Connect-Across. These rules dictate what you can do any time that it is your turn. During your turn, you can make any one of the three following moves:
Place one of your markers on any open tile that is already part of the board.
Place a new tile on the table, making sure that it touches the side or corner of another tile that is already part of the board.
Move one of your markers that is already on the board. This movement can be a single space, to an adjacent and empty tile, or, it can be a capture jump just like in checkers. In this case, your piece leaps from its current position on the board, over an opponent’s piece, and lands on an empty square. The piece you jump over is removed from the board and returned to its owner.
And that’s it.
To begin a game, the person who won the coin toss has a choice of either of the first two rules. (There are no markers on the board yet, so rule 3 is unavailable at first.) The first player may either place one of their markers on any one of the four empty squares, or they may instead choose to place a tile on the table, thus increasing the size of the game board. Remember, the tile can be placed anywhere, as long as it touches an existing tile on either an edge or at a corner.
Figure 11-13 shows one example of an opening move. In this case, the player using the light colored markers has placed one of their pieces on the board. They could have chosen to set down another tile instead.
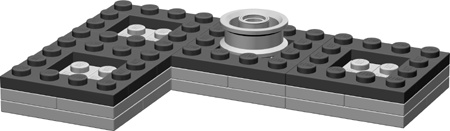
Figure 11-13. The upside-down wheel makes an effective yet simple marker, and it fits perfectly in the center of a tile.
The game then shifts to the other player. Again, they may choose from either rule 1 or rule 2 initially. They can place a marker or place a tile.
Players continue to take turns making moves in a similar fashion. Of course, once either player has placed at least one piece on the board, they may decide to use rule 3 on any of their subsequent turns. Remember that you can pick any of the three moves you want, but you can only make one move during each turn.
What you will notice is that the board soon begins to grow in a rather organic fashion, with rows and columns branching out in many directions. You’ll likely find that no two games are ever played on the same shaped board. Figure 11-14 shows a game in progress. You can see that the player using the light-colored markers has a good chance of making four-in-a-row diagonally through the middle.

Players continue to add tiles or markers and make single or capture moves until one player is able to get four of their own markers lined up in a row. The row may be vertical, horizontal, or diagonal along four adjacent tiles with touching corners. You can see an example in Figure 11-15. The player using the light-colored markers has created a diagonal row. Follow the wheels from the bottom center of the picture toward the top. The first player to accomplish this wins the game.

Creating your own original game is one part inspiration and 99 parts play testing. A lot of ideas sound good on paper and may even look good if you create the board and playing pieces for them. But many games end up being too complicated, too confusing, or just plain boring. Play testing involves actually sitting down with other players and observing your game in action. It helps you find areas that need improvement and allows you to adjust the rules to make the game more fun.
When you’re thinking about making your own game, try to think about the following:
What is the main point of this game?
How can I use LEGO pieces to help bring this game to life?
What makes this game different every time it is played?
Will the game have a theme or will it use abstract pieces like checkers?
What makes it challenging?
How can I keep the rules simple but at the same time create interesting twists?
If you can come up with good answers to some of these questions, you are well on your way to designing a fun and exciting game. The next step is too build a prototype of the game. This is essentially a copy of the game you can try out by play testing. Find a friend who enjoys games and get them to walk through the game a few times with you. It won’t take long to find the parts that don’t work well and to recognize areas that you can tweak to make things more lively. The LEGO system is perfectly suited to building game prototypes; after all, building things is what it does best.