In Appendix B of this book, you will find information regarding model Design Grids. Take a moment now to visit the website for this book (www.apotome.com/grids.html) and print out at least one copy of Design Grid #1.
You’ll find that this grid looks very similar to traditional graph paper, except that each square is exactly the size of a standard 1x1 LEGO element as seen from above, looking down on the stud. To plot the location of different colored bricks, simply shade in the squares, much like I did when planning the Empire State Building model in Chapter 6.
For the examples in this chapter, I’ll be using only the colors gray, black, and white. For your own models you can, of course, use any colors at your disposal.
As a simple way to get started with mosaics, you might want to try a geometric pattern. Like the tiles above a kitchen sink, this technique involves repeating one or more designs to create a pleasing image.
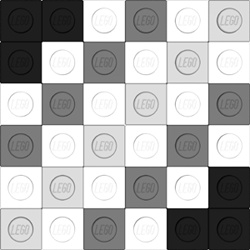
The Design Grids can be used to plan this type of mosaic or you can just build one freehand, developing the pattern as you go. You may wish to try a repeating pattern at first. Outline a small set of squares (perhaps 6x6, 8x8, or 10x10) such as those shown in Figure 8-4. Then use this small area to create a patterned tile.
Figure 8-4. Planning a mosaic tile doesn’t need to be complicated. This rough sketch took only a couple of minutes, but it gave me a good idea of what the final product would look like.
The next step is to use your sketch as a pattern to create the actual mosaic out of LEGO pieces. As noted earlier, you can use a 32x32 stud baseplate if you have one, or you can even use smaller waffleplates and simply join them together.
In both Figures Figure 8-5 and Figure 8-6, you can see there’s really nothing complicated about actually building the mosaic. It’s simply a matter of attaching your 1x1 elements to a baseplate.
Figure 8-5. If you have enough 1x1 plates, you can make a very thin mosaic. If not, you can always use 1x1 bricks instead.
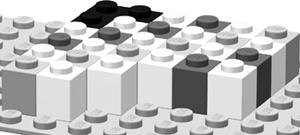
The mosaic in Figure 8-5 was made using 1x1 standard plates. Compare that to Figure 8-6, which was made using 1x1 standard bricks instead. From this point forward, I will refer to 1x1 bricks when discussing this technique, since they are much more common and inexpensive than 1x1 plates.
Figure 8-6. 1x1 bricks work just as well as plates when you are creating a studs-out mosaic. Your art is a bit thicker, but in the end, it looks just the same when viewed from the front.
When you’re done setting down the elements onto the baseplate, your first tile might look something like the pattern shown in Figure 8-7. This isn’t a complete work of art (yet!) but rather one of many sections that can work with others to form a final presentation.
Figure 8-7. A small grouping of 1x1 pieces gives you a tile that you can then repeat to make even more complex patterns.
Compare the sketch in Figure 8-4 to Figure 8-7, and you’ll see that I’ve replaced the different shaded squares with various colors of LEGO pieces; I’ve worked with black, white, and two different shades of gray. Of course, when you’re creating your own mosaics, you can use any of the brighter colors you have in your collection of elements.
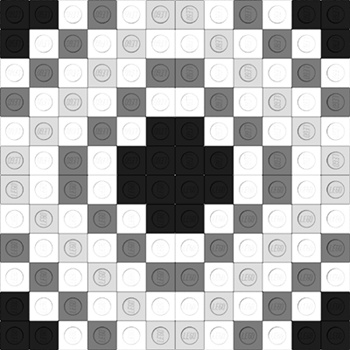
Remember earlier I mentioned using repeating patterns (like tiles above a kitchen sink) to create larger mosaics? Take a look at Figure 8-8, and you’ll see what happens when I repeat the 6x6 pattern I just created.
Figure 8-8. Four tiles grouped together to make a larger mosaic. This pattern can then be repeated to make even bigger images.
Figure 8-8 is a mosaic made up of four copies of my 6x6 tile from Figure 8-7. Notice that I’ve rotated a couple of the tiles to make the black corners meet in the middle. This helps create a more pleasing pattern and also one that can be repeated as many times as you like. I can in turn create four more copies of the 6x6 pattern and place them next to the first four (see Figure 8-9).
In Figure 8-9, you can see that the pattern continues to match and repeat. This could become the ballroom floor for a minifig-scale hotel. Or, as noted earlier, you can simply repeat it until it fills a large waffleplate and becomes a pleasing image of nothing but patterns. Try designing your own tile pattern. Then see what it looks like when you put multiple copies side by side.
If you want to try something a bit more complicated, you can tackle a photo mosaic. These, as the name suggests, are LEGO pieces arranged to look as much like an actual photograph as possible. There are a couple of interesting ways to create this type of mosaic. The first, print and trace, is a fairly low-tech approach that also gives you a bit of room to add your own artistic flair to the project. The second, converting to pixels using a computer, is a more sophisticated approach, but it can still result in natural and interesting results.
To make this technique work, you’ll need two things.
A decent picture of what you want to turn into a mosaic. If it’s a digital picture, make sure it’s loaded into your computer. If it’s an actual printed photograph, first scan it in so that you can manipulate it digitally. You’ll also need to print the picture you’ve decided upon, but before you do that, there are two more things you’ll want to do first.
Crop the image so that the picture is more or less square on all sides.
Resize the image so that the length and width are as close to 6 1/2 inches (162 millimeters) as you can get. This assumes you are attempting to make a 32x32 stud mosaic.
A copy of Design Grid #2 (see Appendix B). Preferably, this should be printed on paper that is not too thick or opaque.
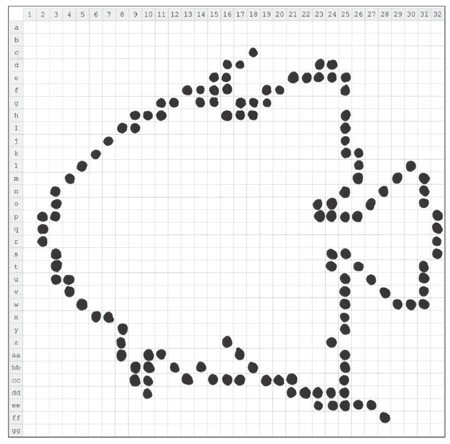
To create the pattern for your mosaic, just place your printed image under the copy of the Design Grid that you printed out. You may wish to staple or paperclip the two sheets together so that they don’t slide apart. Now simply shade in the squares on the Design Grid to match the light and dark patterns you see through the grid. In Figure 8-10, you can see that I’ve applied this technique to an image of a fish that I found on the Internet.
Although the studs-out technique tends to be a bit blocky looking, it does work reasonably well for subjects with strong shapes, outlines, or patterns. When selecting a picture to use, try to make sure that the important part of the image fills as much of the space as possible. In other words, a close-up of a friend’s face will work better than a picture of a car driving on a bridge far off in the distance.
Figure 8-10. An angelfish begins to emerge from the design grid. Preplanning gives you some sense of what the final mosaic will look like.
In Figure 8-10, you can see that the illustration of the fish I used mostly fills the 32x32 grid. That gives me as much space as possible to use when defining the outline of the object in the image. Keep in mind that with a studs-out mosaic, you are not going to end up with smooth, flowing lines. For certain, your mosaic image will end up being a bit rough. The challenge then is to see just how natural you can make your design despite the handicap of doing it all with square pieces.
Note
You may notice the numbers along the top side of the Design Grid and the letters along the left side. Refer to Appendix B for more information about these markings.
In Figure 8-11, I’ve begun to add some of the details within the outline of the fish. I’ve used different shades of pencil and even different ways of shading the squares to suggest differences in color.
Figure 8-11. A close-up of just the face and mouth of the angelfish. Coloring within the lines is optional.
You may wish to use the legend printed at the bottom of the Design Grid to remind yourself which symbol represents which color. As you can see in Figure 8-12, it’s easy to put it to use. Simply draw a symbol (or shading pattern) in a box and then write the name of the color next to the symbol it represents.
Figure 8-12. It takes only a minute to jot down the legend to go along with your design. This helps make the actual building process of your mosaic much more enjoyable.
It’s worth pointing out that it really doesn’t matter how neat your design looks on paper. By that, I mean don’t worry if you don’t shade in each of the boxes with computer-like precision. The Design Grid version is just a rough sketch of what your final LEGO mosaic will look like. The only important thing is that you can tell what color you intended to go in each square. No one will see the paper version, so be as messy as you like.
Note
It can sometimes be a challenge to see through the Design Grid to know which boxes to shade. If you’re having trouble, try holding the original image up to a window; then place the Design Grid on top of it. The light shining through should help you see where you want to sketch in your mosaic. Need a similar trick you can use when the sun’s not shining? Try finding a translucent plastic storage container—like the one in which you might store LEGO bricks—and turn it upside down. Then, as before, put the original image, with the Design Grid on top. There should be enough light filtering up from below to help you see what the original image looks like.
Finally, in Figure 8-13 you can see how my angelfish design turned out. Although it’s far from photorealistic, it’s a reasonable representation of my subject matter.
Figure 8-13. Although a bit rough around the edges, the blueprint for my fish mosaic still gives me a good starting point.
As you translate your paper design into actual LEGO elements, be sure to make changes as needed. The pattern you’ve drawn on the Design Grid should provide you with an excellent starting point, but you don’t need to follow it exactly. Sometimes seeing the actual pieces on the baseplate will trigger the desire to make changes; make as many as you feel you need to until the picture feels right.
If you’re having trouble seeing what the mosaic looks like before it’s complete, try one of two things:
Set your semifinished work on edge and step away from it. Most mosaics are best viewed from at least a short distance away. It will help some of the lines and rough edges blur together and form a smoother image.
Squint your eyes just a bit. This reproduces that blurring effect without requiring you to get up and walk away from your build area. Don’t spend hours with your eyes this way, but a few seconds now and then should help you to see how the work is progressing.
The second (more high-tech) approach to creating the blueprint for your mosaic is to use computer software to apply a mosaic effect directly to your digital image. I’ve created an example using a picture of one of my own cats. In this case, the original image of Izzy was taken when she was just a kitten.
Figure 8-14 shows both the original unaltered image and the version that has had a mosaic effect applied to it.
Figure 8-14. The real Izzy meets the digital Izzy. A side-by-side comparison of an actual photo and what it looks like after applying a mosaic filter.
As you can see, the original image on the left fills as much of the square as possible, just as I suggested earlier in this chapter. You can also see the same image on the right but with a bit of computer processing added. I used a program called Paint Shop Pro to add something called a mosaic filter. This special effect, appropriately enough, turns an ordinary image into a series of square blocks of color—in this case black, white, and grays.
To get the exact level of filtering that I wanted, I played around with the size of the blocks that the program uses to create the effect. When I was done, the image on the right had exactly 32 squares across and down—just like the LEGO waffleplate I’ve mentioned previously. You may be able to achieve similar results using a program that you have on your own computer. The filter itself may not necessarily be called mosaic, but look through the effects menus in your image-processing programs until you find something similar.
Once you’ve doctored the original image, the only thing left to do is to print out the mosaic version. This then becomes the blueprint for your building process. You can simply use it like a map; it will show you which squares should be which colors. Of course by using a color image and a color printer, you can create a more exciting mosaic that puts to use LEGO elements of all the colors of the rainbow.
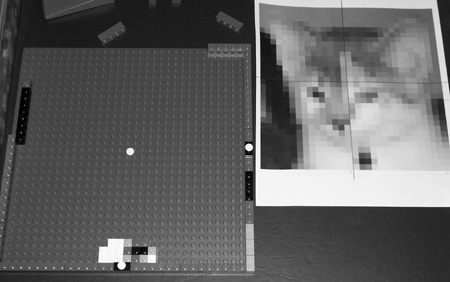
Figure 8-15 shows the Izzy mosaic on my build table at the beginning of construction.
Because the digitized image doesn’t have the row and column labels that you find on Design Grid #2, you have to do something else to keep track of where you are on the baseplate versus the printout. One way to do that is simply to cut your image into quarters. You can see in Figure 8-16 that I’ve drawn a line vertically through the center of the image and another horizontally.
Figure 8-15. Everything you need to build a mosaic. Be sure you have lots of small elements like 1x1’s and 1x2’s handy.
Use each quarter on the printout to represent each quarter on the actual LEGO baseplate. In other words, if there is a light gray square in the very bottom left corner of the quartered section on the image, then make sure the bottom left corner of the baseplate gets a light gray element. Then look to see what color goes next to that piece and build up the mosaic accordingly.
Figure 8-16. The white 1x1 cylinder plate in the center of the baseplate represents the point on the photo printout at which the four quarter sections meet.
You may want to break your mosaic plan down into even smaller sections. You might try dividing each of the four sections into four more, for a total of sixteen. That way you aren’t trying to re-create the entire mosaic at once, but instead, you are working on small, manageable areas.
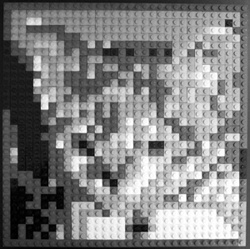
The result, when all the bricks are affixed to the baseplate, is a real life mosaic that looks more or less like the plan I started out with. And, as you can see in Figure 8-17, it looks pretty much like my original subject as well.
Figure 8-17. Izzy the kitten becomes Izzy the LEGO mosaic. Remember to step back a few feet and let your eyes see the bricks as one image and not as individual elements.
If your actual brick version of the mosaic doesn’t look as you intended it, don’t give up. Try setting it upright and stepping back. Look at the entire image and try to see what parts of it don’t seem to be sitting right with you. Then, go back and replace a few bricks at a time until the problem areas disappear.


