
No matter how old you are, when you sit down in front of a pile of LEGO bricks, one thing never changes: you want to snap a few bricks together. Why this happens is not a mystery. LEGO bricks, like grains of sand on a beach, are meant to be together.
But what are the best ways to join bricks? That depends, of course, on what you’re building. Official LEGO literature goes to great lengths to point out the many possible ways to connect your bricks. For example, they suggest that if you take six 2x4 bricks, you can arrange them in 102,981,500 different patterns. (Someone at LEGO has a very good understanding of geometry and mathematics or just way too much time on their hands.) Figure 2-1 demonstrates just three of the millions of possible combinations. I’d need an enormous number of pages to show pictures of every pattern.
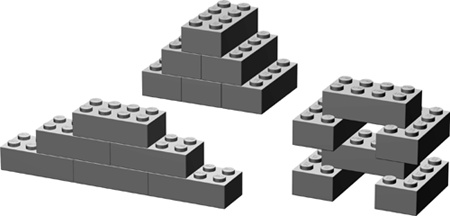
Perhaps more important than the number of ways in which you can fasten bricks together are the principles behind how they should be put together.
For example, consider any two 2x4 bricks. You can connect them in three basic ways, as illustrated in Figures Figure 2-2 through Figure 2-4. You can stack them, overlap them, or stagger them.
Is it best to put them together like this?

Like this?
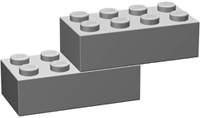
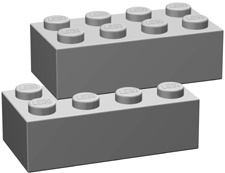
Each of the diagrams in Figures Figure 2-2 through Figure 2-4 represents a different type of bonding, or joining of LEGO bricks. Bonding patterns are the ways in which bricks are arranged or connected. Let’s look at each of these patterns individually to get a sense of how they can be most useful.
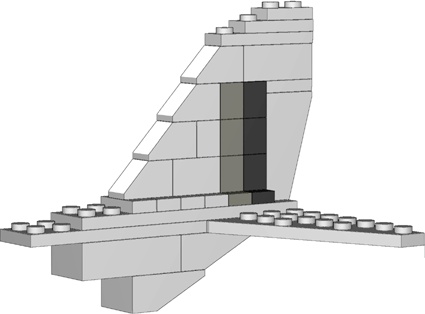
Although not the most common way to build, and usually not the sturdiest, at times, stacking bricks one on top of the other is necessary. For instance, a small shop in your LEGO town might have vertical stripes of color that you wish to appear painted on the sides of the building. Or perhaps an airplane needs to have a colorful pattern of lines on its tail section.
Typically your decision to use vertically stacked bricks is driven by aesthetic rather than structural needs. The reason for this is simple: as you can see in Figure 2-5, stacks of bricks, unsupported by surrounding pieces or layers, are generally not very strong.
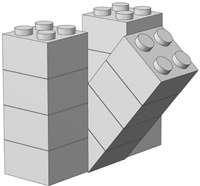
Figure 2-5. Crash! With nothing to support it, the center column of bricks is prone to falling over when you least expect it.
When you do need to stack bricks, make sure that you secure the stacks—both above and below—with longer bricks or plates. For example, as you can see in Figure 2-6, stacked 1x1 bricks create the vertical stripes on the tail section of a plane. The vertical part of the tail sits on several offset plates, but below that, the stripes are held together by a 2x8 plate. Near the top, the stacked bricks are locked together by the 1x4 plate you can see just above the highest slope piece.
No building technique adds as much to your models as overlapping does. As with real brick walls, LEGO bricks work best together when they sit on top of each other in overlapping patterns. These overlapping connections strengthen the structure and prevent it from collapsing. (Depending on the size of brick you are using, this overlap may be one-half of the brick below, or as little as a small part of the lower brick.) Figure 2-7 illustrates just a handful of different overlap patterns. The ones you use depend on the bricks you have available and the model you are building.
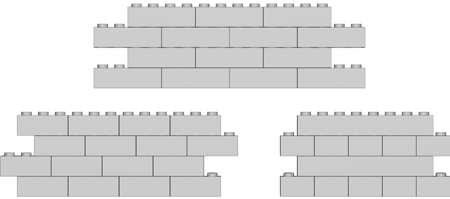
Overlapping bricks gives your models strength and allows you to fully exploit one of the primary features of the LEGO system: the interlocking feature of elements. Models containing standard bricks and plates almost always utilize one or more overlap patterns. Later in this chapter, I’ll show you how to build walls and connect them together. Those tasks both make significant use of the overlap pattern.
Don’t forget that other elements need to be overlapped as well. Pieces like doors and windows should be secured using this technique to make sure they are solidly built into a wall. In Figure 2-8, you can see this principle in action.
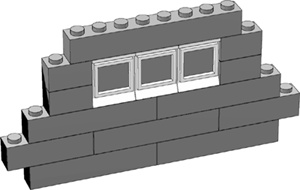
Figure 2-8. A well-placed brick can make the difference between a solid wall and one that will eventually fall apart.
It’s clear in Figure 2-8 just how important overlapping is. You can see that the 1x8 brick at the top of the wall overlaps not only the windows, but also the bricks to either side of them. This helps create a solid structure.
The simplest way to achieve good overlapping is to simply remember that you want to avoid too many bricks stacked on top of each other, which creates vertical seams. You can see what I mean in Figure 2-9.

Figure 2-9. A poorly designed wall (on the left) is shown with a properly designed wall (on the right).
The wall on the left in Figure 2-9 was created using the stacking technique you saw earlier in the chapter. You can see how unstable the door would be if you tried to open it because the 1x4 brick on top of it isn’t attached to anything else. On the right, you can see the better way to create a wall with a door. Notice that the 1x8 brick over the door is also attached to bricks on either side, just as the windows are in Figure 2-8. This helps anchor the door to the wall and makes sure that they won’t come apart when you least expect it.
When you stagger bricks, you set one layer of bricks back from the front edge of an adjoining layer of bricks to produce a stair-step pattern.
Staggering is a particularly important technique when you’re building sculptures (covered in Chapter 7). It allows bricks that are typically square or rectangular to achieve more organic shapes when used in the right combinations. That isn’t its only use of course. Figure 2-10 shows a very common way to use the staggering technique.

In Figure 2-10, you see a small house or perhaps a vacation cottage. By staggering the bricks, you can create a roof out of nothing more than standard bricks. In other words, instead of using sloped bricks for the roof, you create one from ordinary elements; this is a popular technique in the LEGO building world. Figure 2-11 shows a portion of the roof in close-up so that you can see exactly why the staggering technique is so useful in situations like this.

In Figure 2-11, I alternated the colors of the layers in the close-up of the roof so it’s easier for you to see how I accomplished the staggering. Obviously 2xN-sized bricks work best for this technique. Notice that even though I stagger the bricks (to accomplish the slope of the roof), I still overlap them from layer to layer. This combination of two techniques results in a sturdier model.