
To give you a better idea of what Technic pieces look like, I’ve included illustrations of some of the most common elements from this category. A separate complete overview of the Technic subset appears in Appendix A (the Brickopedia). The pieces shown in this chapter give you an overview of the types of elements described as being Technic pieces.
Note
You may find that your own LEGO collection doesn’t include a large number of the parts described in the following pages. That might lead you to wonder, “Where can I get more Technic parts if I need them?” There is no one perfect answer, but here are a couple of suggestions. First, go to the official LEGO website (www.lego.com) and look for sets that carry the Technic label. Or, you can look on the website for this book (www.apotome.com/links.html) and find up-to-date links to current sets that also contain some Technic-style parts. Building up a stock of Technic parts can take time, but the added flexibility they bring to your models is worth the effort.
The images that follow show the range of sizes in which LEGO Technic pieces have been made. I’ve included images for many of the most common Technic elements, though many more exist that I’ve not recorded here. An explanation of the cataloging technique used for these entries is available at the beginning of Appendix A.
Technic bricks are very much like the standard 1xN bricks you first saw back in Chapter 1. The primary difference is that Technic bricks have holes running through them that allow you to connect them to gears or other bricks via pins or axles. You can see a Technic brick next to a standard brick in Figure 9-2.

Figure 9-2. A Technic 1x2 on the left compared to a standard 1x2 on the right. Note the hole running through the brick and the hollow studs. These help define the look of Technic brick elements.
Technic bricks, just like standard bricks, come in a variety of sizes from as small as 1x1 to as long as 1x16. A few samples are shown in Figure 9-3.

It’s interesting to note that most Technic bricks are designed with the holes centered between the studs on top. The most notable exceptions to that rule are the 1x1 and the 1x2 with two holes. You can see each of these pieces in Figure 9-4.

It’s easy to see the similarities between Technic bricks and beams. Both are long, thin elements with holes in the sides. There are, however, differences between them that make it worth differentiating between the two. Whereas bricks have traditional studs on top, beams do not.
Technic bricks come in only one width, whereas beams come in a square full-width variety and also a thinner half-width version. That means that while Technic bricks have the same geometry as standard 1xN bricks, full-width beams are a squarish shape when you view them from the end and half-width ones are significantly thinner. In Figure 9-5, you can see a brick sitting behind each of the two styles of beam.

Figure 9-5. A half-width beam sits in front of a full-width beam that in turn sits in front of a 1x4 Technic brick.
Beams began appearing in Technic sets in the late 1990s. They opened the door to models that used studless building techniques. This is a general term applied to any combination of parts that are held together in ways other than the traditional stud/tube connection. In the case of Technic beams, this usually means that they are attached to one another using pins or axles. I’ll talk more about those pins in a minute, but for now you can see a simple example of studless construction in Figure 9-6.

Figure 9-6. You could use a technique like this to produce part of a bridge or maybe the boom on a large crane.
The rounded look of studless construction adds a sense of realism, although some builders still prefer to work with the traditional studded Technic bricks instead of the newer beams.
In many ways, LEGO Technic gears are identical to gears you find in everyday objects such as bicycles, cars, or even old-fashioned grandfather clocks. The only real difference, of course, is that LEGO gears can be attached to and used with other LEGO pieces. Figure 9-7 shows a small sample of some of the many sizes of LEGO gears that are available.

I’ll talk more about how gears work later in the chapter when I discuss assembly ideas.
Earlier I noted that Technic bricks have holes that run through them. Those holes were obviously created for a reason—namely, to enable you to connect the bricks to each other and to other pieces (using pins) and to also allow you to attach things like gears or wheels to the bricks (using axles and/or pins). To allow for such a variety of connections, pins and axles come in an equal number of configurations, some of which are shown in Figure 9-8.

Once you’ve inserted a Technic axle through the hole in another Technic element, you will most likely want to secure it with something. A bushing is a tight-fitting collar that slides onto an axle with enough friction to keep it from flying off when the axle spins. Although bushings don’t lock completely tight (like nuts and bolts) they do go a long way toward keeping your axles in place.
You can see a simple example, showing a bushing in use, later in the chapter when we look at the helicopter model. For now, take a look at the half-width and full-width bushings versions in Figure 9-9.

There may be situations that arise where you want to connect Technic axles for aesthetic and/or functional reasons. Coupler elements allow you to join axles together at a variety of angles. They may have an opening that holds an axle firmly (like the opening facing front on the leftmost part in Figure 9-10), or they may have openings like Technic bricks that allow axles or pins to spin (like the opening on the bottom of the rightmost part in Figure 9-10).

I mentioned features on most couplers that allow axles and/or pins to rotate or, by contrast, for axles to be held tightly and prevented from spinning. Figure 9-11 demonstrates the basic difference in these two attributes.
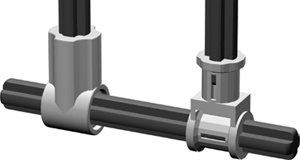
Figure 9-11. Rotating versus nonrotating openings in Technic couplers. The part on the left allows the axle to spin if needed, while the piece on the right keeps it from doing any spinning at all.
As noted in the part descriptions earlier, many pieces have one or both of these features. That is, some have an opening that allows an axle to rotate easily while that same piece may or may not also have an opening that fits an axle exactly and does not allow rotation. Finding the right coupler for the right task is always an interesting challenge when you are building with Technic parts.