In both Chapters Chapter 3 and Chapter 5 we looked at things that had very straight sides and were primarily constructed using the overlap technique. Sculpting, on the other hand, relies more on the stagger technique you have been using so far in this chapter. The example you built to learn about sculpting was a simple sphere. But there are only so many times you would ever need to build something so plain. More likely, you’ll want to sculpt an animal, a statue, a cartoon character, or perhaps some extraterrestrial being born in your imagination.
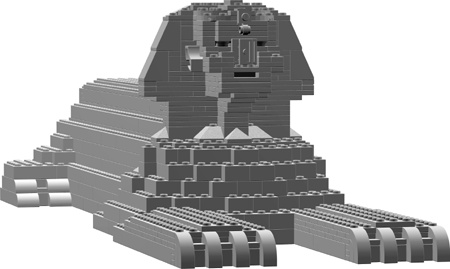
For this section, I tried to find a subject that would be familiar and yet still offer interesting ways in which to build it as a LEGO brick sculpture. I chose the famous Great Sphinx of Giza. It has overlooked the sands of Egypt for thousands of years. The real Sphinx is itself a sculpture, so this model is then a sculpture of a sculpture. You can see the model I created in Figure 7-19.
As with the Empire State Building example from Chapter 6, the first thing I did was look on the Internet to find pictures of the Sphinx. Unlike what I did with that micro model, I did not use the design grids for planning the construction of the Sphinx. Rather, I went on the look and feel of the work as it progressed. Remember, there is no right way or wrong way to tackle a project like this. If you prefer to use the grids to help plot your design, that is perfectly acceptable.
Aside from the fact that it’s so well known, I picked the Sphinx for two other reasons. First, it is a relatively simple shape to attempt to copy in LEGO elements. By contrast, a sculpture of a knight riding a horse would have presented much greater challenges due to the larger number of shapes, curves, and angles required.
Second, it is essentially just one color and therefore allowed me to concentrate on shape alone, rather than having to also select proper colors as I went. What color should the Sphinx be, though? To make it look very accurate, I modeled it in tan colored bricks. If you want to build your own but don’t have enough of those elements, you might want to think of an alternate color such as white or yellow. Although not as realistic as tan, these colors would be less cartoonish than if you build it out of red or blue.
In Chapter 6, I talked about finding a unique feature on the object you are using for inspiration. In the case of the Sphinx, most people recognize the human-like head with a Pharaoh’s headdress. This is the starting point I selected. If you were building the model on your own, you might decide you’d rather build the body of the statue first (a form based on a lion at rest) and work your way up.
Note
For complete instructions to build the Sphinx model, visit www.apotome.com/instructions.html.
For the example in this book, I built the head until it looked right and then created a body to match. I made this decision because I was more concerned about capturing the look of the head than I was about getting the body exactly correct. After all, if people don’t recognize the head, then the rest of the sculpture may not matter anyway.
In an attempt to copy the head of the statue, I first looked at the angles that make up the headdress. It is the headdress that helps define the shape of this part of the Sphinx, and getting it to look realistic was important to the success of my sculpture.
The sides of the headdress slope at an angle of around 55 degrees. That’s a little less than a 65-degree standard LEGO slope, but it’s pretty close. (For more about this slope piece, refer to Appendix A, the Brickopedia.) After I selected these pieces to start with, I began building the head.
You can see the Sphinx’s head starting to take shape in Figure 7-20. As the sides of the head began to rise, I also wanted to build outward to capture the face. Remember, a sculpture needs to look right in all three directions: length, width, and height. I couldn’t just build a flat face because the sculpture also needs to appear accurate when viewed from the front or the side.
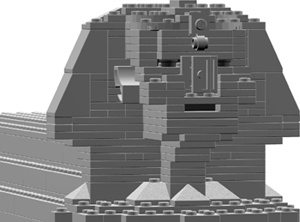
In Figure 7-21, I’ve shown the head rotated 90 degrees so that you can see the face coming to life. Does it have to be perfect? No, not at all. This was a relatively small model, so trying to duplicate every last detail would have been very difficult. It is important, however, to capture the overall appearance of the object and let the mind of the viewer fill in the remaining details.
The actual Sphinx has several unique features that I wanted to capture. Each presented its own challenges with regard to parts selection and building techniques.
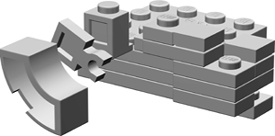
One of the features I did simulate was the missing nose on the real Sphinx. Notice in Figure 7-22 how I used plates with their undersides facing outward to give the impression of uneven stone where the nose was once attached.
Figure 7-22. Note the unique ways each piece connects to the others. The three pieces on the right join together to become the nose, as you can see on the left side of this illustration.
You can see in Figure 7-22 that I took advantage of the unique geometry of LEGO studs and tubes. The offset plate (to the far right of Figure 7-22) fits perfectly into the tube of the 2x2 plate next to it. The plate, in turn, fits snuggly into the open sides of the headlight bricks next to it.
The ears, like the nose, are another example of how you can turn LEGO elements in directions other than with their studs pointed upward.
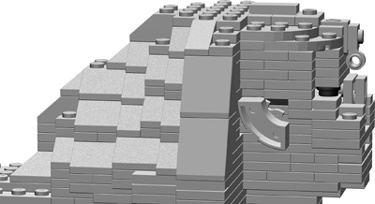
In Figure 7-23, you can see a 2x2 macaroni brick with its underside facing away from the side of the head. The more natural curved shape of this element helped add some character to the face of my Sphinx model.
The large paws, stretching out from the Sphinx, are mostly rectangular but do have some curved toes at the end.
To create these more natural shapes, I tucked a 1x2 half-arch piece under a 1x3x2 half-arch (Figure 7-24) to represent each toe. As you can see, the smaller of the two parts nests perfectly under the larger half-arch, creating a less blocky appearance.
In Figure 7-25, I’ve turned the head yet again so that you can see the back of the Sphinx’s headdress.
Figure 7-25. The back of the headdress was an exercise in sculpting with slopes. I didn’t follow any hard-and-fast rule. I just kept adding and removing slopes, changing the type of slope I was using, and generally just working at it until I had the natural look I wanted.
When you actually sit down to build any sculpture from real bricks, you will also find yourself turning it to various angles to make sure it looks right from every direction. In the case of my Sphinx, standard slope elements, in several different variations, proved immensely useful for sculpting the back of the headdress.
Figure 7-25 shows the headdress blending into the body. It’s important to point out that I didn’t get the look I wanted on the first attempt. You probably won’t either when working on your own sculptures. Don’t be afraid to take parts off the model, move them around, or swap in new parts until you have sculpted the shape you want.
There are certainly many times when you will want to start at the bottom of a model and work your way up. For example, you’d probably apply this approach to most buildings. In such cases, you will find it much easier to build successfully if you build a solid foundation and work your way up, building the walls next and finally the roof.
In the case of my Sphinx model, I chose to go the opposite route, but for a reason. I built the head first to make sure my replica looked the part—that it looked like the head of the Sphinx. Then I built a body to match the head.
Once the head was completed, it was easiest to work on the shoulders next, then the back, and finally the legs. When building downward from the neck, it was easier to make the body match the scale at which I built the head. Since I wasn’t overly concerned with making a perfect representation—I settled for reduced detail at this small size—it wasn’t critical that I work out the exact scale like we did for the train station back in Chapter 3. Instead, this was more an exercise in eyeballing the model to make sure it has the look I was after.
The shoulders and neck of the Sphinx are primarily a combination of standard bricks, plates, and slopes too. Never overlook the inherent flexibility of these basic pieces; this is one reason that they have long been the heart of the LEGO building system.
As I continued to build the lower body and legs (see Figure 7-26), I also continued to go back to the pictures of the Sphinx I found on the Internet. Images of real life objects, buildings, vehicles, and so on can be enormously beneficial when you’re building LEGO models. If you are ever able to see, in person, the thing it is you wish to build, then be sure to take some photographs while you are there. Capture the subject in a wide shot, to get its overall size and shape, but also be sure to get close-ups of details and features that you want to replicate. This research technique is used by Master Builders who work for the LEGO company. Why not use it to make your work more realistic and natural?
The completed Sphinx model is shown in Figure 7-26. Notice that I made a conscious decision to leave some areas of the model uneven; not every edge is perfectly square. This was an attempt to reproduce some of the wear and tear that time has taken on the actual Sphinx.


