
By this point, you might be saying to yourself, “I’d like to build a station like that, but I don’t have all those special pieces.” Don’t worry! You can replace certain specific pieces with other more common pieces. This is a design technique known as substitution. It has nothing to do with replacing French fries with mashed potatoes, but it has everything to do with making the best use of your existing LEGO pieces.
Although you might not be able to make an exact copy of this model with your own collection, you can come close by substituting pieces where needed.
Even if your collection comes mostly from assorted buckets, you should have enough basic bricks to make the walls the way they appear in the first model. You may not have exactly the right number of pieces in the same colors, though, so don’t be afraid to change colors. Gray, brown, or even white would all be reasonably realistic colors.
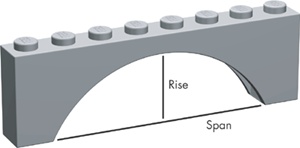
It’s often possible to build an arch from inverse slopes. To do this, you first need to determine the slope, or curvature, you are trying to imitate. To get the slope, you use a combination of the rise and the span.
Imagine the span as the length of an imaginary line that runs from the bottom inside edge of one side of the arch to the opposite side. Then, imagine the rise as the distance from this line to the center underside of the arch itself (also known as the soffit), as shown in Figure 3-24.
It’s easy to see that by increasing the span of your arch, you are stretching it out sideways, and therefore, you’re lowering the angle at which the curve of the arch extends across the other side. This can be a useful shape for things like bridge construction.
Similarly, you can visualize that if you increase the rise of the arch, the angle from the base of one side to the point at which the arch peaks will increase as well. High narrow arches are commonly found in doorways or as part of building facades.
Typically, when I am trying to replicate an arch with slopes, I use a photo or a sketch of the structure as a guide. I then hold up inverse slopes to the picture and try to match the angle of the arch with the angle of the bricks. You can see in Figure 3-25 that by choosing carefully and sometimes mixing different angles of slopes, you can make some handsome arches without using a single arch brick.

Figure 3-25. A standard 1x8x2 arch is shown superimposed over top of a composite arch made up of 1x2 and 1x3 inverse slopes. The result is nearly the same shape.
Additionally, you may wish to insert standard bricks or plates between the layers of the slopes to increase the rise of the arch without affecting its span.
Windows can sometimes prove frustrating, because they aren’t always as easy to come by as one would hope. By using some simple tricks, however, you can give your station its own characteristic windows. Figure 3-26 shows that by simulating a small arch (replacing a 1x4 arch element), I’ve created a look similar to the original train station model in Figure 3-4.
To replace the windows on the side and end of the station, try the trick shown in Figure 3-27. It’s not perfect, but it’s better than no windows at all.


Figure 3-27. Substitutions won’t look exactly like the pieces they’re replacing, but searching for combinations that work is half the fun.
In Figure 3-27, you can see that the thickness of a standard plate has again been put to good use. Here I use three 1x3 plates separated by two 1x1 cylinders. The result is a window that is three bricks high and that fits perfectly where I need it.
Finally, you might need another way to create a roof. What you may find when you search your collection is that you have sloped roof bricks, but they aren’t the black color shown in the first version of the model. If this is the case, you can easily substitute red or blue slopes for the black ones and still maintain the same style of roof. Or, you may find you just don’t have enough slope bricks of any color and need another way to make your roof.
In the next example, I use common 2xN bricks to create the illusion of a sloped, though somewhat jagged, roof. I do this by setting down a layer of bricks that mimics the length and width of the sloped roof. As with the original, I am sure to include internal bracing in the form of longer bricks that run from side to side. (These are not unlike the ceiling joists found in real buildings.)
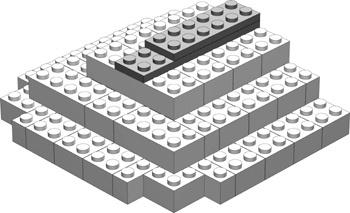
Next, I carefully add the second layer, making sure to overlap any point at which two lower-level bricks come together. By moving each layer inward by three studs, I come close to simulating the slope originally created by the 33-degree roof bricks. I am effectively combining the overlapping and staggering techniques in this process.
You can use this example (shown in Figures Figure 3-28 through Figure 3-33) to replace the steps shown in Figures Figure 3-13 through Figure 3-17.

Figure 3-28. These are the same plates you see in Step 8 of the main model (Figure 3-13). Begin building your substitute roof from that point forward.
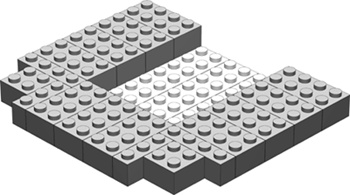


Figure 3-31. The second layer is staggered from the first. This provides the imitation slope for the roof.

You can create the larger part of the roof (the submodel) using this same technique.
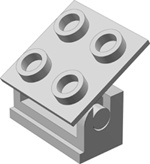
Another way to create simple sloped-roof structures is to attach ordinary plates (4xN, 6xN, and so on) to hinged elements and then angle them as you like. Figure 3-34 shows a simple example of this technique.
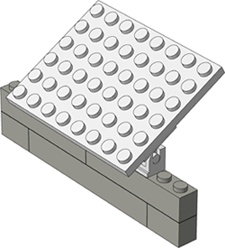
The brick hinge is a wonderfully useful element. It comes in two varieties. The version shown in Figure 3-35 has a 2x2 plate as the hinged portion. It is also available with a 1x2 plate on top.
Pieces like the brick hinge allow you to add varying angles to your models that wouldn’t be possible with just standard bricks and plates.
If you want to use the brick hinge and plate technique, it’s important to plan ahead and build the hinges into the top of the wall. The spaces between them are filled with two plates (shown in Figure 3-36) because a full-height brick would hit the underside of the roof plate.
