Before you start this section, again refer to Appendix B of this book. This time, look for Design Grids #3 and #4. Both of these grids present LEGO elements from the side, as you would see them if you were holding a standard plate element between your fingers, like in Figure 8-19.

Figure 8-19. The plate view grids approach design work as though you are looking at a model from the side of the elements.
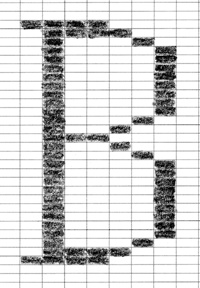
These plate view versions of the Design Grids take a different approach to planning LEGO models. For most models, they allow you to plan your work as seen from the side to help establish shapes and angles. When you use them to prepare a mosaic, they give you the ability to sketch out more subtle patterns than are typically possible with a studs-out approach. Take, for example, the simple sketch of the letter B shown in Figure 8-20.
It’s easy to see that the studs-up mosaic technique offers you the chance to include finer details on such things as letters. When used in a larger mosaic and viewed from a short distance, this letter will begin to appear almost hand drawn. You can compare that with the chunky lettering you saw back in Figure 8-1 when we were looking at the studs-out technique.