The LEGO system is made up of thousands of elements. You’ve already seen many of them used and/or described throughout this book. Some are different sizes of the same type of piece (for example 2x3 and 2x4 are two different sizes of standard bricks), whereas others are exactly the same size but have different decorations or patterns printed on them. To catalog every piece in the system would require an entire book. However, at the same time, it’s useful to try to capture a sense of the various sizes, shapes, and configurations of pieces that exist. To that end, I have included illustrations of nearly 300 elements in this Brickopedia. They cover the range from basic bricks, slopes, and plates, to specialized elements, arches, and even a number of decorative elements.
I have categorized the Brickopedia from the perspective of building with LEGO pieces. As a result, I suggest that you do not use the Brickopedia to plan purchases of LEGO pieces from any type of store either online or at a real location; its categories and terminology may not match. Also, this catalog is not suitable as a device with which to record the contents of official LEGO sets because they may contain specialty parts I have not listed here. In other words, some of the categories and descriptions used here are unique to this text.
Instead, my hope is that this Brickopedia is a tool that you can use (most specifically offline, without the use of a computer) to help categorize, organize, and utilize your most common and most useful elements. As noted, this does not cover the entire spectrum of available LEGO pieces. Rather, it focuses exclusively on standard, common, and highly reusable elements, thus helping you acquire a core knowledge of the LEGO system and its most important aspects.
Each category has a separate entry for each element that contains several pieces of information. The Brickopedia notation system is shown in Figure A-1.

This information is not intended to value the parts, but only to hint at why you may or may not have certain pieces in your own collection.
I have kept the categories and subcategories lean and have made every attempt to use titles that suggest the nature of the pieces. Where possible, I have cataloged similar parts together to show their relationship. For example, I show standard and inverted slopes of the same size on the same page. This is different than many other categorization systems used for LEGO elements.
The Brickopedia divides LEGO elements into several broad categories; within each of these areas are subcategories that help refine the way pieces are classified (see Table A-1). The following tables (Tables Table A-2 through Table A-11) describe the major categories and subcategories. This information may be useful when you are sorting and storing your LEGO pieces and also when you are building with them. It may also give you a better sense of how the whole system works together, one part at a time.
Table A-1. LEGO Elements Categories and Subcategories
Table A-2. The Bricks Category


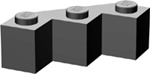
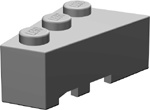


Table A-3. The Plates Category


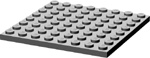


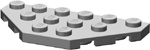


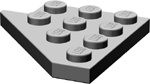


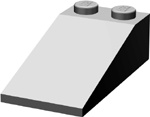
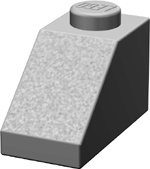
Table A-4. The Slopes Category
|
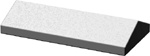
Notes: One of the newest elements in the slope family is also one of the lowest. In fact, as of this writing, this is the only size of 18-degree slope currently available. Imagine entire roofs made from this slightly angled slope. [1999] | |
|
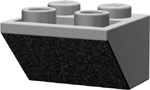
Subcategory: Standard | ||
|
Part #: 30363 | ||

|
Notes: The early 1970s ushered in a whole new series of sloped pieces—these were raked at 33 degrees as opposed to the 45-degree ones that preceded them. This particular example is a peak element that typically caps off a sloped roof. [1971] | |
|
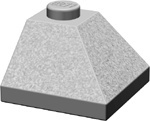
Subcategory: Peak | ||
|
Part #: 3300 | ||
|
Descriptor: 2x4 33 degree |
Notes: The longer of the two 33-degree peaks. Although the 33-degree slopes are available in odd-numbered widths (one and three studs), the peaks come only in even-numbered lengths. [1971] |
|
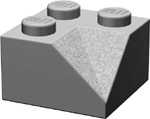
Subcategory: Peak | ||
|
Part #: 3299 | ||

|
Descriptor: 3x1 33 degree |
Notes: It wasn’t until the early 1980s that 33-degree roofs with odd lengths became possible. However, it wasn’t the 3x1 slope shown here that gave us that opportunity; it was the 3x3 shown further along in the Brickopedia. [1982] |
|
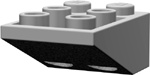
Subcategory: Standard | ||
|
Part #: 4286 | ||
|
Descriptor: 3x1 33 degree |
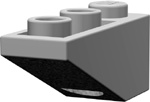
Notes: It was noted in Chapter 1 that many standard slopes have matching inverted varieties. We see one here for the first time. The 3x1 inverted slope is a near mirror image of part 4286. [1982] |
|
Subcategory: Inverted | ||
|
Part #: 4287 | ||

|
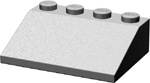
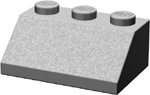
Descriptor: 3x2 33 degree |
Notes: Among the first of the 33-degree slopes to be released in the early 1970s. Commonly referred to as roof bricks, they are certainly used in that context. But as with most elements they are never limited to just one use. [1971] |
|
Subcategory: Standard | ||
|
Part #: 3298 | ||
|
Descriptor: 3x2 33 degree |
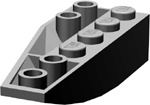
Notes: The undersides of boats, pontoons, airplanes, and more all benefit from inverted slopes like this. Although the 3x1 slope was released in both standard and inverted styles in the same year, the 3x2 standard had to wait 8 years for its inverted match. [1979] |
|
Subcategory: Inverted | ||
|
Part #: 3747 | ||

|
Descriptor: 3x3 33 degree |
Notes: Allowed roofs to be made at a 33-degree slant with odd numbers of studs for the first time. [1980] |
|
Subcategory: Standard | ||
|
Part #: 4161 | ||

|
Descriptor: 3x3 33 degree |
Notes: Surely one of the more graceful looking slope elements. Low-angle, pagoda-style roofs just wouldn’t be complete without this corner piece. [1980] |
|
Subcategory: Outer Corner | ||
|
Part #: 3675 | ||
|
Descriptor: 3x4 33 degree |
Notes: As a kid, these were the parts I thought of as roof bricks. I had many of them in classic red. They remain an effective element to this day. [1971] |
|
Subcategory: Standard | ||
|
Part #: 3297 | ||

|
Descriptor: 2x1 45 degree |
Notes: This peak can stand alone, capping off fences, castle walls, or even the backs of dinosaurs, or it can become part of the peak of a standard 45-degree roof. [1976] |
|
Subcategory: Peak | ||
|
Part #: 3044 | ||

|
Descriptor: 1x2 45 degree |
Notes: A perfect companion for the 2x1 peak shown in the previous entry. This piece can be used to finish off the end of a row of peak elements. [1965] |
|
Subcategory: End Peak | ||
|
Part #: 3048 | ||

|
Descriptor: 1x2 45 degree |
Notes: Used for those cases where one peak meets another peak or a portion of sloped roof. The side facing front butts up against a piece like 3043 or against other 45-degree slopes. [1969] |
|
Subcategory: End Peak | ||
|
Part #: 3049 | ||
|
Descriptor: 2x1 45 degree |
Notes: Perhaps the only unusual thing about this element is that it was introduced to the system three years after its inverted counterpart. Of course it goes without saying that it’s now a common element that helps round out the system. [1979] |
|
Subcategory: Standard | ||
|
Part #: 3040 | ||

|
Descriptor: 2x1 45 degree |
Notes: Useful for creating subtle inverted detail under the nose of a small airplane or the hip portion of a miniland figure; this piece can also help shape many small sculptures. [1976] |
|
Subcategory: Inverted | ||
|
Part #: 3665 | ||

|
Descriptor: 2x2 45 degree |
Notes: Standard 45-degree peak. It matches and uses the 3048 element to create a contoured roof. [1965] |
|
Subcategory: Peak | ||
|
Part #: 3043 | ||

|
Descriptor: 2x2 45 degree |
Notes: One of the earliest slopes to be introduced to the modern system, although it’s important to point out that these weren’t there from the beginning. Roofs in the late 1950s and early 1960s had to depend primarily on staggered bricks to form their slope. [1965] |
|
Subcategory: Standard | ||
|
Part #: 3039 | ||
|
Descriptor: 2x2 45 degree |
Notes: The inverted match to 3039. When you look down at the top of elements like this, you’ll notice that part of the top is open and that some of the studs are actually hollow, like tubes sticking out of a small open box. [1975] |
|
Subcategory: Inverted | ||
|
Part #: 3660 | ||
|
Descriptor: 2x2 45 degree |
Notes: Another graceful slope element. Though this piece could also be considered a compound slope, it is probably best described as an outer corner because that’s the portion of a roof it will most often become. [1965] |
|
Subcategory: Outer Corner | ||
|
Part #: 3045 | ||
|
Descriptor: 2x2 45 degree |
Notes: What happens when two sections of roof meet? Simple—you just need to join them together with an inside-corner slope like this. This is a unique piece in many ways because there is currently no similar element in any of the other angles. [1965] |
|
Subcategory: Inner Corner | ||
|
Part #: 3046 | ||

|
Descriptor: 2x2 45 degree |
Notes: You can find many uses for this piece, not the least of which is creating a turret effect near the top of a castle tower. [1984] |
|
Subcategory: Inverted Outer Corner | ||
|
Part #: 3676 | ||
|
Descriptor: 2x3 45 degree |
Notes: You can never have too many elements with odd numbers of studs. This piece is no exception. [1965] |
|
Subcategory: Standard | ||
|
Part #: 3038 | ||

|
Descriptor: 2x3 45 degree |
Notes: A peak element that’s three studs long? Not common, but they do exist. [1965] |
|
Subcategory: Peak | ||
|
Part #: 3042 | ||

|
Descriptor: 2x4 45 degree |
Notes: If you’re building a roof of any significant size, you’ll need longer slopes like this one to cover the bulk of the surface. [1965] |
|
Subcategory: Standard | ||
|
Part #: 3037 | ||

|
Descriptor: 2x2x2 65 degree |
Notes: Though this element was originally released without a center tube inside, a newer version appeared in 2003 that did include this important feature. This is also currently the only piece that is raked at 65 degrees. [1978] |
|
Subcategory: Standard | ||
|
Part #: 3678 | ||

|
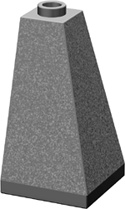
Descriptor: 2x2x2 75 degree |
Notes: No, it’s not a dunce cap for square-headed people; it’s an interesting and very steep peak element. This is useful for everything from castle towers to Santa hats. Although the other 75-degree slopes are three bricks high, this one is only two. [1986] |
|
Subcategory: Peak | ||
|
Part #: 3688 | ||

|
Descriptor: 2x1x3 75 degree |
Notes: Yet another piece commonly found in castle walls, but also the perfect angle for the rear end of a classic style of fire truck. [1984] |
|
Subcategory: Standard | ||
|
Part #: 4460 | ||
|
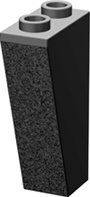
Descriptor: 2x1x3 75 degree |
Notes: Currently the only 75-degree inverted element. Its interesting feature is that the entire face opposite the sloped side is hollow so that it accepts studs at a 90-degree angle. [1988] |
|
Subcategory: Inverted | ||
|
Part #: 2449 | ||

|
Descriptor: 2x2x3 75 degree |
Notes: A solid piece in both look and structure. This is perfect for the lower walls of any castle or any other building that requires a sturdy foundation. [1977] |
|
Subcategory: Standard | ||
|
Part #: 3684 | ||
|
Descriptor: 2x2x3 75 degree |
Notes: A perfect match for the 3684 and 4460. This one gives you the angles you need to create a corner. You can even use 75-degree slopes to create a very steep roof, perhaps for a ski chalet. [1978] |
|
Subcategory: Outside Corner | ||
|
Part #: 3685 | ||

|
Descriptor: 1x3x2 |
Notes: A unique new piece that hasn’t yet found its way into a large number of sets. Hopefully that will change as the years go by. This element perfectly matches the curve of the 1x3x2 half-arch piece (6005) shown in the arches category. [2003] |
|
Subcategory: Curved | ||
|
Part #: 33243 | ||

|
Descriptor: 3x2 bullnose |
Notes: Another element that really has no equal in terms of shape. This element is perfect for giving a more subtle rounded edge to buildings or vehicles. [1995] |
|
Subcategory: Curved | ||
|
Part #: 6215 | ||

|
Descriptor: 2x4 left 45 to 90 degree |
Notes: In my mind, these two elements are some of the most interesting to be released in many years. They are unique in that they have the ability to act as intermediaries between standard bricks and 45-degree slopes. That is because one end of each of these left/right elements is a perfect 90 degrees. Then, along its four-stud length, that 90 degrees transforms to 45 degrees, becoming one full stud wider at the base as it does. [2002] |
|
Subcategory: Curved | ||
|
Part #: 43721 | ||

|
Descriptor: 2x4 right 45 to 90 degree | |
|
Subcategory: Curved | ||
|
Part #: 43720 | ||

|
Descriptor: 6x2 left |
Notes: Spaceships, airplanes, and other flying machines all became more streamlined with the addition of this pair of pieces to the system. The compound shape—which has a curving slope from tip to studs and a matching curved side—provides a very sleek and realistic shape for traveling machines. [2002] |
|
Subcategory: Compound | ||
|
Part #: 41748 | ||

|
Descriptor: 6x2 right | |
|
Subcategory: Compound | ||
|
Part #: 41747 | ||
|
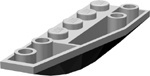
Descriptor: 6x2 left |
Notes: The year 2002 was obviously an important one for new slopes; these two slopes and the four preceding them in this table all made their debut during that year. This pair of elements helps add contours to boats of all sizes, whether as parts of the bow or parts of pontoons to help keep it afloat. They can be used together, side by side, or separated by piece 500 (6x1 curved inverted) to make a wider profile. [2002] |
|
Subcategory: Compound Inverted | ||
|
Part #: 41765 | ||
|
Descriptor: 6x2 right | |
|
Subcategory: Compound Inverted | ||
|
Part #: 41764 | ||

|
Descriptor: 6x1 |
Notes: Flat-sided slopes are great, but at times you may want something a little more delicate. These two pieces offer just such a quality. Given their shape, they obviously create a more rounded, and therefore a smoother, angle. [2002] |
|
Subcategory: Curved | ||
|
Part #: 464 | ||

|
Descriptor: 6x1 | |
|
Subcategory: Curved Inverted | ||
|
Part #: 500 | ||

|
Descriptor: 6x2 |
Notes: Matching exactly the slope of part 464, the 6x2 version is also suited for nose cones, wings, and other models that require its gentle arch. [2003] |
|
Subcategory: Curved | ||
|
Part #: 44126 | ||

|
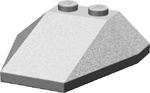
Descriptor: 4x4 original style |
Notes: This element is older than the 6069 and is certainly somewhat boxier in the way that its sloped sides meet. [1985] |
|
Subcategory: Compound | ||
|
Part #: 4858 | ||
|
Descriptor: 4x4 new style |
Notes: Sometimes new parts come along that make older versions look somewhat dated. Although the 6069 shown here isn’t an exact replacement for the 4858, it certainly creates a more sporty projection. [1992] |
|
Subcategory: Compound | ||
|
Part #: 6069 | ||

|
Notes: Although released at the same time as the 4858 compound slope, this inverted element is a much closer match to the more modern-looking 6069 shown previously. [1985] | |
|
Subcategory: Compound Inverted | ||
|
Part #: 4855 |
Table A-5. The Specialized Elements Category

|
Notes: Among the most beloved pieces ever produced. Its only real drawback is that it is often difficult or expensive to acquire in large quantities. Maybe someday a bulk pack of these will be available in common colors. [1958] | |
|
Subcategory: Odd Face | ||
|
Part #: 3063 | ||

|
Descriptor: 4x4 macaroni |
Notes: It’s tempting to think that this piece could have been created anytime in the last 40 years, but for whatever reason, it took until 2004 for it to appear. An excellent companion to the original 2x2 macaroni brick. [2004] |
|
Subcategory: Odd Face | ||
|
Part #: 48092 | ||

|
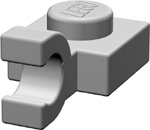
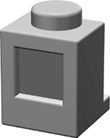
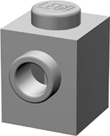
Descriptor: 1x1 with indented stud on one side |
Notes: The famed headlight brick shown here in two different views—from both the front and the back. Of course front and back are not always important when you’re using this piece because it can attach to other elements in a variety of ways. Similarly, it offers various options by which you can attach other pieces to it. The indented stud on the side can become home to transparent 1x1 cylinder plates to create faux headlights. You can use a row of these to attach a 1xN element horizontally and, of course, the opening in the back can accept a single stud of any kind. [1979] |
|
Subcategory: Junctions | ||
|
Part #: 4070 | ||
|
Descriptor: 1x1 with indented stud on one side | |
|
Subcategory: Junctions | ||
|
Part #: 4070 | ||
|
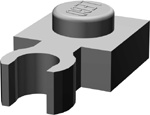
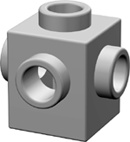
Descriptor: 1x1 with studs on two sides |
Notes: This piece was long awaited by many builders. It brings the usefulness of the headlight brick to another level by moving the side stud flush with the face of the brick. Having these studs on only two sides allows this piece to become part of any wall. [2004] |
|
Subcategory: Junctions | ||
|
Part #: 47905 | ||
|
Descriptor: 1x1 with studs on all sides |
Notes: Having been around much longer than the 47905 shown in the previous entry, this element is sometimes called the hydrant brick. Although amazing in its design, it does have a drawback; often the studs you aren’t using just get in the way. [1985] |
|
Subcategory: Junctions | ||
|
Part #: 4733 | ||

|
Descriptor: 1x4 with studs on one side |
Notes: Although it may not be the most elegant part, this piece just might be one of the most functional. It’s small enough to build into almost any structure, yet at the same time, it offers four horizontal studs onto which you can then securely attach other pieces. [2000] |
|
Subcategory: Junctions | ||
|
Part #: 30414 | ||
|
Descriptor: 2x4x2 with studs on three sides |
Notes: You might not need one of these pieces every day, but that shouldn’t stop you from searching for new uses for such an unusual element. This solid piece can form the core of junction substructures. [1990] |
|
Subcategory: Junctions | ||
|
Part #: 2434 | ||

|
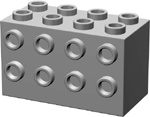
Descriptor: 2x4x2 with tubes on sides |
Notes: The creation of the 2x4x2 with studs on all sides (part 2434) left an obvious opening for the opposite part. Thus the 2x4x2 with tubes on two sides was born. Its rather industrial look earns it the nickname “engine block.” [1992] |
|
Subcategory: Junctions | ||
|
Part #: 6061 | ||
|
Notes: A tiny piece with one lowly stud might not seem that useful, but think again. With this element, you can have parts of a model that are recessed one-half stud in depth offering greater subtlety to the shape and feel of your work. [1977] | |
|
Subcategory: Junctions | ||
|
Part #: 3794 | ||

|
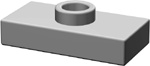
Descriptor: 1x1 to 1x1 bracket |
Notes: Need to change directions within a very small space? This is your part of choice. The hole on top is exactly one stud in diameter, and the area around it is exactly the height of a stud as well. [2002] |
|
Subcategory: Junctions | ||
|
Part #: 554 | ||

|
Descriptor: 1x2 to 2x2 bracket |
Notes: You can easily insert these pieces into a vertical wall leaving the four-studded side exposed and available for attaching other parts. Although it’s relatively new, this is likely to become a valuable member of the bender class of parts. [2002] |
|
Subcategory: Junctions | ||
|
Part #: 44728 | ||

|
Descriptor: 2x2 to 2x2 bracket |
Notes: This was one of the earliest parts to ever offer studs that were perpendicular to the base of the part. This gem showed up in some of the classic space-themed sets of the late 1970s. [1978] |
|
Subcategory: Junctions | ||
|
Part #: 3956 | ||

|
Descriptor: 1x2 to 1x4 bracket |
Notes: Similar in many respects to part 44728. The difference is that the four horizontal studs are now in a single row rather than in two rows of two. Again, this part is useful when you’re trying to attach something directly to a vertical wall. [1987] |
|
Subcategory: Junctions | ||
|
Part #: 2436 | ||
|
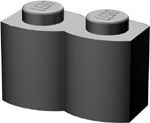
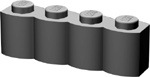
Descriptor: 1x2 Log |
Notes: Odd Face was the name given to this subcategory because the “face” or front surface of these bricks is something other than standard studs or just a smooth wall. The log brick is, of course, useful in brown, but gray versions are interesting too. [1996] |
|
Subcategory: Odd Face | ||
|
Part #: 30136 | ||
|
Descriptor: 1x4 Log |
Notes: The longer version of part 30136. What’s unfortunate is that as of this writing, there isn’t a 1x1 log brick. However, you can sometimes substitute a 1x1 cylinder and get at least some of the effect you’re after. [1996] |
|
Subcategory: Odd Face | ||
|
Part #: 30137 | ||

|
Descriptor: 1x2 grille |
Notes: A unique piece in that the oddness of its face is different from front to back. Both sides can be described as grille-like. You can use these in groups or rows with similar faces exposed or, alternately, you can mix unlike faces for a great effect. You’ll sometimes see these functions as grates on the sides of machinery, roll-up doors on fire engines, or even to replicate corrugated steel panels. [1986] |
|
Subcategory: Odd Face | ||
|
Part #: 2877 | ||

|
Descriptor: 1x2 grille (rear view) | |
|
Subcategory: Odd Face | ||
|
Part #: 2877 | ||

|
Descriptor: 1x2 and 1x2 plate |
Notes: Although technically two pieces, this pair is almost always seen and used together. [1987/1987] |
|
Subcategory: Hinges | ||
|
Part #: 2429/2430 | ||
|
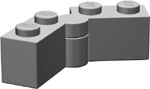
Descriptor: 1x2 and 1x2 brick |
Notes: You can certainly use this pair of parts to create a wall section that swings away from the rest of a building, but you can also used it to create angled sections that don’t move. [1977/1977] |
|
Subcategory: Hinges | ||
|
Part #: 3830/3831 | ||

|
Descriptor: 1x2 brick |
Notes: You can use this piece to give motion to things like spaceship cockpits or you can angle the studs forward and build the brick into a stationary wall. Once the studs are exposed, you can use them to attach other elements. [1978/1978] |
|
Subcategory: Hinges | ||
|
Part #: 3937/3938 | ||

|
Descriptor: 2x2 brick |
Notes: We saw this pair of elements as part of the alternative section in Chapter 3. In that case, we used the larger top portion to help support the angled alternate roof. [1978/1991] |
|
Subcategory: Hinges | ||
|
Part #: 3937/6134 | ||

|
Descriptor: 2x5 plate |
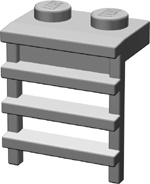
Notes: A classic piece in many respects. This piece is sometimes used to attach things like fire truck ladders, but it is just as capable of being the hinge for wings on a quirky bird. [1967] |
|
Subcategory: Hinges | ||
|
Part #: 3149 | ||

|
Descriptor: 2x2 plate |
Notes: A scaled-down version of the larger 4x4 turntable. This is only one plate high and can hide in many inconspicuous areas of a model. [1977] |
|
Part #: 3680 | ||

|
Descriptor: 4x4 brick |
Notes: The part depicted here is actually the “modern” version of a similar element that was first produced back in 1963. Earlier versions did not have the square baseplate seen here; rather, they were cylindrical all the way to the bottom. [1977] |
|
Subcategory: Turntables | ||
|
Part #: 3403 | ||
|
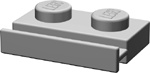
Descriptor: 1x2 channel rail plate |
Notes: Momentarily I’ll introduce you to the 1x4 channel-face brick. The piece shown here can be used to build a substructure that can then be slid into the 1x4 channel-face element (part 2653) with great precision. Also available in a version that is eight studs long. [1997] |
|
Subcategory: Odd Face | ||
|
Part #: 32028 | ||

|
Notes: This piece is sometimes used as a purely decorative element when put together using the stacking technique. [1981] | |
|
Subcategory: Odd Face | ||
|
Part #: 4216 | ||

|
Descriptor: 1x4 channel face |
Notes: Although this can certainly be decorative, it can also be quite useful for accepting substructures mounted on the 32028 channel rail plates. [1991] |
|
Subcategory: Odd Face | ||
|
Part #: 2653 | ||
|
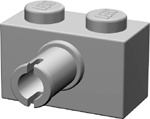
Descriptor: 1x2 pin face with one pin |
Notes: So you’ve built a substructure on rail plates and are using the 1x4 channel brick to mount it. Now you need to lock it in place. 1x2 bricks like the one shown here can mate up with 1x2 Technic bricks, which are shown in the Technic category. [1988] |
|
Part #: 2458 | ||
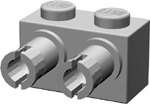
|
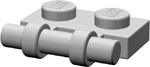
Descriptor: 1x2 pin face with two pins |
Notes: The pin configuration on this piece matches exactly with any two holes on any other Technic brick. Note that its pins are centered under the studs, unlike the 2548 above, whose pin is located between the studs. [2000] |
|
Subcategory: Pin-Enabled | ||
|
Part #: 30526 | ||

|
Descriptor: 2x2 pin face |
Notes: When you need a pin to be a secure part of a solid wall, reach for this element. Building it into a 2xN wall gives you a sturdy pin onto which you can attach almost anything. [1985] |
|
Subcategory: Pin-Enabled | ||
|
Part #: 4730 | ||

|
Descriptor: 2x2 pin top |
Notes: This is perhaps one of those parts you might not need for the longest time, but when you do, you’ll be glad it exists. The same goes for the plate version of this part (2460). [1995] |
|
Part #: 4729 | ||

|
Descriptor: 2x2 pin top plate |
Notes: Sure, this piece can be a place to mount the rotors for a small helicopter, but it can be so much more. Check the description for the pin drop plate in the next entry, then imagine that you’ve got the bottom of the plates open to build on, rather than the studs. [1988] |
|
Subcategory: Pin-Enabled | ||
|
Part #: 2460 | ||

|
Descriptor: 2x2 pin drop plate |
Notes: Here’s what you do: First, build a Technic beam into the side of a model, a beam with three or more holes. Then, join together two or more of the 2476 elements, attach other pieces to them, and finally mount them into the holes of the beam. [1988] |
|
Subcategory: Pin-Enabled | ||
|
Part #: 2476 | ||

|
Descriptor: Single drop hole plate |
Notes: These pieces allow Technic pins or axles to attach below bricks or plates. Those pins or axles could carry gears, wheels, or other Technic bricks with similar holes. The 2444 piece is shown from the side under which is attached its only hole. The 2817 is viewed from the side, showing both holes. [1987/1989] |
|
Subcategory: Axle Plate | ||
|
Part #: 2444 | ||

|
Descriptor: Double drop hole plate | |
|
Subcategory: Axle Plate | ||
|
Part #: 2817 | ||
|
Notes: A compact model may still require motion. The wheel/tire set here is mounted on a tiny 2x2 plate that has slender pins sticking out each side. These little wheels may not look like much, but they go around, and that’s what counts. [1985/1986/1985] | |
|
Subcategory: Wheels/Tires | ||
|
Part #: 4600/4624/3641 | ||

|
Descriptor: 2x2 wide plate with slick tires |
Notes: Are you creating a microsized street machine? Why not include some mean looking slicks? The plate in this figure sets the wheels out wider than the one shown in the previous entry. That gives your street rod a more defined racing look. [1994/1991/1996] |
|
Part #: 6157/6014/30028 | ||

|
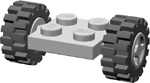
Descriptor: 2x4 brick with medium wheels/tires |
Notes: The wheels you see here (with the four studs showing) are sometimes referred to as Freestyle, named after the series of sets from which they originated. They spin freely on pins jutting out from the sides of the 2x4 brick. [1995/1988/1985] |
|
Subcategory: Wheels/Tires | ||
|
Part #: 6249/6248/3483 | ||

|
Notes: These wheels, with Technic axle holes, can find themselves used in a huge number of ways. Pop some Technic bricks on this axle, and you can mount the wheels on a car. Strip off the tires, and you’ve got Technic pulleys. [1984/1985] | |
|
Subcategory: Wheels/Tires | ||
|
Part #: 3482/3483 | ||
|
|
Descriptor: Brick separator |
Notes: Did you know that the brick separator isn’t just a tool, but it’s also considered a part within the LEGO system? After all, it does have studs on top and the equivalent of tubes underneath. [1990] |
|
Subcategory: n/a | ||
|
Part #: 6007 |
Table A-6. The Technic Category

|
Descriptor: 1x1 with one axle hole |
Notes: At first glance, this element might seem too tiny to be of much use, but don’t let its compact size fool you. This just makes it easier to sneak it into an otherwise tight situation, which allows you to attach other Technic elements to it. [1993] |
|
Subcategory: Brick | ||
|
Part #: 6541 | ||

|
Notes: This piece was first introduced with the other original Technic elements back in 1977. Though it appears in a variety of colors every year, it’s interesting to note that, since the beginning, at least one set each year has had the black version of this part in it. [1977] | |
|
Subcategory: Brick | ||
|
Part #: 3700 | ||

|
Descriptor: 1x2 keyhole |
Notes: The keyhole brick is unique among the Technic elements, in that it effectively locks an axle in a certain position. You can then use that axle (or axle/pin) to attach wheels, pulleys, or other moving parts. [1998] |
|
Subcategory: Brick | ||
|
Part #: 32064 | ||
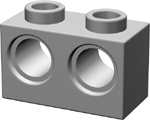
|
Descriptor: 1x2 with two axle holes |
Notes: Even good ideas can sometimes take a while to see the light of day. Having one axle hole under each stud allows for different connections than those that are possible with other bricks where the holes are centered between the studs. [1996] |
|
Subcategory: Brick | ||
|
Part #: 32000 | ||

|
Descriptor: 1x4 |
Notes: A common-sized Technic brick that has been incorporated into a wide variety of sets over the years. [1977] |
|
Subcategory: Brick | ||
|
Part #: 3701 | ||

|
Descriptor: 1x6 |
Notes: Another common element that, like the 1x4 version, has been seen in a large range of sets since first being produced back in the late 1970s. [1978] |
|
Subcategory: Brick | ||
|
Part #: 3894 | ||
|
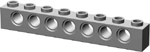
Descriptor: 1x8 |
Notes: This is perhaps one of the more commonly available lengths of the standard Technic bricks. It has appeared in nearly 300 different sets over the course of the last quarter century. [1977] |
|
Subcategory: Brick | ||
|
Part #: 3702 | ||
|
|
Descriptor: 1x10 |
Notes: Though not introduced in the earliest years of the Technic elements, this was an obvious size to add to the list. [1985] |
|
Subcategory: Brick | ||
|
Part #: 2730 | ||
|
|
Descriptor: 1x12 |
Notes: Most LEGO builders will tell you that you can never have too many LEGO pieces. And though the medium-length Technic bricks might not feel that different from each other, it’s a good bet that you’ll want to collect lots of each size if you can. [1978] |
|
Subcategory: Brick | ||
|
Part #: 3895 | ||
|
|
Descriptor: 1x14 |
Notes: Although there is no standard 1x14 brick, there is an element of this length in the Technic series of parts. This piece is a relatively new addition to the Technic family. [1997] |
|
Subcategory: Brick | ||
|
Part #: 32018 | ||
|
|
Descriptor: 1x16 |
Notes: The granddaddy of the standard Technic beams. These pieces are much sought after by builders of all skill levels, especially those working on things like cranes or bridges. [1977] |
|
Subcategory: Brick | ||
|
Part #: 3703 | ||

|
Descriptor: 2x4 |
Notes: The invention of the LEGO Technic brick brought about the necessity of inventing a plate to go along with it. The 2x4 version was first introduced in 1977 and since then, there have only ever been three different sizes of this type of part. [1977] |
|
Subcategory: Plate | ||
|
Part #: 3709B | ||
|
|
Descriptor: 2x6 |
Notes: The second in the trio of standard Technic plates. The holes in the plates (centered between the studs) allow for axles to be positioned vertically, though the axles generally spin best when you steady them with a second plate above or below the first. [1996] |
|
Subcategory: Plate | ||
|
Part #: 32001 | ||
|
|
Notes: The longest standard Technic plate yet produced. Note that this version, like the 2x4, was first released in 1977. It’s odd that the 2x6 (pictured in the previous entry) would have to wait nearly 20 years to first see the light of day. [1977] | |
|
Subcategory: Plate | ||
|
Part #: 3738 | ||

|
Descriptor: 1x3 |
Notes: An interesting little piece with a single standard axle hole in the center surrounded on either side by plus-sign-shaped holes that are exactly the size of an axle. The middle hole allows pins or axles to spin, whereas the end openings do not. [1995] |
|
Subcategory: Beam Half-Width | ||
|
Part #: 6632 | ||

|
Descriptor: 1x3 |
Notes: This is the smallest of the full-width pieces. Note that it is the same length as part 6632 but contains only rounded axle holes. Most of the straight full-width beams share this trait. [2000] |
|
Subcategory: Beam Full-Width | ||
|
Part #: 32523 | ||

|
Notes: This element represents one of the first of the studless liftarm style of pieces to be introduced. In its first year of production, this piece appeared only in a parts pack and not in a set that built any sort of model. [1987] | |
|
Subcategory: Beam Half-Width | ||
|
Part #: 2825 | ||

|
Descriptor: 1x5 |
Notes: The shortest of the half-width elements to feature only smooth axle holes. Contrast this to part 6632, which is shorter but also has holes that lock axles in place. [1997] |
|
Subcategory: Beam Half-Width | ||
|
Part #: 32017 | ||

|
Descriptor: 1x5 |
Notes: This piece, like the other full-width beams, has only smooth axle holes throughout its length. These allow for pins and axles to rotate freely. For comparison, see part 32348, which also has holes that prevent axles from moving. [2000] |
|
Subcategory: Beam Full-Width | ||
|
Part #: 32316 | ||
|
|
Descriptor: 1x6 |
Notes: Like most of the other half-width straight beams, this part consists only of rounded pin/axle holes. [1998] |
|
Subcategory: Beam Half-Width | ||
|
Part #: 32063 | ||
|
|
Descriptor: 1x7 |
Notes: The longest of the half-width sized pieces. As seen in Figure 9-6, these slender pieces help introduce rounded and gentler shapes to what might otherwise be boxy Technic models. [1998] |
|
Subcategory: Beam Half-Width | ||
|
Part #: 32065 | ||

|
Descriptor: 1x7 single bend |
Notes: Most of the bent beams share the common feature of having fixed-axle holes at each end and open holes in between that allow axles to rotate. [2000] |
|
Subcategory: Beam Full-Width | ||
|
Part #: 32348 | ||
|
|
Descriptor: 1x9 |
Notes: Like its longer cousin (the 1x15), this is not a piece that appears in large numbers in single sets. [2001] |
|
Subcategory: Beam Full-Width | ||
|
Part #: 120 | ||

|
Descriptor: 1x9 single bend |
Notes: This piece is identical to part 6629, other than the fact that the bend on this piece occurs at the third axle hole. [1999] |
|
Subcategory: Beam Full-Width | ||
|
Part #: 152 | ||

|
Descriptor: 1x9 single bend |
Notes: Identical to part 152, other than the fact that the bend on this piece occurs at the fourth axle hole. [1996] |
|
Subcategory: Beam Full-Width | ||
|
Part #: 6629 | ||
|
|
Descriptor: 1x15 |
Notes: The longest of the full-width beams currently available. These are not terribly common pieces and rarely show up in large quantities in any one particular set. [2000] |
|
Subcategory: Beam Full-Width | ||
|
Part #: 32278 | ||

|
Descriptor: 1x11.5 double bend |
Notes: I’ve always thought this part had the obvious resemblance to the forks on the front of a forklift vehicle. [1997] |
|
Subcategory: Beam Full-Width | ||
|
Part #: 32009 | ||

|
Descriptor: 2x4 single bend |
Notes: Proof that Technic beams come in all manner of variations. Note that this one has a 90-degree bend near one end but that only one of its ends has the X-shaped axle opening. The remaining openings are pin-type holes. [1999] |
|
Subcategory: Beam Full-Width | ||
|
Part #: 32140 | ||

|
Descriptor: 3x3 single bend |
Notes: I find this element quite pleasing to the eye. It has a natural symmetry, and the openings (mostly of the locking axle type) give it the look of fancy metal work. Oh, and it’s handy for building Technic models too! [1998] |
|
Subcategory: Beam Half-Width | ||
|
Part #: 32056 | ||

|
Descriptor: 3x3 braced |
Notes: Elements like this one and part 32250 combine the traditional square geometry of LEGO elements with more natural curved shapes. They are especially useful in small models where you want to achieve complex angles in small spaces. [2000] |
|
Subcategory: Beam Half-Width | ||
|
Part #: 32249 | ||

|
Descriptor: 3x5 single bend |
Notes: A simple variation of part 32140. Many of the elements in this category seem to be different combinations of length, hole type, and number of bends along their length. [2000] |
|
Subcategory: Beam Full-Width | ||
|
Part #: 32526 | ||

|
Descriptor: 3x5 braced |
Notes: A long, more sloped version of part 32249. This one lends itself well to large-scale automobiles or flying machines. [2000] |
|
Subcategory: Beam Half-Width | ||
|
Part #: 32250 | ||

|
Descriptor: 8 tooth |
Notes: Barely bigger than the axles on which it is mounted, this little gear is handy for so many things. It helps create the steering for the model in Figure 9-1 and helps with changing speed and/or power within a gear train when used with larger gears. [1977] |
|
Subcategory: Gear | ||
|
Part #: 3647 | ||

|
Descriptor: 12 tooth bevel |
Notes: This is the more modern incarnation of the 12-tooth bevel gear. The earlier version was not as strong and was prone to breakage under stress. [1995] |
|
Subcategory: Gear | ||
|
Part #: 6589 | ||

|
Descriptor: 12 tooth double bevel |
Notes: Properly positioned, a double-bevel gear can provide input to two single-bevel gears. [1999] |
|
Subcategory: Gear | ||
|
Part #: 32270 | ||

|
Descriptor: 16 tooth |
Notes: Another standard gear from the earliest days of Technic. [1977] |
|
Subcategory: Gear | ||
|
Part #: 4019 | ||

|
Notes: This gear can be used with an identical piece to change the direction of movement between two axles, or it can be paired up with the double-bevel version to create even more elaborate combinations. [1999] | |
|
Subcategory: Gear | ||
|
Part #: 32198 | ||

|
Descriptor: 20 tooth double bevel |
Notes: The late 1990s saw an explosion in the number and type of gears available. This is probably due, at least in part, to the 1998 release of the programmable robotic LEGO set known as Mindstorms. [1999] |
|
Subcategory: Gear | ||
|
Part #: 32269 | ||

|
Descriptor: 24 tooth |
Notes: This is the original design (released in 1977) of the standard 24-tooth gear. When first produced, it lacked enough support for the openings in the center, and this led to some pieces breaking under heavy loads. In 1995, it was replaced with a stronger version. [1977] |
|
Subcategory: Gear | ||
|
Part #: 3648 | ||

|
Descriptor: 24 tooth clutch |
Notes: The dark gray core of this element actually rotates, with some friction, within the center of the gear. This allows the gear to slip a bit under high stress and may keep the axle or other gears from breaking. [1997] |
|
Subcategory: Gear | ||
|
Part #: 60C01 | ||

|
Descriptor: 24 tooth crown |
Notes: A crown gear, like beveled gears, can be used to change the direction of motion. A standard gear, or another crown gear, can meet with it at a 90-degree angle. [1977] |
|
Subcategory: Gear | ||
|
Part #: 3650A | ||

|
Descriptor: 40 tooth |
Notes: The granddaddy of all LEGO gears both in terms of size and age. Like most gears, it appears primarily in gray, but recent years have also seen it released in such colors as red, blue, green, and white. [1977] |
|
Subcategory: Gear | ||
|
Part #: 3649 | ||

|
Descriptor: Worm |
Notes: Worm gears are most useful when power is important but speed is not. They do well when heavy loads are placed on them but may bind if spun too fast. [1985] |
|
Subcategory: Gear | ||
|
Part #: 4716 | ||

|
Descriptor: 1x4 Rack |
Notes: What is a gear rack? In reality it’s nothing more than a round gear that has been flattened out so that all of the teeth are lined up next to each other. Useful for creating rack and pinion steering for Technic models. [1977] |
|
Subcategory: Gear | ||
|
Part #: 3743 | ||

|
Descriptor: Classic pin |
Notes: Don’t confuse the classic light gray pin with a nearly identical part that is typically molded in black. The piece shown here allows other parts to spin freely. The black friction pin is larger by just enough for pieces to hold more tightly. [1977] |
|
Subcategory: Pin/Axle | ||
|
Part #: 3673 | ||

|
Descriptor: Pin/axle |
Notes: Need to attach a bushing or keyhole brick to a regular Technic brick? This isn’t a problem with this unique piece. The need for such conversions (one type of connector to another) is a common concern when you’re working with nonstandard elements. [1978] |
|
Subcategory: Pin/Axle | ||
|
Part #: 3749 | ||

|
Descriptor: Three-stud-long axle with stop |
Notes: Sometimes you want to mount gears or bushings on a short axle but ensure that they won’t slip off. The stud at the end of this element makes sure other pieces won’t fly off at the worst possible moment. [1995] |
|
Subcategory: Pin/Axle | ||
|
Part #: 6587 | ||

|
Descriptor: Three-stud-long pin |
Notes: This element often forms critical connections where you need three pieces held together. When inserted in the pinhole of a brick or beam, this piece has a certain amount of friction that makes it less prone to spinning freely. [1993] |
|
Subcategory: Pin/Axle | ||
|
Part #: 6558 | ||

|
Descriptor: Two-stud-long axle |
Notes: Believe it or not, the version of this part that was available from 1977 until 1996 didn’t have the little notches you see above. The result was that often this small piece got stuck more often than it got loose. Thankfully LEGO corrected this problem. [1997] |
|
Subcategory: Pin/Axle | ||
|
Part #: 32062 | ||

|
Descriptor: Four-stud-long axle |
Notes: The standard axle arrived with other Technic parts as part of the original Expert Builder series of sets in 1977. It is available in lengths from as small as 2 studs right up to versions that are 12 studs long! [1977] |
|
Subcategory: Pin/Axle | ||
|
Part #: 3705 | ||

|
Descriptor: Bushing |
Notes: Sometimes you’ll use this piece to hold axles in place and at other times, you’ll use it as a tiny pulley. The center of both the half and full bushings are exactly sized to the standard axle. [1980] |
|
Subcategory: Half-Width | ||
|
Part #: 4265C | ||

|
Descriptor: Bushing |
Notes: The full bushing is just about the height of a 1x1 brick and predates the half-sized one by just a few years. This part offers greater resistance for holding axles and gears in place. [1977] |
|
Subcategory: Full-Width | ||
|
Part #: 3713 | ||

|
Notes: This piece is used, quite simply, to join two axles together end-to-end. Basically, it allows you to make one longer axle out of two shorter ones. [1993] | |
|
Subcategory: Coupler | ||
|
Part #: 6538 | ||

|
Notes: This piece shares a common trait with the other coupler elements. One hole runs through the piece and allows axles or pins to spin freely. The hole running perpendicular to it is like a bushing and holds axles tight. [1993] | |
|
Subcategory: Coupler | ||
|
Part #: 6536 | ||

|
Descriptor: 0 degrees (#1) |
Notes: The most basic of the coupler elements. It creates a simple T connection between two axles. An axle placed through the round hole is free to rotate whereas the other X-shaped hole holds an axle locked in one position. [1997] |
|
Subcategory: Coupler | ||
|
Part #: 32013 | ||

|
Descriptor: 180 degrees (#2) |
Notes: This piece accepts two axles, one on either end, pointing toward each other, and, as with all the pieces in this group, it has a hole running through the middle that allows a pin or axle to spin if need be. [1997] |
|
Subcategory: Coupler | ||
|
Part #: 32034 | ||

|
Descriptor: 160 degrees (#3) |
Notes: If you read the descriptor for each of the pieces in this section, you’ll notice a number in degrees. This is the angle of the two axle openings, and it is measured on the side facing up, as pictured here. [1997] |
|
Subcategory: Coupler | ||
|
Part #: 32016 | ||

|
Descriptor: 135 degrees (#4) |
Notes: Each descriptor for this group of parts also includes a number, written in brackets. You can also find these numbers printed on the actual elements, which makes it easy to keep them separate. [1999] |
|
Subcategory: Coupler | ||
|
Part #: 924 | ||

|
Descriptor: 110 degrees (#5) |
Notes: Different combinations of couplers and axles can become everything from the roll cage for a racecar to the landing gear for a rugged spacecraft. [1997] |
|
Subcategory: Coupler | ||
|
Part #: 32015 | ||

|
Descriptor: 90 degrees (#6) |
Notes: More interesting geometry notes: The end of each of the couplers in this section is also the exact size and shape so that it fits just perfectly in between four standard studs on a plate or baseplate. [1997] |
|
Subcategory: Coupler | ||
|
Part #: 32014 |
Table A-7. The Arches Category

|
Notes: Perfectly suited for archer’s windows built into thick castle walls. This piece probably represents the smallest possible arch piece that can be both practical and elegant. [1976] | |
|
Subcategory: Standard | ||
|
Part #: 4490 | ||

|
Descriptor: 1x4 |
Notes: A classic Roman arch that forms a semicircular shape. This arch is the same piece we used overtop of the train station ticket windows in Chapter 3. These arches are useful in any number of architectural situations. [1976] |
|
Subcategory: Standard | ||
|
Part #: 3659 | ||
|
Descriptor: 1x6 |
Notes: The radius on this arch is much greater than that of the 1x6x2 shown in the next entry. In other words, if you kept following the arch shape, the imaginary circle under the brick would be much larger on this piece. [1972] |
|
Subcategory: Standard | ||
|
Part #: 3455 | ||

|
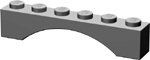
Notes: Like the 1x4 arch the 1x6x2 arch represents a classic Roman shape that is extremely pleasing to the eye. A series of these can create a pleasing arcade for any building. [1971] | |
|
Subcategory: Standard | ||
|
Part #: 3307 | ||

|
Descriptor: 1x8x2 |
Notes: Like the 1x6 arch, this piece uses a slightly larger radius to form the arch shape. Therefore the arch appears to be still spreading outward as it reaches the edge of the span. [1971] |
|
Subcategory: Standard | ||
|
Part #: 3308 | ||

|
Descriptor: 1x12x3 |
Notes: Now that’s an arch! Impressive in its very size, this piece adds a grand opening to train tunnels, fire stations, or other buildings requiring this type of architectural detail. [1993] |
|
Subcategory: Standard | ||
|
Part #: 6108 | ||

|
Descriptor: 1x2 |
Notes: Tuck this compact piece under part 6005 shown next, and you can create interesting shapes, either in matching or complementary colors. [1992] |
|
Subcategory: Half | ||
|
Part #: 6091 | ||

|
Descriptor: 1x3x2 |
Notes: A natural partner to the 6091 element shown previously. In fact, 6091 fits nicely under the arch of the 6005. By itself, this 1x3x2 piece can also be considered a flying-buttress type of arch. [1995] |
|
Subcategory: Half | ||
|
Part #: 6005 | ||

|
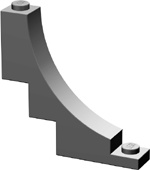
Descriptor: 1x5x4 |
Notes: Used alone, this is another flying-buttress arch due to the fact that it starts at a point away from a wall or structure and then meets up with it at the top of its half arch. Used in pairs, these pieces become essentially a 1x10x4 arch. [1986] |
|
Subcategory: Half | ||
|
Part #: 2339 | ||
|
Descriptor: 1x5x4 |
Notes: Another case where nearly a decade separates the release of a standard part (such as the 2339 shown previously) and its inverted counterpart—the half arch shown here. [1997] |
|
Subcategory: Half Inverted | ||
|
Part #: 30099 | ||
|
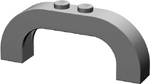
Descriptor: 1x6x2 |
Notes: No, it’s not the handle from a LEGO lunchbox … though it could be. Instead, it’s an arch with gently curved corners that can be used as a wonderful decorative piece. [1994] |
|
Subcategory: Standard | ||
|
Part #: 6183 | ||

|
Descriptor: 1x6x3 |
Notes: Another and perhaps the most suited piece capable of being a flying buttress. This one really extends outward from the top until it reaches the bottom of the half arch. This is yet another piece that is simply elegant to look at. [1992] |
|
Subcategory: Half | ||
|
Part #: 6060 |
Table A-8. The Tiles and Panels Category
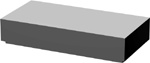
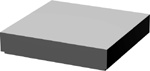


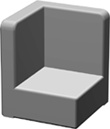


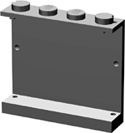

Table A-9. The Cones and Cylinders Category

|
Notes: Is this the smallest element in the entire system? Well, just about. It is barely bigger in the middle than the stud on top of it and it is hardly bigger at the bottom than a regular tube. This piece is available in solid and transparent colors. [1980] | |
|
Subcategory: Standard | ||
|
Part #: 4073 | ||

|
Descriptor: 2x2 cylinder plate |
Notes: Observe the keyhole-shaped opening in this piece. It matches perfectly with a similar feature found on 2x2 cylinders. I used that opening to help create the presser tool in Chapter 13. [1980] |
|
Subcategory: Standard | ||
|
Part #: 4032 | ||

|
Descriptor: 1x1 cone |
Notes: You may use this piece as the nose cone of a very small rocket, but even if you don’t, it’s a handy shape nonetheless. It’s worth pointing out that the tip is just the right size to fit into the bottom of an identical piece or the underside of nearly any regular brick or plate. [1985] |
|
Subcategory: Standard | ||
|
Part #: 4589 | ||

|
Descriptor: 1x1 cylinder |
Notes: Shown here is the updated version of a part that was originally released with the earliest parts in 1958. The difference here is that the stud is hollow, whereas the original was solid. [1977] |
|
Subcategory: Standard | ||
|
Part #: 3062B | ||

|
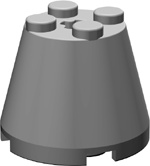
Descriptor: 2x2x2 cone |
Notes: Another part that underwent a face-lift after its original release. In this case, as with the 1x1 cylinder, the newer version has a hollow stud. [1984] |
|
Subcategory: Standard | ||
|
Part #: 3942 | ||

|
Descriptor: 2x2 cylinder |
Notes: Sort of like a tiny coffee can, only with studs on top. This piece, like some of the other cylinders and cones, has a hole running vertically through it that matches exactly to the size of standard Technic axle. [1978] |
|
Subcategory: Standard | ||
|
Part #: 3941 | ||
|
Descriptor: 3x3x3 cone |
Notes: These pieces are sometimes used as the engines on a rocket or space shuttle. [1995] |
|
Subcategory: Standard | ||
|
Part #: 6233 | ||

|
Descriptor: 4x4x2 cone |
Notes: This lampshade-like piece can be used as the engine of a spaceship or it can also be a transitional piece that joins 4x4 cylinder pieces to 2x2 cylinder pieces. [1982] |
|
Subcategory: Standard | ||
|
Part #: 3943 | ||

|
Descriptor: 4x4 cylinder |
Notes: The holes on the sides of this piece easily accept a Technic pin or axle or even the studs from any standard piece. The only real problem is that when you stack a bunch of these, they tend to look like a column of Swiss cheese. [1995] |
|
Subcategory: Standard | ||
|
Part #: 6222 | ||
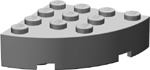
|
Notes: Another case where the existence of one part highlights the absence of a similar part. There is, for example, no 3x3 quarter-cut cylinder, nor is there a 2x2 for that matter. Maybe someday? [1990] | |
|
Subcategory: Adapted | ||
|
Part #: 2577 |
Table A-10. The Baseplates Category

Table A-11. The Decorative Category