As noted earlier, there are many wonderful books already on the market that deal with building complex Technic-style models, especially those incorporating the LEGO Mindstorms programmable brick system. Rather than try to re-create any of those advanced techniques in this book, I have decided instead to provide you with a handful of basic assembly tips and tricks that you can apply to almost any model regardless of the percentage of Technic pieces it contains.
Just as with regular system pieces, there are no right or wrong ways to assemble Technic elements. There are, however, some interesting combinations that might be worth pointing out.
In Chapter 2, we looked at three basic methods for assembling bricks: stacking, staggering, and overlapping. On their own, these techniques might not seem very interesting, but you learned that they are critical skills that can be used in combination to help you build models as complex as you wish them to be.
Figure 9-12 showcases two very important assembly techniques. The first is what’s known as a gear train.
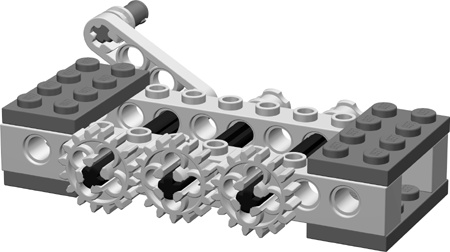
The example shown here consists of three gears and a small handle or crank on the opposite side of the beams. Turning the handle (as shown in Figure 9-13) has the effect of causing the first gear (on the left) to rotate. That forces the gear in the middle (also known as an idler gear in this scenario) to turn as well. Lastly, the idler gear passes on its rotation to the gear on the right (called the driven gear).
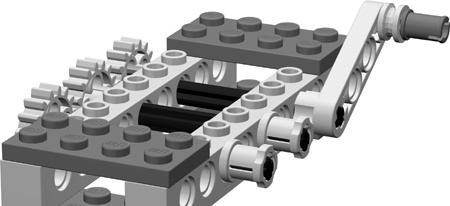
Figure 9-13. The gear set from the opposite side, showing the crank and also some full width bushing in action
The second technique demonstrated in Figure 9-12 is seen in the 2x4 plates that hold the Technic bricks together.
Look at what happens in Figure 9-14 when I replace those 2x4 plates with 1x4 plates. It is easy then for the 1x10 Technic bricks to shift out of alignment.
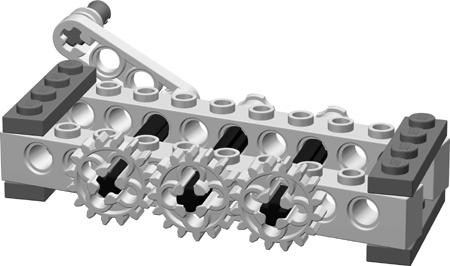
Figure 9-14. Looks can be deceiving. Although I only replaced the dark gray plates (both ends), the result is a major potential problem. See the next illustration to see what I mean.
Although at first things may not appear to be that bad, look at Figure 9-15 to see what can happen to the gears when the bricks become misaligned. It’s quickly obvious why the 2x4 plates were so important. You’ll want to make sure you use 2xN or even wider plates when creating frameworks within which Technic axles will need to spin smoothly so that the Technic bricks remain perfectly parallel to each other.
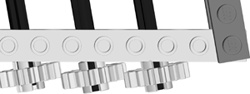
Figure 9-15. It takes only a minor misalignment to cause gears to no longer run smoothly. In the previous image, they appeared to be lined up, but in this top view, you can see that they clearly are not.
As you build any model containing Technic pieces, it’s very likely that you’ll spend at least some time making minor adjustments to the position of axles, pins, gears, and so on in order to make sure they line up as closely as possible.
If you’ve ever ridden a sleek 10-speed bicycle or a rugged mountain bike, you’ve probably already experienced the science of gear ratios. You know that when you are just getting the bike moving you want to be in a low gear. That is, you want to have a low ratio between the size of the chain ring in the front (attached to the pedals) and the cogs in the back (attached to the rear wheel). That means that you have to pedal a lot but that you have more power to get the bicycle in motion.
Then, as you gain speed, you know that the next step is to switch to a higher gear so that you are making fewer rotations of the pedals but getting much faster revolutions of the rear wheel. If you look down at this point, you see that the size of the chain ring you’re using in the front is much larger than the cog you’re using in the back. Take a look at some LEGO gears (in Figure 9-16) to see this further demonstrated.

Figure 9-16. In this example, assume that the gear on the left is the driver and the one on the right is the driven gear. This demonstrates a low gear ratio that is slow but powerful.
Imagine that in Figure 9-16 the small gear (with 8 teeth) on the left is toward the front of the bike and the larger one (with 16 teeth) is on the wheel at the back.
The gear on the left is only one-half the size of the one on the right. That means that every time you rotate the small gear, the larger one moves only one-half of a circle. That is an example of a low gear, just like when you’re pulling away from the curb on your bike.
Switch gears, though, and you find that you’re now using a high gear ratio, like the example shown in Figure 9-17.

Figure 9-17. In this example, assume that the gear on the left is the driver and the one on the right is the driven gear. This demonstrates a high gear ratio that is fast but less powerful.
With the larger (driver) gear now at the front, the smaller (driven) gear has to move much more quickly to catch up. This is just like what you do on your bike once you are moving along at a reasonable speed. This means you have to do less work (turn the driver gear fewer times) in order to make the wheel (attached to the driven gear) move quickly.
Deciding which gear ratios to use (low and powerful or high and faster) depends upon what function the gears in your model are trying to accomplish.
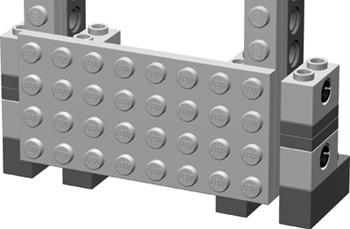
Figure 9-18 showcases another classic Technic assembly trick. This one uses the inherent geometry of a standard Technic brick to allow one brick to be positioned perpendicular to the bricks around it.
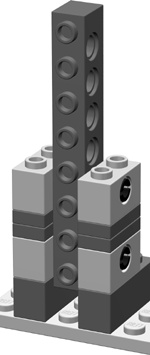
Figure 9-18. The pins shown peaking out of the 1x2 Technic bricks are the key to holding the 1x8 brick in its vertical position.
The vertically aligned brick in Figure 9-18 may not, at first, appear to have much use. Keep in mind, though, that a piece like that may only set the stage for other more important pieces to be attached. Remember back in Chapter 3 I talked about alternative ways to assemble a roof? I showed you that with some standard plates and brick hinges you could create angled roofs that could take the place of slope elements. It’s possible, in certain situations, to do the same sort of substitution for walls as well. Figure 9-19 shows just such an example.
Although a bare plate, mounted with studs facing out, may not be exactly the look you’re after, you can use the piece as a base upon which to mount other elements, perhaps even a small mosaic or other decorative pieces.