
For many hobbies, you need some type of tool or combination of tools to work with the basic materials. When you build a car or an airplane from a plastic model kit, you need to use things like glue, paint, and perhaps even a knife to complete the project. To assemble models using the Meccano construction system or similar things out of Erector, you need screwdrivers and wrenches to tighten nuts and bolts.
One thing that has always made LEGO bricks easy to use is the fact that they require no tools to connect pieces together. Does that mean you can’t use tools? Not at all. In some cases, you may find it useful to add some small implements to your building environment. One of the very simplest of LEGO tools is little more than a standard brick or plate that can be used to measure other LEGO pieces—most often Technic axles.
As you’re building a model from an official LEGO set, you may find an image within the instructions that looks something like Figure 13-1.
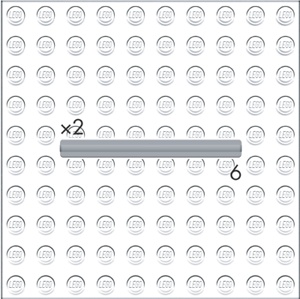
As you can see, there are (usually) two numbers next to the picture of a Technic axle. The number with the letter X in front of it represents how many of that piece you need to use in this step of the instructions. The other number, with no letter next to it, indicates how long the axle should be. The length is measured in studs. Figuring out if you’ve got the right piece is easy—simply use a LEGO brick as your measuring tool as shown in Figure 13-2.
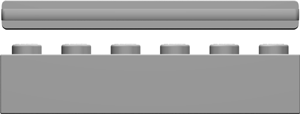
Using the brick, you can quickly confirm the length of the axle. This allows LEGO to manufacture the axles without worrying about any identifying marks. Although it may not seem very high tech, using a LEGO piece as a measuring device is using a tool nonetheless. This is a simple, yet elegant, solution, and one that has always struck me as another example of making something no more complicated than it needs to be.
There are also tools that can be made from … you guessed it, other LEGO pieces!
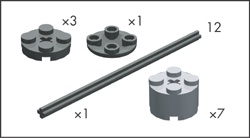
One item that always sits on my building table is a presser tool; I find this useful when I’m working with small elements, especially in tight corners. The presser tool is handy for those times when you need to push down on a small tile, plate, or maybe a panel in a recessed corner or one that is between other elements where your fingertip just can’t reach. This tool is simple to build and is something you may wish to leave together so that it is always available when you need it. The pieces used to create this tool are shown in Figure 13-3.
Actually assembling the tool is quite simple. Figure 13-4 shows how the 2x2 cylinder bricks and plates slide onto the axle. You can use any combination of these elements to create your own customized patterns and color schemes.
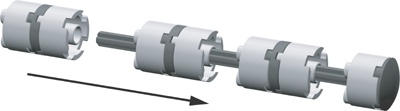
The 2x2 inverted cylinder tile shown on the right side of Figures Figure 13-4 and Figure 13-5 forms the end of the tool giving it a nice, rounded look and feel.

In Figure 13-6, you can see the tool being used to seat a stubborn 1x1 plate. You can loosely align the part in question, and then, using the presser tool, gently apply a downward force that helps set the piece in place.
