By default, you cannot save the changes you make to the font colors and background settings that you make in the Fonts and Colors dialog. To fix this issue, Visual Studio 2015 has a feature called Themes. If you go to Tools | Options | Environment | General, you can change the theme to one of the three pre-installed stock themes (Light, Blue, and Dark).

A different theme completely changes the look of Visual Studio—from the colors of the title bars to the background color of the text editor window.
You can also customize the theme of Visual Studio completely, but you'll need an extension to do so. Extensions are little programs that can be installed into Visual Studio to modify its behavior.
By default, your customized color settings cannot be saved or reloaded into another Visual Studio installation without the extension. With the extension, you will also be able to save your own color theme to share with others. You can also load the color settings made by another person or by yourself into a fresh copy of Visual Studio.
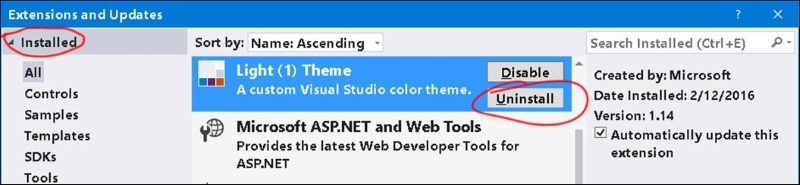
- Go to Tools | Extensions and Updates…
- From the dialog that appears, choose Online in the panel on the left-hand side. Start typing
Theme Editorinto the search box at the right. The Visual Studio 2015 Color Theme Editor dialog will pop up in your search results.
- Click the small Download button in the top right-hand corner of the entry. Click through the installation dialog prompts, allowing the plugin to install. After installation, Visual Studio will prompt you to restart.
Tip
Alternatively, visit https://visualstudiogallery.msdn.microsoft.com/6f4b51b6-5c6b-4a81-9cb5-f2daa560430b and download/install the extension by double-clicking the
.vsixthat comes from your browser. - Click Restart Now to ensure the plugin is loaded.

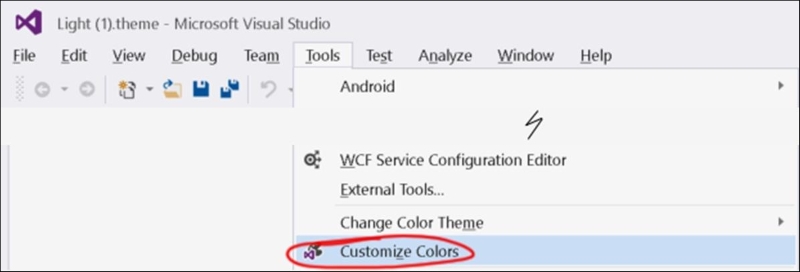
- After restarting, go to Tools | Customize Colors to open the Color Themes editor page.
- From the Color Themes dialog that appears, click on the little palette-shaped icon on the upper-right corner of the theme that you want to use as your base or starting theme (I've clicked on the palette for the Light theme here, as you can see in the following screenshot).
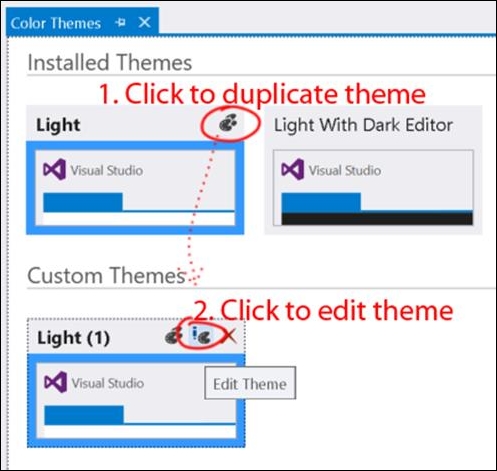
- A copy of the theme will appear in the Custom Themes section in the lower part of the Color Themes window. Click on Edit Theme to modify the theme. When you are editing the theme, you can change everything from the font text color to the C++ keyword color.
- The main area you are interested in is the C++ Text Editor section. To gain access to all the C++ Text Editor options, be sure to select the Show All Elements option at the top of the Theme Editor window, as shown in the following screenshot:

- Note that, while most of the settings you are interested in will be under Text Editor | C/C++, some will not have that C++ subheading. For example, the setting for the main/plain text inside the editor window (for all languages) is under Text Editor | Plain Text (without the C++ subheading).
- Select the theme to use from Tools | Options | Environment | General. Any new themes you have created will appear automatically in the drop-down menu.