
If you have followed the previous recipe, you will notice that when you use Play In Editor, the button that loads is unusually small.
The reason for this is UI Scaling, a system that allows you to scale the user interface based on the screen size. User interface elements are represented in terms of pixels, usually in absolute terms (the button should be 10 pixels tall).
The problem with this is that if you use a higher-resolution panel, 10 pixels might be much smaller, because each pixel is smaller in size.
The UI scaling system in Unreal allows you to control a global scale modifier, which will scale all the controls on the screen based on the screen resolution. Given the earlier example, you might wish to adjust the size of the button so that its apparent size is unchanged when viewing your UI on a smaller screen. This recipe shows two different methods for altering the scaling rates.
- Create a custom
PlayerControllersubclass. Call itScalingUIPlayerController. - Inside the class, override
BeginPlay:virtual void BeginPlay() override;
- Add the following code in the implementation of that function:
Super::BeginPlay(); TSharedRef<SVerticalBox> widget = SNew(SVerticalBox) + SVerticalBox::Slot() .HAlign(HAlign_Center) .VAlign(VAlign_Center) [ SNew(SButton) .Content() [ SNew(STextBlock) .Text(FText::FromString(TEXT("Test button"))) ] ]; GEngine->GameViewport->AddViewportWidgetForPlayer(GetLocalPlayer(), widget, 1); - Create a new
GameModesubclass calledScalingUIGameMode, and give it a default constructor:ScalingUIGameMode();
- Within the default constructor, set the default player controller class to
ScalingUIPlayerController:AScalingUIGameMode::AScalingUIGameMode() :AGameMode() { PlayerControllerClass = ACustomHUDPlayerController::StaticClass(); } - This should give you a user interface like the one from the previous recipe. Note that the UI is very tiny if you use Play In Editor:

- To alter the rate at which the UI scales down or up, we need to change the scaling curve. We can do that through two different methods.


- Browse to your project directory, and look inside the
Configfolder:
- Open
DefaultEngine.iniinside your text editor of choice. - Find the
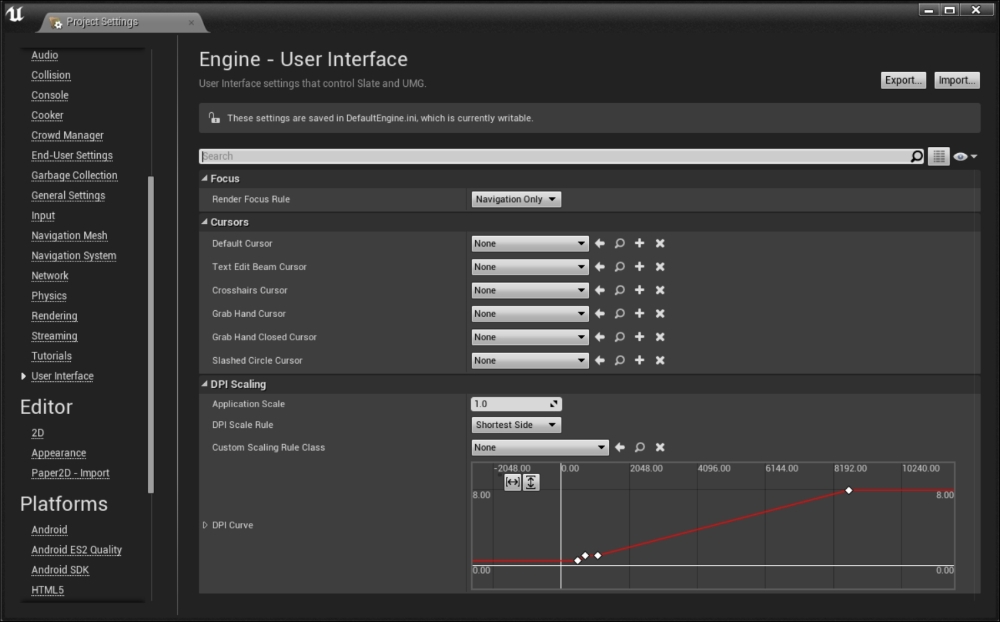
[/Script/Engine.UserInterfaceSettings]section:[/Script/Engine.UserInterfaceSettings] RenderFocusRule=NavigationOnly DefaultCursor=None TextEditBeamCursor=None CrosshairsCursor=None GrabHandCursor=None GrabHandClosedCursor=None SlashedCircleCursor=None ApplicationScale=1.000000 UIScaleRule=ShortestSide CustomScalingRuleClass=None UIScaleCurve=(EditorCurveData=(PreInfinityExtrap=RCCE_Constant,PostInfinityExtrap=RCCE_Constant,Keys=((Time=480.000000,Value=0.444000),(Time=720.000000,Value=1.000000),(Time=1080.000000,Value=1.000000),(Time=8640.000000,Value=8.000000)),DefaultValue=340282346638528859811704183484516925440.000000),ExternalCurve=None)
- Look for a key called
UIScaleCurvein that section. - In the value for that key, you'll notice a number of
(Time=x,Value=y)pairs. Edit the second pair so that itsTimevalue is720.000000and theValueis1.000000. - Restart the editor if you have it open.
- Start the Play In Editor preview to confirm that your UI now remains readable at the PIE screen's resolution (assuming you are using a 1080p monitor so that the PIE window is running at 720p or thereabouts):

- You can also see how the scaling works if you use a New Editor Window to preview your game.
- To do so, click on the arrow to the right of Play on the toolbar.
- Select New Editor Window.
- Inside this window, you can use the console command
r.setreswidthxheightto change the resolution, and observe the changes that result from doing so.
- As usual, when we want to use a custom
PlayerController, we need a customGameModeto specify whichPlayerControllerto use. - We create both, a custom
PlayerControllerandGameMode, and place someSlatecode in theBeginPlaymethod ofPlayerControllerso that some UI elements are drawn. - Because the main game viewport is usually quite small within the Unreal editor, the UI initially shows in a scaled-down fashion.
- This is intended to allow for the game UI to take up less room on smaller resolution displays, but can have the side effect of making the text very difficult to read if the window isn't being stretched to fit the full screen.
- Unreal stores the configuration data that should persist between sessions, but not necessarily be hard-coded into the executable inside config files.
- Config files use an extended version of the
.inifile format that has been commonly used with Windows software. - Config files store data using the following syntax:
[Section Name]
Key=Value
- Unreal has a
UserInterfaceSettingsclass, with a property calledUIScaleCurveon it. - That
UPROPERTYis marked as config, so Unreal serializes the value to the.inifile. - As a result, it stores the
UIScaledata in theDefaultEngine.inifile, in theEngine.UserInterfaceSettingssection. - The data is stored using a text format, which contains a list of key points. Editing the
Time,Valuepairs alters or adds new key points to the curve. - The Project Settings dialog is a simple frontend for directly editing the
.inifiles yourself, and for designers, it is an intuitive way to edit the curve. However, having the data stored textually allows for programmers to potentially develop build tools that modify properties such asUIScalewithout having to recompile their game. Timerefers to the input value. In this case, the input value is the narrower dimension of the screen (usually, the height).Valueis the universal scaling factor applied to the UI when the screen's narrow dimension is approximately the height of the value in theTimefield.- So, to set the UI to remain normal-sized at a 1280x720 resolution, set the time/input factor to 720, and the scale factor to 1.