Custom editor windows are useful when you have a new tool with user-configurable settings, or want to display some information to people using your customized editor.
Be sure to have an editor module by following the recipe earlier in this chapter before you start.
Read through either the Creating new menu entries or Creating new toolbar buttons recipes so that you can create a button within the editor that will launch our new window.
- Inside your command's bound function, add the following code:
TSharedRef<SWindow> CookbookWindow = SNew(SWindow) .Title(FText::FromString(TEXT("Cookbook Window"))) .ClientSize(FVector2D(800, 400)) .SupportsMaximize(false) .SupportsMinimize(false) [ SNew(SVerticalBox) +SVerticalBox::Slot() .HAlign(HAlign_Center) .VAlign(VAlign_Center) [ SNew(STextBlock) .Text(FText::FromString(TEXT("Hello from Slate"))) ] ]; IMainFrameModule& MainFrameModule = FModuleManager::LoadModuleChecked<IMainFrameModule>(TEXT("MainFrame")); if (MainFrameModule.GetParentWindow().IsValid()) { FSlateApplication::Get().AddWindowAsNativeChild(CookbookWindow, MainFrameModule.GetParentWindow().ToSharedRef()); } else { FSlateApplication::Get().AddWindow(CookbookWindow); } - Compile your code, and launch the editor.
- When you activate the command you created, either by selecting the custom menu option or the toolbar option that you added, you should see that the window has been displayed with some centered text in the middle:
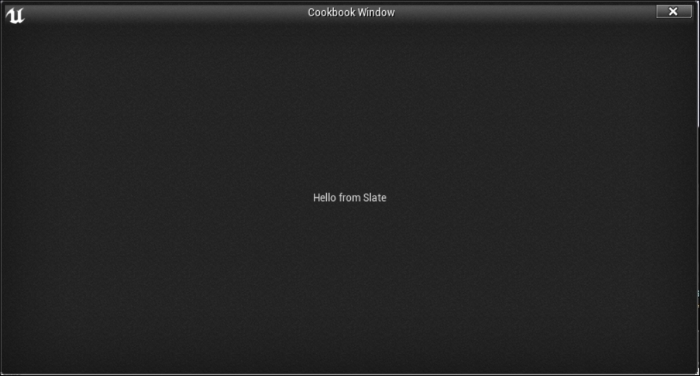
- As should be self-explanatory, your new editor window won't display itself, and so, at the start of this recipe, it is mentioned that you should have implemented a custom menu or toolbar button or a console command that we can use to trigger the display of our new window.
- All of Slate's widgets are usually interacted with in the form of
TSharedRef< >orTSharedPtr< >. - The
SNew()function returns aTSharedReftemplated on the requested widget class. - As has been mentioned elsewhere in this chapter, Slate widgets have a number of functions that they implement, which all return the object that the function was invoked on. This allows for method chaining to be used to configure the object at creation time.
- This is what allows for the Slate syntax of
<Widget>.Property(Value).Property(Value). - The properties that are set on the widget in this recipe are the window title, the window size, and whether the window can be maximized and minimized.
- Once all the requisite properties on a widget have been set, the bracket operators (
[]) can be used to specify the content to be placed inside the widget, for example, a picture or label inside a button. SWindowis a top-level widget with only one slot for child widgets, so we don't need to add a slot for it ourselves. We place content into that slot by creating it inside the pair of brackets.- The content we create is
SVerticalBox, which is a widget that can have an arbitrary number of slots for child widgets that are displayed in a vertical list. - For each widget we want to place into the vertical list, we need to create a slot.
- The easiest way to do this is to use the overloaded
+operator and theSVerticalBox::Slot()function. Slot()returns a widget like any other, so we can set properties on it like we did on ourSWindow.- This recipe centers the Slot's content on both horizontal and vertical axes using
HAlignandVAlign. - A
Slothas a single child widget, and it's created inside the[]operators just as forSWindow. - Inside the
Slotcontent, we create a text block with some custom text. - Our new
SWindownow has its child widgets added, but it isn't being displayed yet, because it isn't added to the window hierarchy. - The main frame module is used to check if we have a top-level editor window, and if it exists, our new window is added as a child.
- If there's no top-level window to be added as a child to, then we use the Slate Application singleton to add our window without a parent.
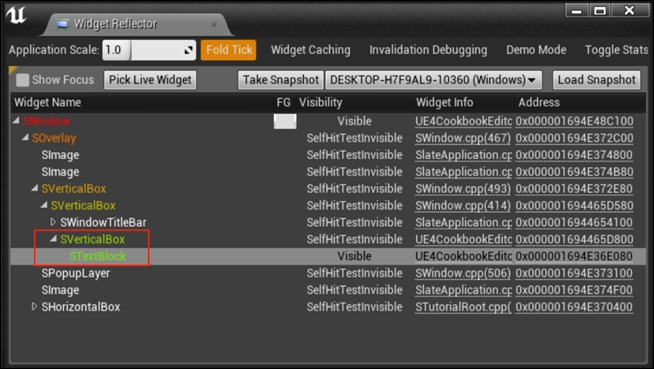
- If you would like to see the hierarchy of the window we've created, you can use the Slate Widget Reflector, which can be accessed via Window | Developer Tools | Widget Reflector.
- If you select Pick Live Widget, and hover your cursor over the text in the center of our custom window, you will be able to see the SWindow with our custom widgets added to its hierarchy.
- Chapter 9, User Interfaces – UI and UMG, is all about UI, and will show you how to add additional elements to your new custom window
..................Content has been hidden....................
You can't read the all page of ebook, please click here login for view all page.