
Enums are commonly used in C++ as flags or inputs to switch statements. However, what if you want to pass an enum value to or from C++ from a Blueprint? Alternatively, if you want to use a switch statement in Blueprint that uses an enum from C++, how do you let the Blueprint editor know that your enum should be accessible within the editor? This recipe shows you how to make enums visible in Blueprint.
- Create a new
StaticMeshActorclass calledTreeusing the editor. - Insert the following code above the class declaration:
UENUM(BlueprintType) enum TreeType { Tree_Poplar, Tree_Spruce, Tree_Eucalyptus, Tree_Redwood }; - Add the following
UPROPERTYin theTreeclass:UPROPERTY(BlueprintReadWrite) TEnumAsByte<TreeType> Type;
- Add the following to the
Treeconstructor:auto MeshAsset = ConstructorHelpers::FObjectFinder<UStaticMesh>(TEXT("StaticMesh'/Engine/BasicShapes/Cylinder.Cylinder'")); if (MeshAsset.Object != nullptr) { GetStaticMeshComponent()->SetStaticMesh(MeshAsset.Object); GetStaticMeshComponent()->bGenerateOverlapEvents = true; } GetStaticMeshComponent()->SetMobility(EComponentMobility::Movable); - Create a new Blueprint class, called
MyTree, based onTree. - Inside the blueprint editor for
MyTree, click on the Construction Script tab. - Right-click in the empty window, and type
treetype. There is a Get number of entries in TreeType node.
- Place it, and then connect its output pin to a Random Integer node.
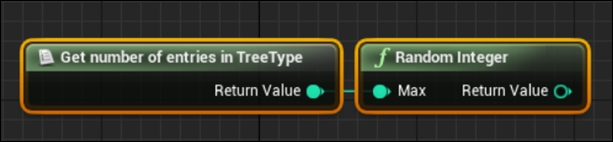
- Connect the output of the random integer to a
ToBytenode.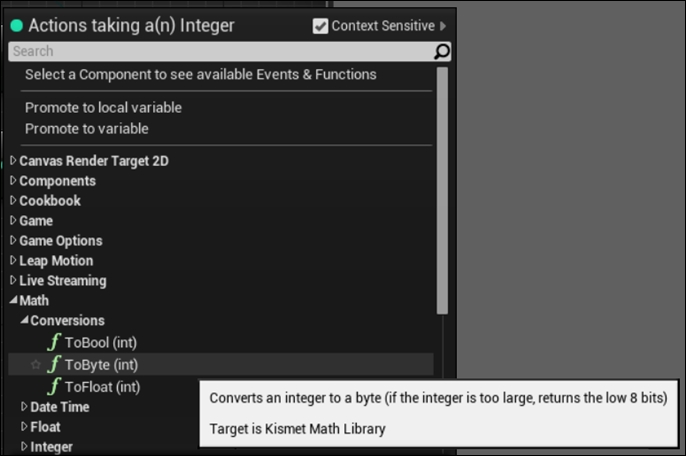
- In the Variables section of the Blueprint panel, expand Tree and select Type.
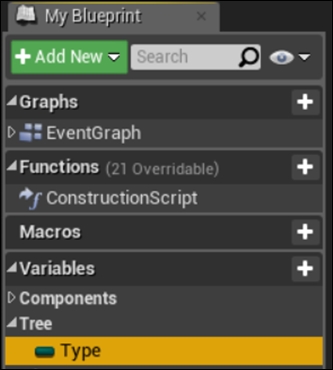
- Drag this into the graph, and select Set when you see a small context menu appear.
- Connect the output of the
ToBytenode to the input of the SET Type node. You'll see an extra conversion node automatically appear.
- Lastly, connect the execution pin of Construction Script to the SET Type node's execution pin.
- Your Blueprint should look like the following:

- To verify that the blueprint is correctly functioning and randomly assigning a type to our tree, we are going to add some nodes to the Event Graph.
- Place a
Print Stringnode after the Event BeginPlay event node.
- Place a
Format Textnode, and connect its output to the input of thePrint Stringnode. A conversion node will be added for you.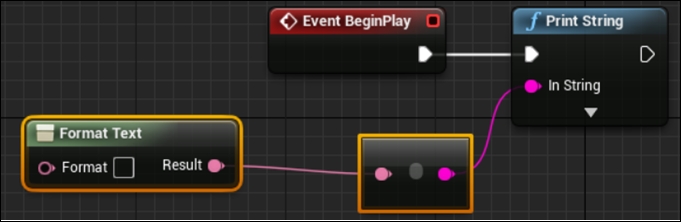
- Inside the
Format Textnode, add My Type is {0}! to the textbox.
- Drag
Typefrom the variables section of the Blueprint into the graph selecting Get from the menu.
- Add an Enum to Name node to
Typeoutput pin.
- Connect the Name output to the input pin on
Format Textlabelled0.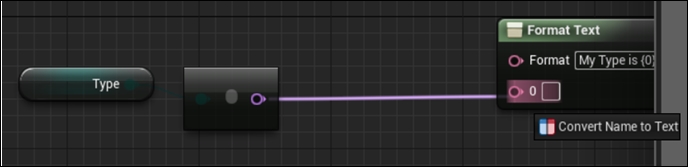
- Your Event Graph should now look like the following:

- Drag a few copies of your Blueprint into the level and hit Play. You should see a number of trees printing information regarding their type, verifying that types are being randomly assigned by the Blueprint code that we created.

- As usual, we use
StaticMeshActoras the base class for ourActorso that we can easily give it a visual representation in the level. - Enumerated types are exposed to the reflection system using the
UENUMmacro. - We mark the
enumas Blueprint-available using theBlueprintTypespecifier. - The
enumdeclaration is just the same as we would use in any other context. - Our
Treerequires aTreeType. Because tree has tree-type is the relationship we want to embody, we include an instance ofTreeTypein ourTreeclass. - As usual, we need to use
UPROPERTY()to make the member variable accessible to the reflection system. - We use the
BlueprintReadWritespecifier to mark the property as having both get and set support within Blueprint. - Enumerated types require being wrapped in the
TEnumAsBytetemplate when used inUPROPERTY, so we declare an instance ofTEnumAsByte<TreeType>as the Tree'sTypevariable. - The constructor changes for
Treeare simply the standard load and initialize our static mesh component preamble used in other recipes. - We create a Blueprint that inherits from our
Treeclass so that we can demonstrate the Blueprint-accessibility of theTreeType enum. - In order to have the Blueprint assign a type to the tree at random when we create an instance, we need to use the Blueprint Construction Script.
- Within the Construction Script, we calculate the number of entries in the
TreeType enum. - We generate a random number, and use that as an index in the
TreeType enumtype to retrieve a value to store as ourType. - The Random number node, however, returns integers. Enumerated types are treated as bytes in Blueprint, so we need to use a
ToBytenode, which can then be implicitly converted by Blueprint into anenumvalue. - Now that we have Construction Script assigning a type to our tree instances as they are created, we need to display the tree's type at runtime.
- We do so with the graph attached to the
BeginPlayevent within the Event Graph tab. - To display text on screen, we use a
Print Stringnode. - To perform string substitution and print our type out as a human-readable string, we use the
Format Textnode. - The
Format Textnode takes terms enclosed in curly braces, and allows you to substitute other values for those terms returning the final string. - To substitute our
Typeinto theFormat Textnode, we need to convert our variable stores from theenumvalue into the actual name of the value. - We can do so by accessing our
Typevariable, then using theEnum to Namenode. Name, orFNamesin native code, are a type of variable that can be converted to strings by Blueprint, so we can connect ourNameto the input on theFormat Textnode.- When we hit play, the graph executes retrieving the type of tree instances placed in the level, and printing the names to the screen.
..................Content has been hidden....................
You can't read the all page of ebook, please click here login for view all page.