 Mapping Shares to Drive Letters
by L.J. Zacker, Craig Zacker, David Pogue
Windows XP Pro: The Missing Manual, Second Edition
Mapping Shares to Drive Letters
by L.J. Zacker, Craig Zacker, David Pogue
Windows XP Pro: The Missing Manual, Second Edition
- Windows XP Pro Edition: The Missing Manual, 2nd Edition
- What the Reviewers Said
- The Missing Credits
- Introduction
- I. The Windows XP Desktop
- 1. The Desktop and Start Menu
- Logging In
- The Elements of the XP Desktop
- The Start Menu
- Start→Log Off
- Start→Shut Down (Turn Off Computer)
- Start→All Programs
- Start→Run
- Start→Search
- Start→Help and Support
- Start→Control Panel
- Start→Set Program Access and Defaults
- Start→My Network Places
- Start→My Computer
- Start→My Music, My Pictures
- Start→My Recent Documents
- Start→My Documents
- Customizing the Start Menu
- 2. Windows, Folders, and the Taskbar
- 3. Organizing Your Stuff
- 4. Getting Help
- 1. The Desktop and Start Menu
- II. The Components of Windows XP
- 5. Programs and Documents
- 6. The Freebie Software
- The Windows XP Accessories
- Windows XP Games
- Everything Else
- 7. Pictures, Sound, and Movies
- 8. The Control Panel
- Category View: The Big XP Change
- Accessibility Options
- Add Hardware
- Add or Remove Programs
- Administrative Tools
- Automatic Updates
- Bluetooth Devices
- Date and Time
- Display
- Folder Options
- Fonts
- Game Controllers
- Internet Options
- Keyboard
- Mouse
- Network Connections
- Network Setup Wizard
- Phone and Modem Options
- Power Options
- Printers and Faxes
- Regional and Language Options
- Scanners and Cameras
- Scheduled Tasks
- Security Center
- Sounds and Audio Devices
- Speech
- System
- Taskbar and Start Menu
- User Accounts
- Windows Firewall
- Wireless Network Setup Wizard
- III. Windows Online
- 9. Hooking Up to the Internet
- 10. Security, Firewalls, and Service Pack 2
- 11. Web, Chat, and Videoconferencing
- Internet Explorer
- Windows Messenger
- 12. Outlook Express 6
- IV. Plugging into Windows XP
- 13. Printing, Fonts, and Faxing
- 14. Hardware
- 15. Joining, Compressing, and Encrypting Disks
- 16. Maintenance, Backups, and Troubleshooting
- V. Life on the Network
- 17. Accounts, Permissions, and Logging On
- Introducing User Accounts
- Windows XP: The OS With Two Faces
- Local Accounts on a Workstation
- Local Accounts on a Domain Computer
- Local Users and Groups
- Setting Up the Logon Process
- Logging On
- Profiles
- NTFS Permissions: Protecting Your Stuff
- 18. Setting Up a Workgroup Network
- 19. Introducing Network Domains
- 20. Sharing Network Files
- 21. Three Ways to Dial In from the Road
- 17. Accounts, Permissions, and Logging On
- VI. Appendixes
- A. Installing Windows XP Pro
- B. Windows XP, Menu by Menu
- C. Fun with the Registry
- Index
- Colophon
If you access network shares on a regular basis, you may want to consider another access technique called mapping shares. Using this trick, you can assign a letter to a particular shared disk or folder on the network. Just as your hard drive is called C: and your floppy drive is A:, you can give your Family Stuff folder the letter F: and the Jaz drive in the kitchen the letter J:.
Doing so confers several benefits. First, these disks and folders now appear directly in the My Computer window. Getting to them can be faster this way than navigating to the My Network Places window. Second, when you choose File→Open from within one of your applications, you’ll be able to jump directly to a particular shared folder instead of having to double-click, ever deeper, through the icons in the Open File dialog box. You can also use the mapped drive letter in pathnames anywhere you would use a path on a local drive, such as the Run dialog box, a File→Save As dialog box, or the command line.
To map a drive letter to a disk or folder, open any folder or disk window. Then:
Choose Tools→Map Network Drive.
The Map Network Drive dialog box appears, as shown in Figure 20-7
Figure 20-7. Top: The “Reconnect at logon” option tells Windows to locate the share and map this drive letter to it every time you start your computer. Bottom: Once you’ve mapped a few folders or disks to their own letters, they show up in the Network Drives group within your My Computer window. (Note the drive letters in parentheses—in this example, J:, K:, and L:.)
Using the drop-down list, choose a drive letter.
You can select any unused letter you like (except B, which is still reserved for the second floppy disk drive that PCs don’t have anymore).
Indicate which folder or disk you want this letter to represent.
You can type its UNC code into the Folder box, choose from the drop-down list of recently accessed folders, or click Browse.
To make this letter assignment stick, turn on “Reconnect at logon.”
If you don’t use this option, Windows will forget this assignment the next time you turn on the computer. (Use the “Connect using a different user name” option if your account name on the shared folder’s machine isn’t the same as it is on this one.)
Click Finish.
A window opens to display the contents of the folder or disk. If you don’t want to work with any files at the moment, just close the window.
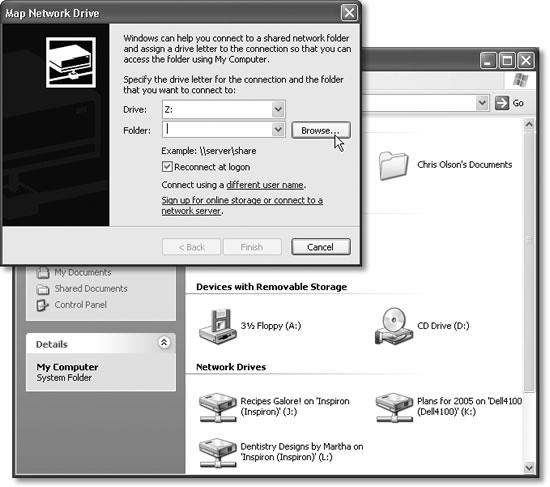
From now on (depending on your setting in step 4), that shared disk or folder will show up in your My Computer list alongside the disks that are actually in your PC, as shown at bottom in Figure 20-7
Tip
If you see a red X on one of these mapped icons, it means that the PC on which one of the shared folders or disks resides is either off the network or turned off completely.
WORKAROUND WORKSHOPAutomatic Reconnections Can Be Tricky
If you select “Reconnect at logon” when mapping a shared disk or folder to a letter, the order in which you start your computers becomes important. The PC containing the shared disk or folder should start up before the computer that refers to it as, say, drive K:. That way, when the second computer searches for “drive K:” on the network, its quest will be successful.
On the other hand, this guideline presents a seemingly insurmountable problem if you have two computers on the network, and each of them maps drive letters to folders or disks on the other.
In that situation, you get an error message to the effect that the permanent connection is not available. It asks if you want to reconnect the next time you start the computer. Click Yes.
Then, after all the computers have started up, open My Computer or Windows Explorer. You can see the mapped drive, but there’s a red X under the icon. Ignore the X. Just double-click the icon. The shared folder or disk opens normally (because the other machine is now available), and the red X goes away.
-
No Comment